Sketch Challenge - Feathered Fun

This card is all about birds! I made it for the weekly Splitcoaststampers Sketch Challenge using the Feathered Fun Stamp Set and a piece of Nests of Winter Designer Series Paper.


Here’s the sketch I used. You can see all the projects posted for this week’s challenge by clicking on the sketch below.


Tips & Instructions

  • Crumb Cake Card Base - 5-1/2 x 8-1/2, score at 4-1/4

  • Basic White Layer - 2 x 5-1/4, emboss using the Birch Wood 3D Embossing Folder and adhere to the card base.

  • Stamp the 2 birds on Basic White in Black Memento Ink. Color with Stampin’ Blends Markers. I used Dark Balmy Blue, Light Crumb Cake, Dark Timid Tiger and Dark Lemon Lolly. Fussy cut the birds.

  • Stamp the Happy Birthday sentiment in Black Memento ink on a piece of the bark pattern from the Nests of Winter Designer Series Paper. Stamp the Happy and then die cut using the More Messages Dies. Then stamp the Birthday and do the same thing. Just use small pieces of the paper.

  • Adhere the Happy Birthday to the card and then adhere the birds with Dimensionals.

  • Cut a 2 x 2 square of the Designer Series Paper and adhere it to a 2-1/8 x 2-1/8 piece of Crumb Cake and then adhere to the card with Dimensionals.

  • Add 3 Pressed Flower Motifs.


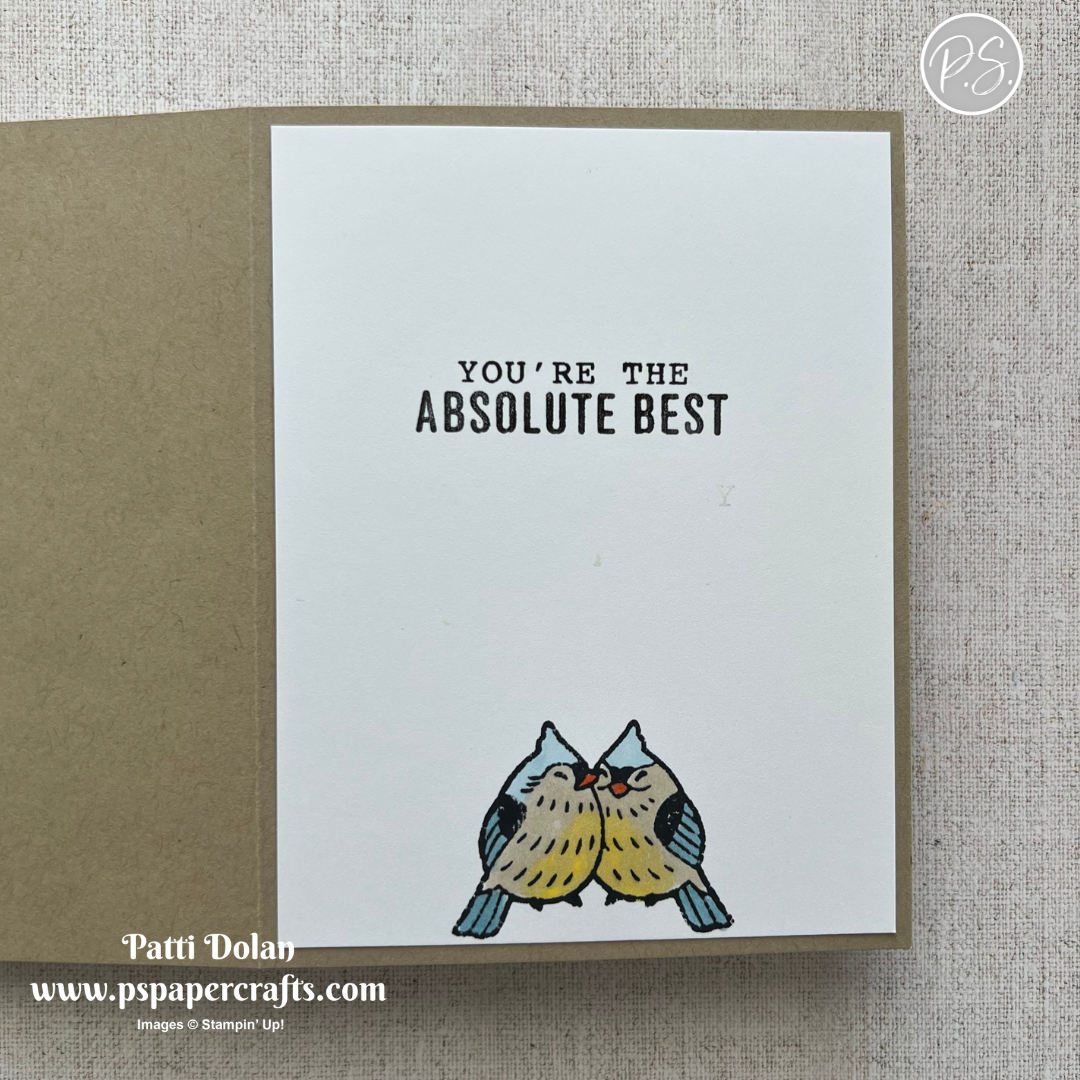
On the inside layer (4 x 5-1/4), stamp sentiment in Black Memento ink. Stamp the birds in Black Memento Ink and color with Stampin’ Blends Markers.


I love birds so this stamp set and the patterned paper are some of my favorites.


Supply List

You can click on the item to purchase it from my Online Store.

Shop Here
 

Buckle Fun Fold Card

I made these fun Buckle Fold Cards on my YouTube Channel today. The key for this card is to find the right die for the slot. There are a variety you can use and maybe you have more in your stash.


Watch the video to see step by step instructions to make this design.

Click on the button below to get a printable pdf with measurements and instructions.


Buckle Fold Card Project Sheet

The die I used for the slots on both cards is from the Delightful Wishes Dies. It’s a great, narrow rectangle. I used the Mixed Media Florals Designer Series Paper along with the Mixed Florals and Mixed Labels Stamp Set.


This card was made using the Floral Delight Designer Series Paper and Delightful Wishes Bundle, so pretty!


Supply List

You can click on the item to purchase it from my Online Store.

Shop Here
 

Gallery Blooms Color Combo

I used a fun technique to color this pretty birthday card. I was explaining it to my friend Joan and decided to use it for this week’s Color Combo. I used ink and Wink of Stella to color the flowers and leaves on the image from the Gallery Blooms Stamp Set.


The Color Combo is from my July Inspiration Calendar - Flirty Flamingo, Poppy Parade and Garden Green.

You can get my Inspiration Calendar each month when you subscribe to my email list.


Subscribe To My Email List

Tips & Instructions

  • Thick Basic White Card Base - 5-1/2 x 8-1/2, score at 4-1/4

  • Poppy Parade - die cut using the frames dies from the Gallery Blooms Dies. You will use the large frame, save the small one for another project.

  • Basic White - Stamp the flower image from the Gallery Blooms Stamp Set in Black Memento Ink. Color with ink and Wink Of Stella. I used Garden Green on the leaves and Flirty Flamingo on the flowers.

    To do this press a small clear block onto a stamp pad and then use the Wink Of Stella brush to pick up the ink and paint on the image. When it gets too light, pick up more ink. You can get nice shading depending on how much ink is on the brush.

    NOTE: Be sure to clean your brush before switching colors. Do this by brushing your Wink Of Stella on scrap paper until it is clear.

  • Die cut the flower with the coordinating die.

  • Lay the frame and flowers on the card base to determine where to stamp the sentiment. Stamp the sentiment in Poppy Parade Ink. The sentiment is from the Year Of Flowers Stamp Set.

  • Adhere the frame to the card base. Adhere the flowers with Dimensionals.

  • Add some Flirty Flamingo Loose Frosted Dots with tiny dots of glue.


For the inside I used a piece of Poppy Parade cut at 4 x 5-1/4 and layered a piece of Basic White cut at 3-3/4 x 5. Stamp the sentiment in Poppy Parade and the flower in Black Memento. Color the flower with Garden Green and Flirty Flamingo Inks with Wink Of Stella.


The picture really doesn’t show how pretty and shimmery the flowers are with the Wink Of Stella.


Supply List

You can click on the item to purchase it from my Online Store.

Shop Here
 

Sketch Challenge - Silly Safari

This week’s Sketch Challenge from Splitcoaststampers was fun and I used leaves for the different rectangles. I have those cute little animals peeking out behind them.


Here’s the sketch I used. You can see all the projects posted for this week’s challenge by clicking on the sketch below.


Tips & Instructions

  • Granny Apple Green Card Base - 5-1/2 x 8-1/2, score at 4-1/4

  • Basic White - 4 x 5-1/4, stamp the animals towards the top of the layer in Black Memento Ink. Color them with Stampin’ Blends Markers. I used Light Timid Tiger and Light from the Light Color Combo Pack for the cheetah, Light & Dark Crumb Cake for the monkey and Light Gray Granite for the rhino.

  • Florals In Bloom - cut to fit just below the animals. Mine is 2-1/8 x 5-1/4. Adhere to the white layer and then to the card.

  • Stamp 2 leaves in Pretty Peacock Ink and 2 leaves in Lost Lagoon Ink and fussy cut them out. Adhere them to the card with Dimensionals.

  • Stamp the sentiment in Pretty Peacock on a 3/4 x 2-1/4 strip of Basic White. Adhere to a 1 x 2-1/2 strip of Pretty Peacock and then adhere to the card with Dimensionals.

  • Add a Low Profile Sparkle Dot to the sentiment.


On the inside layer (4 x 5-1/4), stamp sentiment in Pretty Peacock Ink. Stamp the zebra in BlackMemento Ink. I colored the nose with a Light Stampin’ Blends Marker from the Light Combo Pack.


These animals are so cute, they make me smile.


Supply List

You can click on the item to purchase it from my Online Store.

Shop Here
 

Christmas In July BOGO Sale

I’m clearing out my Stampin’ Up! Christmas products and that means Merry Christmas to you!!!


Get my Retired Stampin’ Up products FREE when you place an order of equal value from my Online Store.

For example, choose $50 of my retired product, which you will get for FREE when you place a $50 order (before shipping & tax) in my Online Stampin’ Up Store.

You will also be responsible for paying for the shipping on the retired product. The BOGO Sale is only available in the United States. Sale ends July 14, 2025 or when product runs out.  

Please feel free to share my sale with your friends.

BOGO SALE STEPS (please read carefully)

  1. CHOOSE YOUR RETIRED PRODUCT - Email me as soon as possible with your wish list. First come, first reserved. I will periodically update the list with “taken” labels, but there will be a lag between emails and updates.

  2. EMAIL ME -  patti@pspapercrafts.com and I will reserve the retired product in the order that the emails come in.

  3. WAIT FOR A CONFIRMATION EMAIL FROM ME - I will pull the retired product for you and let you know which items on your wish list were still available. Then I will calculate how much you need to order from the online store.   I will also let you know how much the shipping for the retired products will be.

  4. PLACE YOUR ONLINE ORDER - Place your order from my online store in the amount equivalent or greater than the retired product value (before shipping and tax). You have 24 hours from the time that I send the email to place your order.

  5. PAY SHIPPING ON RETIRED PRODUCTS - Once your online order has been placed, I will send you a Paypal invoice for the shipping on the retired products. I will be using USPS shipping.

  6. WAIT FOR YOUR PRODUCTS TO ARRIVE - I will ship the Retired Products on a rolling basis no later than the end of July. Stampin’ Up will ship the New Products you ordered.

Choose your retired products BELOW, then email me.

patti@pspapercrafts.com

Sketch Saturday - Silly Safari

I knew I had to get the Silly Safari Stamp Set when I saw the Hakuna Matata sentiment. My grandson absolutely loves the Lion King and we are taking him for this 10th birthday to the Broadway Show so this card is perfect for him.


I made this card for the weekly Atlantic Hearts Sketch Challenge. Here’s the sketch I used.


Tips & Instructions

  • Pretty Peacock Card Base - 5-1/2 x 8-1/2, score at 4-1/4

  • Florals In Bloom Designer Series Paper - 4 x 5-1/4, adhere to the card base.

  • Two-Tone Pretty Peacock - (2 pieces) 1/2 x 5, tear both ends to let the white show. Use the dark side for one piece and the light side for the other piece.

  • Two-Tone Mossy Meadow - 1/2 x 5, tear both ends to let the white show.

  • Adhere the 3 strips to the card.

  • Die cut the largest circle from Basic White using the Stylish Shapes DIes.

  • Stamp the giraffe on the white circle in Black Memento ink. Color with Stampin’ Blends. I used Light Darling Duckling,Light Pecan Pie, Light & Dark Crumb Cake and the Light Combo Pack.

  • Stamp the sentiment in Black Memento Ink.

  • Adhere the circle to the card.

  • Add some Low Profile Sparkle Gems.


On the inside layer (4 x 5-1/4), stamp sentiment and animals in Black Memento ink. Color with Stampin’ Blends Markers. I used the Light Combo Pack for the zebra’s nose & ears, Light & Dark Crumb Cake for the Monkey and Light Gray Granite & the Light Combo Pack for the Rhino.


My grandson is going to be so happy to receive this card. Hakuna Matata!!!


Supply List

You can click on the item to purchase it from my Online Store.

Shop Here
 

Easy Corner Fold Cards

These Corner Fold Cards are easy to make and so pretty! I used new Online Exclusive products for both cards. The Designer Series Papers are gorgeous!


Watch the video to see step by step instructions to make this design.

Click on the button below to get a printable pdf with measurements and instructions.


Easy Corner Fold Card Project Sheet

This card features the Painterly Pears Designer Series Paper and I die cut the pear and leaves using the Perfectly Pears Dies. The sentiment is from the Charming Day Stamp Set.


This card made using the Floral Charm Designer Series Paper and I die cut the large floral piece using the Charming Day Dies.


Supply List

You can click on the item to purchase it from my Online Store.

Shop Here
 

Red, White and Blue Color Combo

Happy 4th of July! I’m using red, white and blue for this week’s Color Combo from my July Inspiration Calendar! The die cut letters were made using the Alphabet A La Mode Dies.


The colors I used are Poppy Parade, Basic White and Blueberry Bushel.

You can get my Inspiration Calendar each month when you subscribe to my email list.


Subscribe To My Email List

Tips & Instructions

  • Thick Basic White Card Base - 5-1/2 x 8-1/2, score at 4-1/4

  • Blueberry Bushel Layer - 3-7/8 x 5-1/8

  • Basic White Layer - 4 x 5-1/4 (you will cut this down after you add the stripes)

  • Cut 1/2” strips of Poppy Parade, Thick Basic White and Blueberry Bushel.

  • Put adhesive all over the white layer. I used Seal+

  • Adhere the strips to the layer creating a pattern. I started in the middle and worked out on both sides.

  • Trim off the pieces that hang over the sides from the back and then cut it down to 3-3/4 x 5. Save one of the piece you cut off to use on the inside layer.

  • Adhere the striped layer to the blue layer and then to the card base.

  • Die cut the largest square from Basic White using the Stylish Shapes Dies.

  • Die cut the USA letters from Poppy Parade using the Alphabet A La Mode Dies and adhere the letters to the white square. Adhere the square to the card with Dimensionals.

  • Die cut some stars and adhere to the card. I looked to see what I had and found star dies in the All Zipped Up Dies but you can use whatever you have. Adhere them to the card.


On the inside layer (4 x 5-1/4), add the striped strip (leftover when you cut down the layer for the card front). Die cut some stars and adhere them to the layer.


This is a great card to celebrate our Independence Day!


Supply List

You can click on the item to purchase it from my Online Store.

Shop Here
 

Sketch Challenge - Year of Flowers

I love the Year of Flowers Stamp Set. You can create a personal birthday card by stamping the flower for their birth month.


I made this card for the weekly Splitcoaststampers Sketch Challenge. Here’s the sketch I used.

You can see all the projects posted for this week’s challenge by clicking on the sketch below.


Tips & Instructions

  • Highland Heather Card Base - 5-1/2 x 8-1/2, score at 4-1/4

  • Basic White Layer - 4 x 5-1/4, adhere to the card base.

  • Granny Apple Green Layer - 2 x 5-1/4, emboss using the glass folder from the Glass & Garden Embossing Folders. Adhere to the card.

  • Using the largest square die from the Stylish Shapes Dies, cut a square from Highland Heather Cardstock. Die cut a piece of Basic White using the next smaller die.

  • Stamp the black corners on the white square in Black Memento Ink. The stamp is from the Spring Corners Stamp Set.

  • Stamp the flower in Black Memento Ink using the Year of Flowers Stamp Set on the square. Color with Highland Heather and Granny Apple Green Stampin’ Blends Markers.

  • Adhere the squares together and then adhere to the card with Dimensionals.

  • Die cut the label using the Stylish Shapes Dies and stamp the sentiment using the Year of Flowers Stamp Set. Adhere to the card with Dimensionals.

  • Add some Purple Fine Shimmer Gems.


On the inside layer (4 x 5-1/4), stamp sentiment in Black Memento Ink and the flower in Highland Heather Ink.


I love this embossing folder, it has such a cool pattern.


Supply List

You can click on the item to purchase it from my Online Store.

Shop Here
 

Tent Fold Stepper Cards

I watched Karen Titus make these fun Tent Fold Stepper Cards and decided to make them for my Friday Fun Fold cards. They stand up so nicely!


Watch the video to see step by step instructions to make this design.

Click on the button below to get a printable pdf with measurements and instructions.


Tent Fold Stepper Card Project Sheet

I made this card using the Lovely Garden Designer Series Paper and More Messages Bundle. The blue hydrangea in this paper really caught my eye.


This card was made using the Splendid Autumn Designer Series Paper. I added some Brushed Brass Butterflies to both cards, one of my favorite embellishments.


Supply List

You can click on the item to purchase it from my Online Store.

Shop Here
 

Coneflower Celebrations Color Combo

I love coneflowers and this one is soooo large it takes up the entire card front. The detailed layer and flower center dies give the card a 3D look.


I used the Color Combo from my June Inspiration Calendar - Coastal Cabana, Secret Sea and Crushed Curry. You can get my calendar each month when you subscribe to my email list.


Subscribe To My Email List

Tips & Instructions

  • Secret Sea Card Base - 4-1/4 x 11, score at 5-1/2 (top folding)

  • Basic White Layer - 4 x 5-1/4, lightly blend Coastal Cabana Ink on the layer with a Blending Brush. Stamp sentiment in Secret Sea Ink.

  • Die cut the large flower (the one that you fold in half) from Crushed Curry Cardstock. Fold it in half and adhere together or cut off one half. Die cut the detailed petals from another piece of Crushed Curry Cardstock and blend some Crushed Curry Ink on it with a Wink of Stella Glitter Brush.

  • Die cut the flower center from a scrap of Secret Sea Cardstock and add some Wink of Stella.

  • Adhere the petals and flower center to the flower.

  • Die cut the stem from Secret Sea Cardstock.

  • Die cut the leaves and detailed leaves from Coastal Cabana Cardstock. Blend some Coastal Cabana Ink on detailed leaves and adhere to the leaves.

  • Adhere the stem and leaves to the white layer. Adhere the flower using Dimensionals.

  • Add some Secret Sea Flat Pearls.


On the inside layer (4 x 5-1/4), stamp sentiment and butterfly in Secret Sea Ink. Color the butterfly using Wink of Stella and Coastal Cabana and Secret Sea Ink.


The Wink Of Stella adds such a nice shimmer to the flower.


Supply List

You can click on the item to purchase it from my Online Store.

Shop Here
 

Sketch Challenge - Everyday Happiness

The Everyday Happiness Designer Series Paper has beautiful, subtle patterns and I thought it would work for this week’s sketch challenge.


Here’s the sketch I used from the weekly Splitcoaststampers Sketch Challenge. You can see all the projects posted for this week’s challenge by clicking on the sketch below.


Tips & Instructions

  • Lost Lagoon Card Base - 5-1/2 x 8-1/2, score at 4-1/4

  • Everyday Happiness Designer Series Paper Layer - 4 x 5-1/4, adhere to the card base.

  • Lost Lagoon - 2 strips cut at 7/8 x 3-3/4.

  • Everyday Happiness Designer Series Paper Strips (floral) - 2 strips cut at 3/4 x 3-5/8, adhere to the Lost Lagoon strips and then to the card.

  • Lost Lagoon Strip - 7/8 x 4-1/4, banner right side

  • Everyday Happiness Designer Series Paper Strip (dotted) - 3/4 x 4, banner right end and adhere to the Lost Lagoon strip. Adhere to the card.

  • Stamp the sentiment on Basic White using the More Messages Stamp Set. Die cut with coordinating die. Adhere using Mini Dimensionals. You can stamp the entire set of sentiments and die cut them at one time or just ink up the sentiment you want on a scrap and die cut using just that label area on the large die.

  • Add 2 Faceted Gems.


On the inside layer (4 x 5-1/4), stamp sentiment in Gray Granite Ink and die cut with coordinating die. Adhere a 3/4 x 5-1/4 strip of Designer Series Paper.


I love the watercolor look of this paper, it’s so bright and fun.


Supply List

You can click on the item to purchase it from my Online Store.

Shop Here
 

Fun Easel Cards

Here’s a twist on a Easel Fun Fold Card. These are fun to make and sit open so nicely.


Watch the video to see step by step instructions to make this design.

Click on the button below to get a printable pdf with measurements and instructions.


Easel Card Project Sheet

This card is a great masculine birthday card and was made using the Sunrise Sailing Bundle and Full of Life Designer Series Paper.


I used the Turtle-Y Cute Designer Series Paper for this fun kid’s birthday card. The sentiment is from the Coneflower Celebrations Stamp Set.


Supply List

You can click on the item to purchase it from my Online Store.

Shop Here
 

Paper Tags - Color Combo

I made this card using the Paper Tags Bundle and this week’s Color Combo. The large stamp has coordinating dies that cut the tag and a mat with a cute heart cutout. I used my Misti to get good, solid image.


The Colors I used are from my June Inspiration Calendar - Granny Apple Green, Real Red and Pool Party.

You can get my calendar each month when you subscribe to my email list.


Subscribe To My Email List

Tips & Instructions

  • Granny Apple Green Card Base - 5-1/2 x 8-1/2, score at 4-1/4

  • Basic White Layer - Die cut using the largest die from the Perennial Postage Dies. Using a Blending Brush, lightly blend Granny Apple Green to the layer leaving the edges white. Adhere to the card base.

  • Stamp the large sentiment tag in Pool Party Ink on Basic White Cardstock and die cut using the coordinating die.

  • Die cut the larger scalloped tag from Real Red Cardstock. Adhere the tags together and then adhere to the card with Dimensionals.

  • Tie a bow with a piece of Iridescent Striped Trim and adhere with a Glue Dot.

  • Add some Iridescent Faceted Gems.


On the inside layer (4 x 5-1/4), stamp sentiment in Real Red Ink.


I love this sentiment; you can send it to anyone to just brighten up their day.


Supply List

You can click on the item to purchase it from my Online Store.

Shop Here
 

Sketch Challenge - Sweet Jar

This Sweet Jar Stamp Set and Punch are so fun. There’s lots of different images you can stamp inside the jar and then punch it out with the lid.


I made this card for the weekly Splitcoaststampers Sketch Challenge. Here’s the sketch I used.

You can see all the projects posted for this week’s challenge by clicking on the sketch below.


Tips & Instructions

  • Melon Mambo Card Base - 5-1/2 x 8-1/2, score at 4-1/4

  • Basic White Layer - 3-3/4 x 5, emboss using the Mini Corrugated 3D Embossing Folder and adhere to the card base.

  • Marbled Elegance Specialty Designer Series Paper Square - 3 x 3, adhere to the card.

  • Stamp the jar and lid in Smoky Slate Ink and punch using the coordinating Sweet Jar Builder Punch.

  • Stamp the hearts in the jar in Melon Mambo Ink.

  • Adhere the jar and lid to the card with Dimensionals.

  • Stamp the sentiment on a 3/8 strip of Basic White in Melon Mambo Ink and cut apart. Adhere the sentiment to the card using Mini Dimensionals.

  • Add some Pretty In Pink Gems.


On the inside layer (4 x 5-1/4), stamp sentiment and hearts in Melon Mambo Ink.


I love corrugated layer along with the marbled layer, so fun!


Supply List

You can click on the item to purchase it from my Online Store.

Shop Here
 

Sketch Saturday - Impressions Abloom Birthday Card

I love Gorgeous Grape and Granny Apple Green together! The flowers were die cut using the Impressions Abloom Dies and the background layer created by ink blending some Granny Apple Green Ink to a piece of Irresistible Designs Specialty Paper.


I made this card for the weekly Atlantic Hearts Sketch Challenge. Here’s the sketch I used.


Tips & Instructions

  • Gorgeous Grape Card Base - 5-1/2 x 8-1/2, score at 4-1/4

  • Basic White Layer - 3-3/4 x 5

  • Irresistible Designs Specialty Designer Series Paper - 3-5/8 x 4-7/8, blend Granny Apple Green Ink and then wipe with a tissue to make those white lines pop. Adhere to the white layer and then to the card base.

  • Die cut the flower pieces using the Impressions Abloom Dies

    • 2 small flowers from Gorgeous Grape adding the detailed die to get the embossed lines.

    • 2 single stems from Granny Apple Green

    • 2 flower centers from Daffodil Delight. I die cut them and then ran them through again with the detailed die to get the embossed dots.

    • Assemble the flowers.

  • To create the pot I used the Heartfelt Hexagon Punch to punch a piece of Early Espresso Cardstock. I only cut a half of the hexagon and then trimmed it down. Adhere the flowers to the back of the pot.

  • Adhere the pot with flowers to the card with Dimensionals.

  • Stamp sentiment (from the Beautiful Butterflies Stamp Set) on a 3/8 strip of Basic White, trim it down and then adhere to a 5/8 strip of Gorgeous Grape. Adhere to the card with Dimensionals..

  • Tie a bow with a piece of Gold Striped Mesh Ribbon and adhere to the pot with a Glue Dot.

  • Add some Flower Accents.


On the inside layer (4 x 5-1/4), stamp sentiment in Gorgeous Grape Ink. Die cut a flower and leaves and adhere to the bottom corner.


I love that you can ink blend the Irresistible Designs Specialty Paper. There are 3 different designs you can use.


Supply List

You can click on the item to purchase it from my Online Store.

Shop Here
 

Corner Fold Cards

These beautiful Corner Fold Cards are so easy to make and really highlights our pretty patterned papers.


Watch the video to see step by step instructions to make this design.

Click on the button below to get a printable pdf with measurements and instructions.


Corner Fold Card Project Sheet

This card was made using the Florals In Bloom Designer Series Paper and Year of Flowers Bundle. I love all the different flowers for each month of the year in the stamp set.


This card was made using the Beautiful Gallery Designer Series Paper and Gallery Blooms Bundle, so elegant.


Supply List

You can click on the item to purchase it from my Online Store.

Shop Here
 

Layered Thoughts - Color Combo

I saw Sara Douglass, our CEO make a card like this on Instagram and though it would be perfect for this week’s Color Combo. I used the Layered Thoughts Stamp Set for the big, bold sentiment and then stamped the flowers around it using the Blooming Phrases Stamp Set.


The Color Combo is from my June Inspiration Calendar - Lemon Lolly, Balmy Blue and Poppy Parade. You can get my Inspiration Calendar each month when you subscribe to my email list.

 
Subscribe To My Email List
 

Tips & Instructions

  • Thick Basic White Card Base - 5-1/2 x 8-1/2, score at 4-1/4

  • Poppy Parade Layer - 4 x 5-1/4

  • Basic White Layer - 3-7/8 x 5-1/8

  • Stamp the sentiment on the white layer in Black Memento Ink using the Layered Thoughts Stamp Set.

  • Stamp the flowers around the sentiment using the Blooming Phrases Stamp Set. I stamped off on some of them to get different shades.

  • Adhere the stamped layer to the Poppy Parade Layer and then to the card base.

  • Add Iridescent Pearls to some of the flower centers.


Inside layer:

  • Poppy Parade Layer - 4 x 5-1/4

  • Basic White Layer - 3-7/8 x 5-1/8

  • Stamp sentiment in Black Memento Ink and then stamp the flower in Poppy Parade and leaves in Balmy Blue inks.

  • Adhere layers together and then to the inside of the card.


This card is so bright, bold and fun!!!


Supply List

You can click on the item to purchase it from my Online Store.

Shop Here
 

Sketch Challenge - Woven Textures

I love all the texture on this card with the Glass Embossing Folder and Woven Textures Designer Series Paper. It’s clean and simple but with lots of texture.


I made this for the weekly Splitcoaststampers Sketch Challenge. Here’s the sketch I used. You can see all the projects posted for this week’s challenge by clicking on the sketch below.


Tips & Instructions

  • Basic Beige Card Base - 5-1/2 x 8-1/2, score at 4-1/4

  • Early Espresso Layer - 3-7/8 x 5-1/8

  • Basic White Layer 3-3/4 x 5, emboss the bottom half using the Glass Embossing Folder and adhere it to the Early Espresso layer and to the card base.

  • Woven Textures Designer Series Paper - cut 3 different patterns at 1-1/2 x 1-1/2. Adhere the squares to the white layer.

  • Basic Beige - 1-1/4 x 2, banner the bottom.

  • Basic White - 1 x 1-5/8, stamp sentiment in Early Espresso. The sentiment is from the Beautiful Motifs Stamp Set. Banner the bottom.

  • Adhere the white banner to the beige banner and then adhere to the card with Dimensionals.

  • Add some Flower Accents.


On the inside:

  • Basic White Layer - 3-3/4 x 5, stamp sentiment in Early Espresso Ink.

  • Early Espresso Layer -3-7/8 x 5-1/8, adhere to white layer and then to the inside of the card.


Isn’t the embossing on the bottom of the white layer so cool!


Supply List

You can click on the item to purchase it from my Online Store.

Shop Here
 

Sketch Saturday - Kintsugi Impressions Birthday Card

I used the Kintsugi Impressions Designer Series Paper for this week’s sketch challenge. I love all the gold in the paper and decided to add some gold torn paper along the edges.


Here’s the sketch I used. It’s from the Atlantic Hearts Sketch Challenge.


Tips & Instructions

  • Misty Moonlight Card Base - 5-1/2 x 8-1/2, score at 4-1/4

  • Basic White Layer - 4 x 5-1/4

  • Kintsugi Impressions Designer Series Paper - 4 x 4, tear in half at a diagonal. Tear toward you to get the edge core of the paper. Tear the bottom piece again the same way to get that edge.

  • Gold Foil Paper - 4 x 4, tear in half at an angle but this time tear away from you to not get the core edge. Repeat for the bottom piece.

  • Kintsugi Impressions Designer Series Paper - 3 x 4, adhere to the center of the Basic White Layer.

  • Adhere the gold pieces behind the Designer Series Paper pieces and then to the white layer so the floral design is in between. You can make this as wide or narrow as you want. Trim off from behind anything that hangs over the edge. Then adhere to the card base.

  • Stamp sentiment on a 1/2 strip of Basic White in Versamark Ink and emboss with Gold Embossing Poweder. Adhere to a 5/8 strip of Gold Foil and then to the card with Dimensionals.

  • Add some Gold Low-Profile Dots.


On the inside layer (4 x 5-1/4), stamp sentiment in Versamark Ink and heat emboss with Gold Embossing Powder. Add a 3/4 x 4 strip of Designer Series Paper to the bottom.


This paper is so pretty with all the gold accents!


Supply List

You can click on the item to purchase it from my Online Store.

Shop Here