Sketch Saturday - Kintsugi Inspirations

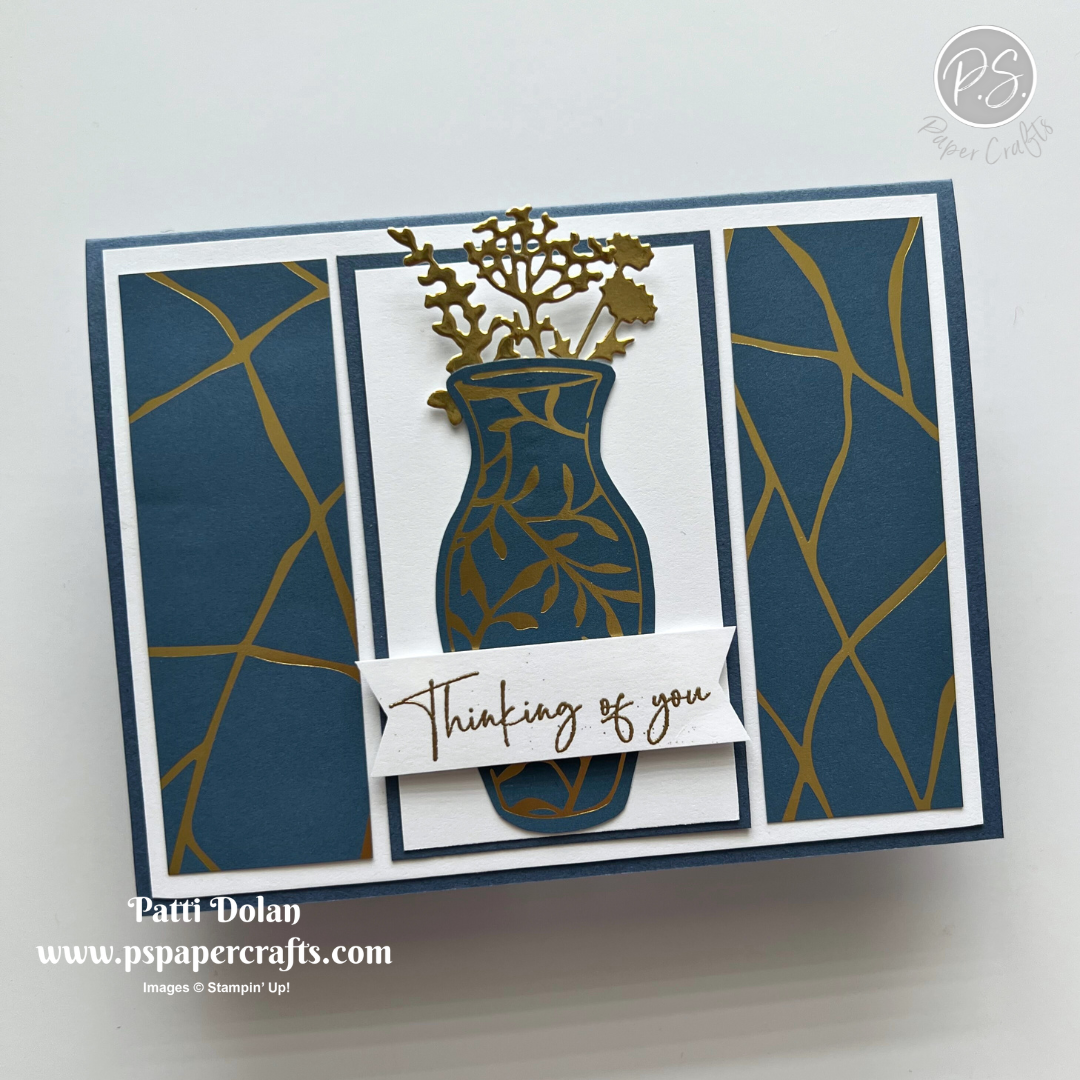
I love the Kintsugi Inspirations Designer Series Paper. The patterns are so pretty and you can fussy cut the beautiful vase right from the paper.


I made this card for the weekly Atlantic Hearts Sketch Challenge. Here’s the sketch I used.


Tips & Instructions

  • Misty Moonlight Card Base - 5-1/2 x 8-1/2, score at 4-1/4

  • Basic White Layer - 4 x 5-1/4, adhere to the card base.

  • Misty Moonlight Center Mat - 2-1/4 x 3-3/4

  • Basic White Center Piece - 2-1/8 x 3-5/8 adhere to the Misty Moonlight Mat and then to the center of the card front.

  • Kintsugi Inpiration Designer Series Paper - cut 2 strips at 1-1/4 x 3-3/4, adhere on both sides of the center piece.

  • Kintsugi Inspirations Designer Series Paper - fussy cut the vase.

  • Die cut 3 floral pieces from Gold Foil using the Gallery Blooms Dies. Adhere them to the vase and then adhere the vase to the card.

  • Stamp sentiment on a 3/4 strip of Basic White in Versamark Ink and heat emboss with Gold Embossing Powder. Banner each end and adhere to the card with Dimensionals.


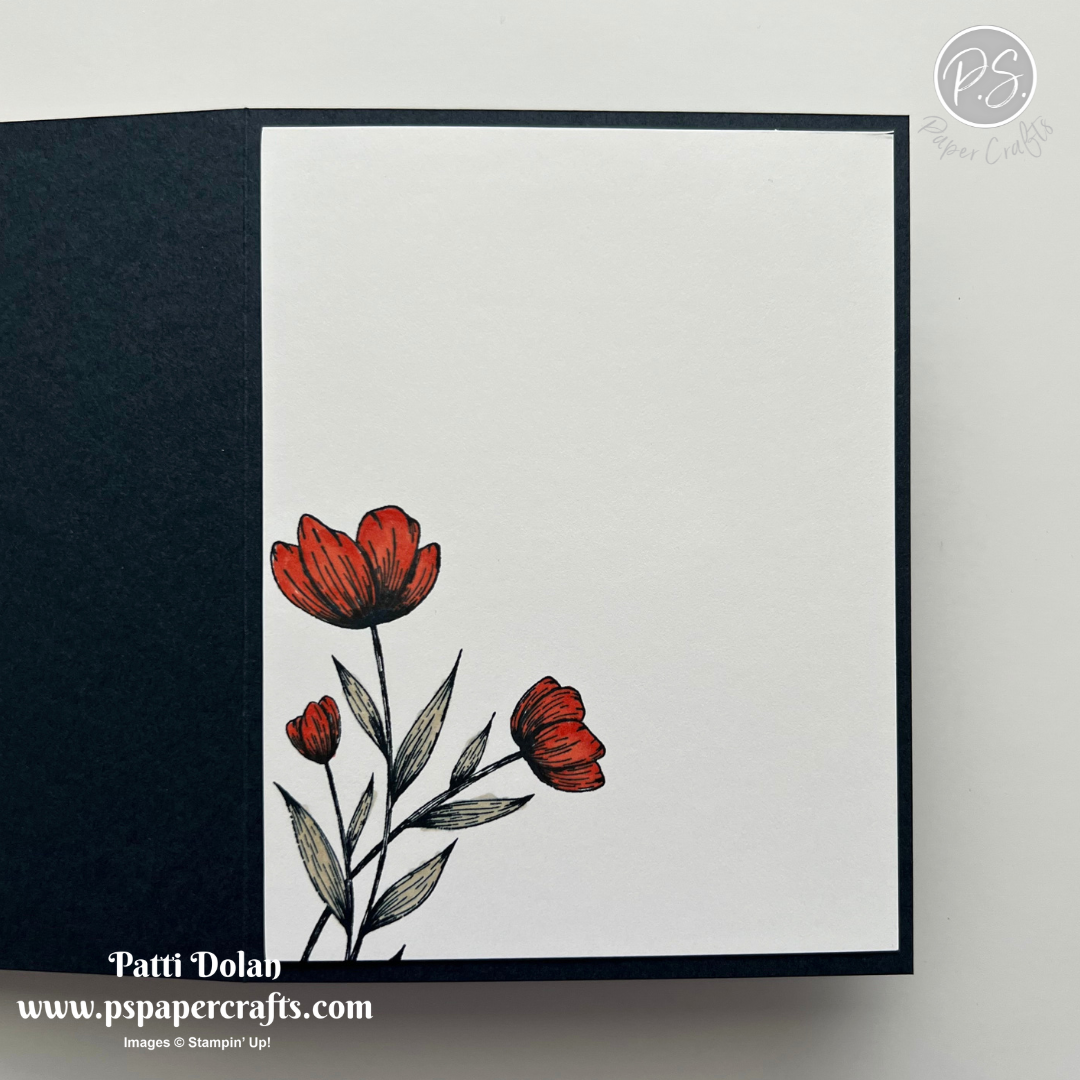
On the inside layer (4 x 5 1/4), add a tea cup that you fussy cut from the Designer Series Paper.


The vase and tea cup designs in the paper are gorgeous with the gold accents.


Supply List

You can click on the item to purchase it from my Online Store.

Step Fold Cards

These Step Fold Cards are so fun and easy to make. They stand up so nicely too!


Watch the video to see step by step instructions to make this design.

Click on the button below to get a printable pdf with measurements and instructions.


I used the Wildflower Birthday Designer Series Paper for this card. It has some great die cuts included and I used them for the birthday cakes. The sentiment is from the Round We Go Stamp Set. It has such wonderful birthday sentiments.


This card was made using the Botanical Textures Designer Series Paper and Gallery Blooms Bundle. The sentiment is from the Cake Celebrations Stamp Set.


Supply List

You can click on the item to purchase it from my Online Store.

Joined Together - Color Combo

The Joined Together 3D Embossing Folder is really cool! I embossed a white layer and then used Blending Brushes to add ink to the different raised areas!


The Color Combo is from my May Inspiration Calendar - Timid Tiger, Misty Moonlight and Lost Lagoon.


You can get my Inspiration Calendar each month when you subscribe to my email list.

Tips & Instructions

  • Misty Moonlight Card Base - 5-1/2 x 8-1/2, score at 4-1/4

  • Basic White Layer - 4 x 5-1/4, emboss using the Joined Together Embossing Folder. Lightly brush ink to the different areas of the embossed layer using blending brushes. I used Timid Tiger, Misty Moonlight and Lost Lagoon.

  • Wrap a piece of Timid Tiger Faux Linen Ribbon around the layer and adhere to the back of the layer. Adhere the layer to the card base.

  • Die cut a label using the Nested Labels Dies from a piece of Basic White Cardstock. Stamp the sentiment in Lost Lagoon Ink. The sentiment is from the Textured Notes Stamp Set.

  • Die cut the next size up label from Misty Moonlight Cardstock. Adhere to the white label and then adhere to the card with Dimensionals.

  • Tie a bow with the ribbon and adhere with a Glue Dot.

  • Add some Lost Lagoon Faceted Gems.


On the inside layer (4 x 5 1/4), stamp sentiment in Timid Tiger Ink and stamp a branch in Lost Lagoon Ink.


I love the unique kintsugi-inspired design on the embossed layer.


Supply List

You can click on the item to purchase it from my Online Store.

Sketch Challenge - Cheers & Sips

I made this card for the weekly Splitcoaststampers Sketch Challenge using the Celebratory Sips Designer Series Paper. It has such great images that you can die cut with the Cheers & Sips Dies.


Here’s the sketch I used. You can see all the projects posted for this week’s challenge by clicking on the sketch below.


Tips & Instructions

  • Secret Sea Card Base - 4-1/4 x 11, score at 5-1/2

  • Basic White Layer - 4 x 5-1/4, adhere to the card base.

  • Celebratory Sips Designer Series Paper - 3-1/4 x 3-1/2, adhere to the card.

  • Die cut the drinks using the Cheers & Sips Dies from the Celebratory Sips Designer Series Paper, the sheet with the color blotches. Use the textured die on the large drink just below the white area. Adhere the drinks to the card using Dimensionals on the smaller one.

  • Die cut the strawberry and sprig from the Designer Series Paper using the coordinating dies. Adhere them to the drinks.

  • Die cut the label from a scrap of Basic White using the Mixed Labels Dies. Stamp the sentiment in Strawberry Slush Ink and adhere to the card with Dimensionals.

  • Wrap a piece of Gold Striped Mesh Ribbon around the card front and tie a knot in the front.


On the inside layer (4 x 5 1/4), stamp sentiments Strawberry Slush Ink. Add a 3/4 x 4 strip of Designer Series Paper to the bottom of the layer.


I love the texture on the tall glass, it gives it such a realistic look.


Supply List

You can click on the item to purchase it from my Online Store.

Sketch Saturday - Impressions Abloom

This week’s Sketch Challenge was pretty easy for me so I added an embossed layer and splattered some ink to jazz it up.


Here’s the sketch I used from the weekly Atlantic Hearts Sketch Challenge.


Tips & Instructions

  • Blackberry Bliss Card Base - 5=1/2 x 8-1/2, score at 4-1/4

  • Basic White Layer - 4 x 5-1/4, emboss with the Damask Designs Embossing Folder and adhere to the card base.

  • Blackberry Bliss Layer - Die cut using the Textured Notes Dies.

  • Basic White Layer - Die cut using the Textured Notes Dies. Stamp the sentiment in Blackberry Bliss Ink. The sentiment is from The Right Words Stamp Set. Splatter some Bubble Bath Ink on the layer and then adhere the layer to the Blackberry Bliss layer and then to the card.

  • Using the Impressions Abloom Dies die cut the flower from Bubble Bath Cardstock and the flower center from Blackberry Bliss Cardstock. To do this, use the frame with the textured die centered in it. Die cut 2 flowers from Old Olive Cardstock. Assemble the flower and adhere to the card with Dimensionals.


On the inside layer (4 x 5 1/4), stamp sentiment in Blackberry Bliss Ink. Die cut the 6 small flowers from Blackberry Bliss Cardstock and adhere around the sentiment.


I love all the embossing on this card.


Supply List

You can click on the item to purchase it from my Online Store.

Triple Balcony Fold Cards

These Triple Balcony Fold Cards are so fun! You can add different die cuts to the balconies to create a 3D card.


Watch the video to see step by step instructions to make this design.

Click on the button below to get a printable pdf with measurements and instructions.


This card was made using the Celebratory Sips Designer Series Paper and Cheers & Sips Bundle. There are lots of fun drink designs in the paper pack that you can die cut or fussy to use to decorate your balconies.


I love how this card turned out, those little critters are so cute. They are from the Peekaboo Forest Bundle. The patterned paper is from the Nests of Winter Designer Series Paper.


Supply List

You can click on the item to purchase it from my Online Store.

Spotlight On Nature Color Combo

The Spotlight On Nature Stamp Set is one of my favorites. I love the simple flowers.


I used the Color Combo from my May Inspiration Calendar - Secret Sea, Crumb Cake and Calypso Coral. The pop of orange works so well against the neutral colors.

You can get my Inspiration Calendar each month when you subscribe to my Email List.

Tips & Instructions

  • Secret Sea Card Base - 5-1/2 x 8-1/2, score at 4-1/4

  • Calypso Coral Layer - 4 x 5-1/4

  • Crumb Cake Layer - 3-3/4 x 5, stamp the floral image in Secret Sea Ink. Color the flowers with a dark Calypso Coral Stampin’ Blends Marker and the leaves with a Light Crumb Cake Stampin’ Blends Marker. Color over the flowers and leaves with a Wink of Stella Glitter Brush.

  • Emboss the Crumb Cake Layer using the Exposed Brick 3D Embossing Folder. Adhere to the Calypso Coral Layer and then to the card base.

  • Stamp the sentiment on a 3/4 x 1-3/8 scrap of Crumb Cake in Secret Sea Ink.

  • Adhere the sentiment piece to a scrap of Secret Sea cut to 7/8 x 1-1/2. Adhere to the card with Dimensionals.

  • Add some Pressed Flower Motifs.


On the inside layer (4 x 5 1/4), stamp the floral image in Secret Sea Ink. Color the flowers with a Dark Calypso Coral and the leaves with Light Crumb Cake Stampin’ Blends Markers.


I love to stamp a layer and then emboss it, such a pretty look.


Supply List

You can click on the item to purchase it from my Online Store.

Sketch Saturday - Nests Of Winter

I pulled out the Nests of Winter Designer Series Paper for this week’s Splitcoaststampers Sketch Challenge. Birds are out in feeders so I thought it was appropriate!


Here’s the sketch I used. You can see all the projects posted for this week’s challenge by clicking on the sketch below.


Tips & Instructions

  • Night of Navy Card Base - 5-1/2 x 8-1/2, score at 4-1/4

  • Nests of Winter Designer Series Paper - 4 x 5-1/4, adhere to the card base.

  • Cut 3 strips of Gray Granite Cardstock at 1/2 x 5-1/4 and adhere them to the card.

  • Die cut 2 circles with birds from the Nests of Winter Designer Series Paper using the Stylish Shapes Dies. Adhere to the card with Dimensionals.

  • Stamp the sentiment on a scrap of Basic White Cardstock in Night of Navy Ink. Adhere to the card with Dimensionals.

  • Add a small Pressed Flower Motifs embellishment.


On the inside layer (4 x 5 1/4), stamp sentiment in Night of Navy Ink. Add a 3/4 x 4 strip of the Nests of Winter Designer Series Paper.


These birds are so pretty. I can sit and watch birds eating at the feeders all day!


Supply List

You can click on the item to purchase it from my Online Store.

Pretty Fan Fold Cards

I love this Fan Fold Card Design! These cards turned out so pretty and once I figured out all the measurements, they were easy to put together.


Watch the video to see step by step instructions to make this design.

Click on the button below to get a printable pdf with measurements and instructions.


This card was made using the pretty Kintsugi Inspirations Designer Series Paper. The sentiment is from the Beautiful Motifs Stamp Set.


This card was made using the beautiful Florals In Bloom Designer Series Paper. I like the sentiment so much from the other card, I decided to use it for this card as well. It fits perfectly on the card.


Supply List

You can click on the item to purchase it from my Online Store.

Impressions Abloom Color Combo

Do you ever stamp your own background layer? I love to do that and decided to use the Impressions Abloom Stamp Set and this week’s Color Combo to make this fun Thanks card.


The Color Combo is from my May Inspiration Calendar - Strawberry Slush, Lost Lagoon and Lemon Lolly.


Tips & Instructions

  • Lost Lagoon Card Base - 5-1/2 x 8-1/2, score at 4-1/4

  • Basic White Layer - 4 x 5-1/4

  • Stamp the flowers on the white layer starting with the largest image, then the next largest and so on stamping off the edge. Stamp the leaves in spaces to fill in. I stamped off the small Strawberry Slush flowers (stamp on scrap paper first) to get a lighter shade and add another color. Stamp the flower centers.

  • Wrap a piece of Strawberry Slush Faux Linen Ribbon around the layer and adhere to the back. Adhere the layer to the card base.

  • Die cut the rectangle from a scrap of Basic White using the Sentimental Framing Dies. Stamp the sentiment in Lost Lagoon Ink and adhere to the card with Dimensionals.

  • Tie a bow with the ribbon and adhere with a glue dot.

  • Add a Strawberry Slush Flat Pearl to the sentiment label.


On the inside layer (4 x 5 1/4), stamp sentiment in Lost Lagoon Ink. Stamp some flowers along the bottom.


These flowers are so fun and pretty and you can do this using any combination of colors.


Supply List

You can click on the item to purchase it from my Online Store.

Sketch Challenge - Beautiful Gallery

The Beautiful Gallery Designer Series Paper is full of designs that look like paintings. I decided to die cut the house from one of the papers to use as the focal piece. The background layer is from the Flower Garden Foil Specialty Paper; hard to photograph but so pretty.


I made the card for this week’s Splitcoaststampers Sketch Challenge. Here’s the sketch I used. You can see all the projects posted for this week’s challenge by clicking on the sketch below.


Tips & Instructions

  • Secret Sea Card Base - 5-1/2 x 8-1/2, score at 4-1/4

  • Flower Garden Foil Paper (Cloud Cover pattern) - 4 x 5-1/4, adhere to the card base.

  • Secret Sea Layer - 3 x 3-3/4

  • Beautiful Gallery Designer Series Paper - 3 strips cut to 1-1/8 x 2-7/8, adhere to the Secret Sea layer leaving a small border around each piece.

  • Beautiful Gallery Designer Series Paper - Die cut the the house scene using the second from largest circle from the Stylish Shapes Dies. Adhere to the layer with Dimensionals.

  • Adhere the layer to the card.

  • Die cut a scrap of Secret Sea Cardstock using the Mixed Labels Dies.

  • Stamp the sentiment on the label in Versamark Ink and heat emboss using Silver Embossing Powder. Adhere to the card using one Dimensionals on the right side and liquid glue on the left side so it sits nicely on the circle.


On the inside layer (4 x 5 1/4), stamp sentiment in Versamark Ink and heat emboss with Silver Embossing Powder. Add a 3/4 x 4 strip of the Flower Garden Foil Sheet to the bottom.


I love this foil paper with the embossed flowers, it’s gorgeous.


Supply List

You can click on the item to purchase it from my Online Store.

Pop Out Swing Cards

Isn’t this birthday card with that little raccoon peeking out so cute? I used the Peekaboo Forest Stamp Set which works so well with this Pop Out Swing Card. Of course, I love the Thanks card with those pretty flowers!


Watch the video to see step by step instructions to make this design.

Click on the button below to get a printable pdf with measurements and instructions.


This card was made using the Spotlight On Nature Bundle. The background layer was embossed using the Damask Designs Embossing Folder, so pretty.


I used the Peekaboo Forest Stamp Set and Nests of Winter Designer Series Paper to make this cute kid’s Birthday Card.


Supply List

You can click on the item to purchase it from my Online Store.

Feathered Fun - Color Combo

When I saw this week’s color combo, I knew I wanted to make a card with the new Feathered Fun Stamp Set. This is one of our Reversible Stamp Sets where you can use the back of the stamp to ink up and use to fill in the bird outline.


The Color Combo is from my May Inspiration Calendar - Darling Duckling, Lemon Lime Twist and Pumpkin Pie.


Tips & Instructions

  • Darling Duckling Card Base - 5 1/2 x 8 1/2, score at 4 1/4

  • Lemon Lime Twist Cardstock - die cut using the Sentimental Framing Dies. Adhere the frame to the card base.

  • Use the Sentimental Framing Dies to cut again from Basic White Cardstock. Use the inside piece to stamp the birds. Use the reverse side of the stamp and ink it up with Darling Duckling Ink. Stamp off (stamp on a piece of scrap to get a layer of ink off). Stamp the detailed side of the bird over the image.

  • Color the birds with Stampin Blends Markers leaving some of the Darling Duckling colors there. I used Lemon Lime Twist and Pumpkin Pie.

  • Stamp sentiment in Pumpkin Pie ink. The sentiment is from the Sentimental Frames Stamp Set.

  • Adhere the layer to the card with Dimensionals.

  • Add some Darling Duckling Flat Pearls.


On the inside layer (4 x 5 1/4), stamp sentiment in Pumpkin Pie Ink. Stamp the reverse side of the bird in Darling Duckling Ink, stamping off on scrap paper first. Stamp the detailed image over in Black Memento Ink. Color with Stampin’ Blends Markers.


I love the details on the Sentimental Framing Dies with the stitching and the dot piercing.


Supply List

You can click on the item to purchase it from my Online Store.

Sketch Challenge - Feathered Fun

I used the Feathered Fun Stamp Set to make this sweet Anniversary Card for the weekly sketch challenge. Those little birdies are so cute!


Here’s the sketch I used. You can see all the projects posted for this week’s challenge by clicking on the sketch below.

 
https://www.splitcoaststampers.com/gallery/showgallery.php?cat=all&si=SC1061&what=keywords
 

Tips & Instructions

  • Thick Basic White Card Base - 5 1/2 x 8 1/2, score at 4 1/4

  • Crumb Cake Layer - 4 x 5 1/4, emboss using the Birch Wood 3D Embossing Folder and adhere to the card base.

  • Use the largest and second largest square dies from the Stylish Shapes Dies to cut a frame. Do this by laying the dies together leaving equal space between the dies and die cut a piece of Pecan Pie Cardstock. You will have an extra square that you can save for another project. Cut the frame into 2 corner pieces with an angle on all the ends.

  • Die cut another square from Basic White Cardstock using the second from largest square die.

  • Stamp the birds on the white square from the Feathered Fun Stamp Set in Black Memento ink. Color with Stampin’ Blends Markers. I used Balmy Blue, Peach Pie and Crumb Cake. Stamp the branch in Pecan Pie ink.

  • Adhere the stamped square to the card with Dimensionals.

  • Adhere the 2 corner frame pieces to the card.

  • Die cut the sentiment label from Basic White Cardstock using the Stylish Shapes Die. Stamp with Pecan Pie ink. The sentiment is from the Mixed Labels Stamp Set. Adhere to the card with Dimensionals.

  • Add 3 Adhesive-Backed Textured Dots.


On the inside layer (4 x 5 1/4), use the Lifetime Of Love to stamp sentiment in Pecan Pie Ink and floral image in Black Memento Ink. Color with Stampin’ Blends Markers. I used Granny Apple Green, Lemon Lolly and Peach Pie.


I love these birds, they make me happy!!!


Supply List

You can click on the item to purchase it from my Online Store.

Sketch Saturday - Detailed Succulent

I used some retiring products for today’s Sketch Challenge. The Detailed Succulent and Hooray For Surprises are both on the Last Chance List and marked down. These are great sets.


Here’s the sketch I used from the Atlantic Hearts Sketch Challenge.


Tips & Instructions

  • Blackberry Bliss Card Base - 5 1/2 x 8 1/2, score at 4 1/4

  • Basic White Layer - 4 x 5 1/4

  • Stamp the succulent images in Berry Burst, Soft Sea Foam and Blackberry Bliss. I masked them as I stamped starting with the large image.

  • Adhere the layer to the card base.

  • Stamp the sentiment on a 3/4” strip of Basic White Cardstock and banner one end.

  • Cut a 1” strip of Blackberry Bliss Cardstock and banner one end making it a little longer than the white strip. Adhere them together and then to the card with Dimensionals.

  • Add some Iridescent Basic Pearls to the card.


On the inside layer (4 x 5 1/4), stamp the succulent images like you did on the card front. Stamp the sentiment in Blackberry Bliss ink. The sentiment is from the Hooray For Surprises Stamp Set.


I love succulents, so this stamp set was right up my alley!


Supply List

You can click on the item to purchase it from my Online Store.

Bendy Fun Fold Cards

These Bendy Fun Fold Cards are pretty and easy to make. They sit up so nicely to display them.


Watch the video to see step by step instructions to make this design.

Click on the button below to get a printable pdf with measurements and instructions.


This card was made using the Woven Textures Designer Series Paper and You Are Remarkable Stamp Set. The sentiment on the strip is from the Textured Notes Stamp Set.


I used brand new products from the new The Beautiful Gallery Suite Collection which is amazing. The Cardstock is Cloud Cover and the Ink is Secret Sea. These are two of the new In Colors from the upcoming Annual Catalog. These products will be available for purchase starting May 6, 2025 and are not included in the supply listed.  


Supply List

You can click on the item to purchase it from my Online Store.

In Color Club & Paper Share

With every new Annual Catalog Stampin' Up! releases 5 new In Colors. 

An easy way to get all the products for each color is to join my In Color Club. Each month receive products for one new color and after 5 months, you'll have them all. Below are the details. 


Here's How It Works:

  • $60 each month, I will send you a PayPal request.

  • 5 month commitment

  • Add on Stampin' Blends Combo for $11 each month

  • Get Free Foiled Frames & Labels Ephemera Pack (an $8 value) with your 5th month.

Email  to patti@pspapercrafts.com to join.


Join my Paper Share & get a sample of the new Designer Series Paper from the Annual Catalog and Online Exclusives. My Paper Share includes 96 pieces of 6x6 Designer Series Papers (1/4 pack of each paper).

  • Kintsugi Inspirations - 12 sheets 

  • Florals In Blooms - 12 sheets 

  • Turtley Cute - 12 sheets 

  • Beautiful Gallery - 12 sheets 

  • Boho Vibes - 12 sheets 

  • Floral Impressions - 12 sheets 

  • Celebratory Sips - 12 sheets 

  • Irresistible Designs Specialty Paper - 6 sheets 

  • Flower Garden Foil - 6 sheets 

FREE - 10 new In Color Card Bases (2 each of 5 colors)

Get your hands on these new papers for $45, includes shipping. 

Order & Pay by May 5.

Schedule:

  • May 5 - deadline to pay 

  • May 6 -I will order all the paper

  • I will cut, label and package all paper shares

  • May 20 (or earlier) - I will start shipping paper shares (assuming there are no backorders)

Email patti@pspapercrafts.com to join.

Sunrise Sailing - Color Combo

Wow, I’m loving the Sunrise Sailing Bundle which is a new Online Exclusive coming out May 6, 2025. There’s a Hybrid Embossing Folder that will die cut and emboss the sailboat along with a beautiful background.


I made this card using the Color Combo from my May Inspiration Calendar - Melon Mambo, Soft Sea Foam and Pretty Peacock.

You can get my calendar each month when you subscribe to my email list.


Tips & Instructions

  • Pretty Peacock Card Base - 5 1/2 x 8 1/2, score at 4 1/4

  • Basic White Layer - 4 x 5 1/4

  • Soft Sea Foam Layer - 1 1/2 x 4, emboss using the bottom area of the Sunrise Sailing Hybrid Embossing Folder. Adhere to the bottom of the white layer.

  • Basic White - 3 x 3 1/2 - stamp the sailboat in Black Memento Ink. Color with Light Melon Mambo and Light Pretty Peacock Stampin’ Blends Markers. Place the stamped piece and coordinating die in the Sailing Hybrid Embossing Folder and run through your die-cutting machine. Adhere to the card with Dimensioals.

  • Use a Light Sea Foam Stampin’ Blends Marker to color scraps of Basic White and then die cut with the cloud dies. Adhere them to the white layer letting them hang off the edge and then trim the overhang. Adhere the layer to the card base.

  • Die cut the 3 seagulls from Pretty Peacock Cardstock and adhere to the card.

  • Stamp the sentiment on a 1/2” strip of Basic White in Melon Mambo Ink and banner each end. Adhere to the card with Dimensionals.


On the inside layer (4 x 5 1/4), stamp the sailboat in Pretty Peacock Ink. Stamp the boat in Pretty Peacock Ink but stamp it off first to get a lighter shade. Stamp the sail stripes in Soft Sea Foam Ink. Stamp the sentiment in Melon Mambo Ink and 3 seagulls in Pretty Peacock Ink.


This is a great stamp set for masculine cards.


The Sunrise Sailing Bundle will be available for purchase starting May 6, 2025 as a new Online Exclusive.