


Campology - You Brighten My Path
I love the sentiment on this card. Who in your life brightens your path? Wouldn’t you love to send them a card to let them know?

The Campology Stamp Set has some great images for the outdoors type but the sentiments are great and the trees are so pretty.

Tips & Instructions
Gray Granite Card Base - 5 1/2 x 8 1/2, score at 4 1/4
Seaside Spray Layer - 5 3/8 x 4 1/8
Whisper White Layer - 5 1/4 x 4
Sponge the white layer lightly with Daffodil Delight and Seaside Spray Ink Pads
Stamp trees with Pear Pizzazz Ink
Stamp sentiment with Gray Granite Ink and cut with Tasteful Labels Dies
Adhere layers to card base and sentiment label using Dimensionals

On the inside stamp lantern image with Gray Granite Ink and color with Light Daffodil Delight Stampin’ Blends Marker. Add some Wink Of Stella to the light.

Supply List

Are you ready to start making your Christmas Cards? Join my Christmas Card Club and let’s get started!!!

Here’s how it works:
Each Month you will receive Card Kits to make 16 cards, 8 each of 2 designs.
Cost is $35 each month (September, October, November).
Pay by the 25th of the prior month (i.e. August 25 for September Card Kits).
Optional add on of stamp set and/or bundle will be offered.
If you complete all 3 months, you will receive a bonus of a $15 shopping spree from my online store.
Email me to reserve your spot - patti@pspapercrafts.com
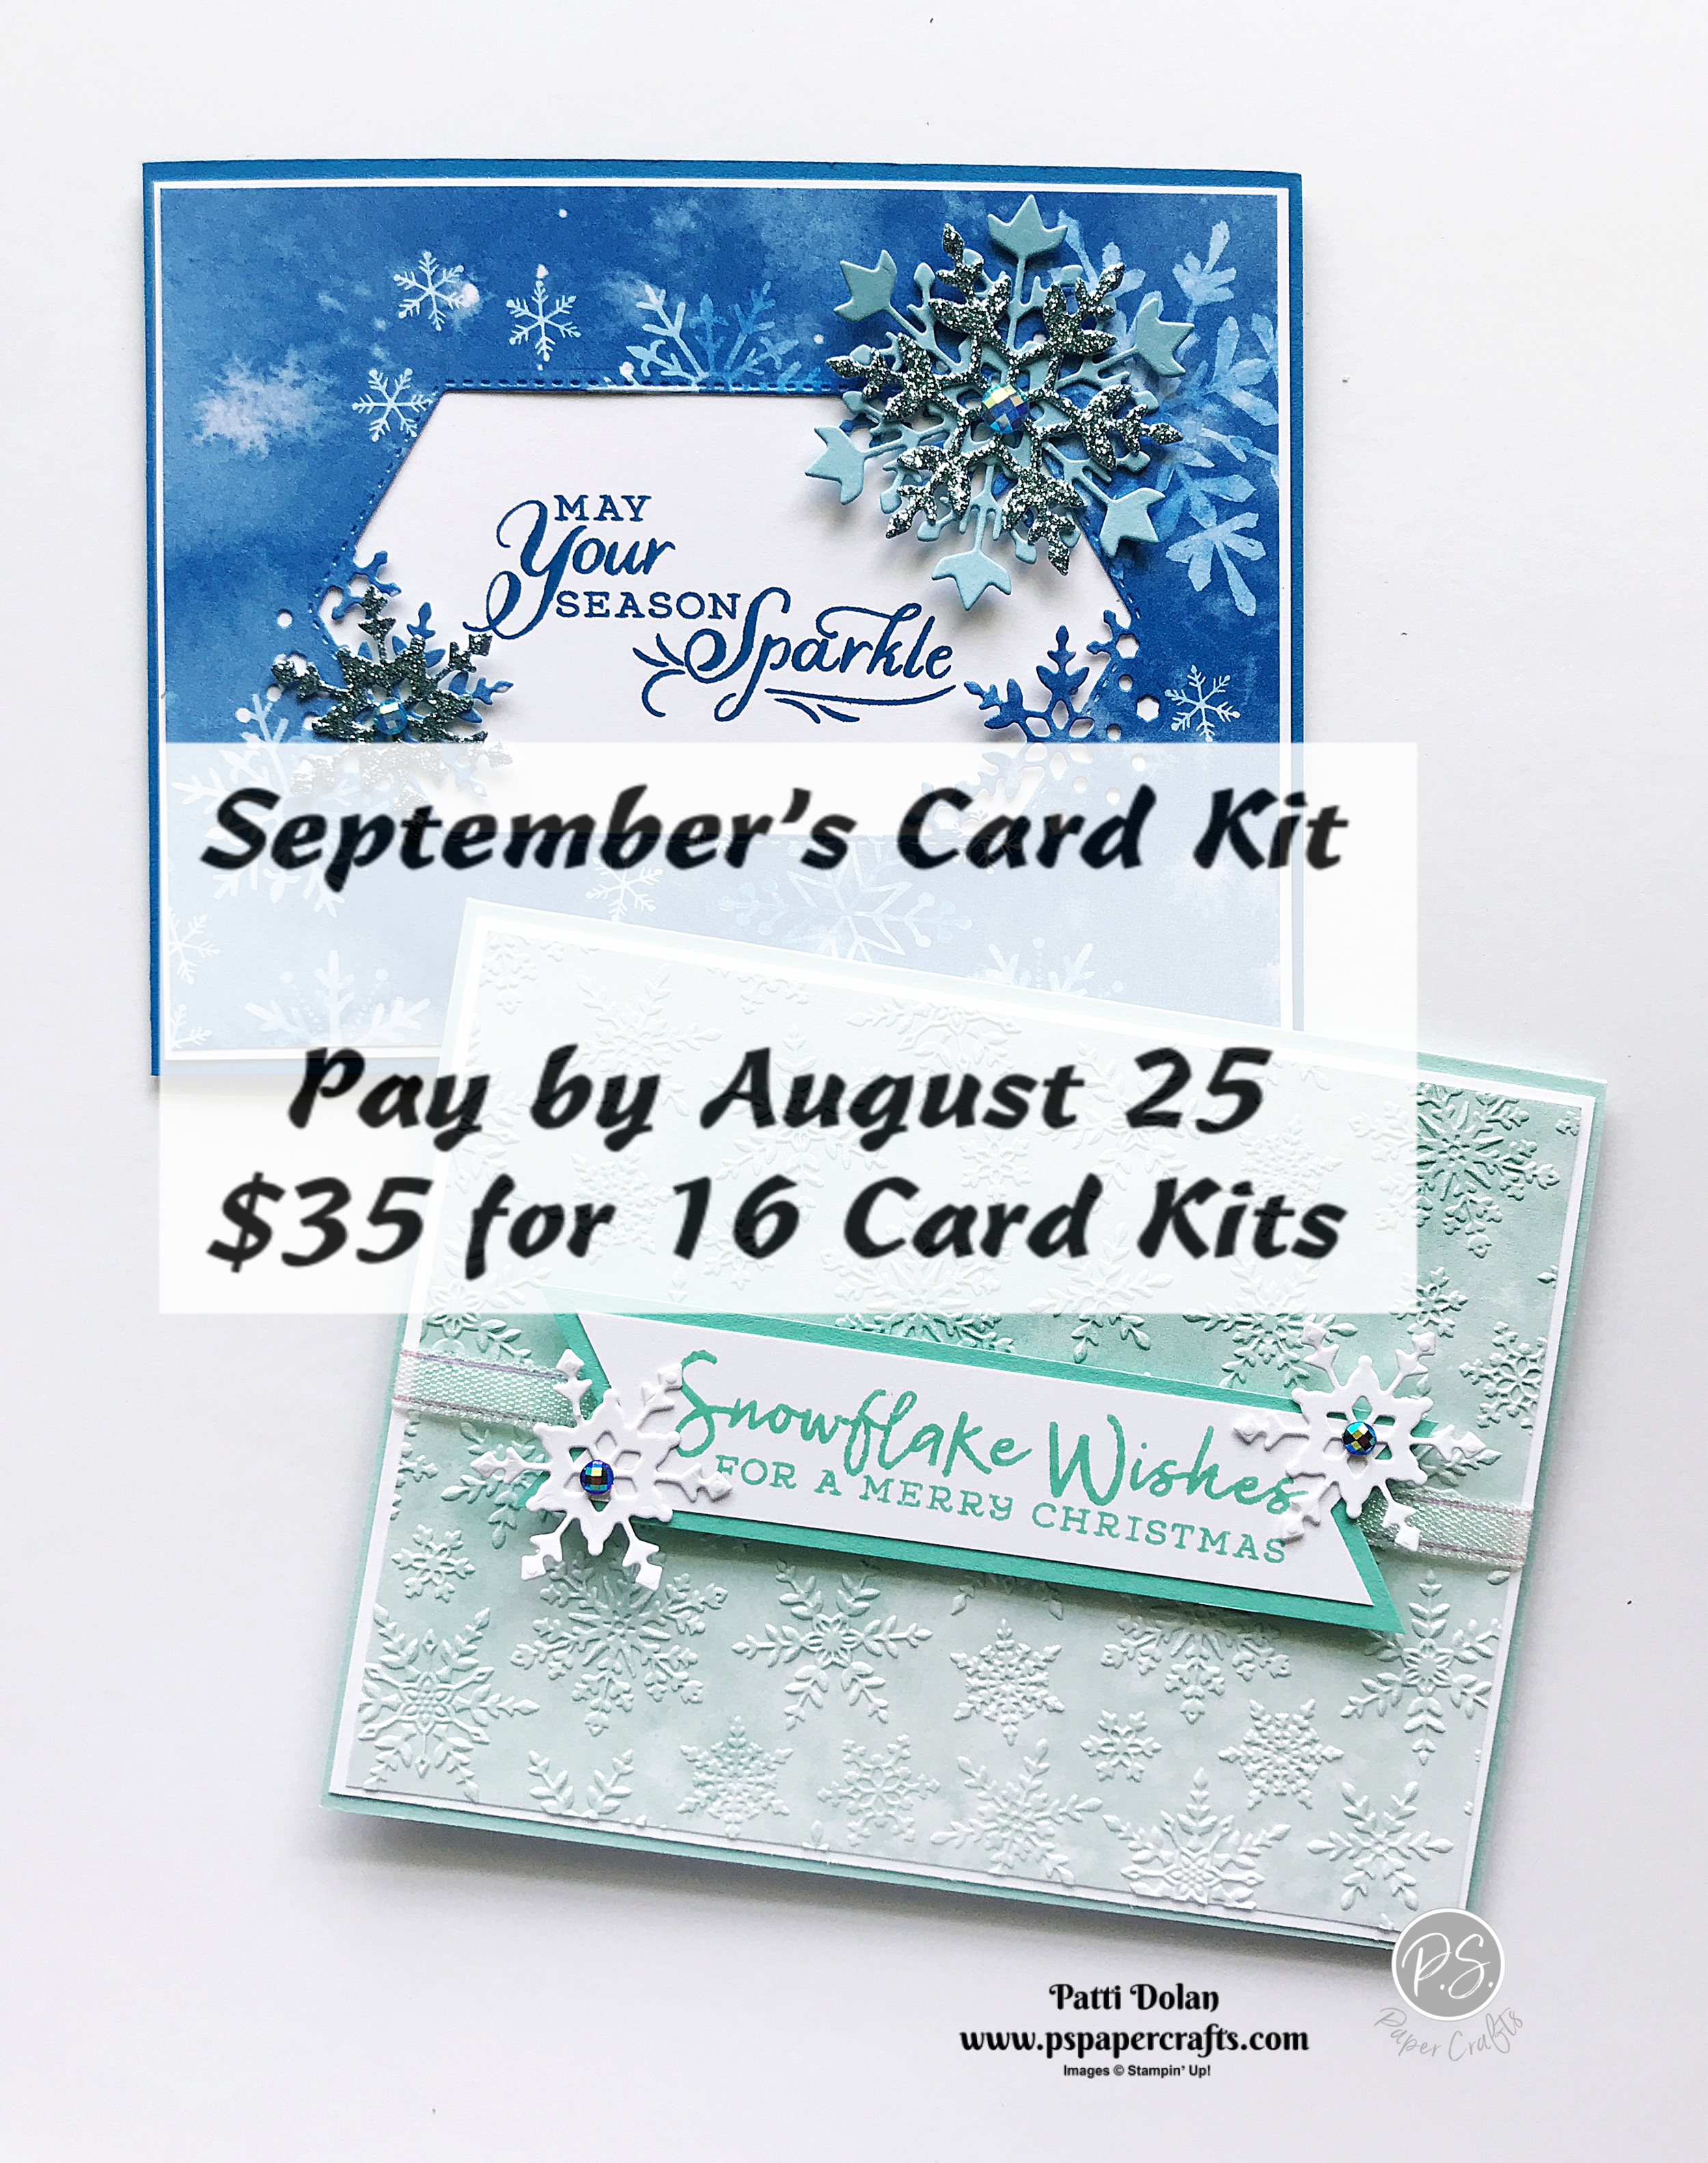
September’s Kit Includes:
16 Card Bases & Envelopes
Layers, Embossed Layers & Die Cuts
Full Package of Snowflake Splendor 1/4” Ribbon (10 yards)
Full Package of Blue Adhesive-Backed Gems (120 pieces)
PDF complete with pictures, measurements and step-by-step instructions
Exclusive access to video demonstrating how to make the card
Below are the cards you will make with September’s Card Kit. You will get kits to make 8 of each design, totaling 16 cards.


Choose Your Package:
Basic Card Kit - $35
Add On Winter Snow Embossing Folder - $7.50 (total $42.50)

Add on Snowflake Wishes Photopolymer Stamp Set - $26 (total $61)

Add on Snowflake Wishes Bundle (Stamp Set & Dies) - $55.75 (Total $90.75)

Email me to reserve your spot - patti@pspapercrafts.com

Sketch Saturday - Queen Anne's Lace
When I saw this sketch, I immediately thought of the Queen Anne’s Lace Stamp Set. The flower images are so delicate and pretty, just like the flowers are.

The sketch is from the CAS(E) This Sketch Challenge from Splitcoaststampers. I love this sketch and was happy to use it to make today’s card.

Tips & Instructions
Old Olive Card Base - 5 1/2 x 8 1/2, score at 4 1/4
Purple Posy Layer - 5 1/8 x 3 7/8
Whisper White Layer - 5 x 3 3/4
Stamp Flower images as shown with Old Olive Ink
Color Flowers with Dark Purple Posy Stampin’ Blend Marker
Adhere layers to card base
Whisper White Strip - 3/4 x about 1 3/4, stamp sentiment and punch one end with Triple Banner Punch
Old Olive Strip - 7/8 x about 1 3/4, punch one end with Triple Banner Punch and adhere to sentiment layer and then adhere to card
Add 3 Butterfly Gems

I was happy how this card turned out; isn’t is pretty?

On the inside, stamp sentiment and flower image with Old Olive Ink. Color flowers with Dark Purple Posy Stampin’ Blends Marker.

Supply List

Autumn Leaves - Baby Wipe Technique
I love using the Baby Wipe Technique to make Autumn Cards. The Beautiful Autumn Stamp Set has some great leaf images for this technique.

On the video below, I’ll walk you through this technique if you’re not familiar. If you are, you can see how pretty these leaves are with the detailed stamp and the multi-color background.
Tips & Instructions
Old Olive Card Base - 5 1/2 x 8 1/2, score at 4 1/4
Whisper White Layer - 5 1/4 x 4
Old Olive Strip - 4 x 1, emboss with Greenery Embossing Folder
Stamp detailed leaf images with Rich Razzleberry and Old Olive Inks randomly on white layer
Fill in with Pine Cones stamping with Cinnamon Cider Ink
Fold a baby wipe and lay it on plastic, then add drops of ink from Ink Refills on the baby wipe (I used Calypso Coral, Daffodil Delight and Pear Pizzazz)
Press leaf background stamp on the baby wipe and then stamp on coordinating leaves
Stamp sentiment with Old Olive Ink on scrap of Whisper White and punch with Timeless Label Punch
Adhere embossed strip over stamped layer
Feed piece of ribbon through acorn and wrap ribbon around layer, adhering to the back
Adhere layer to card base
Adhere sentiment label with Dimensionals
Tie bow and adhere just above acorn using a Glue Dot

The metallic ribbon is a shiny, metallic grosgrain ribbon and it’s beautiful! Look how nice that Acorn Trinket looks with it.

I’m really happy with how this came out. Don’t you just love Fall!!!
On the inside stamp pinecone and leaves across the bottom and top using Cinnamon Cider, Rich Razzleberry and Old Olive Inks.

Supply List

Beautiful Autumn Grateful For You Card
Isn’t this a fun card? I love the leaves and acorns punched from the Plaid Tidings Designer Series Paper.

The Beautiful Autumn Stamp Set can be bundled with the coordinating Autumn Punch Pack to save 10%. The stamps can be stamped with the detail on their own or layered with the background stamp.

Tips & Instructions
Rich Razzleberry Card Base - 5 1/2 x 8 1/2, score at 4 1/4
Crushed Curry Layer - 5 1/4 x 4
Sahara Sand Layer 5 x 3 3/4, adhere to Crushed Curry Layer
Wrap a piece of the Embroidered Ribbon around layers, adhere to back and adhere layer to card base
Stamp sentiment on Whisper White scrap and cut with smallest label die from Celebration Labels Dies (or you can use whatever punch or die you have on hand)
Punch a bunch of leaves and acorns from the Plaid Tidings Designer Series Paper using the Autumn Punch Pack
Cut heart from Rich Razzleberry scrap using the heart die from Celebration Labels Dies and adhere to sentiment label
Adhere sentiment label to card using Dimensionals
Adhere leaves on card (I used Mini Glue Dots but you can use whatever adhesive you have)

You can use any of the plaid patterns and colors and mix up the card base and layers depending on the colors you choose.

On the inside, stamp sentiment with Rich Razzleberry and the detailed leaves and acorn with Rich Razzleberry, Crushed Curry and Cinnamon Cider Inks.

Supply List

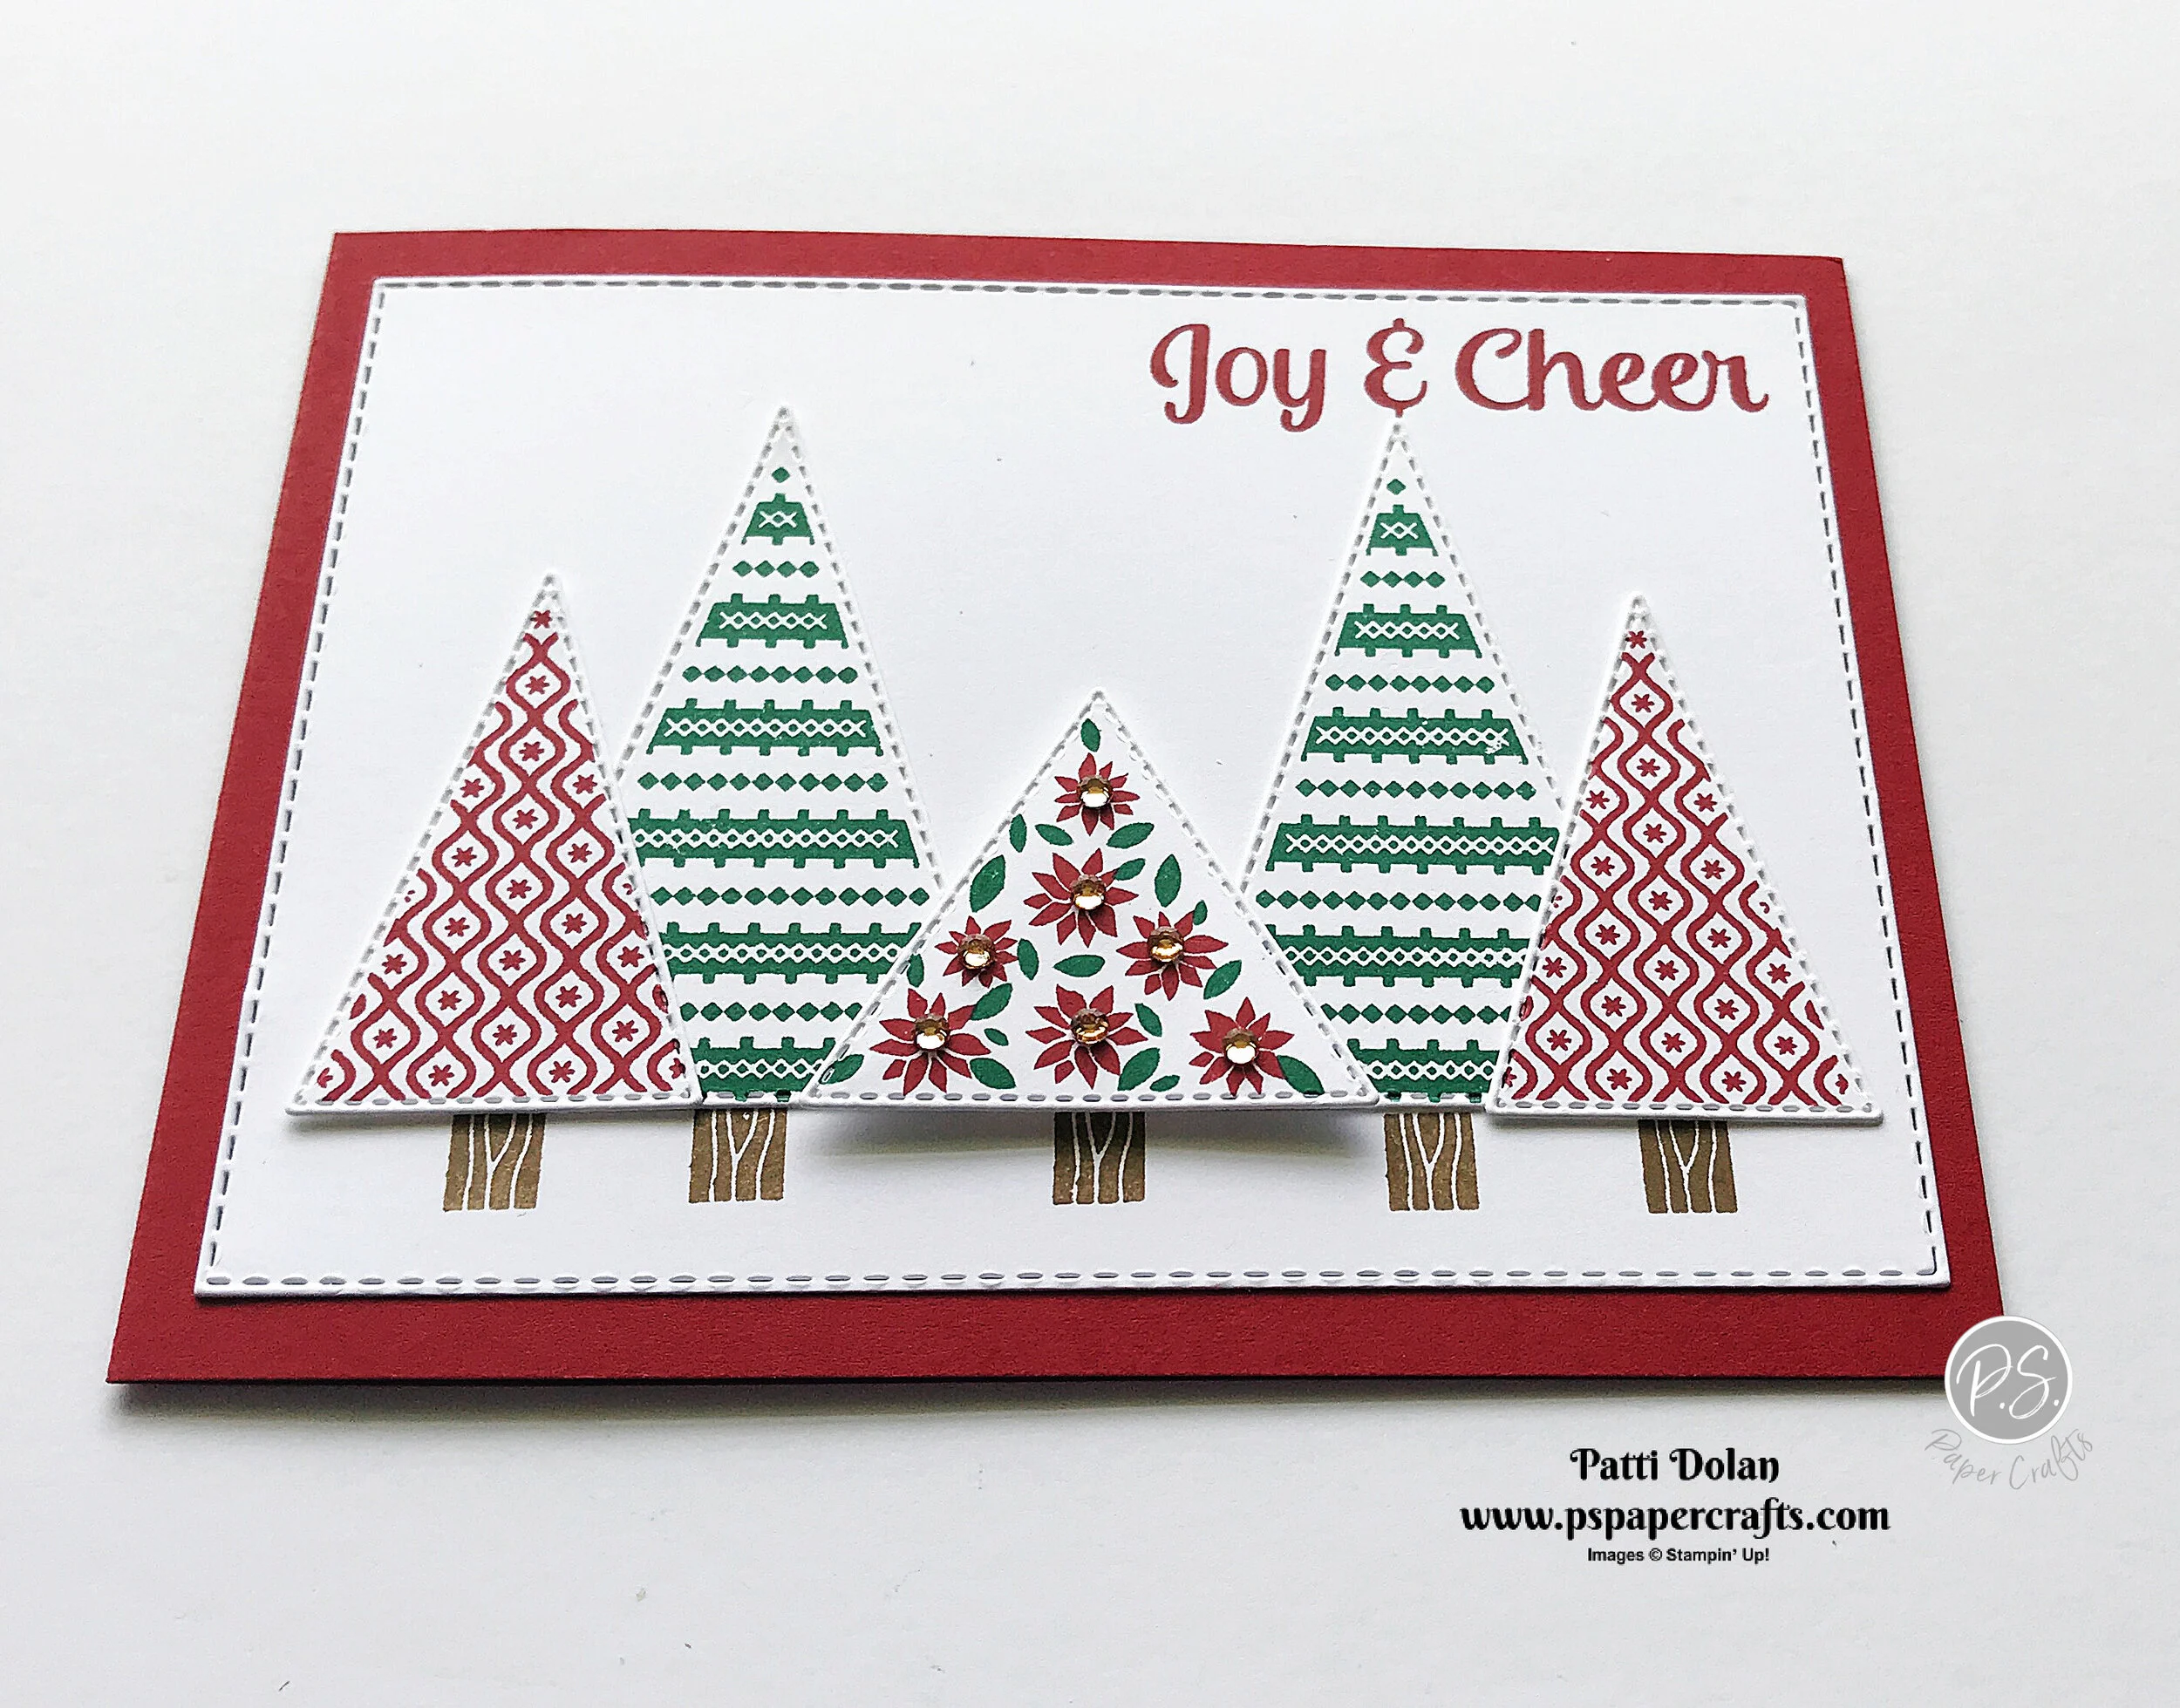
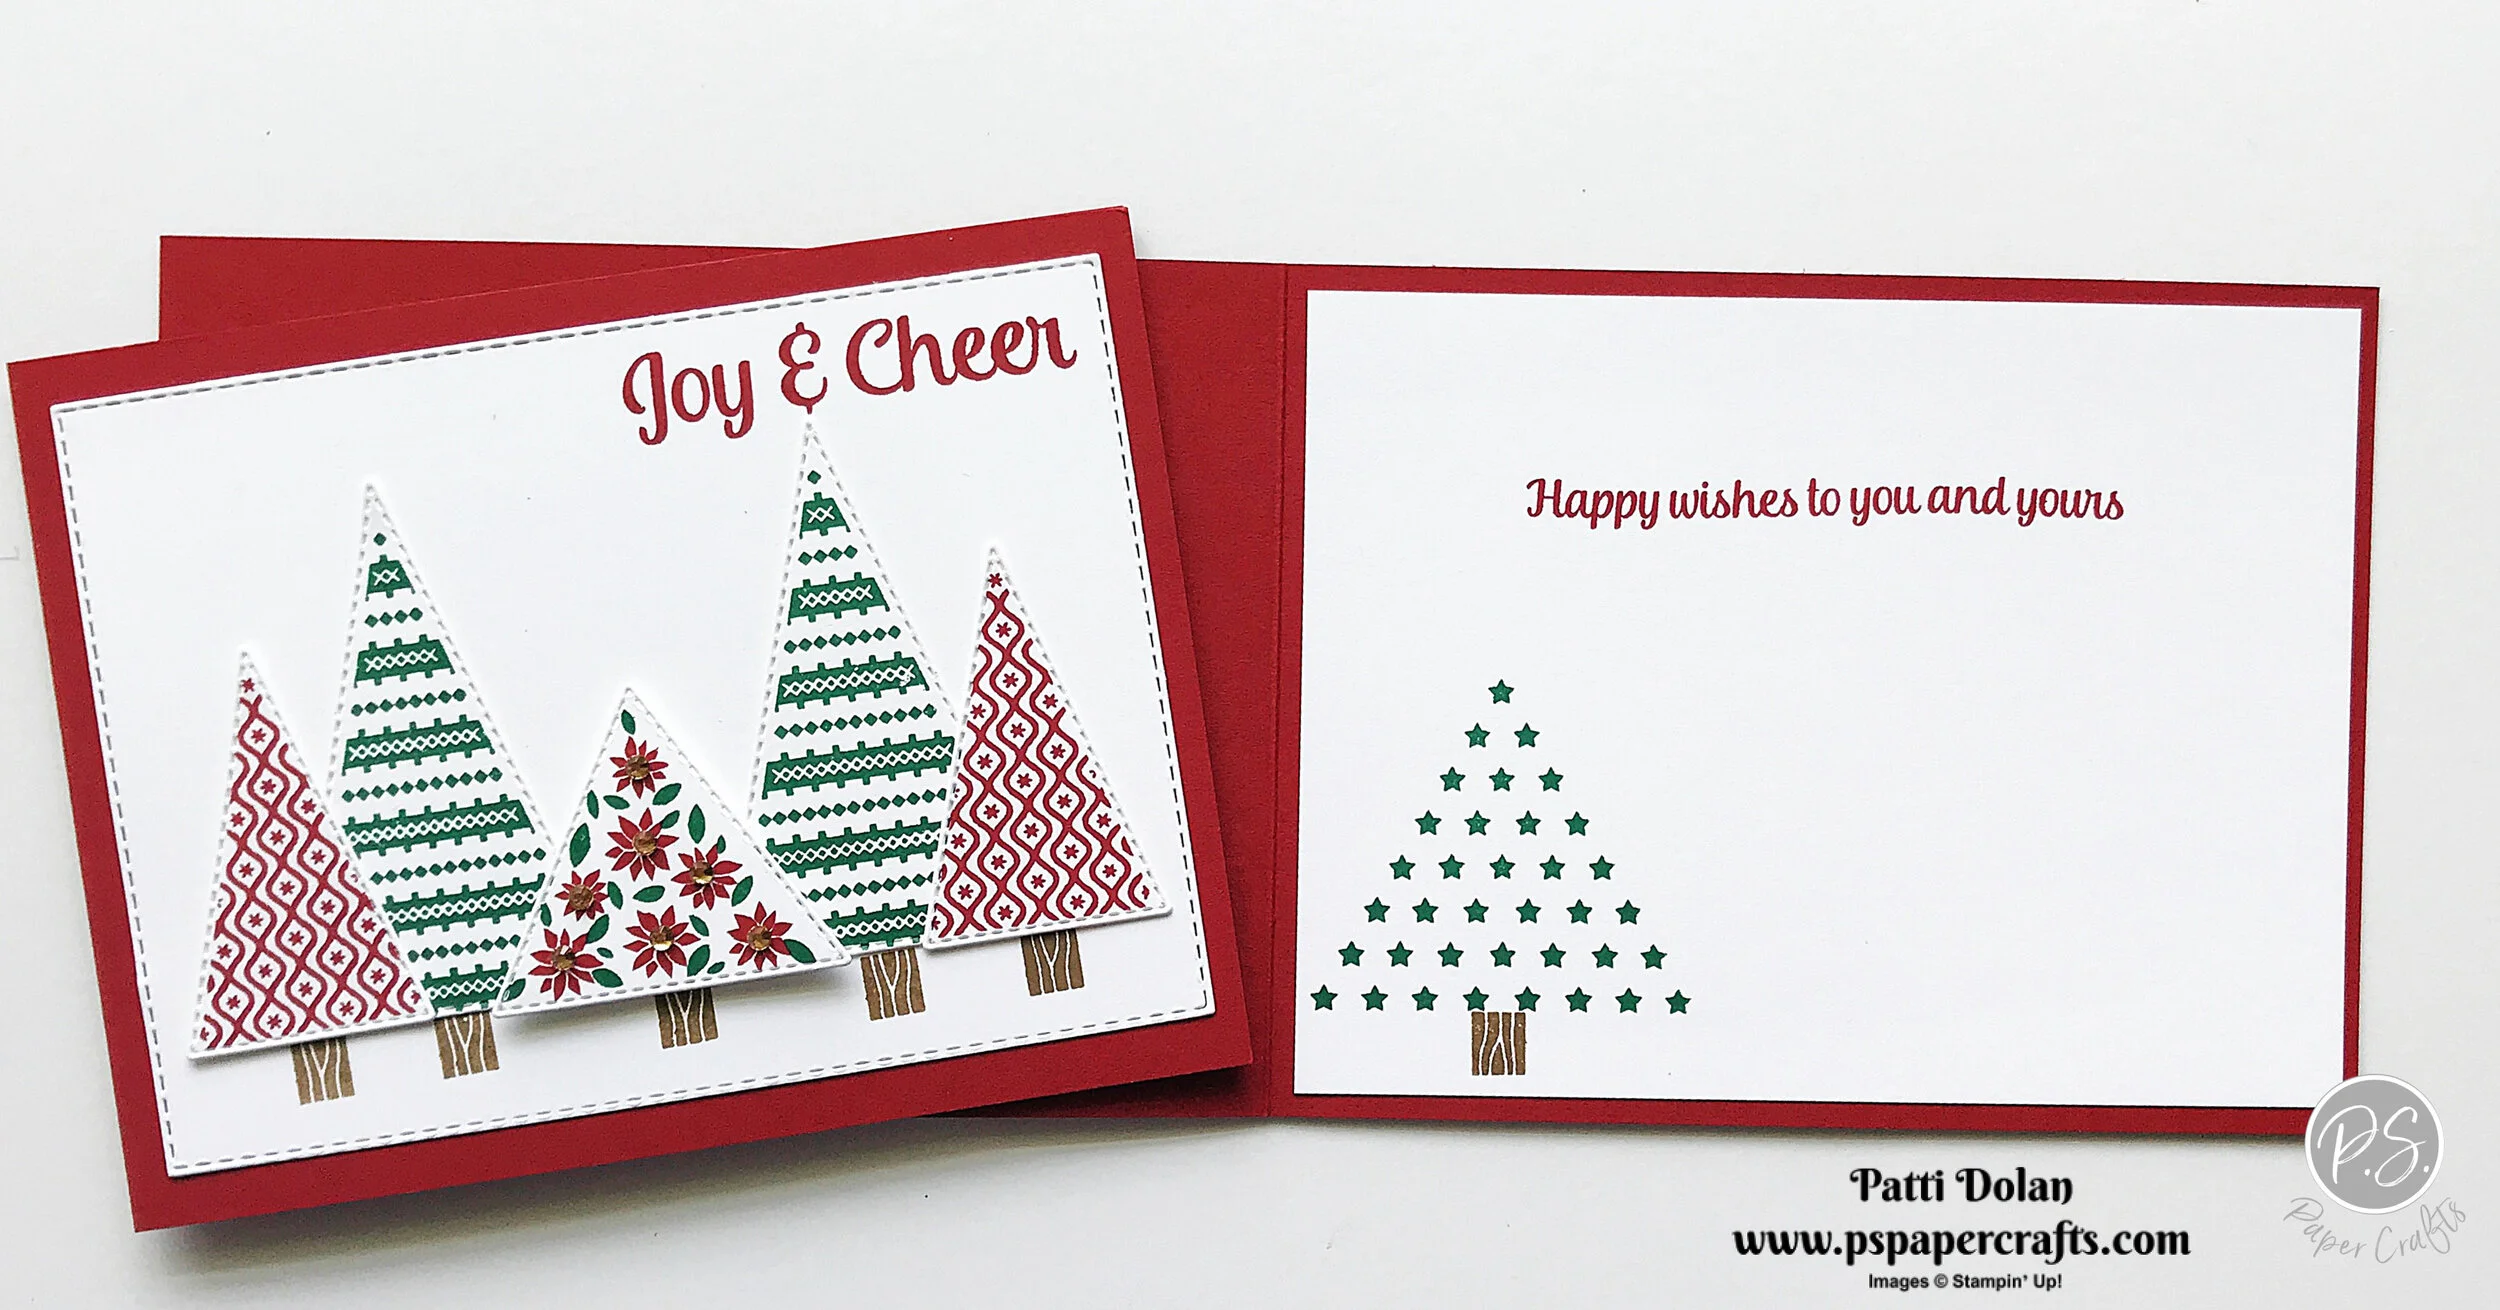
Fun Christmas Trees using Tree Angle Stamp Set & Stitched Triangles
These trees in the Tree Angle Stamp Set are so great. I love how crisp and sharp they stamp. The Stitched Triangles cut the trees out so perfectly.
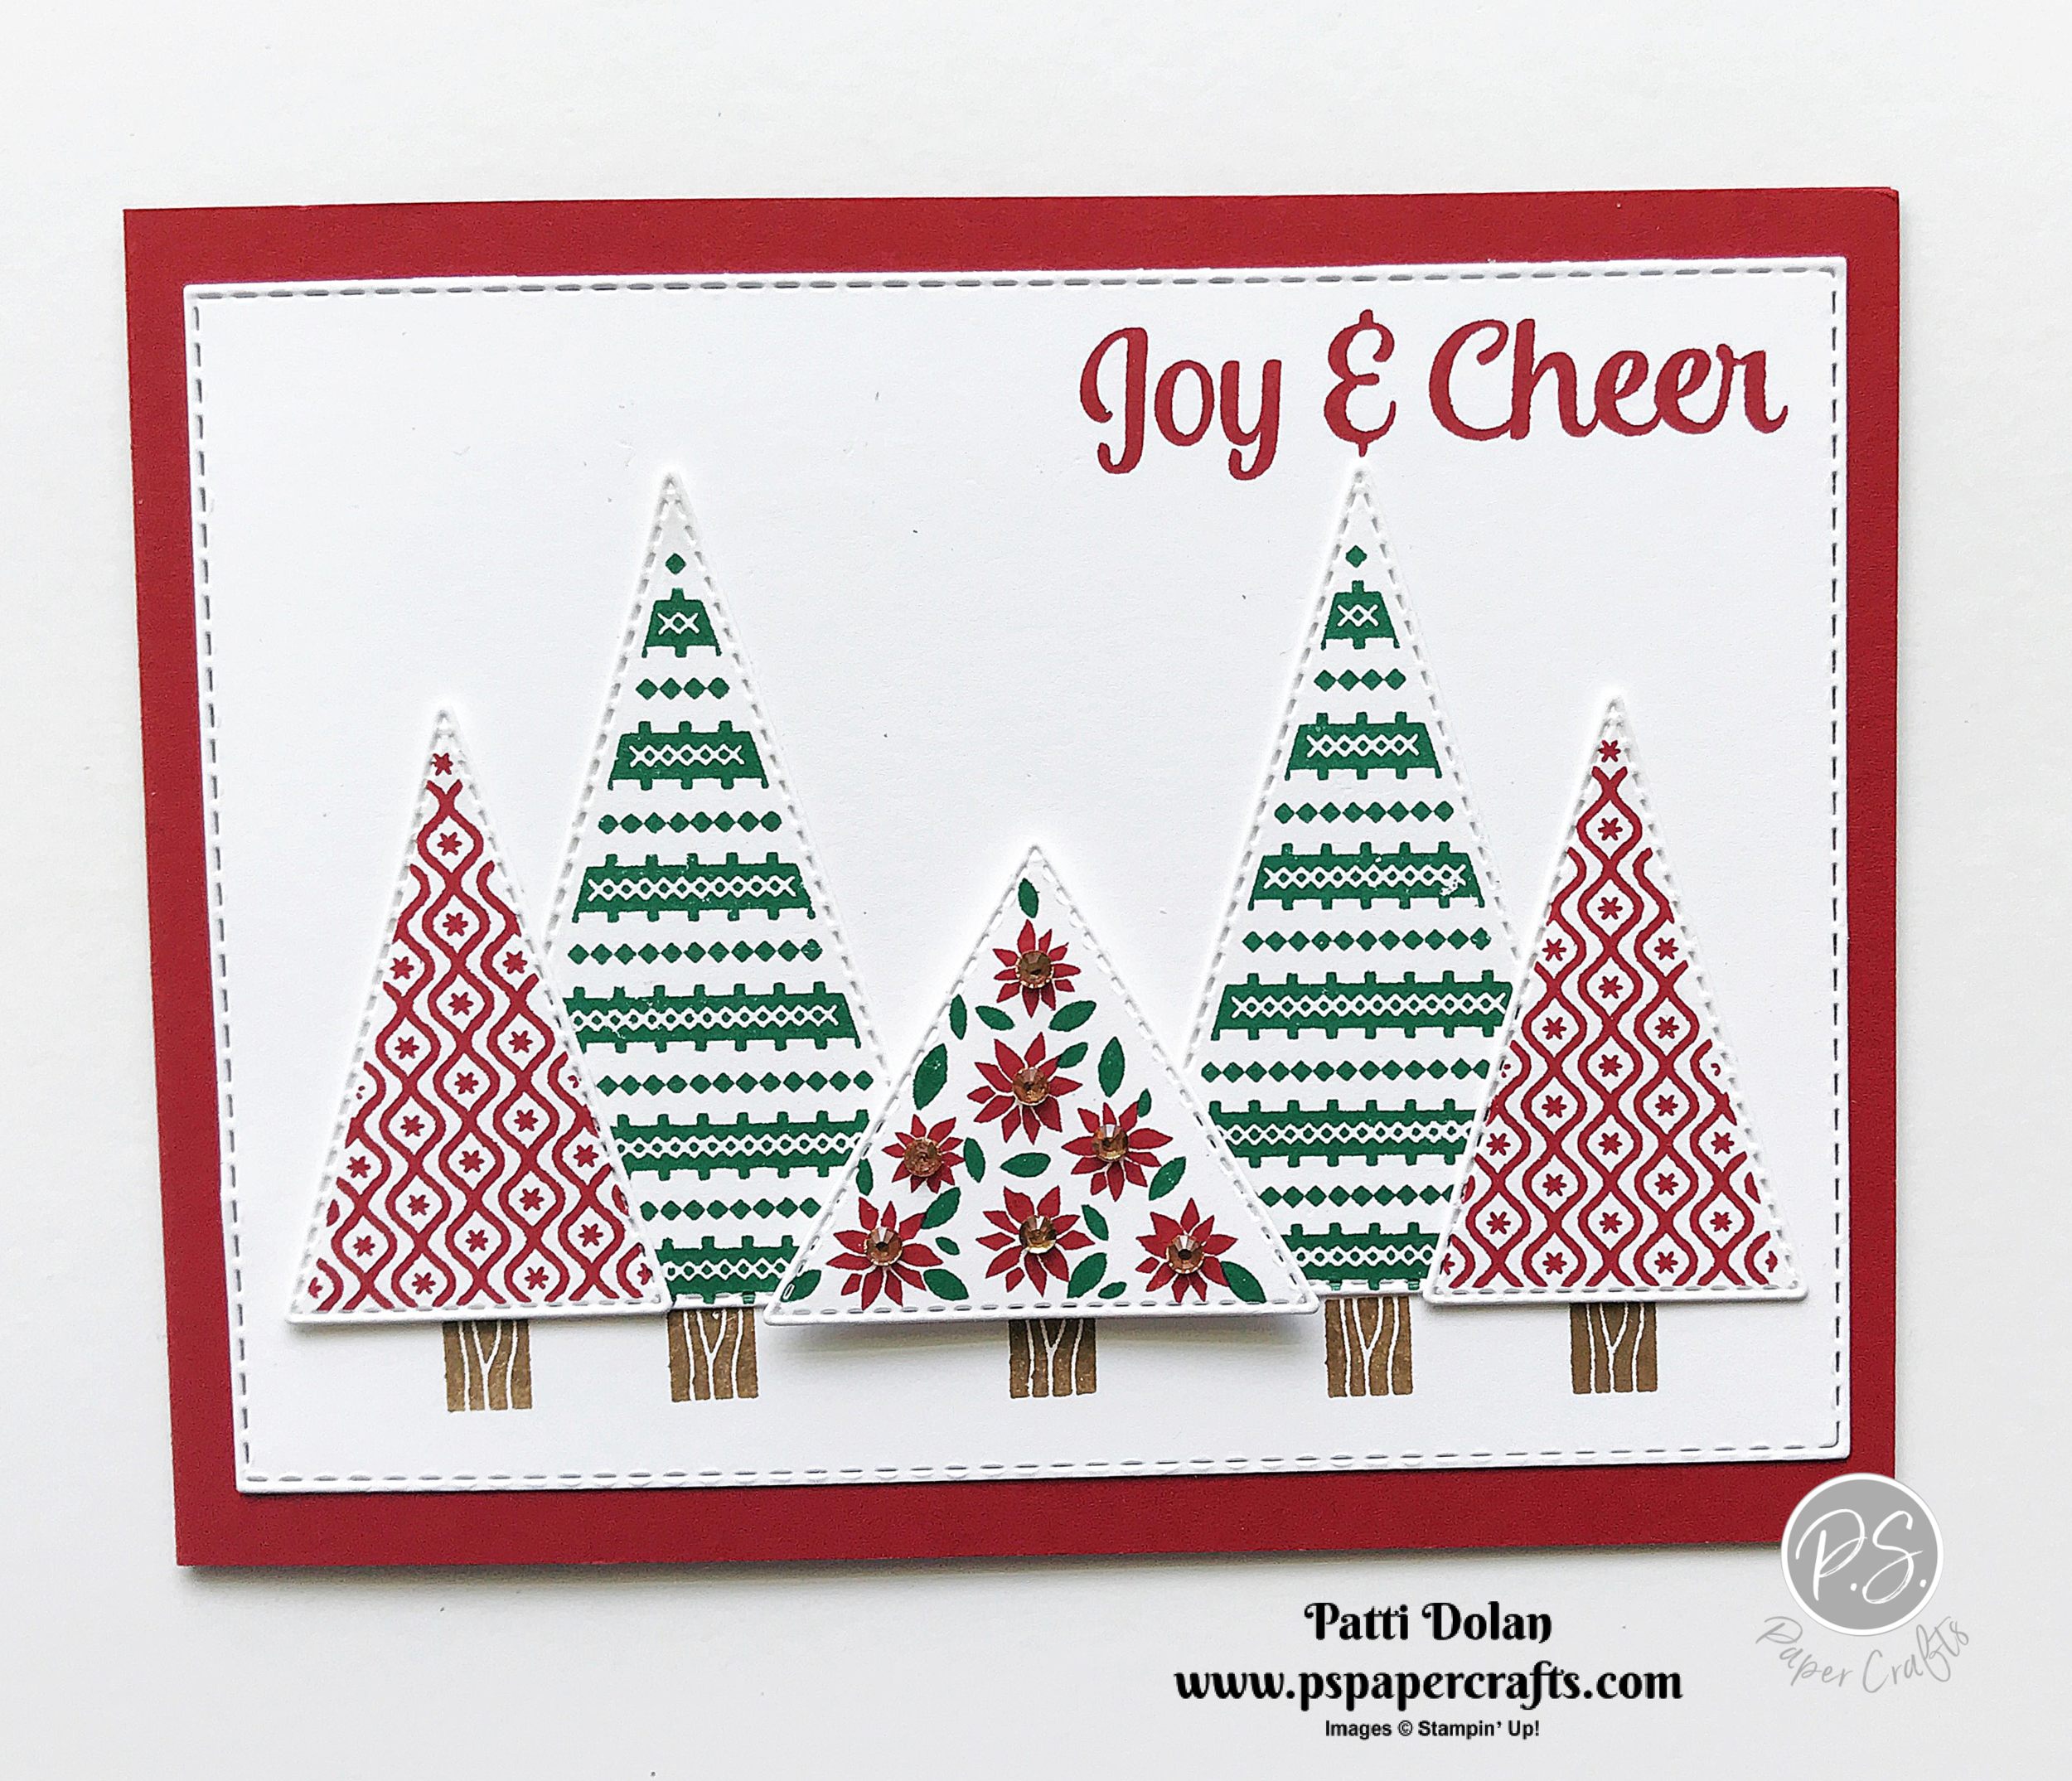
In the video I’ll show you how to make this card and highlight some of the features of the stamp set and dies.
Tips & Instructions
Cherry Cobbler Card Base - 4 1/2 x 11, score at 5 1/2 (side folding horizontal base)
Whisper White - cut with the largest Stitched Rectangle Die
Whisper White - stamp trees with Shaded Spruce and Cherry Cobbler Inks and cut with coordinating Stitched Triangle Dies
Stamp sentiment at the top right corner of rectangle with Cherry Cobbler Ink
Arrange trees on rectangle and move up just a bit so you can stamp the tree trunks below with Soft Suede Ink
Adhere trees above the trunks, using Dimensionals on the tree with the poinsettias
Adhere Champagne Rhinestones to center of poinsettias
Adhere layer to card base
On the inside stamp sentiment with Cherry Cobbler Ink. Stamp tree with Shaded Spruce and trunk with Soft Suede Inks.
Supply List

Important Updates From Stampin' Up!
Stampin’ Up! is launching their new Online Store on August 4, 2020. There are many new features and improvements in the new online store, and we’ve summarized some of them below:
The store is designed to work seamlessly on desktops, tablets, and mobile phones.
New and improved store navigation provides an updated and enhanced shopping experience.
The site utilizes new, larger imagery to better showcase our products and allow up-close details to be seen.
New landing pages tell our product stories better.
New sorting options and filters provide a more intuitive shopping experience, allowing customers to more easily find what they are looking for. The store’s organization and terminology are also more intuitive for new customers.
The site utilizes inventory status information to show customers what items will be retiring soon, have low inventory, or are backordered so they can make informed purchasing decisions.
Customers can mark their favorite items for later reference, and they can create and share personalized wish lists.
A new Quick Shop feature makes it easy to add items to your cart. We have also simplified the checkout process.
Your account information (Logon and Password) should stay the same.
Please do me a favor and make sure you see “Shopping with PATTI DOLAN" at the top left to be sure you are shopping with me.

The New Mini Catalog launches August 4th. This catalog has so many amazing products for all the upcoming holidays. I think you will love it. Watch my Blog to see videos and projects using the new products.
Email me if you need a catalog and I'll send one out to you. You can view an online version by clicking on the catalog picture on the right hand side of this post.

Don't forget to use your Bonus Days Coupons that you earned in July to shop in August. For every $50 you spent in July, you should have received a coupon code in an email from Stampin' Up! You can add those coupon codes when you check out with your order.

Just to add to all the exciting things going on this month, I'm giving away a free package of the Holiday Rhinestone Basic Jewels with a minimum order of $50 placed between August 4 and August 31, 2020.
USE HOST CODE YHP46NA7
This is in addition to the Loyalty Points you can earn and the free PDF I send out for ordering from my online store.

Sketch Saturday - Hippo Happiness
The animals in the Hippo Happiness Bundle are just so cute. I love that you can stamp with the same color to get the different shades for each animal. Just stamp direct for one layer and stamp off to get the lighter background layer.

The Sketch is from the CAS(E) This Sketch Challenge from Splitcoaststampers.

I used the Playing With Patterns Designer Series Paper which has some really fun patterns for backgrounds.

Tips & Instructions
Whisper White Card Base - 5 1/2 x 8 1/2, score at 4 1/4
Night Of Navy - 3 1/2 x 3 1/2 and a second piece at 3 1/2 x 1
Playing With Patterns Designer Series Paper - 3 3/8 x 3 3/8 and a second piece at 3 3/8 x 7/8
Adhere the Designer Series Paper pieces to the Night Of Navy pieces and adhere to card base leaving a space between.
Scrap of Night Of Navy, back with Foam Sheet and cut the “hooray” sentiment from Well Written Dies and adhere in space between pieces on the card.
Stamp Hippo with Highland Heather Ink on Whisper White scrap. Stamp the detailed image directly and stamp the background image after stamping off first (stamping first layer of ink on scrap). Stamp face using Black Memento Ink and cut with coordinating die.
Stamp lamb with Calypso Coral Ink following the same steps as you did with the hippo.
Stamp horse with Costal Cabana Ink following the same steps as you did with the hippo.
Adhere the animals to card using Dimensionals

On the inside
Night Of Navy Layer - 4 3/4 x 3 1/2
Whisper White Layer - 4 5/8 x 3 3/8
Stamp the sentiments (from A Grand Kid Stamp Set) with Coastal Cabana and Night Of Navy Inks
Stamp confetti (from Hippo Happiness Stamp Set) with Highland Heather Ink

Supply List

Love Of Leaves Birthday Card
I love the colors in this card; the different shades of Rich Razzleberry and the Brass Foil Sheets. It’s a great card for a fall birthday and would be perfect for a guy.
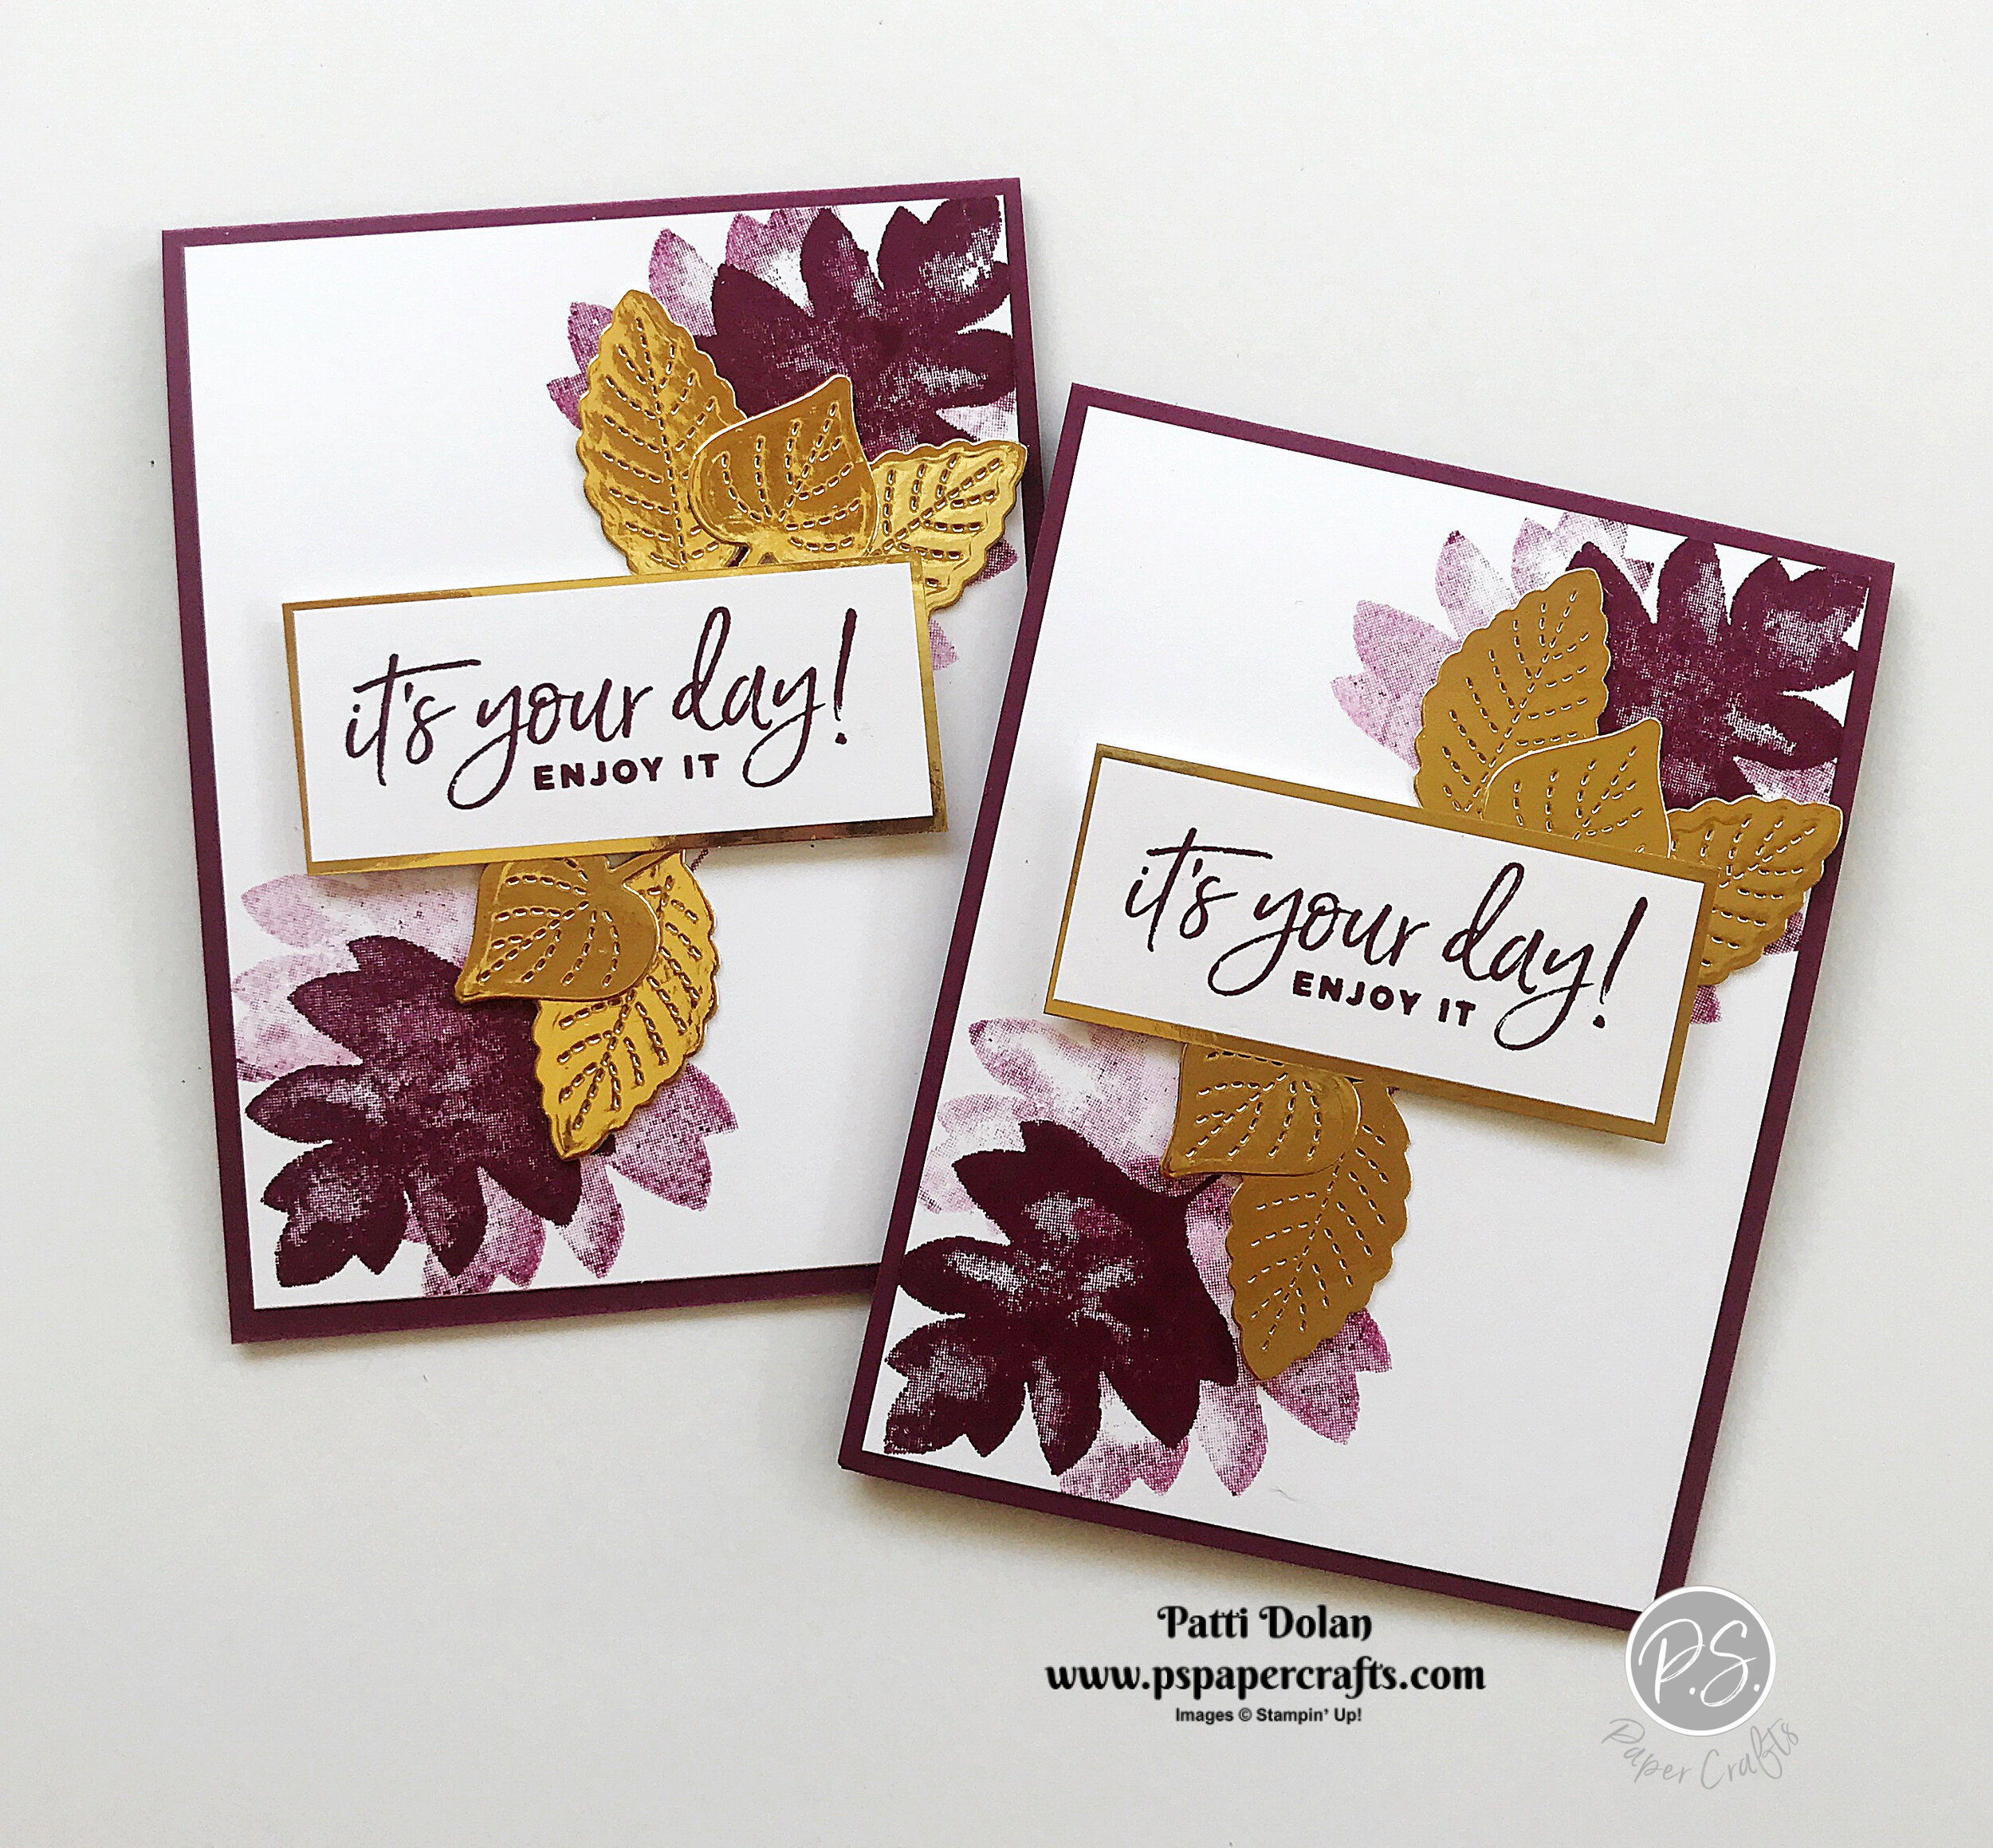
Watch the video to see how cool the Stitched Leave Dies are with the piece for cutting a stitched leaf and a piece that will emboss the leaf with veins, so pretty!
You can get some pretty shades of a color by stamping multiple times without re-inking.

Tips & Instructions
Rich Razzleberry Card Base - 4 1/4 x 11, score at 5 1/2 (top folding)
Whisper White Layer 5 5 1/4 x 4
Stamp 3 leaf images at the top right corner and bottom left corner, stamping each time without re-inking
Whisper White sentiment layer - 3 x 1 1/4, stamp sentiment (from Happiest Of Birthdays)
Brass Foil Sheet - 3 1/8 x 1 3/8, adhere to sentiment layer
Cut 5 leaves from Brass Foil Sheet using the Stitched Leaves Dies
Arrange leaves on card and adhere using the sentiment label to determine placement
Adhere sentiment label using Dimensionals

On the inside stamp sentiment and leaf images with Rich Razzleberry Ink, stamping off the leaf images on scrap first to get a lighter shade.

Supply List

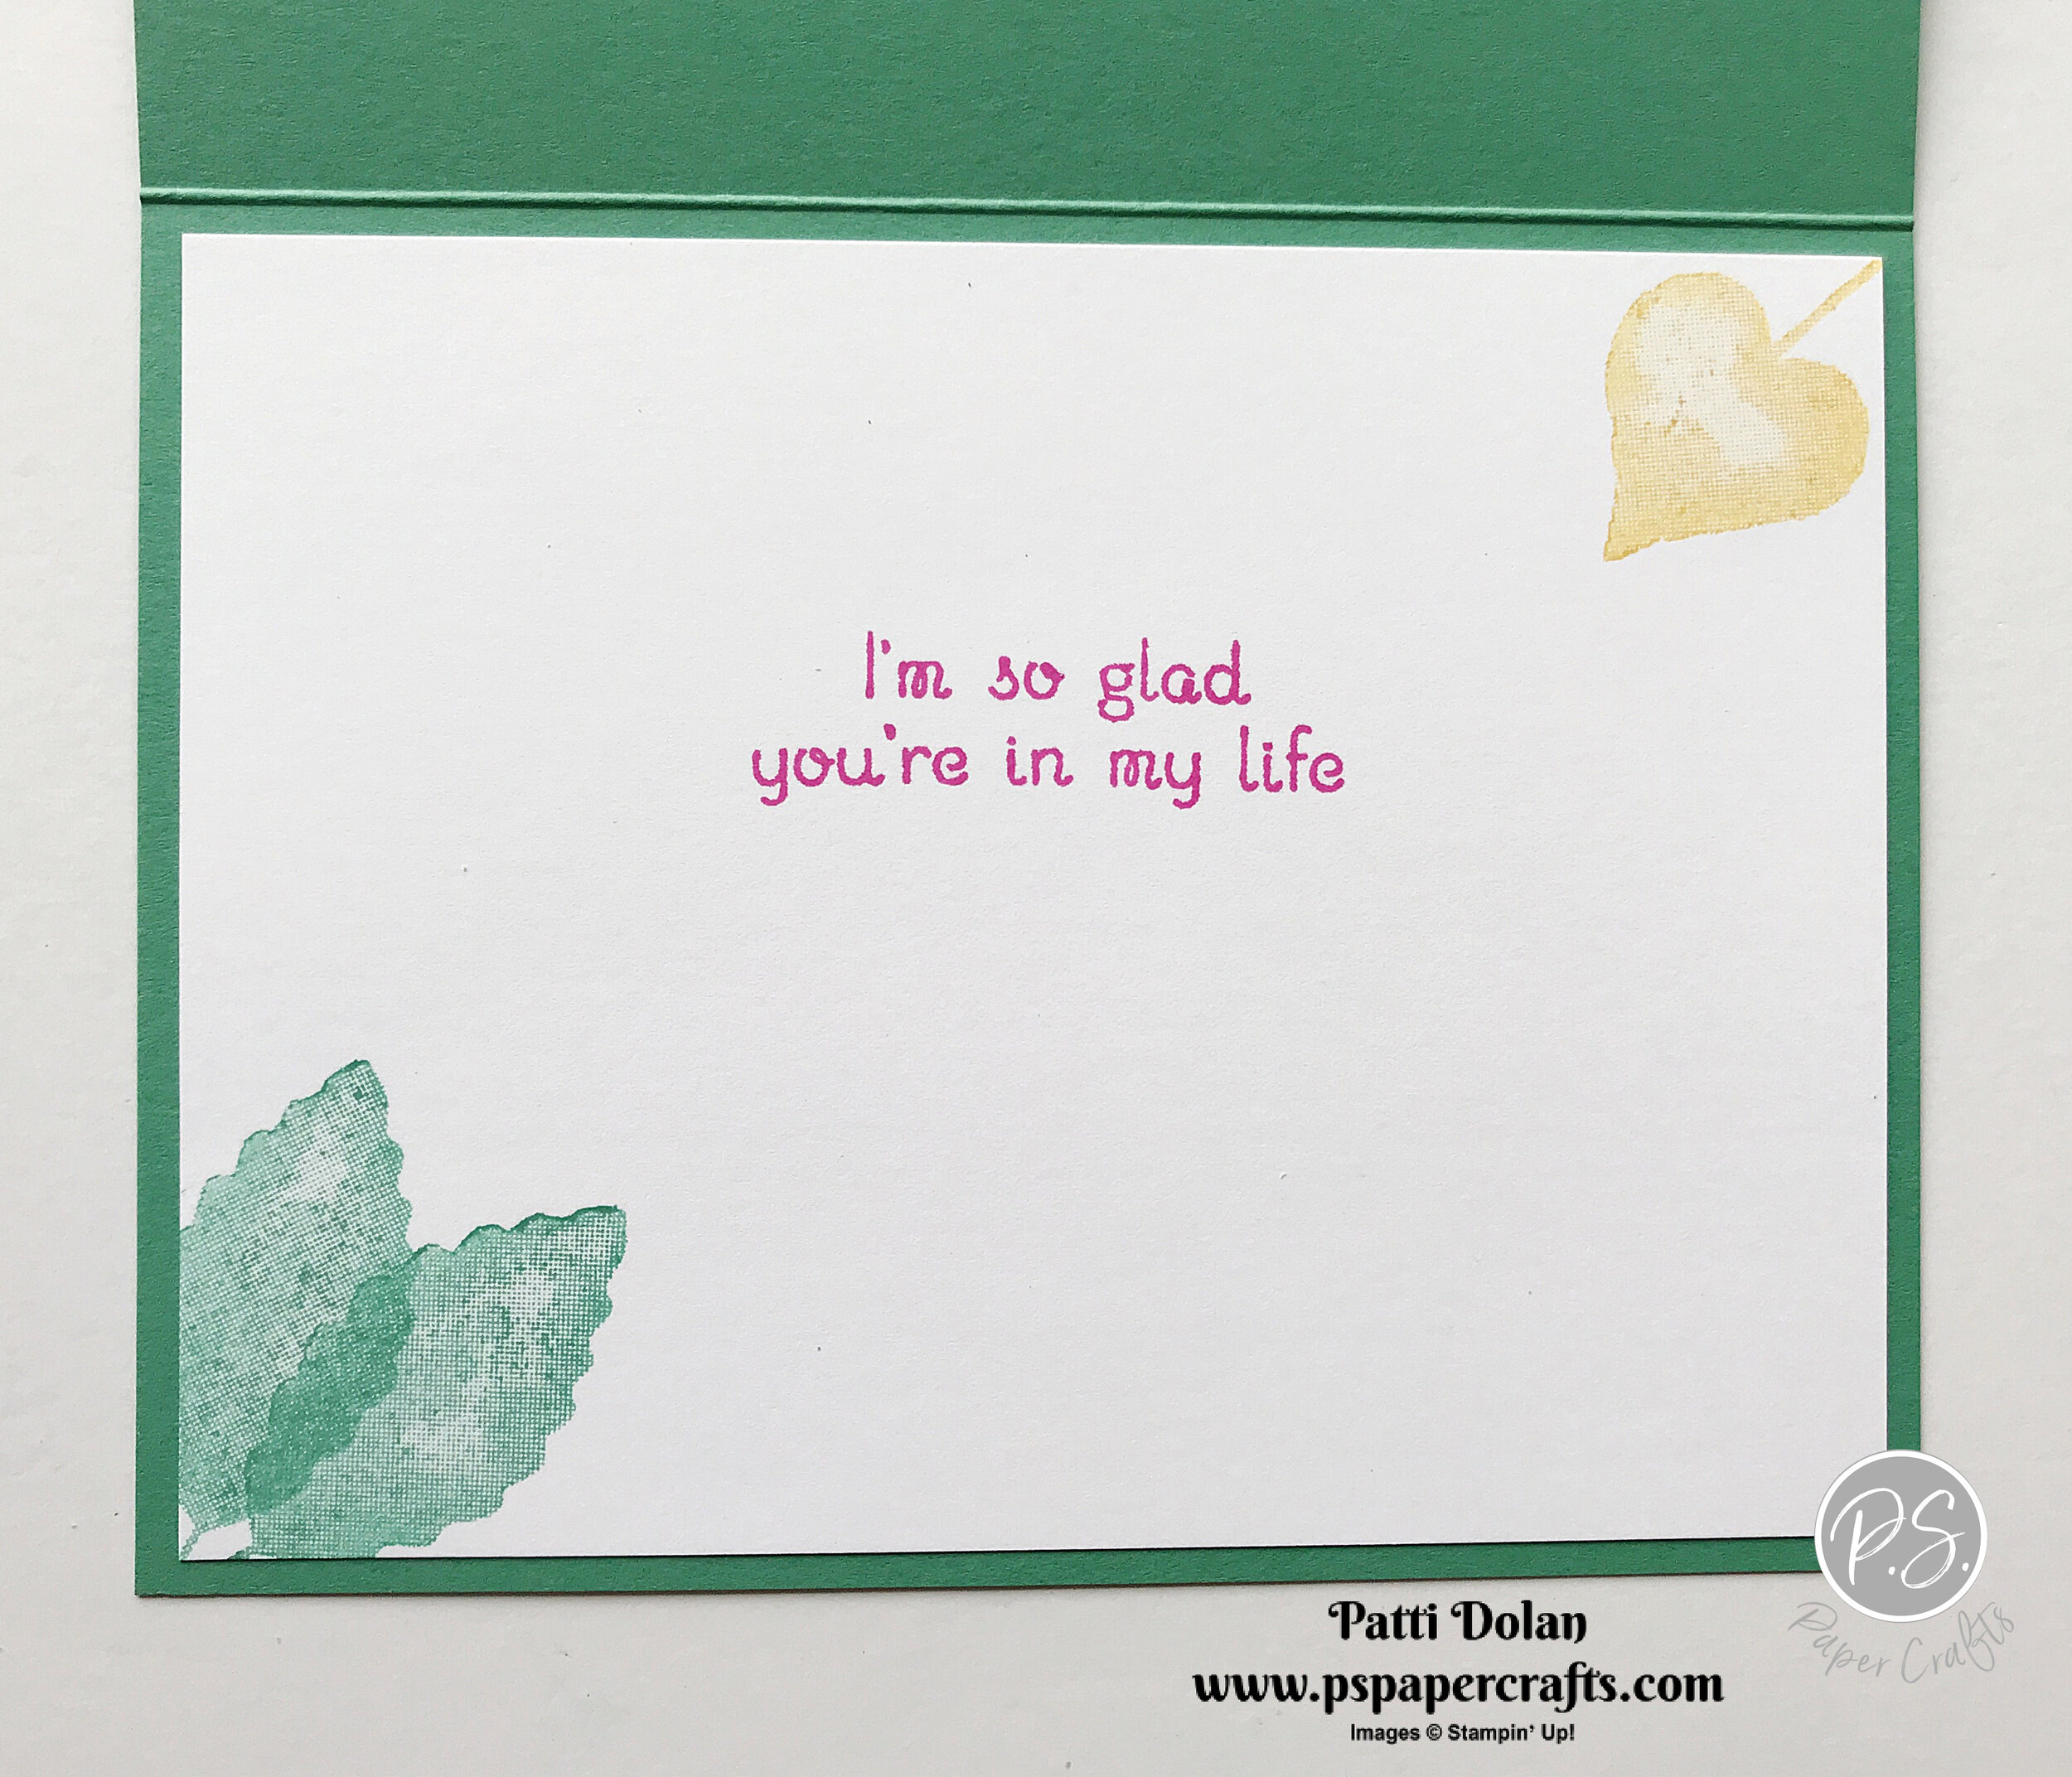
Love Of Leaves with new In Colors
The Love Of Leaves Bundle has these fantastic stitched dies that cut a leaf and also have a piece that will emboss the veins of the leaf….so clever!

I used the 2020-2022 In Color Designer Series Papers on this card. They are great fall colors with the wonderful pop of color from Magenta Madness.

Tips & Instructions
Just Jade Card Base - 5 1/2 x 8 1/2, score at 4 1/4
Whisper White Layer 5 1/4 x 4, wrap ribbon around layer and adhere to back, then adhere layer to card base
Bumble Bee Layer - cut with scalloped rectangle from Stitched So Sweetly Dies and adhere to card
Cut leaves from 2020-2022 In Color Designer Series Paper and arrange on scalloped rectangle
Stamp sentiment with Magenta Madness Ink on Whisper White Cardstock and cut with smaller scalloped rectangle
Adhere sentiment to card with Dimensionals and then adhere the smaller leaves
Add 3 Elegant Faceted Gems

The sentiment is so sweet, just letting someone know that you thought of them.

On the inside stamp the sentiment with Magenta Madness Ink and the leaves with Just Jade and Bumblebee Inks. I stamped off first to get a lighter color. (Stamping Off is when you stamp on a piece of scrap paper first, then on your cardstock so you get a lighter shade.)
Supply List

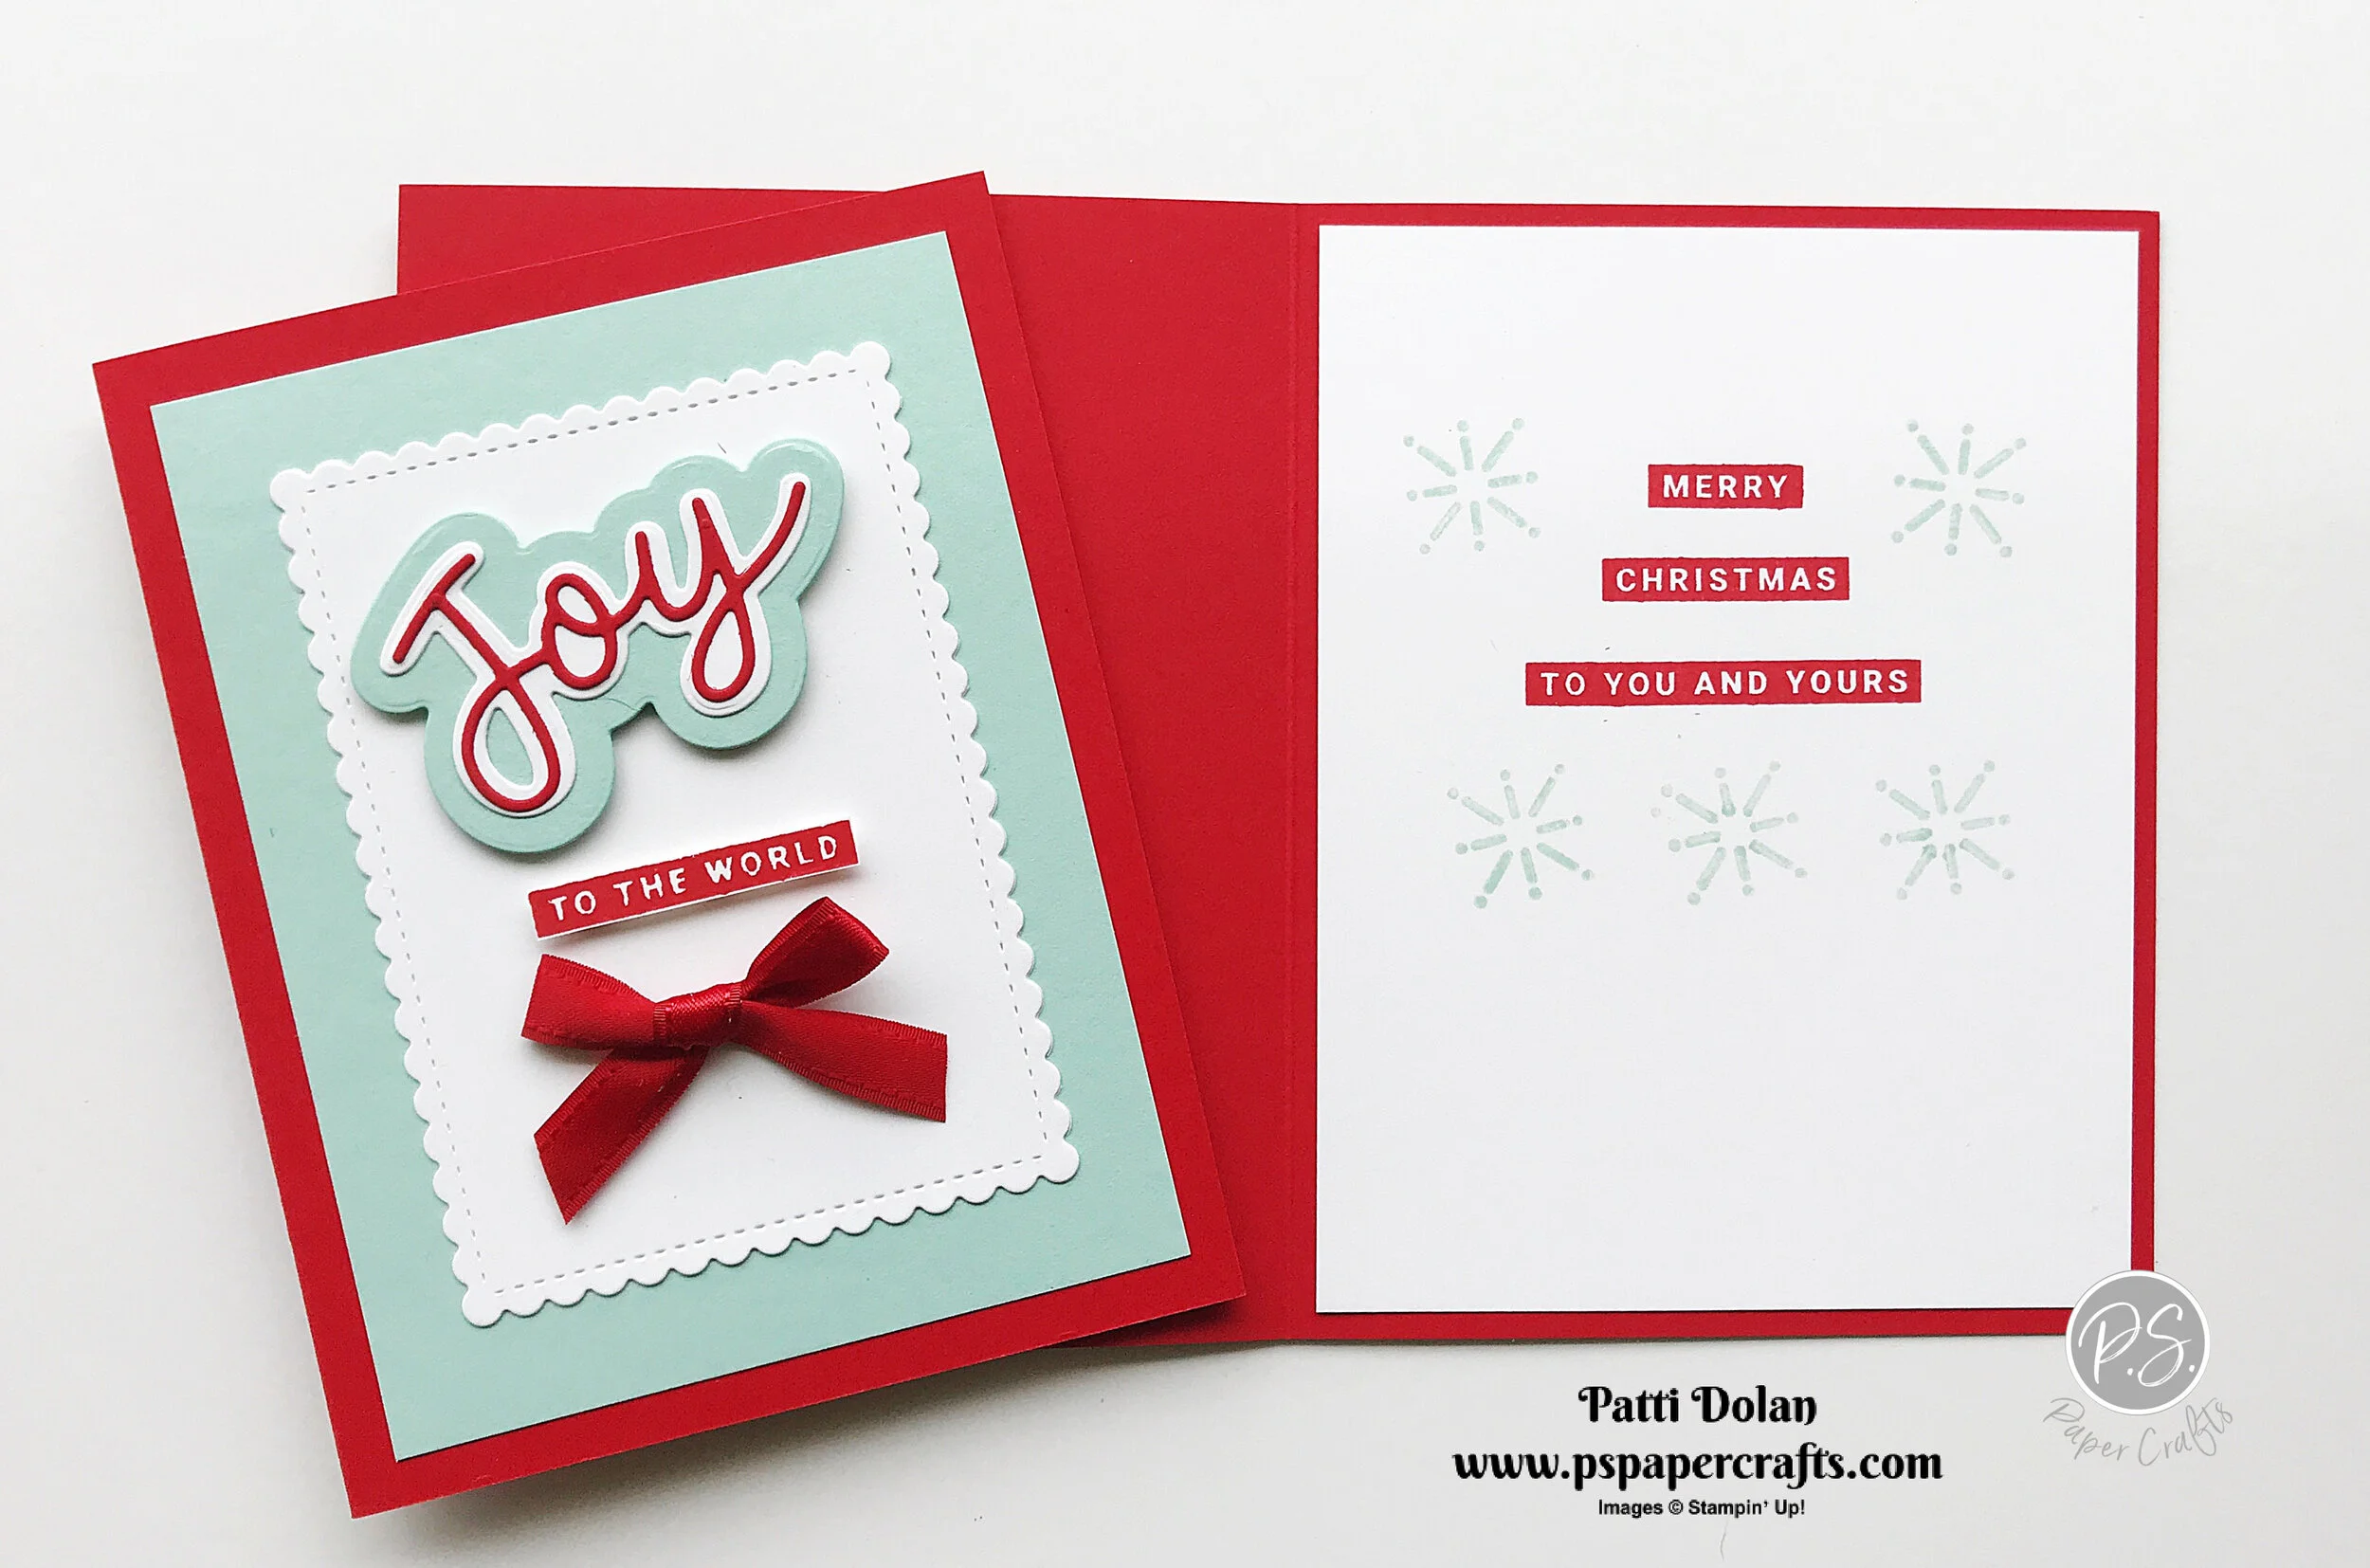
Joy To The World!
Can you believe I’m already making Christmas Cards? The new Mini Catalog from Stampin’ Up! has some amazing products. You can start ordering from it August 4, 2020.

In the video I’ll show you the Peace & Joy Bundle and the great dies that you can use to layer the large sentiments. I used the new Adhesive Sheets on the narrow “Joy” die cut to make it easy to adhere to the background. Watch and you’ll see what I mean.
Real Red and Pool Party are one of my favorite color combinations for winter cards.
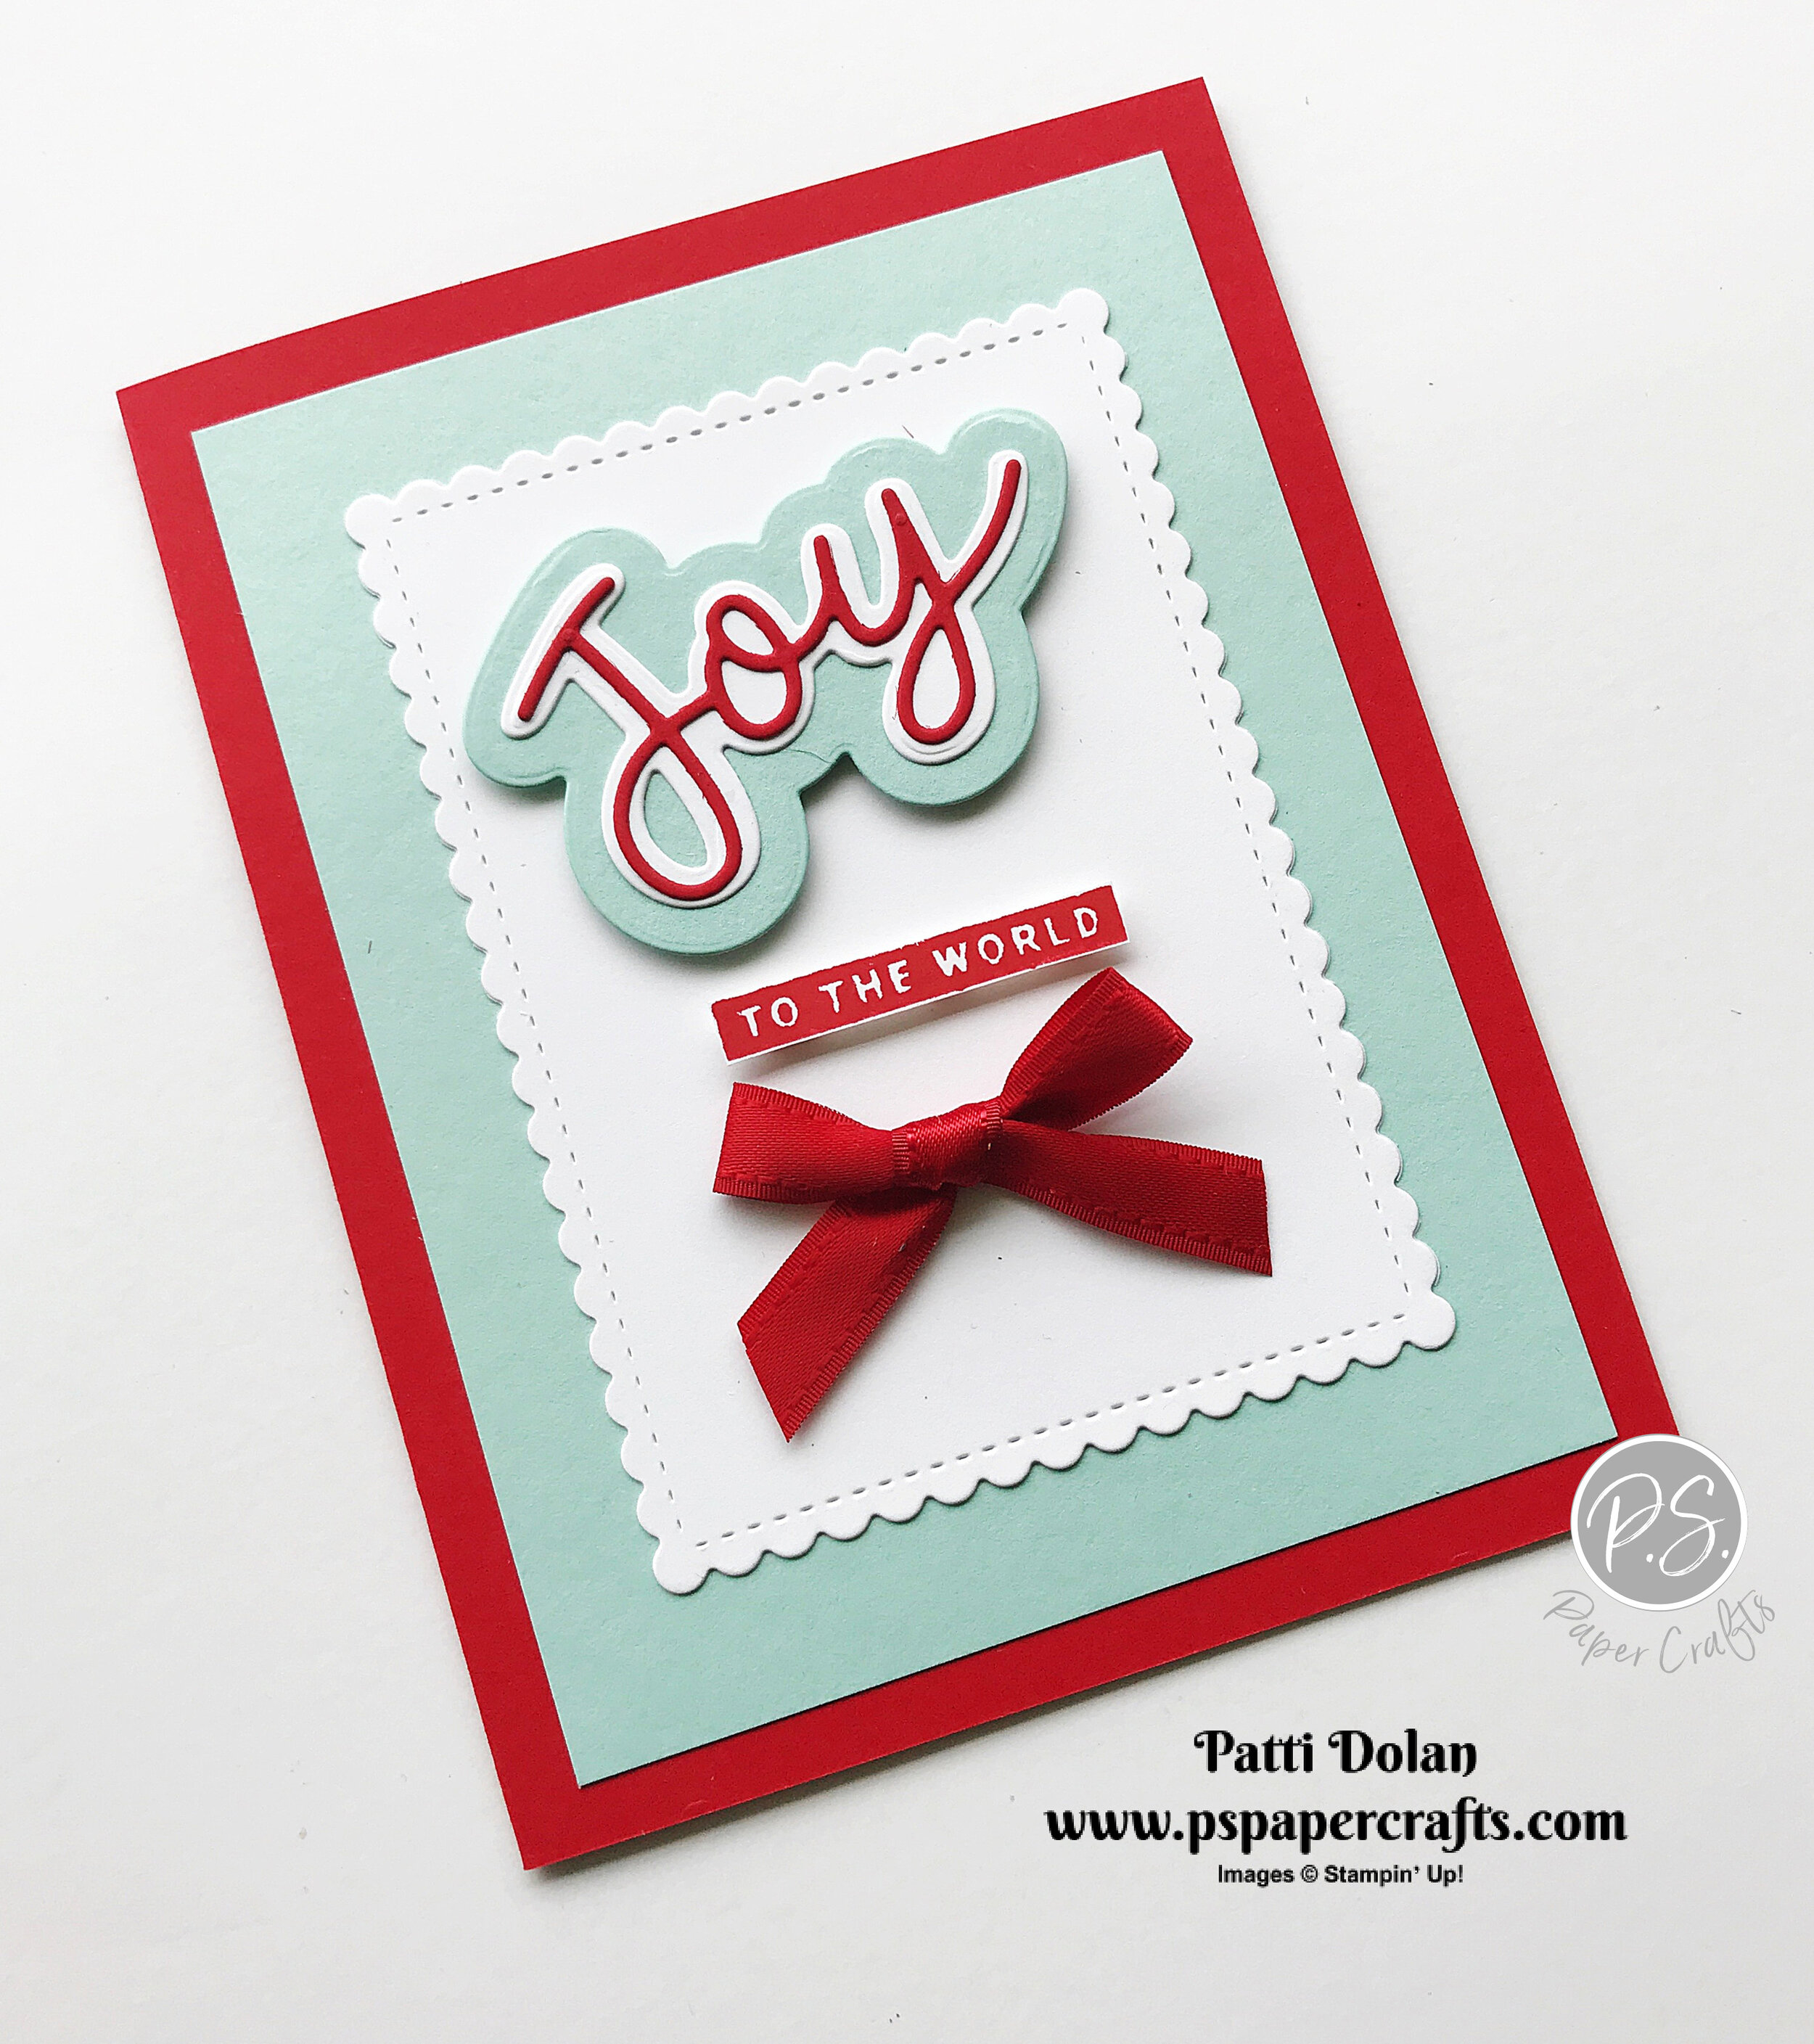
Tips & Instructions
Real Red Card Base - 5 1/2 x 8 1/2, score at 4 1/4
Pool Party Layer - 5 x 3 3/4, adhere to card base
Whisper White Cardstock - cut with largest scalloped rectangle from Stitched So Sweetly Dies
Real Red scrap - back with Adhesive Sheet and cut with the narrow Joy sentiment die
Cut Whisper White Joy background and Pool Party for the larger Joy Background
Adhere Joy pieces together and adhere to card using Dimensionals
Stamp “To The World” sentiment on small scrap of Whisper White with Real Red Ink, cut and adhere using Dimensionals (I cut small pieces of the Dimensionals to use for this)
Tie bow and adhere using Mini Glue Dot

On the inside stamp sentiment with Real Red Ink and some snowflakes with Pool Party Ink.
Supply List

In The Pines - Thinking Of You
The In The Pines Bundle has some beautiful pine tree images and dies. I love pine trees so this bundle really appealed to me.

I used the polka dot paper from the Heartwarming Hugs Designer Series Pack. This helped me decide on the colors: Mossy Meadow and Pear Pizzazz.

Tips & Instructions
Mossy Meadow Card Base - 5 1/2 x 8 1/2, score at 4 1/4
Pear Pizzazz Layer - 5 1/8 x 3 7/8
Heartwarming Hugs Designer Series Paper Layer - 5 x 3 3/4, adhere to Pear Pizzazz layer and wrap ribbon around, adhering to the back. Adhere layer to card base.
Whisper White Cardstock - cut with 2nd largest Layering Ovals Die and cut tree using the Pine Woods Dies.
Pear Pizzazz Cardstock - cut largest scalloped Layering Ovals Die and adhere to white oval, then adhere to card using Dimensionals
Tie bow and adhere using Mini Glue Dot
Whisper White Strip - 1/2 x 2 3/4, stamp sentiment with Mossy Meadow Ink, punch one end with Banner Triple Punch and adhere to card using Dimensionals
Add 3 Elegant Faceted Gems
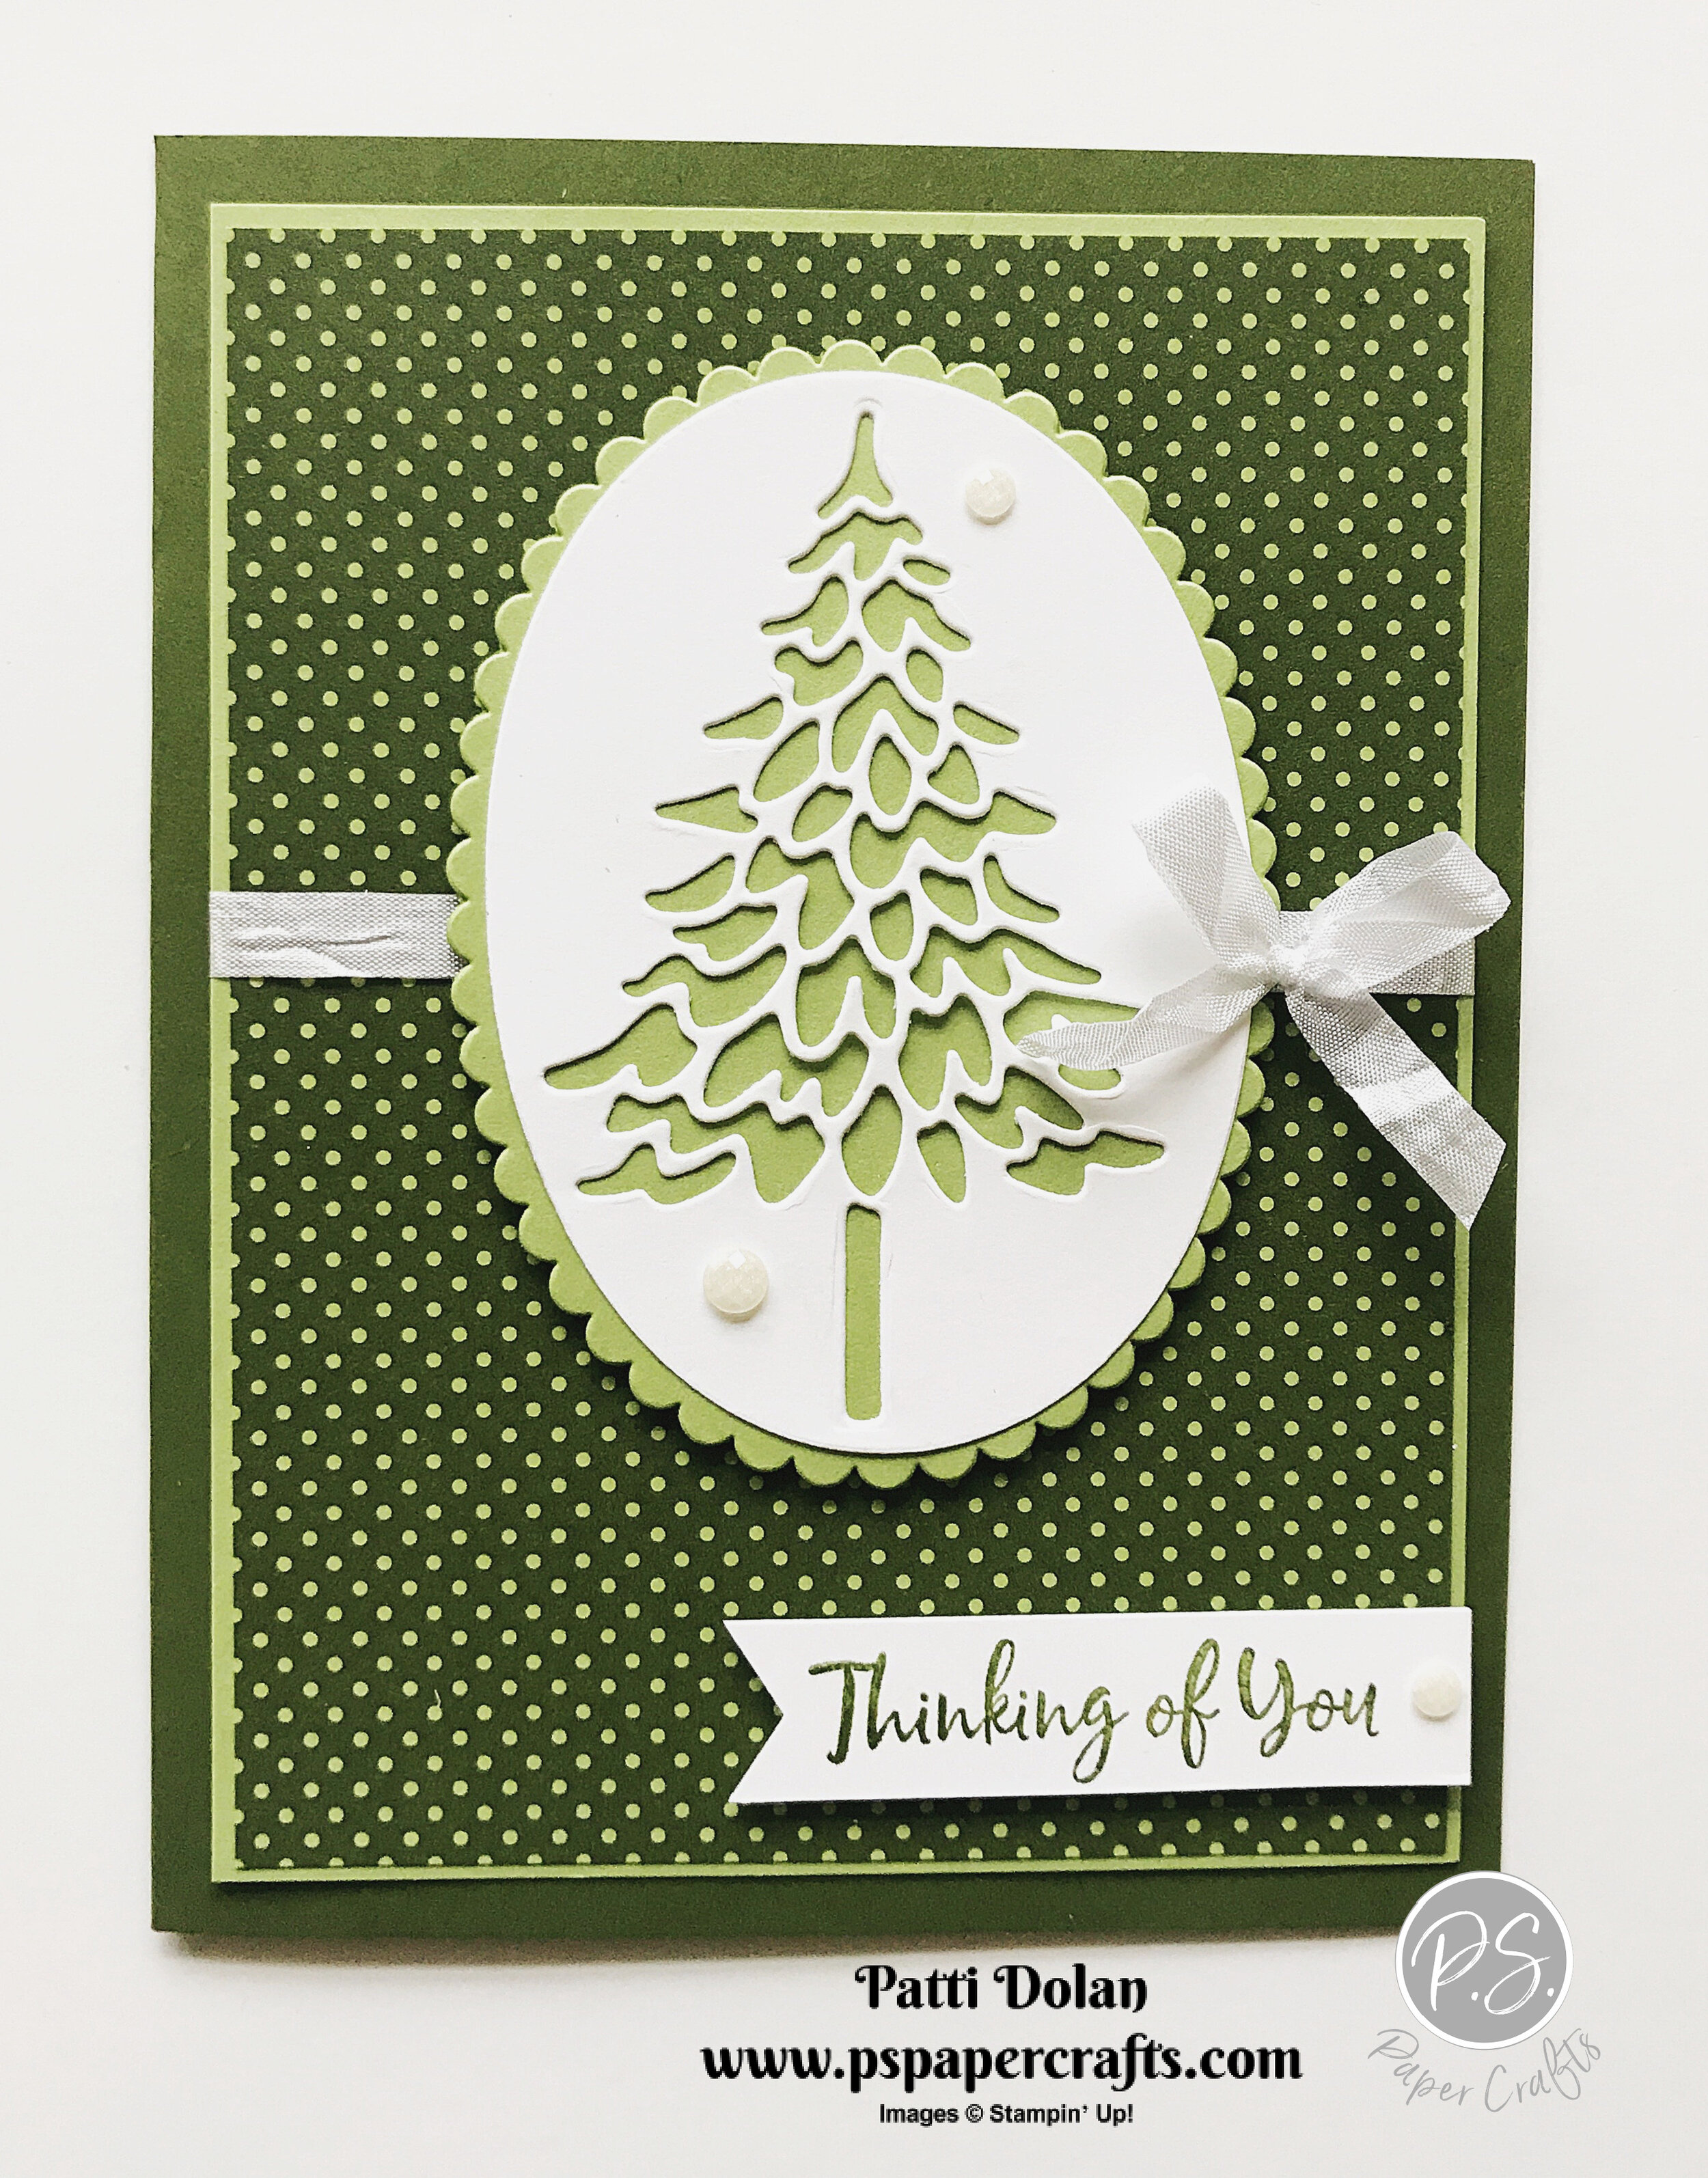
On the inside stamp trees across the bottom with Mossy Meadow Ink.


Sketch Saturday - Butterfly Gala
Today’s card was created for the weekly Sketch Challenge from Splitcoaststampers. This was an easy sketch to follow but I wanted to ramp it up a bit so decided to use the Ornate Floral 3D Embossing Folder.

Here’s the sketch that I followed.

Tips & Instructions
Magenta Madness Card Base - 5 1/2 x 8 1/2, score at 4 1/4
Whisper White Layer - 5 3/8 x 4 1/8
Pool Party Layer - 5 1/4 x 4, emboss with Ornate Floral 3D Embossing Folder
Whisper White Strip - 1/2”, stamp sentiment with Black Memento Ink and punch one end with Banner Triple Punch
Adhere layers and sentiment to card base
Whisper White Scrap - stamp large butterfly with Black Memento Ink and color with Stampin’ Blends (Magenta Madness, Dark Pool Party, Dark Daffodil Delight). Make sure you stamp the body as well.
Punch butterfly with Butterfly Duet Punch and adhere to card using Mini Dimensionals (only adhere the body so the wings are not attached)
Add 3 Rhinestones to butterfly

On the inside stamp 3 small butterflies with Black Memento Ink. Use Post-It Notes to cover the large stamp so you don’t get ink on it and be sure to remove the Post-It Notes before you stamp, repeat this for each butterfly. Color with Stampin’ Blends.

Supply List

Band Together Birthday Card
The Band Together Stamp Set and Detailed Bands Dies are so amazing. I love how this card turned out!

Watch my video to see how I made this card and to see more about the products I used.
Tips & Instructions
Bermuda Bay Card Base - 5 1/2 x 8 1/2, score at 4 1/4
Playing With Patterns Layer - 5 3/8 x 4 1/8
Bermuda Bay - cut large band piece
Stamp sentiment and 2 flowers on Whisper White with Black Memento Ink and cut with coordinating dies
Cut 3 leaf sprigs from Crumb Cake Cardstock and 2 leaf sprigs from Pretty Peacock Cardstock
Color flowers with Melon Mambo Stampin’ Blends
Adhere layer and label to card base, cut ends of label piece that are overhanging
Adhere leaf sprigs behind the flowers and then adhere flowers to card using Dimensionals

On the inside stamp sentiment with Black Memento Ink and leaf images with Bermuda Bay Ink.

Supply List

Just Saying Hello Card
The “Just saying hello” sentiment in the Tasteful Textures Stamp Set is just perfect to send to anyone. Wouldn’t you love to get a card for no reason, just someone saying hello?
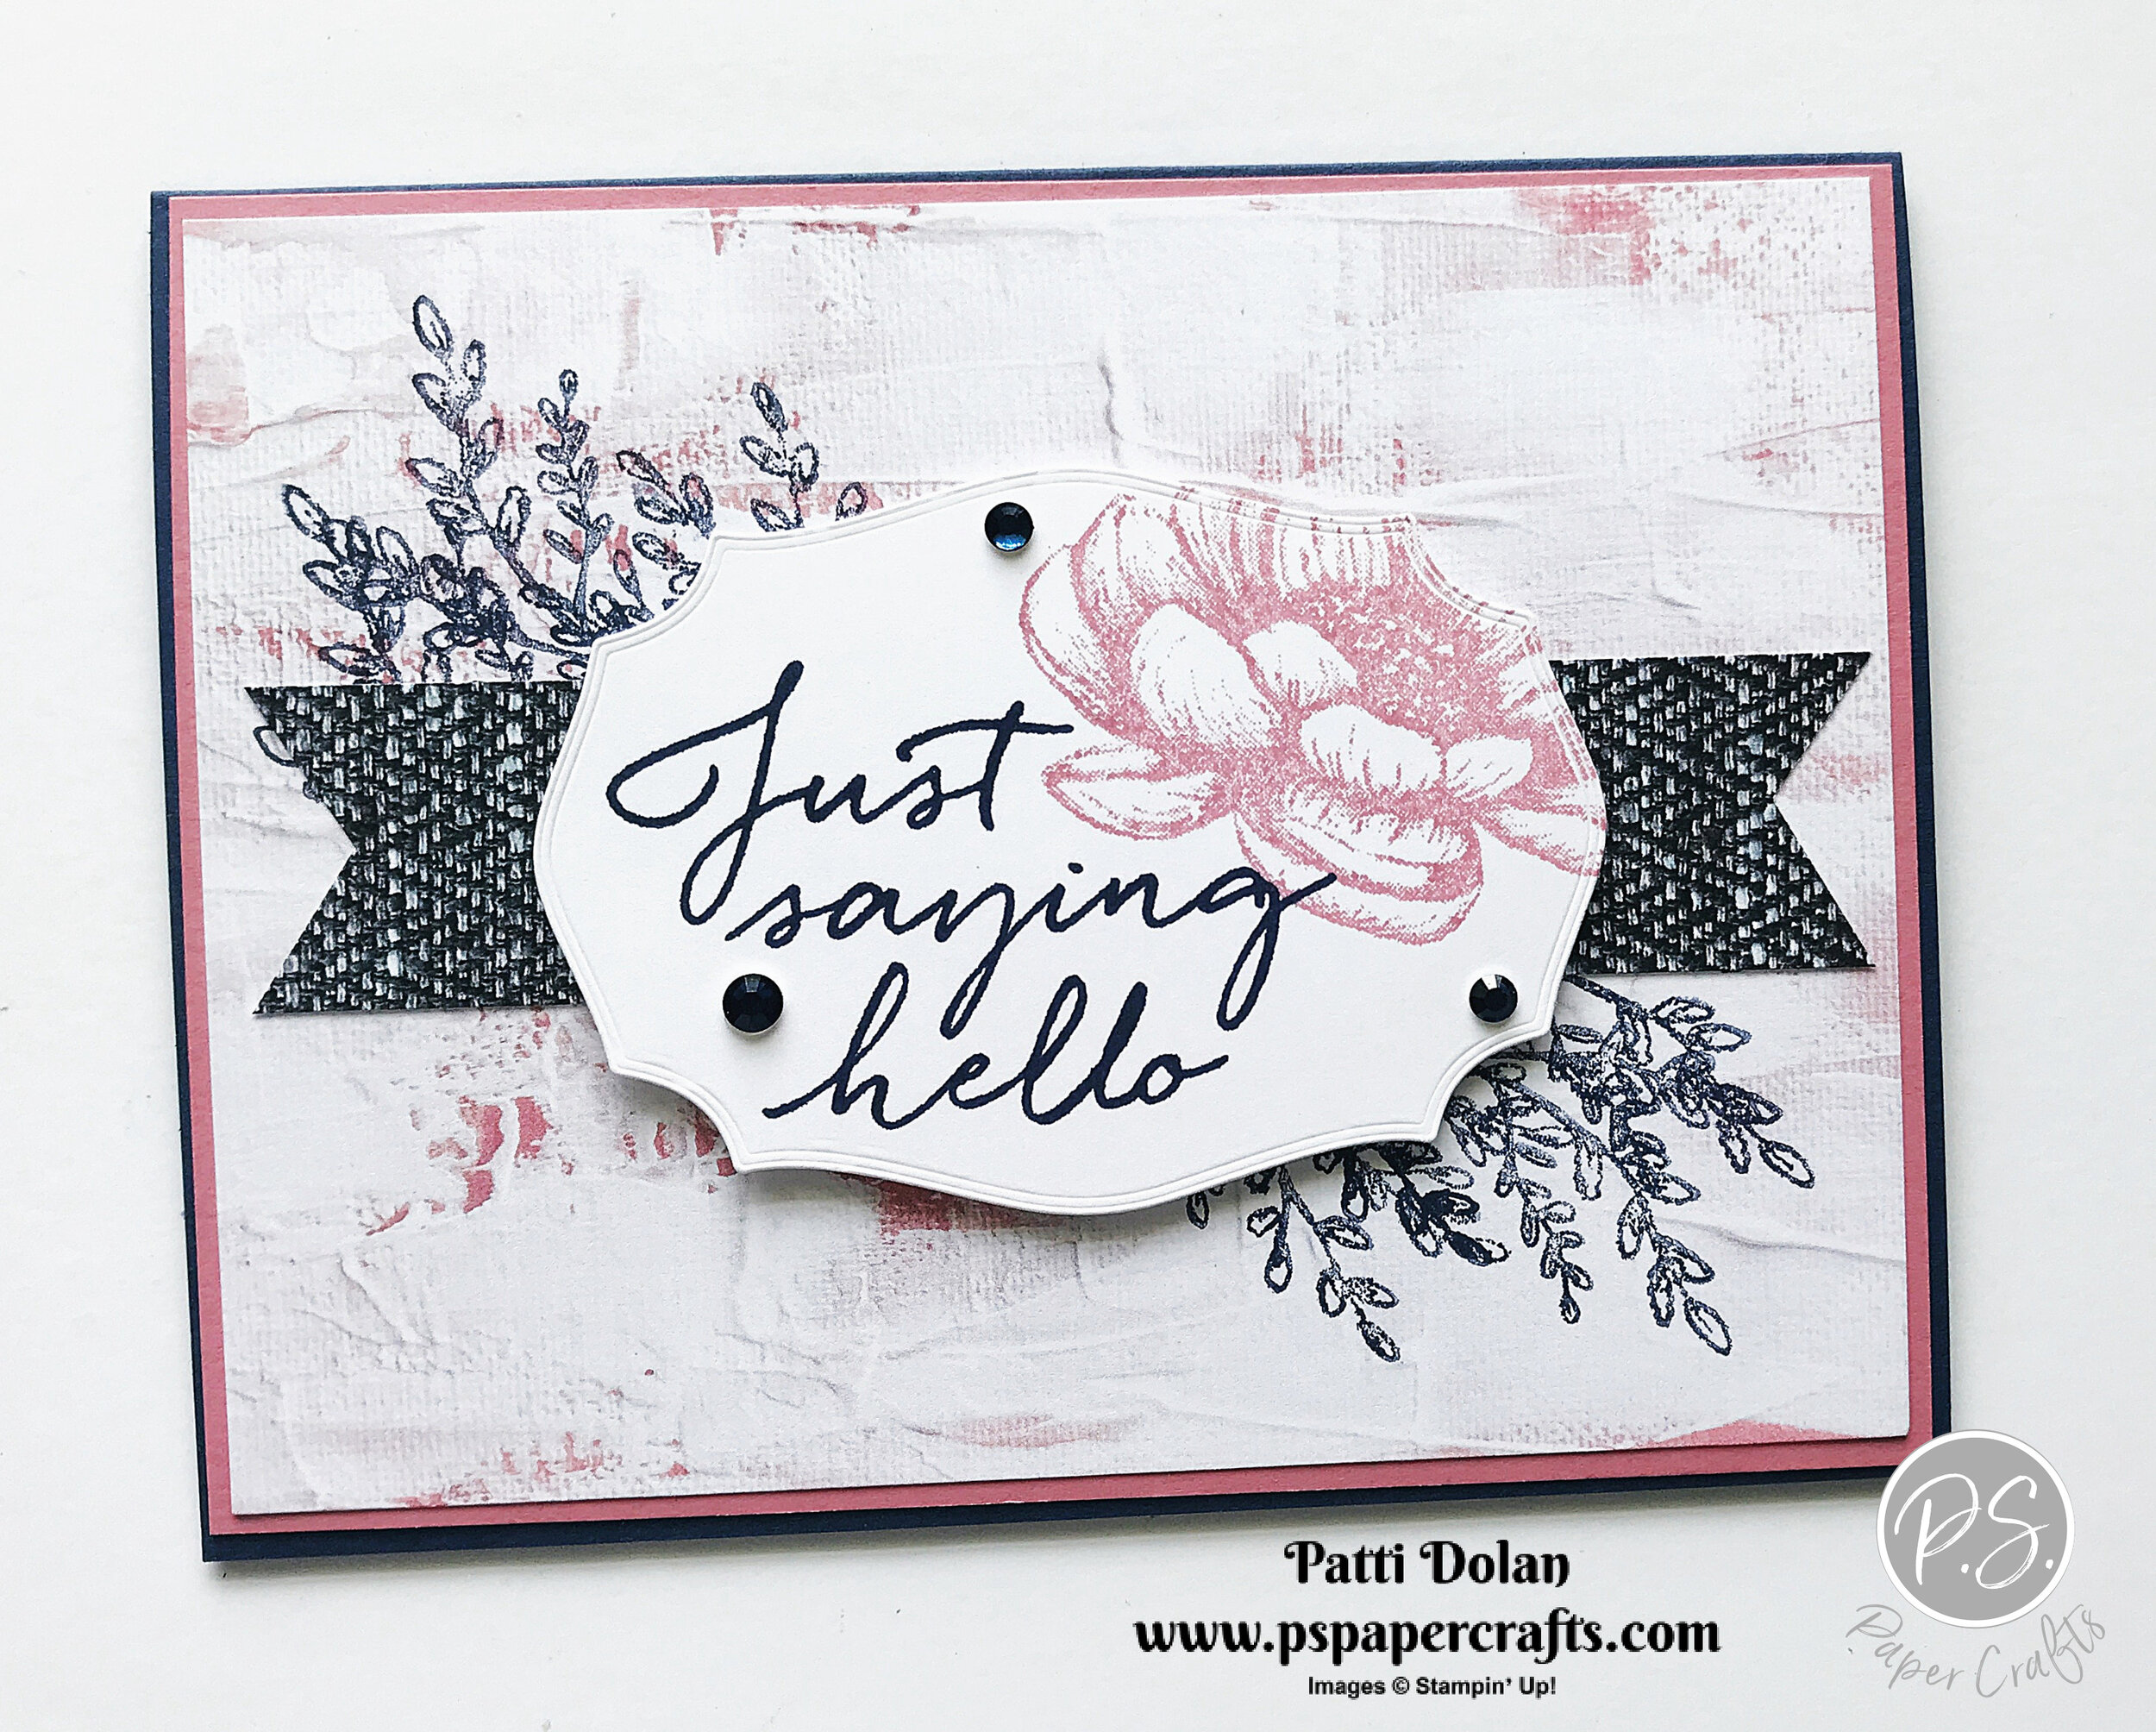
This is one of those stamp sets that I go to pretty often. The images and sentiments are great.

The In Good Taste Designer Series Paper is really unique with all the different textures. It’s great for backgrounds and banners.

Tips & Instructions
Night Of Navy Card Base - 5 1/2 x 8 1/2, score at 4 1/4
Rococo Rose Layer - 5 3/8 x 4 1/8
All In Good Taste Designer Series Paper Layer - 5 1/4 x 4
Scrap of Whisper White, cut with Tasteful Label Die and stamp sentiment with Night Of Navy Ink at bottom corner and the flower with Rococo Rose Ink at top (I stamped off first to get a lighter shade for the flower)
All In Good Taste Designer Series Paper Banner Piece - 1 x 5 1/2, punch banner on each end using the Banner Triple Punch (it is about 5” long after the ends are punched)
Adhere layers and banner piece to card and then adhere sentiment label using Dimensionals
Add 3 Night Of Navy Rhinestones (from Holiday Rhinestone Basic Jewels)

On the inside stamp flower with Rococo Rose Ink on one corner and the leaves with Night Of Navy Ink (stamp off twice on scrap first). I actually made a mistake here. I meant to have them in the bottom left and top right corners but stamped thinking this was a vertical card….shhh, don’t tell anyone!

Supply List

Make Your Own Background
Do you ever make your own background? Instead of using Designer Series Paper, just stamp different images in different colors to create a beautiful background.

In today’s video I’ll show you how I created this bright and cheerful background using the Lovely You Stamp Set. The sentiments in this set are so pretty with the mix of print and script.
The colors I used to stamp the images are the new 2020-2022 In Colors. These are such beautiful colors and work well together - Magenta Madness, Just Jade, BumbleBee and Misty Moonlight.

Tips & Instructions
Misty Moonlight Card Base - 5 1/2 x 8 1/2, score at 4 1/4 (horizontal orientation)
Whisper White Layer - 5 1/2 x 4
Stamp images randomly starting with the larger images first. I used 2 different shades of Just Jade by stamping off first on one of the leaf images.
Whisper White Strip - 3/4” stamp sentiment with Misty Moonlight Ink and punch both ends using the Lovely Label Pick A Punch.
Misty Moonlight Strip - 1”, punch both ends using the Lovely Label Pick A Punch and adhere to sentiment strip
Wrap ribbon around stamped layer and adhere to back, then adhere layer to card base
Adhere sentiment label to to card with Dimensionals
Tie bow and adhere using a Mini Glue Dot
Add Enamel Dots to center of blue flowers

On the inside, stamp sentiment with Misty Moonlight Ink and stamp flowers with Magenta Madness and Bumblebee Ink.

Supply List

Summer Days Card
This is such a sweet card to send to someone who’s far away to let them know you’re thinking of them. I lightly inked the background using a Sponge Brayer to get just a hint of color.

The Summer Days Stamp Set has some fun images. This is a Host Set which you can get for free if you host a party, group together orders from friends or just place your own $150 order.

Tips & Instructions
Garden Green Card Base - 5 1/2 x 8 1/2, score at 4 1/4
Seaside Spray Layer - 5 1/4 x 4
Whisper White Layer 5 x 3 3/4
Using a Sponge Brayer, lightly add ink by rolling the brayer on the ink pad and then starting off your layer roll across. Make sure you have a light touch as you can keep adding to get the color you want. I used Soft Sea Foam at the bottom and Seaside Spray at the top.
Stamp trees and sentiment (from Lovely You) with Garden Green Ink
Stamp clouds with Seaside Spray Ink
Adhere layers to card base

On the inside, stamp part of the tree with Garden Green Ink and some clouds with Seaside Spray Ink.

Supply List

Sketch Saturday - Lovely You
I love the look of a tone on tone card, especially with the Gray Granite patterns in the Peony Garden Designer Series Paper.

This is the sketch I used for today’s card. It’s another CAS(E) This Sketch Challenge from Splitcoaststampers. It’s so fun doing these sketch challenges; t really pushes me outside my comfort zone.

The Lovely You Stamp Set has such great sentiments and the mix of print and script fonts are so pretty.

Tips & Instructions
Gray Granite Card Base - 5 1/2 x 8 1/2, score at 4 1/4
Peony Garden Designer Series Paper (gray pattern) - 5 3/8 x 4 1/8, adhere to card base
Peony Garden Designer Series Paper (floral pattern) - 5 x 2 1/2
Gray Granite Strips - one is 5 x 1/8 and the other is 5 x 1/2, adhere for floral pattern and then adhere to card
Whisper White Sentiment Strip - 2 3/8 x 3/4, stamp sentiment using Gray Granite Ink and adhere to card with Dimensionals
Adhere 3 Elegant Faceted Gems

On the inside stamp sentiment, flowers and leaves with Gray Granite Ink. I stamped off twice with the leaves before stamping to get a lighter color. Stamping off means you stamp on scrap to pull off the first layer of ink giving you a lighter shade. Doing this a second time gives you an even lighter shade.

Supply List

Fun Fold Happiest Of Birthdays
I made a simple fun fold card using the Happiest Of Birthdays Stamp Set. I love how large this sentiment is!

In the video below I’ll show you how to make the fun fold and also how to color your stamp to create the this ombre look.
Tips & Instructions
Gorgeous Grape Card Base - 5 1/2 x 8 1/2, score at 4 1/4 and then 2 1/8 (fold closed and then fold flap back)
Gorgeous Grape Cardstock - cut using largest scalloped rectangle from Stitched So Sweetly Dies
Whisper White Cardstock - 3 3/4 x 2 5/8
Color sentiment stamp using Stampin’ Write Markers - Melon Mambo, Magenta Madness and Gorgeous Grape, breath on stamp and stamp on Whisper White layer
Adhere sentiment layer to Gorgeous Grape scalloped rectangle
Artistry Blooms Designer Series Paper - 5 3/8 x 4 1/8 and two pieces 5 3/8 x 2, adhere to inside of card and two folded parts
Adhere sentiment to front flap making sure to put adhesive only on side that will attach to flap
Add Enamel Dots
For the inside cut second largest scalloped rectangle and stamp sentiment, I colored the sentiment with Gorgeous Grape and the box around it with Magenta Madness Markers and stamped. Adhere to inside making sure it doesn’t show through when card is closed

