Sunflower Mother's Day Card

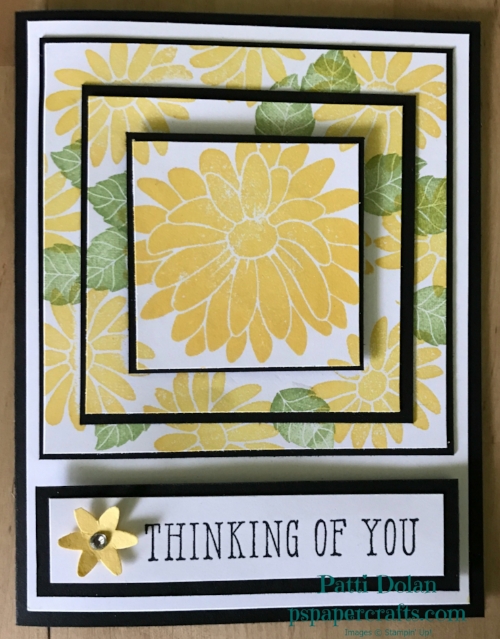
Today's card is a Sunflower Mother's Day Card.  I just love sunflowers!  

I used one of the Eastern Palace medallions for the flower in Daffodil Delight and the center was embossed using the Petals Burst Embossing Folder.  I added some Gold Wink Of Stella for glitter.

I used one of the Eastern Palace medallions for the flower in Daffodil Delight and the center was embossed using the Petals Burst Embossing Folder.  I added some Gold Wink Of Stella for glitter.

Watch the video to see how I made this card.  You can change the sentiment and make it a Thank You, Happy Birthday, Thinking of You card or anything else you'd like.

Below is the supply list used for this card.  You can order these products by shopping clicking the Order Now button and using the May Host Code -  HB6BQJV

Mother's Day Card using Eastern Palace Suite

Check out the instructions below to see how I made this fun Mother's Day card.

Cutting and Scoring:
Very Vanilla card base - 5 1/2 x 8 1/2, scored at 4 1/4 and folded
Very Vanilla strip - 5 1/2 x 2
Eastern Palace Designer Series Paper (DSP) - 2 strips at 5 1/2 x 1 1/4
Lemon Lime Twist - 2 1/4 x 2 1/4 for Medallion
Dapper Denim - 2 1/4 x 2 1/4 for Medallion

Instructions:
Cut out the Dapper Denim Medallion and Lemon Lime Twist Medallion
Stamp image in Dapper Denim on each petal on the Lemon Lime Twist Medallion
Attach the Lemon Lime Twist Medallion to Dapper Denim Medallion (offsetting it)
Attach Clear Faceted Gem to center (new catalog)
Attach Medallion piece to Very Vanilla strip
Stamp small medallion image on either side of medallion piece
Stamp sentiment (Oh So Succulent stamp set)
Adhere rhinestone to center of each small medallion
Adhere one DSP strip to top of card base
Adhere Very Vanilla strip to middle of card base
Adhere second DSP strip to bottom of card base

Supplies:

Triple Layer Technique

Today's card uses the Triple Layer Technique.  It looks like it would be hard to do but its very easy.  

Check out the two cards below. Aren't they elegant. The Happy Anniversary is the one I made on the video. Its for my parents who are celebrating their 62nd wedding anniversary tomorrow.  

I used Sweet Sugarplum ink for the flowers on this card.

I used Sweet Sugarplum ink for the flowers on this card.

This is the inside I added after the video.  This gives you the white space to write your greeting.

This is the inside I added after the video.  This gives you the white space to write your greeting.

This is another one I made with the Thinking Of You sentiment.  I used Daffodil Delight ink for the flowers on this one and added a flower that I punched with a rhinestone for some sparkle.

This is another one I made with the Thinking Of You sentiment.  I used Daffodil Delight ink for the flowers on this one and added a flower that I punched with a rhinestone for some sparkle.

As promised, here's the video.

Here are all the dimensions:
Card base is Basic Black - 5 1/2 x 8 1/2 and folded in half
Whisper White layer - 5 1/4 x 4
Basic Black layers:  3 6/8 x 3 6/8,   3x3,   2 1/8 x 2 1/8
Whisper White layers:  3 5/8 x 5 5/8,   2 13/16 x 2 13/16,   2x2
Sentiment layers: Basic Black 3 3/4 x 1 & Whisper White 3 1/2 x 3/4

Below is the supply list for this project:

Eastern Palace Suite using Gold Vinyl Stickers

Here's another card featuring the Eastern Palace suite.  I used the gold vinyl stickers to add some beautiful accents to the card. The Fresh Fig with the Gold stickers are so rich and beautiful. I am just loving this suite.  

See my blog post from April 26 for the details on the special bundling available for this suite in May.

Take a look at this video to see how I made this card.

Below is the supply list for this project.  Please comment if you have any questions.  You can use my online store to order any products you need.

Eastern Palace Suite

This week I'm featuring the Eastern Palace Suite.  This is a special bundle that will be available for purchase May 1 through May 31 and then the products will be available in the new catalog but not with the bundle pricing.  

Below are two cards I made with this suite.  Which one do you like better?

This one is using Tranquil Tide for the sentiment and the medallion.

This one is using Tranquil Tide for the sentiment and the medallion.

This one uses Dapper Denim for the sentiment and the medallion.

This one uses Dapper Denim for the sentiment and the medallion.

Watch the video to see how I made these cards.

Oh So Succulent Thank You Card

Below are the steps to create this card.  

  • Stamp succulents in Sweet Sugarplum, Mint Macaron, Daffodil Delight, Peekaboo Peach and Calypso Coral.  I stamped off with the backgrounds to get the lighter color and then stamped full strength with the detailed stamps.  I did the same for the greenery in Pear Pizzaz.
    (P.S. TIP: To stamp off, just ink up your stamp full strength and then stamp on scratch paper, then onto your card stock.  That takes a layer of ink off the stamp to get a lighter look. 
  • Using the Big Shot, cut out all the succulents pieces using the matching Succulent Framelits Dies.
  • Using the Big Shot, cut large wreath from the Swirly Scribbles Thinlits Dies in Early Espresso Card Stock.
  • On 5 x 3 3/4 Whisper White Cardstock stamp sentiment in Early Espresso Ink
  • Adhere wreath using the Fine Tip Glue
  • Adhere succulents and greenery using Fine Tip Glue and Dimensionals 
  • Emboss 5 1/4 x 4 Wild Wasabi Cardstock with the Petal Burst Embossing Folder
  • Adhere embossed piece to 5 1/2 x 4 1/4 Whisper White card base
  • Add wreath to card base to complete card.

Supply List:

Welcome to P.S. Paper Crafts!!

Check out this Thank You card using the free Make A Medallion stamp set that is still available until March 31 with a $50 order.  

Below are the steps to make this card:

  • Use Very Vanilla for A2 card base
  • On separate piece of Very Vanilla, stamp outer Medallion Stamp circle in Mint Macaron
  • Stamp inner Medallion Stamp circle in Marina Mist and Sentiment (Thanks) in Marina Mist
  • Cut Medallion with Stitched Framelet
  • Cut Scalloped circle in Mint Macaron
  • Cut strip of Mint Macaron card stock 5 1/2 x 1 1/4
  • Cut strip of Very Vanilla card stock  4 x 3/4
  • Stamp Sentiment from So Very Much set on Very Vanilla card stock and cut banner edge
  • Determine where you want to place the Mint Macaron strip on the card and move it up just a tiny bit, then draw a very light pencil mark along it so you have a guide to stamp the edging with the flourish stamp across the card to make that border, stamp that in Marina Mist.
  • Adhere the Mint Macaron strip over the top edge of the border you just stamped
  • Determine where you want to put the Medallion and before adhering it, adhere the sentiment on the Very Vanilla strip under it
  • Adhere the Medallion with Dimensionals
  • Add 2 rhinestones to Medallion (one above and one below the word Thanks)