Pop-Out Panel Cards

I made these fun Pop-Out Panel Cards on my YouTube Channel today. They are so easy to make and fun to open.


Watch the video to see step by step instructions to make this design.

Click on the button below to get a printable pdf with measurements and instructions.


Triple Floating Diamond Card Project Sheet

This cute Halloween Card was made using the Spooky Sweet Specialty Designer Series Paper and Spooky Halloween Stamp Set.


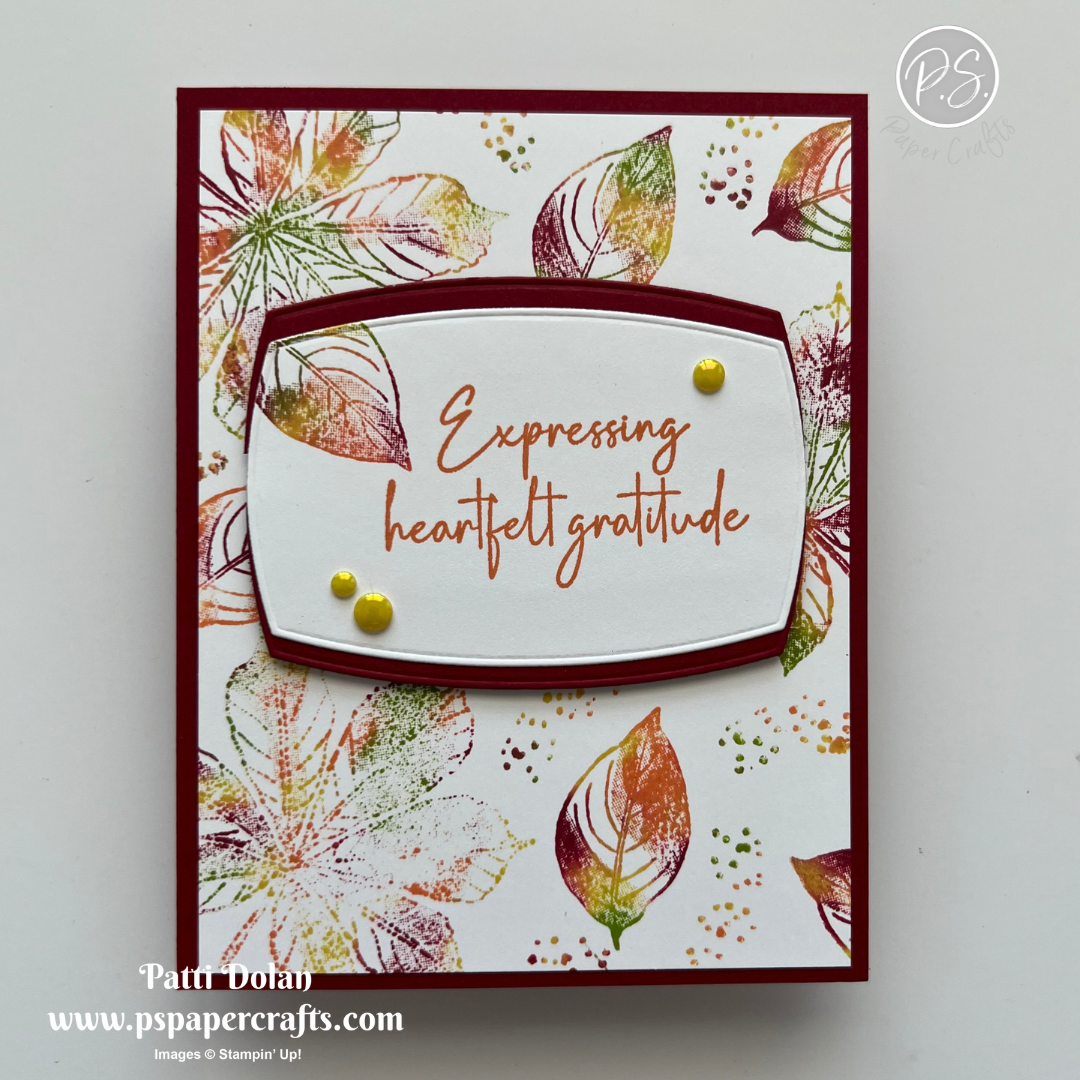
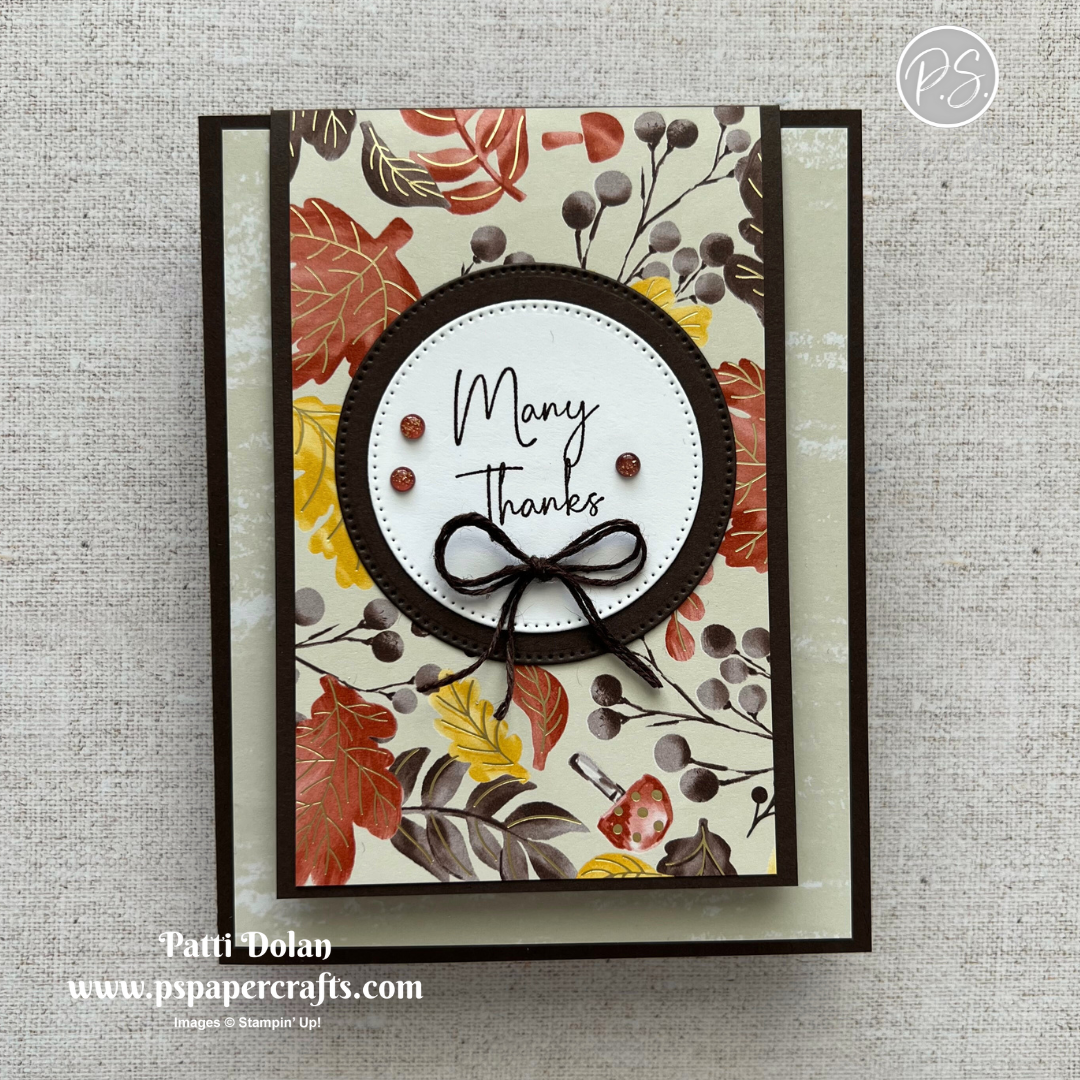
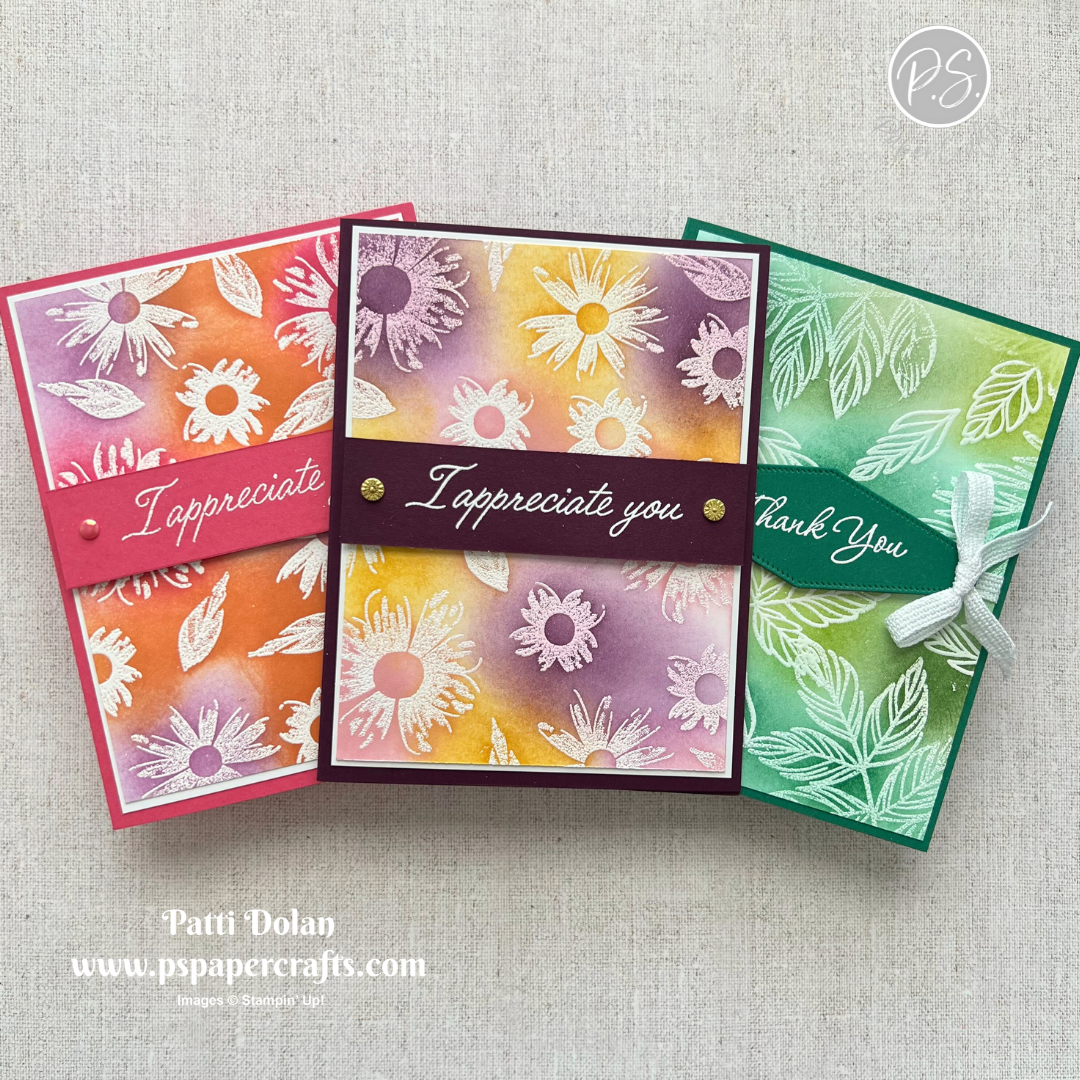
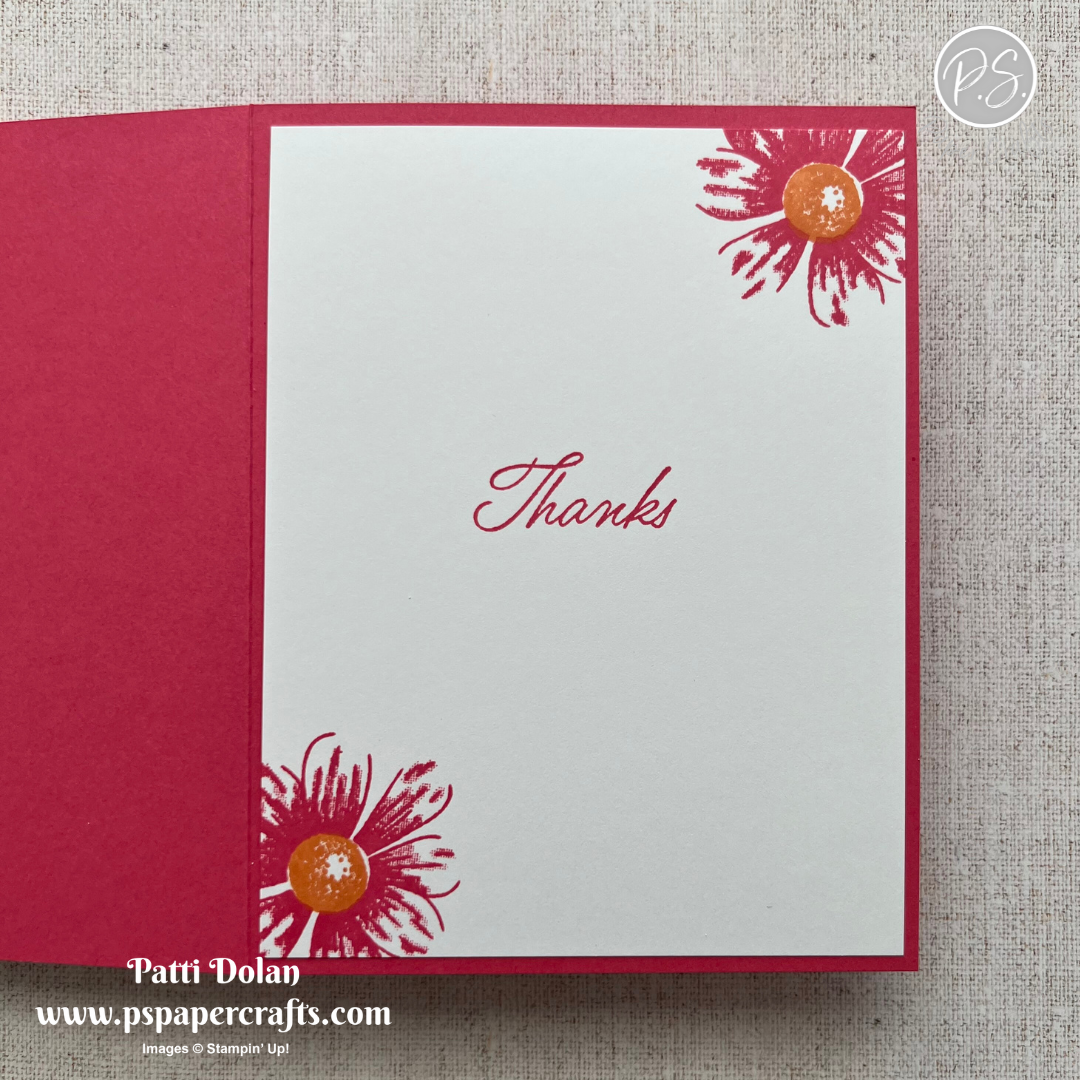
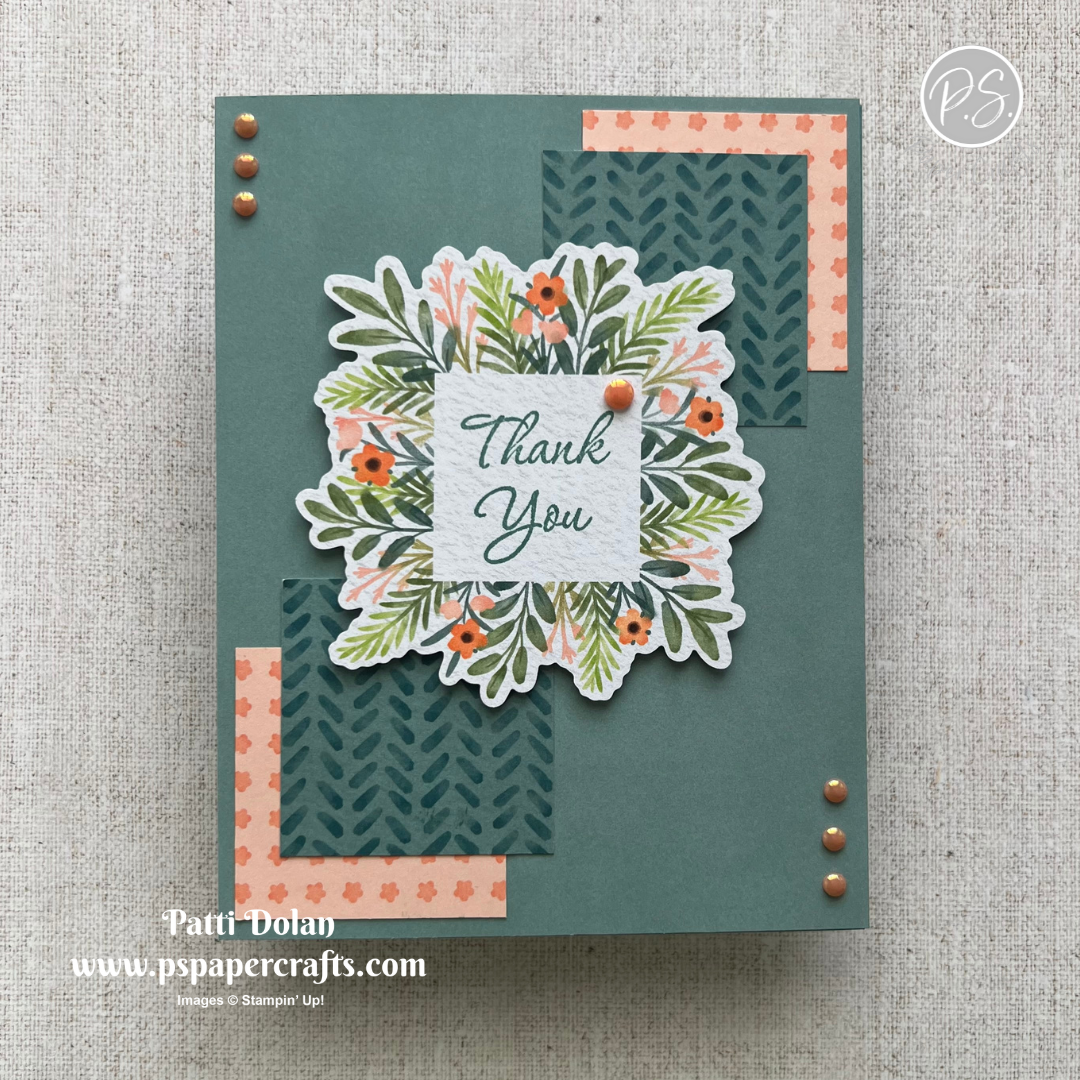
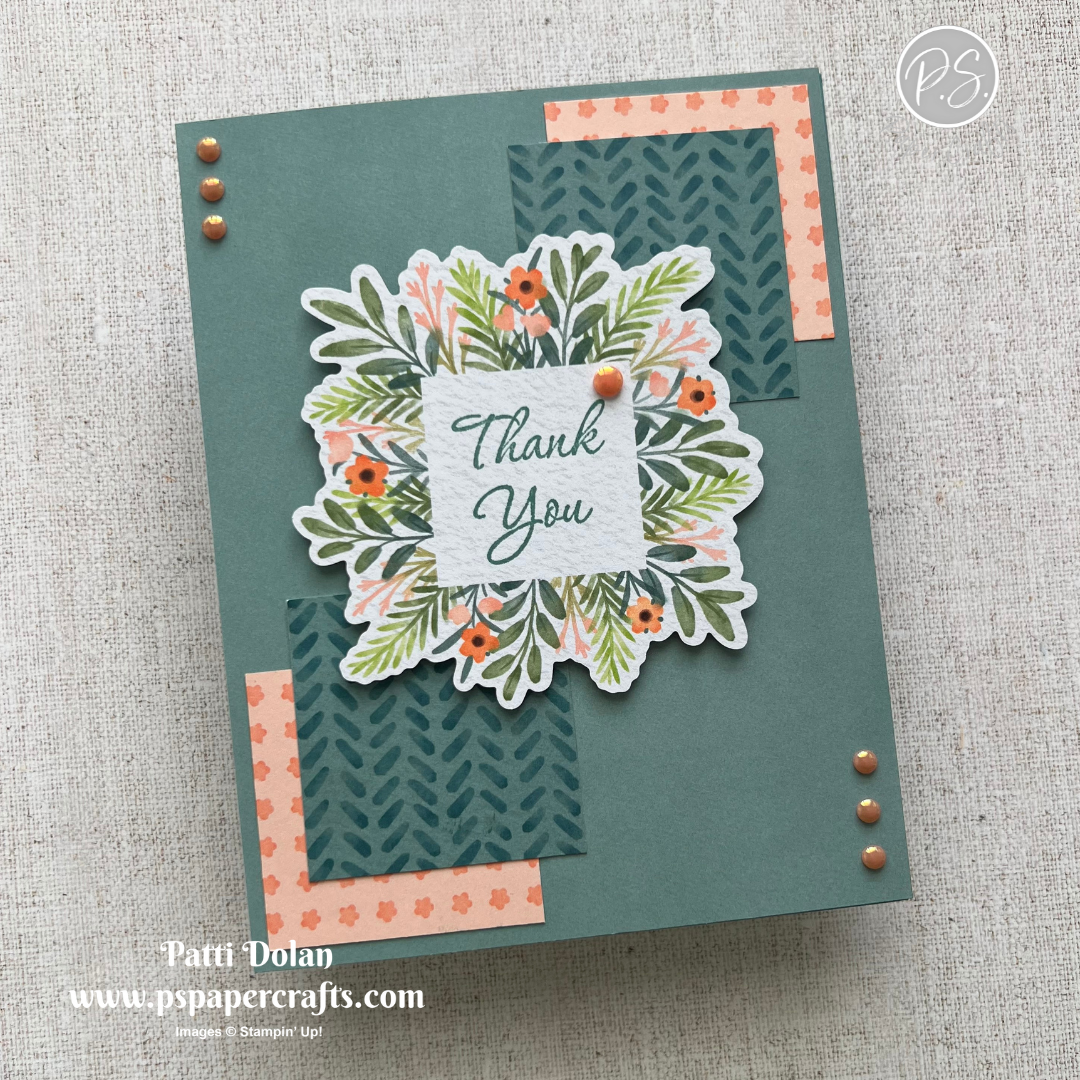
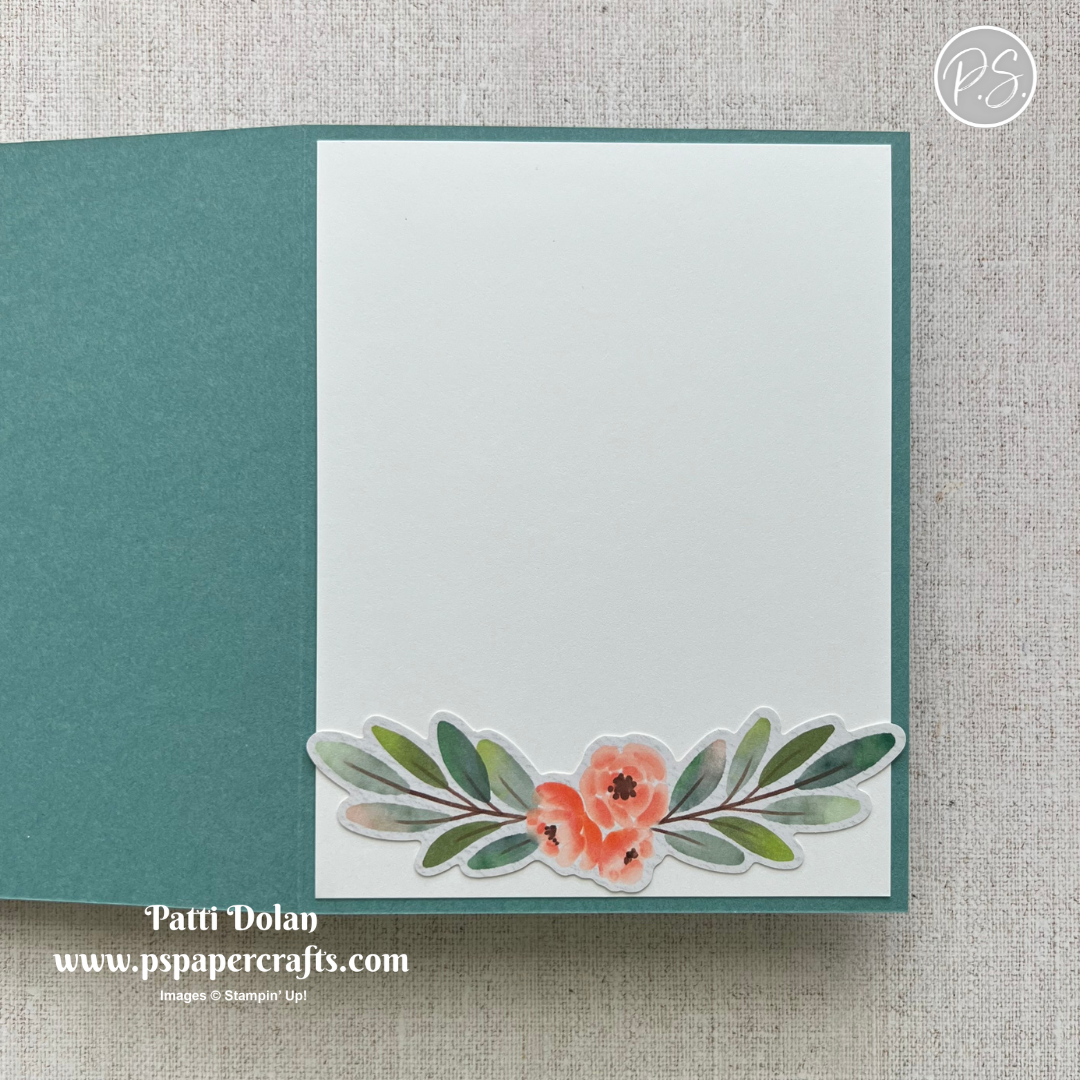
This pretty Thank You Card was made using the Gathering Together Specialty Designer Series Paper and Gathering Moments Stamp Set.


Supply List

You can click on the item to purchase it from my Online Store.

Shop Here
 

Coneflower Celebration Color Combo

I love coneflowers and decided to use the Coneflower Celebration Stamp Set for this weeks Color Combo Challenge.


The Color Combo is from my September Inspiration Calendar - Pretty Peacock, Highland Heather and Daffodil Delight.


Tips & Instructions

  • Pretty Peacock Card Base - 5-1/2 x 8-1/2, score at 4-1/4

  • Daffodil Delight - 3-7/8 x 5-1/8

  • Basic White - 3-3/4 x 5, emboss using the Gathering Leaves Embossing Folder

  • Stamp the coneflower and butterfly images on a piece of Basic White in Black Memento Ink. Die cut with coordinating dies.

  • Color the coneflower in Light Daffodil Delight and Light Pretty Peacock Stampin’ Blends Markers.

  • Color the butterfly in Light & Dark Highland Heather, Dark Daffodil Delight and Light Pretty Peacock Stampin’ Blends Markers.

  • Die cut the stem and 2 leaves from Pretty Peacock Cardstock.

  • Adhere the die cut pieces to the white embossed layer starting with the butterfly working your way down. Use Dimensionals on the butterfly and flower. Use Liquid glue for the stem and leaves.

  • Trim off the bottom off the stem. Adhere the layers together and then to the card base.

  • Stamp the sentiment on a 3/4 strip of Basic White in Highland Heather Ink. Adhere to the card with Dimensionals.

  • Add a Purple Fine Shimmer Gem to the label.


On the inside layer (4 x 5-1/4), stamp sentiment in Highland Heather and the butterfly in Black Memento Inks. Color the butterfly with Stampin’ Blends Markers.


I love the the large flower with the embossed layer behind it.


Supply List

You can click on the item to purchase it from my Online Store.

Shop Here
 

Sketch Saturday - Delicate Pines

I love making cards with scraps and this week’s sketch challenge was perfect for this technique. I used the Elegant Pine Snowflakes Designer Series Paper.


Here’s the sketch I used from the Atlantic Hearts Sketch Challenge.


Tips & Instructions

  • Pretty Peacock Card Base - 5-1/2 x 8-1/2, score at 4-1/4

  • Basic White Layer - 4 x 5-1/4. Cut a piece of Adhesive Sheet to 4 x 5-1/4 and remove one side of the release paper and adhere to the white layer.

  • Cut strips of Elegant Pines Snowflake Designer Series Paper in different widths. Cut strips of Cherry Cobbler and Pretty Peacock in different widths. I cut mine at 1/2”, 3/4” and 1”.

  • Remove the other piece of release paper from the white layer and start adhering the strips to the layer. Let it hang over the side and then trim down as you go.

  • Stamp the sentiment in Cherry Cobbler Ink on a 3/4” strip of Basic White. Banner one end.

  • Cut a 7/8 strip of Cherry Cobbler and banner one end. Adhere the strips together. Adhere to the card.

  • Add a Pretty Peacock Faceted Snowflake.


On the inside layer (4 x 5-1/4), stamp sentiments in Cherry Cobbler Ink. Adhere a 3/4 x 5-1/4 strip of the Designer Series Paper.


I love the patterns on this paper. It works well for this design with light and dark patterns.


Supply List

You can click on the item to purchase it from my Online Store.

Shop Here
 

Pretty Fall Cards using the Baby Wipe Technique

I love making fall cards using the Baby Wipe Technique. Add some drops of ink from our Ink Refills to a baby wipe and use it to ink up your stamp. Each image will come out a little different. Aren’t they pretty!!!


Watch the video to see step by step instructions to make this design.

Click on the button below to get a printable pdf with measurements and instructions.


Baby Wipe Technique Project Sheet

I used the Gathering Moments and Artistic Leaves Stamp Sets along with a variety of Ink Refills. You can use whatever colors you want. I like a green, yellow orange and deep red or purple.


Supply List

You can click on the item to purchase it from my Online Store.

Shop Here
 

Long Time No See - Color Combo

I love coloring with ink and Wink of Stella. I decided to use this technique to color this cute little dog.


I used this week’s Color Combo from my Inspiration Calendar - Crushed Curry, Coastal Cabana and Flirty Flamingo.


Tips & Instructions

  • Flirty Flamingo Card Base - 5-1/2 x 8-1/2, score at 4-1/4

  • Basic White Layer - 3-3/4 x 5, stamp the sentiment in Coastal Cabana Ink.

  • Coastal Cabana strips - Tear 2 strips that are 3-3/4 long. Adhere both pieces to the white layer.

  • Stamp the dog on a piece of Basic White in Black Memento Ink. Color with Wink of Stella and Crushed Curry, Coastal Cabana and Flirty Flamingo Ink. To do this press a small clear block into the ink pad and use the Wink of Stella brush to color the image.
    Tip - clean the brush between ink colors by brushing it on scrap paper until it's clear.

  • Fussy cut the dog and adhere to the card with Dimensionals.


On the inside layer (3-3/4 x 5), stamp sentiment Coastal Cabana Ink. Stamp part of the dog in Black Memento Ink. Color with Ink and Wink of Stella.


I love the sparkle you get when coloring with Wink of Stella. This technique is a great way to color if you don’t have Stampin’ Blends Markers.


Supply List

You can click on the item to purchase it from my Online Store.

Shop Here
 

Sketch Challenge - Long Time No See

Isn’t this card cute? I’m not sure if it’s an Alpaca or a Llama but either way, I love it! I made it for the weekly Splitcoaststampers Sketch Challenge.


Here’s the sketch I used. You can see all the projects posted for this week’s challenge by clicking on the sketch below.


Tips & Instructions

  • Poppy Parade Card Base - 5-1/2 x 8-1/2, score at 4-1/4

  • North Pole Delivery Designer Series Paper - 4 x 5-1/4, adhere to the card base.

  • Poppy Parade Strip - 1-3/4 x 5-1/4

  • Basic White Strip - 1-1/2 x 5-1/4, stamp image in Black Memento Ink. Color with Stampin’ Blends Markers. I used Crumb Cake, Poppy Parade and Pool Party.

  • Adhere the white strip to the Poppy Parade strip and adhere to the card.

  • Fussy Cut 2 presents from the Designer Series Paper and use 2 presents from the die cut sheet in the paper pack. Arrange and adhere the presents to the card. I used Dimensionals on the 2 smaller presents.

  • Stamp sentiment on a 3/4” strip of Basic White in Poppy Parade Ink. Adhere to the card with Dimensionals.


On the inside layer (4 x 5-1/4), stamp sentiment in Poppy Parade Ink. The sentiment is from the Jar of Joy Stamp Set. Stamp the Alpaca/Llama in Black Memento Ink and color with Stampin’ Blends Markers.


I love Poppy Parade and Pool Party together for a Christmas Card.


Supply List

You can click on the item to purchase it from my Online Store.

Shop Here
 

Sketch Saturday - Jar Of Joy

Here’s my card for this week’s Atlantic Hearts Sketch Challenge. I used the Jar of Joy Stamp Set which has some cute images and sentiments.


Here’s the sketch I used. I had a hard time deciding which stamp set to use for the image but I think these cookies worked well for the sketch.


Tips & Instructions

  • Secret Sea Card Base - 5-1/2 x 8-1/2, score at 4-1/4

  • Traditions of Christmas Designer Series Paper - 4 x 5-1/4

  • Secret Sea Strip - 1-3/8 x 4

  • Basic White Strip - 1-1/4 x 4

  • Stamp the cookies on the white strip. I stamped the background in Pecan Pie Ink and the detailed in Crumb Cake Ink but stamped off first to get a very light shade. Stamp the sentiment in Real Red Ink. Adhere to the Secret Sea strip.

  • Real Red Layer - 2-1/2 x 3-1/8, adhere to the Designer Series Paper layer. Then adhere the stamped strip with Dimensionals.

  • Banner one end of a 3/4 strip of Real Red and adhere to the Designer Series Paper Layer.

  • Banner one end of a 1/2 strip of Old Olive and adhere to the Designer Series Paper Layer using Dimensionals.

  • Trim off the banner pieces that hang over the Designer Series Paper and then adhere the layer to the card base.


On the inside layer (4 x 5-1/4), stamp sentiment in Real Red Ink. Stamp the snowman in Black Memento Ink. Stamp the scarf in Real Red Ink and color the carrot with a Pumpkin Pie Stampin’ Blends Marker.


I love the way the cookies turned out. I played with the colors to get the right look.


Supply List

You can click on the item to purchase it from my Online Store.

Shop Here
 

Triple Fold Cards

This is a new version of the Triple Fold Card design for me. I’ve made them in the past but a little different. These cards are easy to make and turn out beautiful.


Watch the video to see step by step instructions to make this design.

Click on the button below to get a printable pdf with measurements and instructions.


Triple Fold Card Project Sheet

This card was made using the new Traditions of Christmas products. The Designer Series Paper in this suite is gorgeous with lots of gold accents. The label was stamped and die cut using the Traditional Labels Bundle.


I love the Painterly Pear products and they are perfect for a fall Birthday card. The sentiment is from The Right Words Stamp Set.


Supply List

You can click on the item to purchase it from my Online Store.

Shop Here
 

Cheers & Sips Color Combo

I wasn’t sure about this color combo but it works great with the Cheers & Sips images. Don’t these drinks look refreshing?


The Color Combo is from my September Inspiration Calendar - Calypso Coral, Fresh Freesia and Mossy Meadow. You can get my calendar each month when you subscribe to my email list.


Subscribe To My Email List

Tips & Instructions

  • Mossy Meadow Card Base - 5-1/2 x 8-1/2, score at 4-1/4

  • Basic White - 3-3/4 x 5, emboss using the Joined Together 3D Embossing Folder and adhere to the card base.

  • Stamp the 2 different glass images from the Cheers & Sips Stamp Set in Black Memento Ink and die cut with the coordinating dies.

  • Color the drinks with Stampin’ Blends Markers leaving a little white space at the top. I used Light Calypso Coral on the tall glass and Dark Fresh Freesia on the shorter glass. Adhere the glasses to the card with Dimensionals.

  • Stamp the 2 sprigs in Mossy Meadow Ink and die cut with the coordinating dies. Adhere to the card.

  • Stamp the sentiment on a 5/8 strip of Basic White in Fresh Freesia Ink and adhere to the card with Dimensionals.

  • Add a Starburst Sequin.


On the inside layer (4 x 5-1/4), stamp sentiments in Mossy Meadow Ink. Stamp the glass and orange slice in Black Memento Ink. Color the drink with Dark Fresh Freesia and the orange slice in Dark & Light Calypso Coral Stampin’ Blends Markers.


I love the embossed layer with the drinks!


Supply List

You can click on the item to purchase it from my Online Store.

Shop Here
 

Sketch Challenge - Spooky Halloween

I made a spooky Halloween Card for this week’s sketch challenge. The Spooky Sweet Designer Series Paper has fun die cuts and panel pieces you can use to easily make some fun cards.


Here’s the sketch I used from the Splitcoaststampers Weekly Sketch Challenge. You can see all the projects posted for this week’s challenge by clicking on the sketch below.


Tips & Instructions

  • Basic Black Card Base - 5-1/2 x 8-1/2, score at 4-1/4.

  • Spooky Sweet Designer Series Paper (orange pattern) - 3-1/2 x 4-3/4, adhere to the card base.

  • Die cut one of the scene panels from the Designer Series Paper using the Everyday Arches Dies and adhere to the card.

  • Die cut the gray and black pattern using the Everyday Arches Dies and stamp the sentiment in Black Memento Ink. Sdhere to the card.

  • Add some black Shimmer Start Foam Stickers to the card.


On the inside layer (4 x 5-1/4), stamp sentiment Black Memento Ink. Add some of the die cut pieces from the paper pack.


I love the little kitty peeking through the window on this panel.


Supply List

You can click on the item to purchase it from my Online Store.

Shop Here
 

Top Flap Fun Fold Cards

I made these Top Flap Fun Fold Cards on my YouTube Channel today using brand new products. The Gathering Together and Modern Christmas Suites are part of the Online Exclusives that launch on September 3, 2025.


Watch the video to see step by step instructions to make this design.

Click on the button below to get a printable pdf with measurements and instructions.


Top Flap Fun Fold Card Project Sheet

I love the fall colors and the gold accents in the Gathering Together Designer Series Paper. The stamps I used are from the Gathering Moments Stamp Set.


This card was made using the Modern Christmas Suite of products. I love the black, white and gold for a Christmas card. The Ornamental Christmas Stamp Set has some fun sentiments.


The products I used for these cards will be available for purchase starting September 3, 2025 when the new Online Exclusives Launch.

Shop Here
 

Label Me Grateful Color Combo

This week’s Color Combo is perfect for a pretty fall birthday card. I used the Label Me Grateful Bundle along with the new Gathering Leaves Embossing Folder.


The Color Combo is from my August Inspiration Calendar - Highland Heather, Blackberry Bliss and Lemon Lime Twist.

You can get my calendar each month when you subscribe to my email list.


Subscribe To My Email List

Tips & Instructions

  • Blackberry Bliss Card Base - 5-1/2 x 8-1/2, score at 4-1/4

  • Basic White Layer, emboss using the Gathering Leaves Embossing Folder and adhere to the card base.

  • Die cut the large sentiment label from Basic White using the Label Me Grateful Dies. Stamp sentiment in Blackberry Bliss Ink. The sentiment is from the Long Time No See Stamp Set.

  • Die cut the branches from Lemon Lime Twist, the leaves from Blackberry Bliss and the flowers from Highland Heather Cardstock.

  • Arrange the leaves and flowers on the label and then adhere to the card with Dimensionals.

  • Add some small iridescent Pearls to the flower centers.


On the inside layer (4 x 5-1/4), stamp sentiment Blackberry Bliss Ink. The sentiment is from the Label Me Grateful Stamp Set. Die cut another set of leaves from Blackberry Bliss and adhere to the layer.


I love the embossed layer on this card, it goes nicely with the leaves that I die cut.


Supply List

You can click on the item to purchase it from my Online Store.

Shop Here
 

Sketch Challenge - Gathering Moments

I’m using brand new products for this week’s Sketch Challenge. They’re from the Gathering Together Suite. The Designer Series Paper is beautiful and I love the large leaf die cuts with the small holes punched out.


Here’s the sketch I used from the weekly Splitcoaststampers Sketch Challenge. You can see all the projects posted for this week’s challenge by clicking on the sketch below.


Tips & Instructions

  • Early Espresso Card Base - 5-1/2 x 8-1/2, score at 4-1/4

  • Gathering Together Designer Series Paper - 4-1/4 x 5-1/2, adhere to the card base.

  • Gold Foil Strip - 1-3/4 x 5-1/2, emboss using the Gathering Leaves Embossing Folder and adhere to the card.

  • Die cut the large leaf from the Gathering Together Designer Series Paper using the Gathering Moments Dies and adhere to the card.

  • Die cut the label from Basic White using the smallest die from the Nested Essentials Dies. Stamp the sentiment from the Gathering Moments Stamp Set in Early Espresso Ink. Adhere to the card with Dimensionals.

  • Add a Flower Accent to the label.


On the inside layer (4 x 5-1/4), stamp sentiment the leaves in Early Espresso Ink, stamping a 2nd and 3rd time without re-inking.


I love the gold accents in the Designer Series Paper along with the gold embossed strip.


The products I used on this card will be available starting September 3, 2025 with the new Online Exclusives Launch

Shop Here
 

Sketch Saturday - Sunflowers

I finally used the Sunflower 3D Embossing folder and wow, it’s beautiful! I used it along with the You Are Remarkable Stamp Set for this week’s Atlantic Hearts Sketch Challenge.


Here’s the sketch I used. It’s simple but there’s so much you can do with it.


Tips & Instructions

  • Thick Basic White Card Base - 5-1/2 x 8-1/2, score at 4-1/4

  • Crushed Curry Cardstock - 4 x 5-1/4, emboss using the Sunflower 3D Embossing Folder. Cut into four pieces, each measuring 1-1/4 x 4. Make sure you keep them in order.

  • Adhere the cardstock pieces to the card front in the order you cut them, leaving white space between each piece.

  • Die cut the banner piece from Basic White using the Nested Essentials Dies. I used the 2nd from the largest die.

  • Stamp the sentiment in Mossy Meadow Ink and adhere to the card with Dimensionals.

  • Tie a bow with 2 strands of Linen Thread and adhere to the banner with a Glue Dot.

  • Add some Mossy Meadow Low-Profile Sparkle Dots.


  • On the inside white layer (3-3/4 x 5), stamp flower in Mossy Meadow Ink. The flower is from the You Are Remarkable Stamp Set.

  • Stamp the sentiment in Crushed Curry Ink. The sentiment is from the Charming Day Stamp Set.

  • Adhere to a 4 x 5-1/4 piece of Crushed Curry and then to the card inside.


I love this Embossing Folder, it is beautiful just as it is or you can add color to it for a different look.


Supply List

You can click on the item to purchase it from my Online Store.

Shop Here
 

Emboss Resist Technique

I love how these cards turned out using the Emboss Resist Technique. It’s fun to do and you can play with lots of different color variations.


Watch the video to see step by step instructions to to this technique.

Click on the button below to get a printable pdf with measurements and instructions.


Emboss Resist Card Project Sheet

This card was made using the Impressions Abloom Stamp Set and Blackberry Bliss, Pretty In Pink and Daffodil Delight Ink Pads.


I used the Impressions Abloom Stamp Set on this card as well. It has a very different look with Strawberry Slush, Timid Tiger and Fresh Freesia Ink Pads.


This card is so pretty. I used the Natural Botanicals Stamp Set along with Shaded Spruce, Garden Green and Granny Apple Green Ink Pads.


Supply List

You can click on the item to purchase it from my Online Store.

Shop Here
 

You Are Remarkable - Color Combo

I decided to use our Watercolor Pencils and Wink of Stella to color this pretty flower from the You Are Remarkable Stamp Set. I love the sentiments in this set.


The Color Combo is from my August Inspiration Calendar - Lemon Lolly, Gorgeous Grape and Old Olive.

You can get my calendar each month when you subscribe to my email list.


Subscribe to my Email List

Tips & Instructions

  • Gorgeous Grape Card Base - 5-1/2 x 8-1/2, score at 4-1/4

  • Lemon Lolly Layer - 4 x 5-1/2, adhere to the card base.

  • Basic White Layer - 3-3/4 x 5, stamp the flower in Black Memento Ink. Stamp the dots around the flower in Lemon Lolly Ink.

  • Color the flower and leaves with Watercolor Pencils and then blend them with Wink of Stella. I used Gorgeous Grape and Old Olive pencils. Color the flower center in Lemon Lolly Ink. I did this by pressing a small clear block onto the ink pad and then picked up ink with the Wink of Stella Brush and painted the image.
    Be sure to clean your Wink of Stella brush between colors by brushing it on a piece of scrap paper until it’s clear.

  • Adhere the stamped layer to the card.

  • Stamp the sentiment on a 1-1/4 strip of Basic White in Old Olive Ink. Cut a banner at the bottom.

  • Banner the bottom of a 1-3/8 strip of Old Olive and cut a little longer than the white banner. Adhere the banner pieces together. Adhere to the card with Dimensionals.

  • Tie a bow with 2 strands of Linen Thread and adhere to the banner with a Glue Dot.


On the inside layer (4 x 5-1/4), stamp sentiment in Old Olive Ink. Stamp the flower in Black Memento Ink and color it like the one on the front.


I love the shine from the Wink of Stella on the flower, so pretty in person.


Supply List

You can click on the item to purchase it from my Online Store.

Shop Here
 

Sketch Challenge - Floral Thank You Card

This week’s Sketch Challenge from Splitcoaststampers was fun. I used the Frames & Flowers Designer Series Paper which is marked down and on the Last Chance List.


Here’s the sketch I used. You can see all the projects posted for this week’s challenge by clicking on the sketch below.


Tips & Instructions

  • Lost Lagoon Card Base - 5-1/2 x 8-1/2, score at 4-1/4

  • Frames & Flowers Designer Series Paper (green pattern) - 4-1/4 x 5-1/2, adhere to the card base.

  • Cut 2 squares of 2 different patterns at 1-3/4 x 1-3/4 and adhere to the card as shown.

  • Use the die-cut from the Frames & Flowers Designer Series Paper and stamp the sentiment in Lost Lagoon Ink. The sentiment is from the Label Me Grateful Stamp Set. I broke the sentiment into two lines to fit the square area. Adhere the die cut to the card with Dimensionals.

  • Add some Timid Tiger Flat Pearls.


On the inside layer (4 x 5-1/4), add a die-cut from the Designer Series Paper pack.


I love the floral piece on this card. The colors and flowers are so pretty.


Supply List

You can click on the item to purchase it from my Online Store.

Shop Here
 

Sketch Saturday - Floral Delight Birthday Card

I’m a day late with my Saturday Sketch Challenge card but that doesn’t matter, I got it done. I used the Floral Delight Designer Series Paper along with the Year of Flowers Stamp Set.


Here’s the sketch I used. It’s from the weekly Atlantic Hearts Sketch Challenge.


Tips & Instructions

  • Old Olive Card Base - 5-1/2 x 8-1/2, score at 4-1/4

  • Basic White Layer - 3-3/4 x 5

  • Old Olive - 3 strips cut at 1-1/8 x 3-1/8

  • Floral Delight Designer Series Paper - 3 strips cut at 1 x 3 (cut and keep them in order to create a scene that flows nicely across the 3 strips)

  • Adhere the Designer Series Paper strips to the Old Olive strips and then to the white layer.

  • Floral Delight Designer Series Paper (yellow pattern) - 2-1/2 x 3-3/4, adhere to the white layer.

  • Wrap a piece of White Ribbon around the layer and adhere to the back with Scotch Tape. Adhere the layer to the card. Tie a bow with a piece of ribbon and adhere to the card with Mini Glue Dots.

  • Cut a label from Basic White using the Stylish Shapes Dies and stamp the sentiment on it in Old Olive Ink. The sentiment is from the Year of Flowers Stamp Set. Adhere to the card with Dimensionals.

  • Add some Low-Profile Sparkle Dots.


On the inside layer (4 x 5-1/4), stamp sentiment Old Olive Ink. Add a 3/4 x 4 piece of the Designer Series Paper.


I love the greens and yellows together in this card.


Supply List

You can click on the item to purchase it from my Online Store.

Shop Here
 

Squeeze Box Fun Fold Cards

These Squeeze Box Fun Fold cards look like a regular card from the front but open it up and there’s lots inside.


Watch the video to see step by step instructions to make this design.

Click on the button below to get a printable pdf with measurements and instructions.


Squeeze Box Fun Fold Card Project Sheet

I used the Wildflower Birthday Designer Series Paper for this card. It has fun patterns and 2 sheets of die cuts to add to your project.


The Beautiful Gallery Designer Series Paper has gorgeous patterns and I used the Damask Embossing Folder which matches one of the patterns.


Supply List

You can click on the item to purchase it from my Online Store.

Shop Here
 

Party Piggy Shaker Card - Color Combo

I made this cute Shaker Card using this week’s Color Combo and the Party Piggy Bundle. The dies in the bundle have a circle that coordinates with the Shaker Domes that you can fill with fun shaker bits.


The Color Combo is from my August Inspiration Calendar - Lemon Lime Twist, Pretty Peacock and Berry Burst. You can get my calendar each month when you subscribe to my email list.


Subscribe To My Email List

Tips & Instructions

  • Pretty Peacock Card Base - 5-1/2 x 8-1/2, score at 4-1/4

  • Basic White Layer - 4 x 5-1/4, adhere to the card base.

  • Lemon Lime Twist Layer - 3-3/4 x 5, emboss using the Dotted Circles 3D Embossing Folder and adhere to the card.

  • Stamp the piggy body and head on Basic White in Berry Burst Ink, stamping off first on a piece of scrap paper to get a lighter shade. Die cut with the coordinating dies.

  • Use the circle die to cut the middle of the piggy’s body out.

  • Stamp the hat and flags on Basic White in Black Memento Ink, die cut with coordinating dies and color with Stampin’ Blends Markers. Use Berry Burst for the hat and Pretty Peacock and Lemon Lime Twist for the flags.

  • Take one of the Small Circle Shaker Domes and fill it with Loose Shaker Elements. I filled it about 1/3 to 1/2 full. Punch a 1-7/8 circle from Basic White Cardstock adhere to the back of the dome. The dome has adhesive on the back so just remove the release paper to adere it.

  • Remove the release paper from the front of the dome and fit it into the opening in the hole that was cut out from the piggy’s body. Press to secure it.

  • Adhere the piggy to the card.

  • Adhere the hat to the piggy with Dimensionals. Adhere the flags.

  • Stamp the sentiment on a 3/4 strip of Basic White in Berry Burst and banner each end. Adhere to the card with Dimensionals.


On the inside layer (4 x 5-1/4), stamp sentiment in Berry Burst Ink and the confetti and hat in Lemon Lime Twist Ink.


Isn’t this a fun card? I think the recipient will love to shake it!


Supply List

You can click on the item to purchase it from my Online Store.

Shop Here