Sketch Saturday - Party Puffins

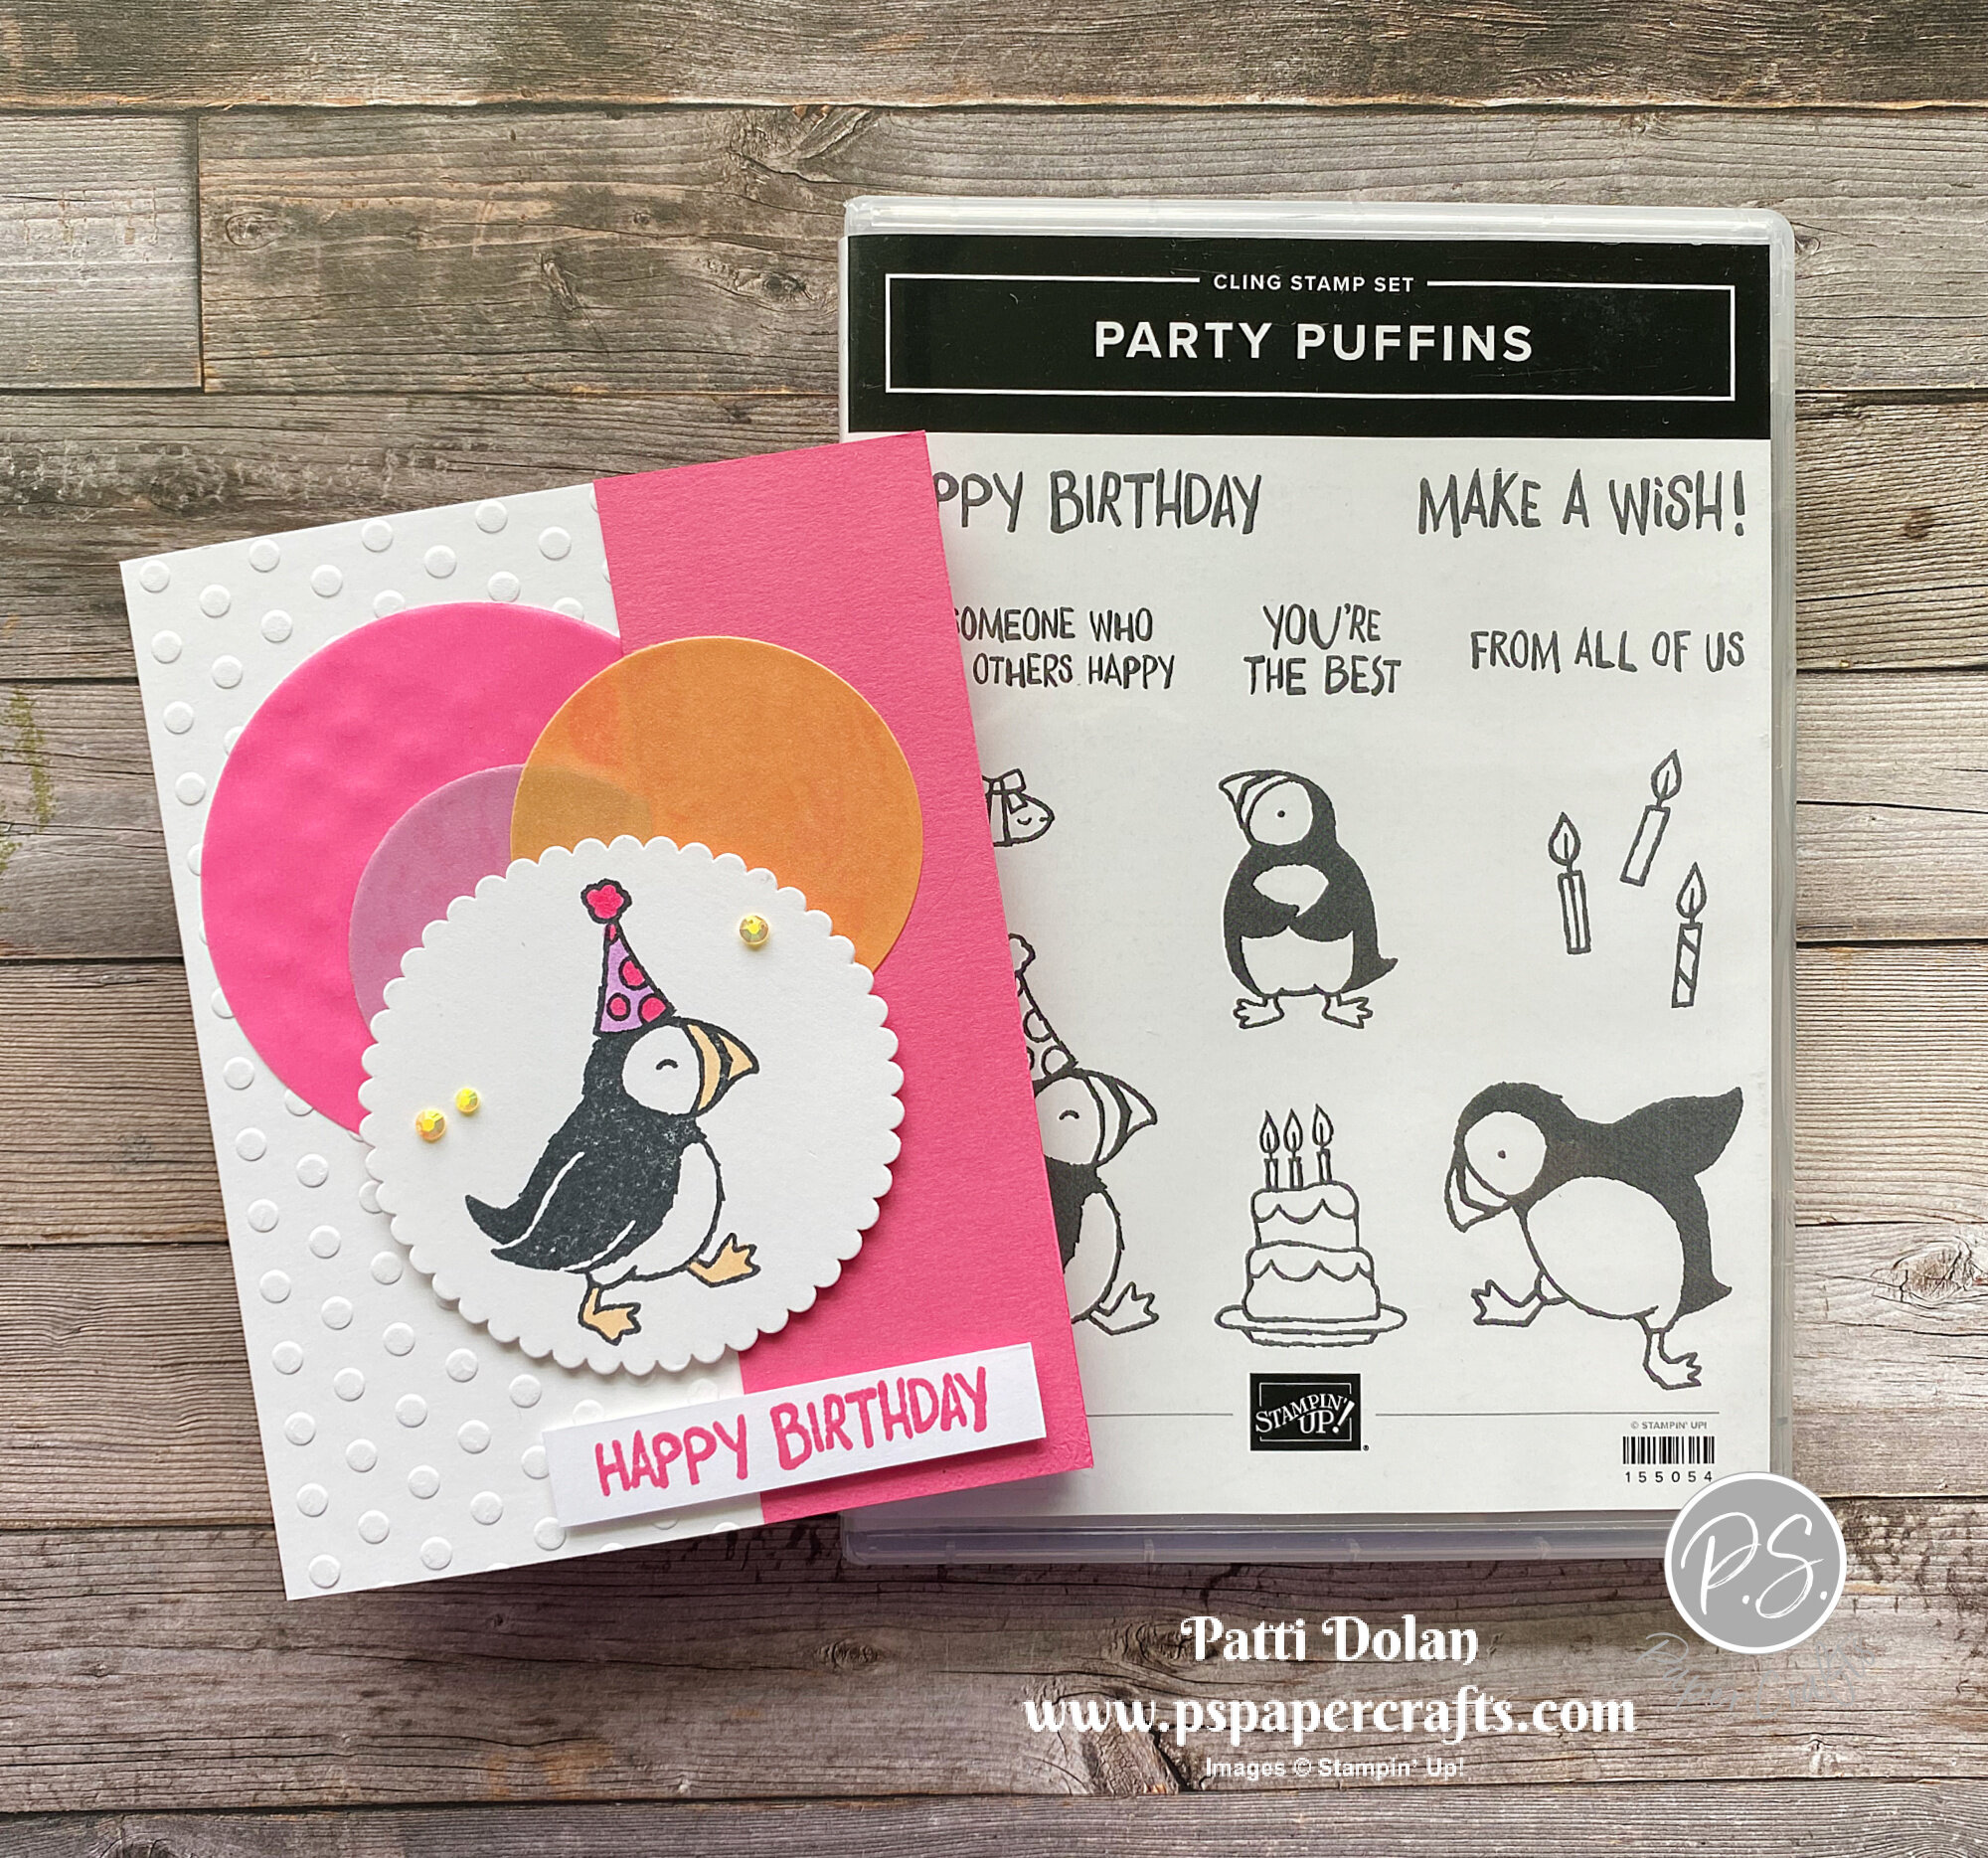
This little Party Puffin is so fun, it makes me smile! I created this card for the weekly sketch challenge from Atlantic Hearts.

 
Sketch Saturday - Party Puffins card2.jpeg
 

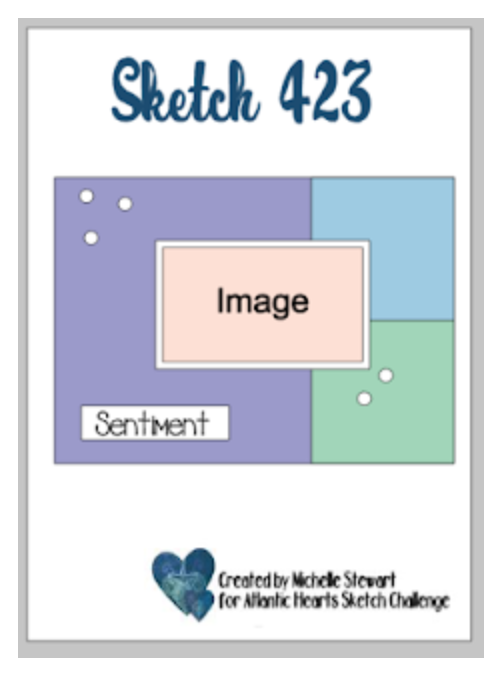
This is the sketch I followed. It was a little tough for me but once I decided to go with the Party Puffins and the new Shimmer Vellum it came together pretty easy.

 
Screen Shot 2021-07-03 at 9.15.16 PM.png
 

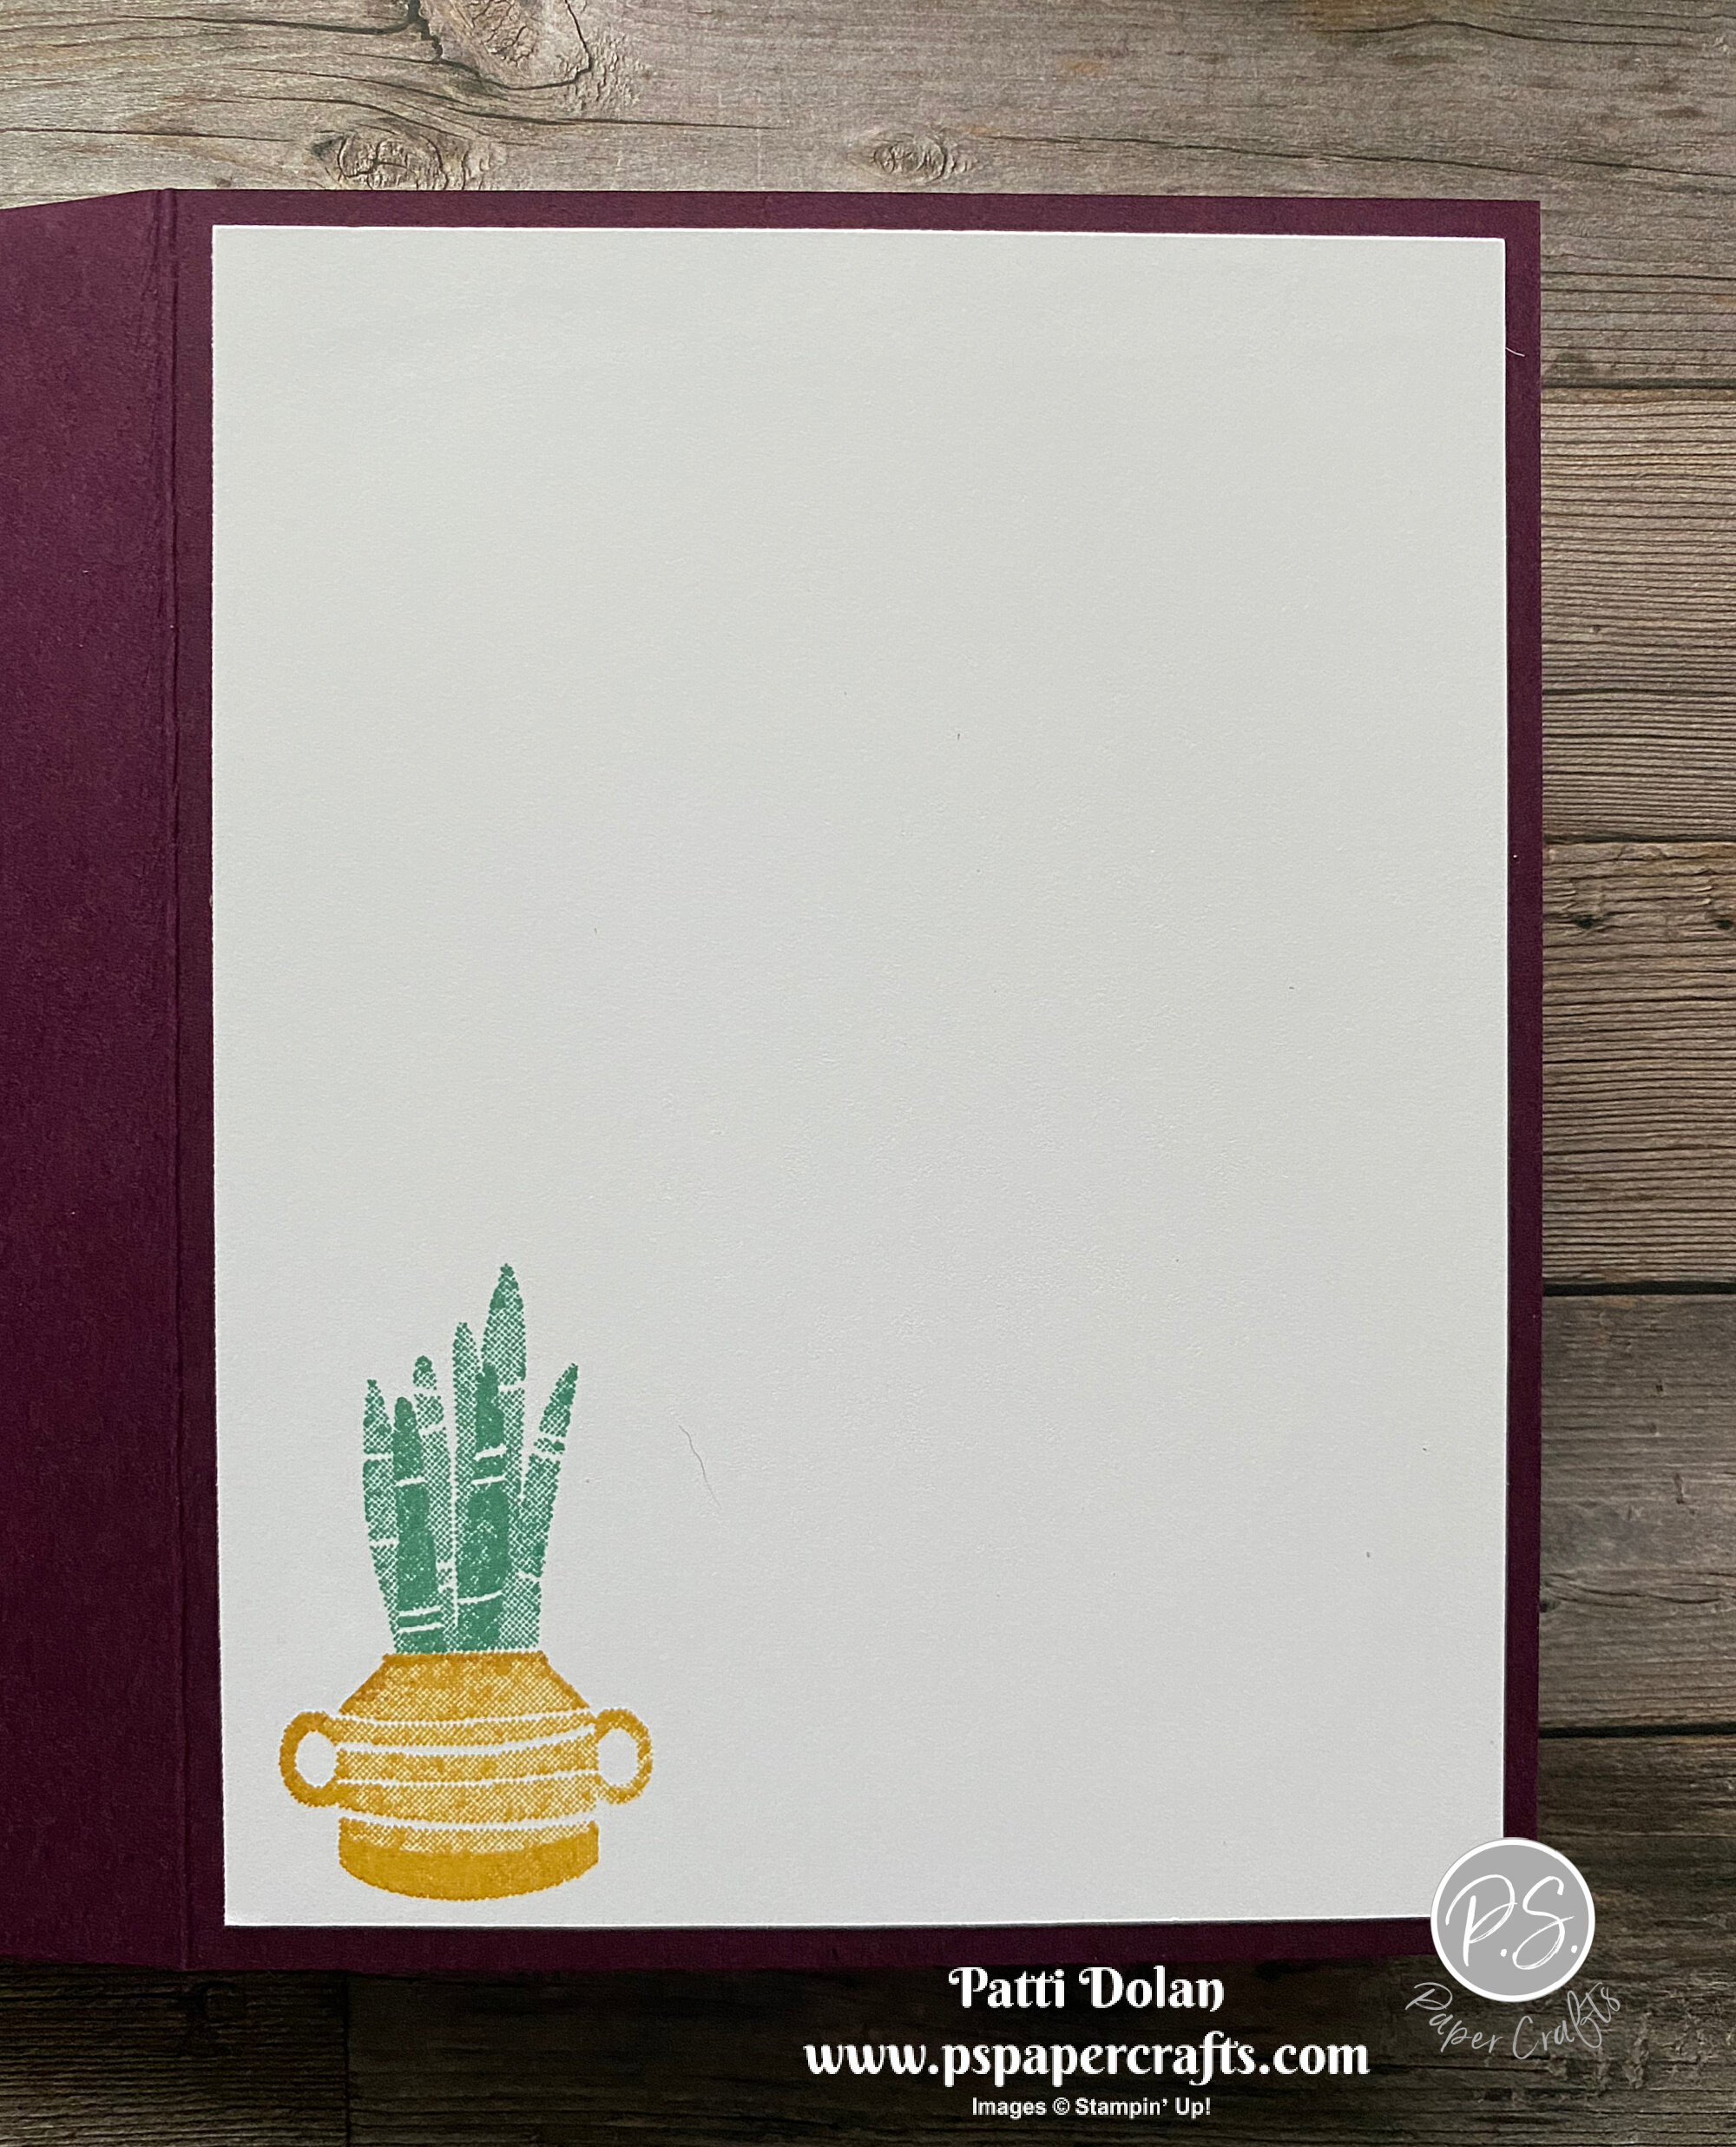
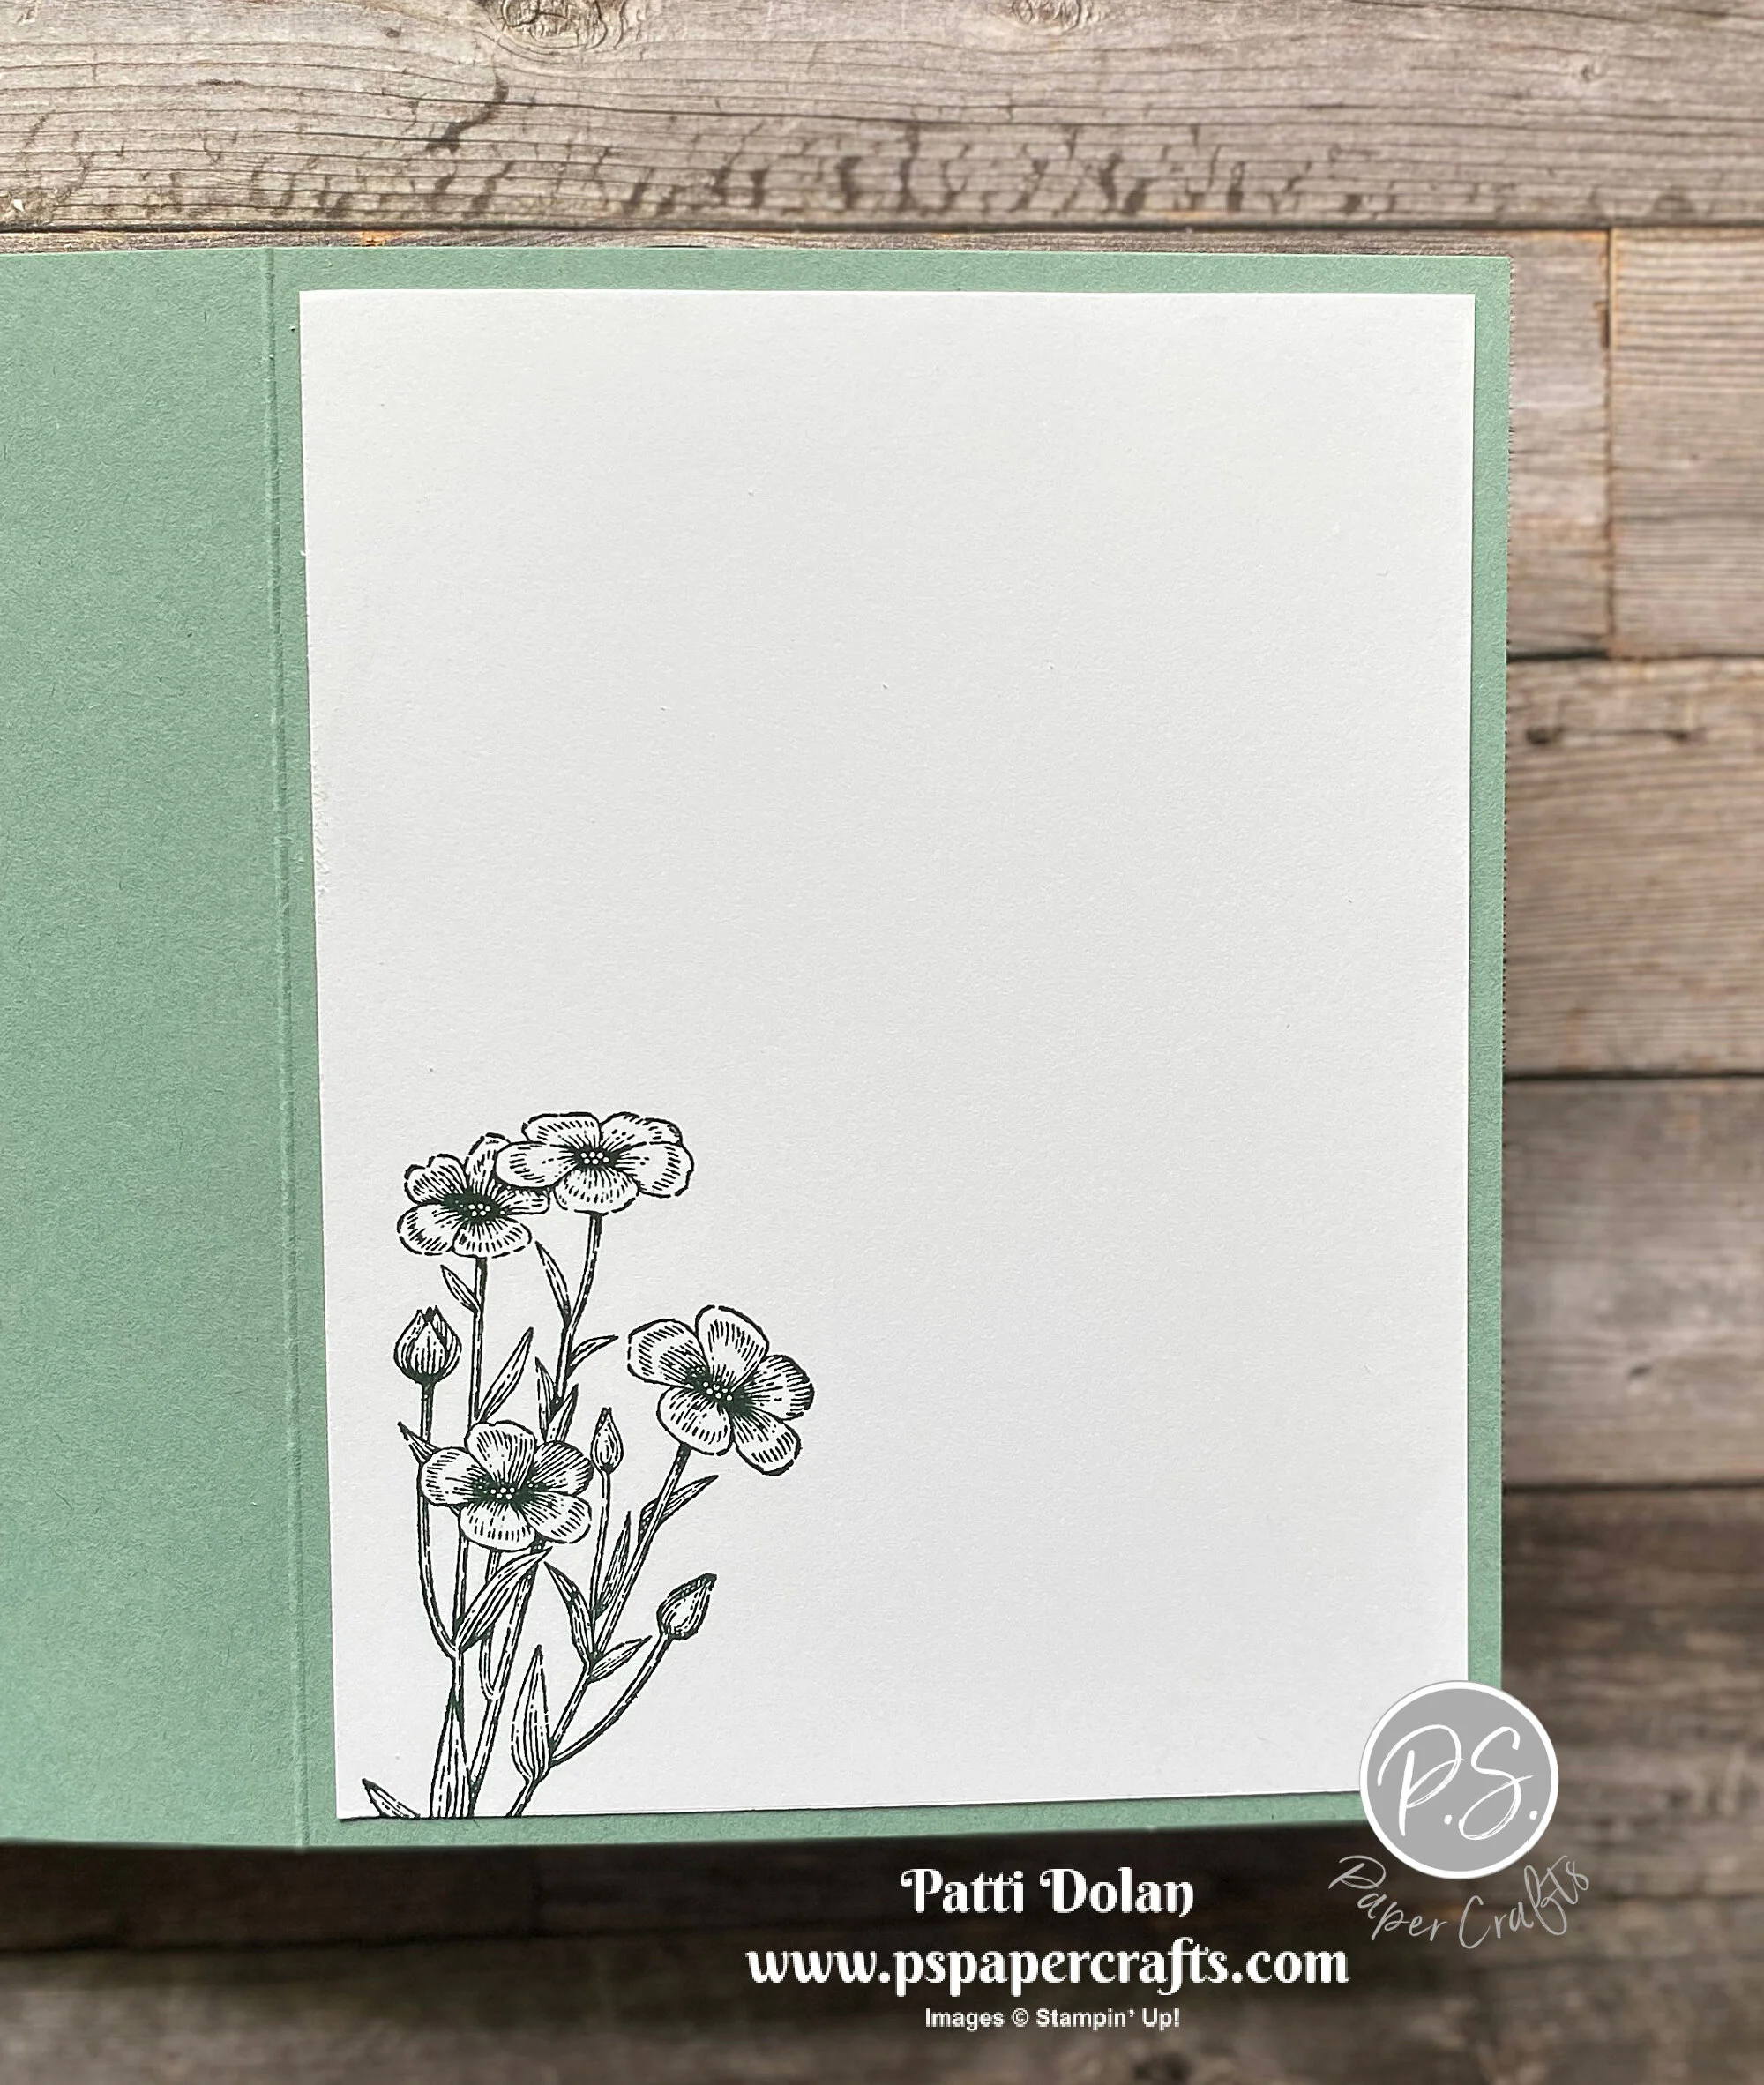
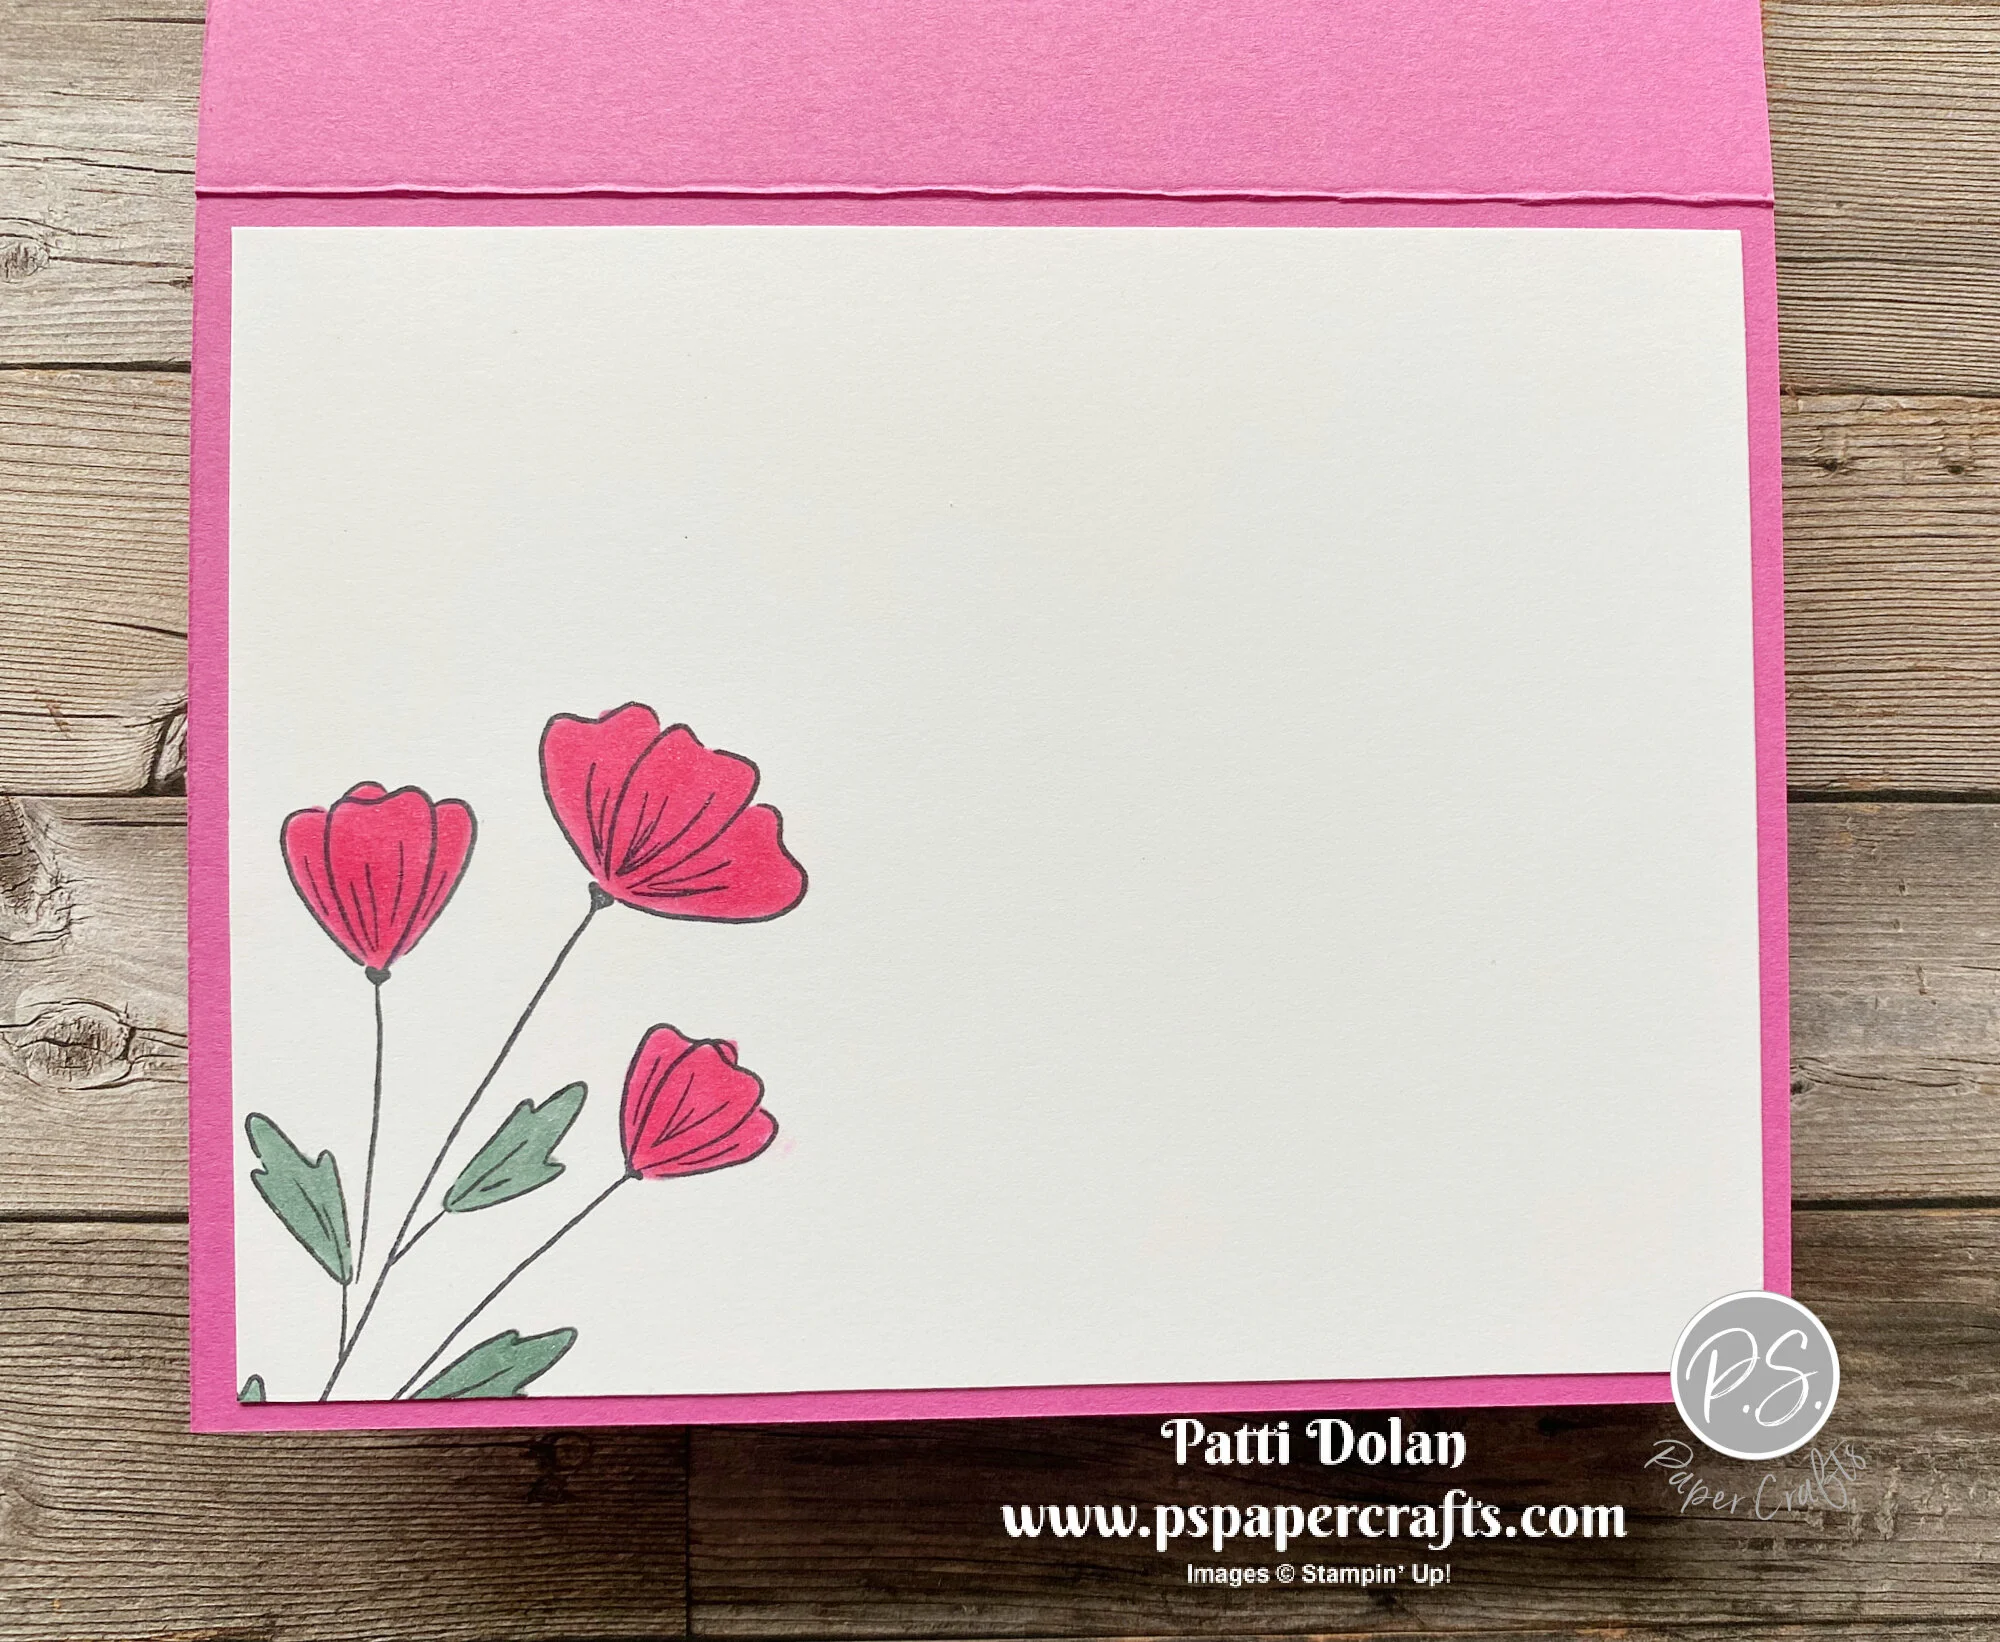
The images and sentiments are so cute in this stamp set. I used the cake on the inside of the card.

 
Sketch Saturday - Party Puffins Stamp.jpeg
 

Tips & Instructions

  • Polished Pink Card Base - 5 1/2 x 8 1/2, score at 4 1/4

  • Basic White Layer - 5 1/2 x 2 1/2, emboss with the Dots Embossing Folder and adhere to left side of the card front.

  • Polished Pink Layer - 5 1/2 x 1 3/4.

  • Using largest Layering Circle Die, cut Polished Pink Shimmer Vellum.

  • Using 4th largest Layering Circle Die, cut Pale Papaya Shimmer Vellum.

  • Using 5th largest Layering Circle Die, cut Fresh Freesia Shimmer Vellum.

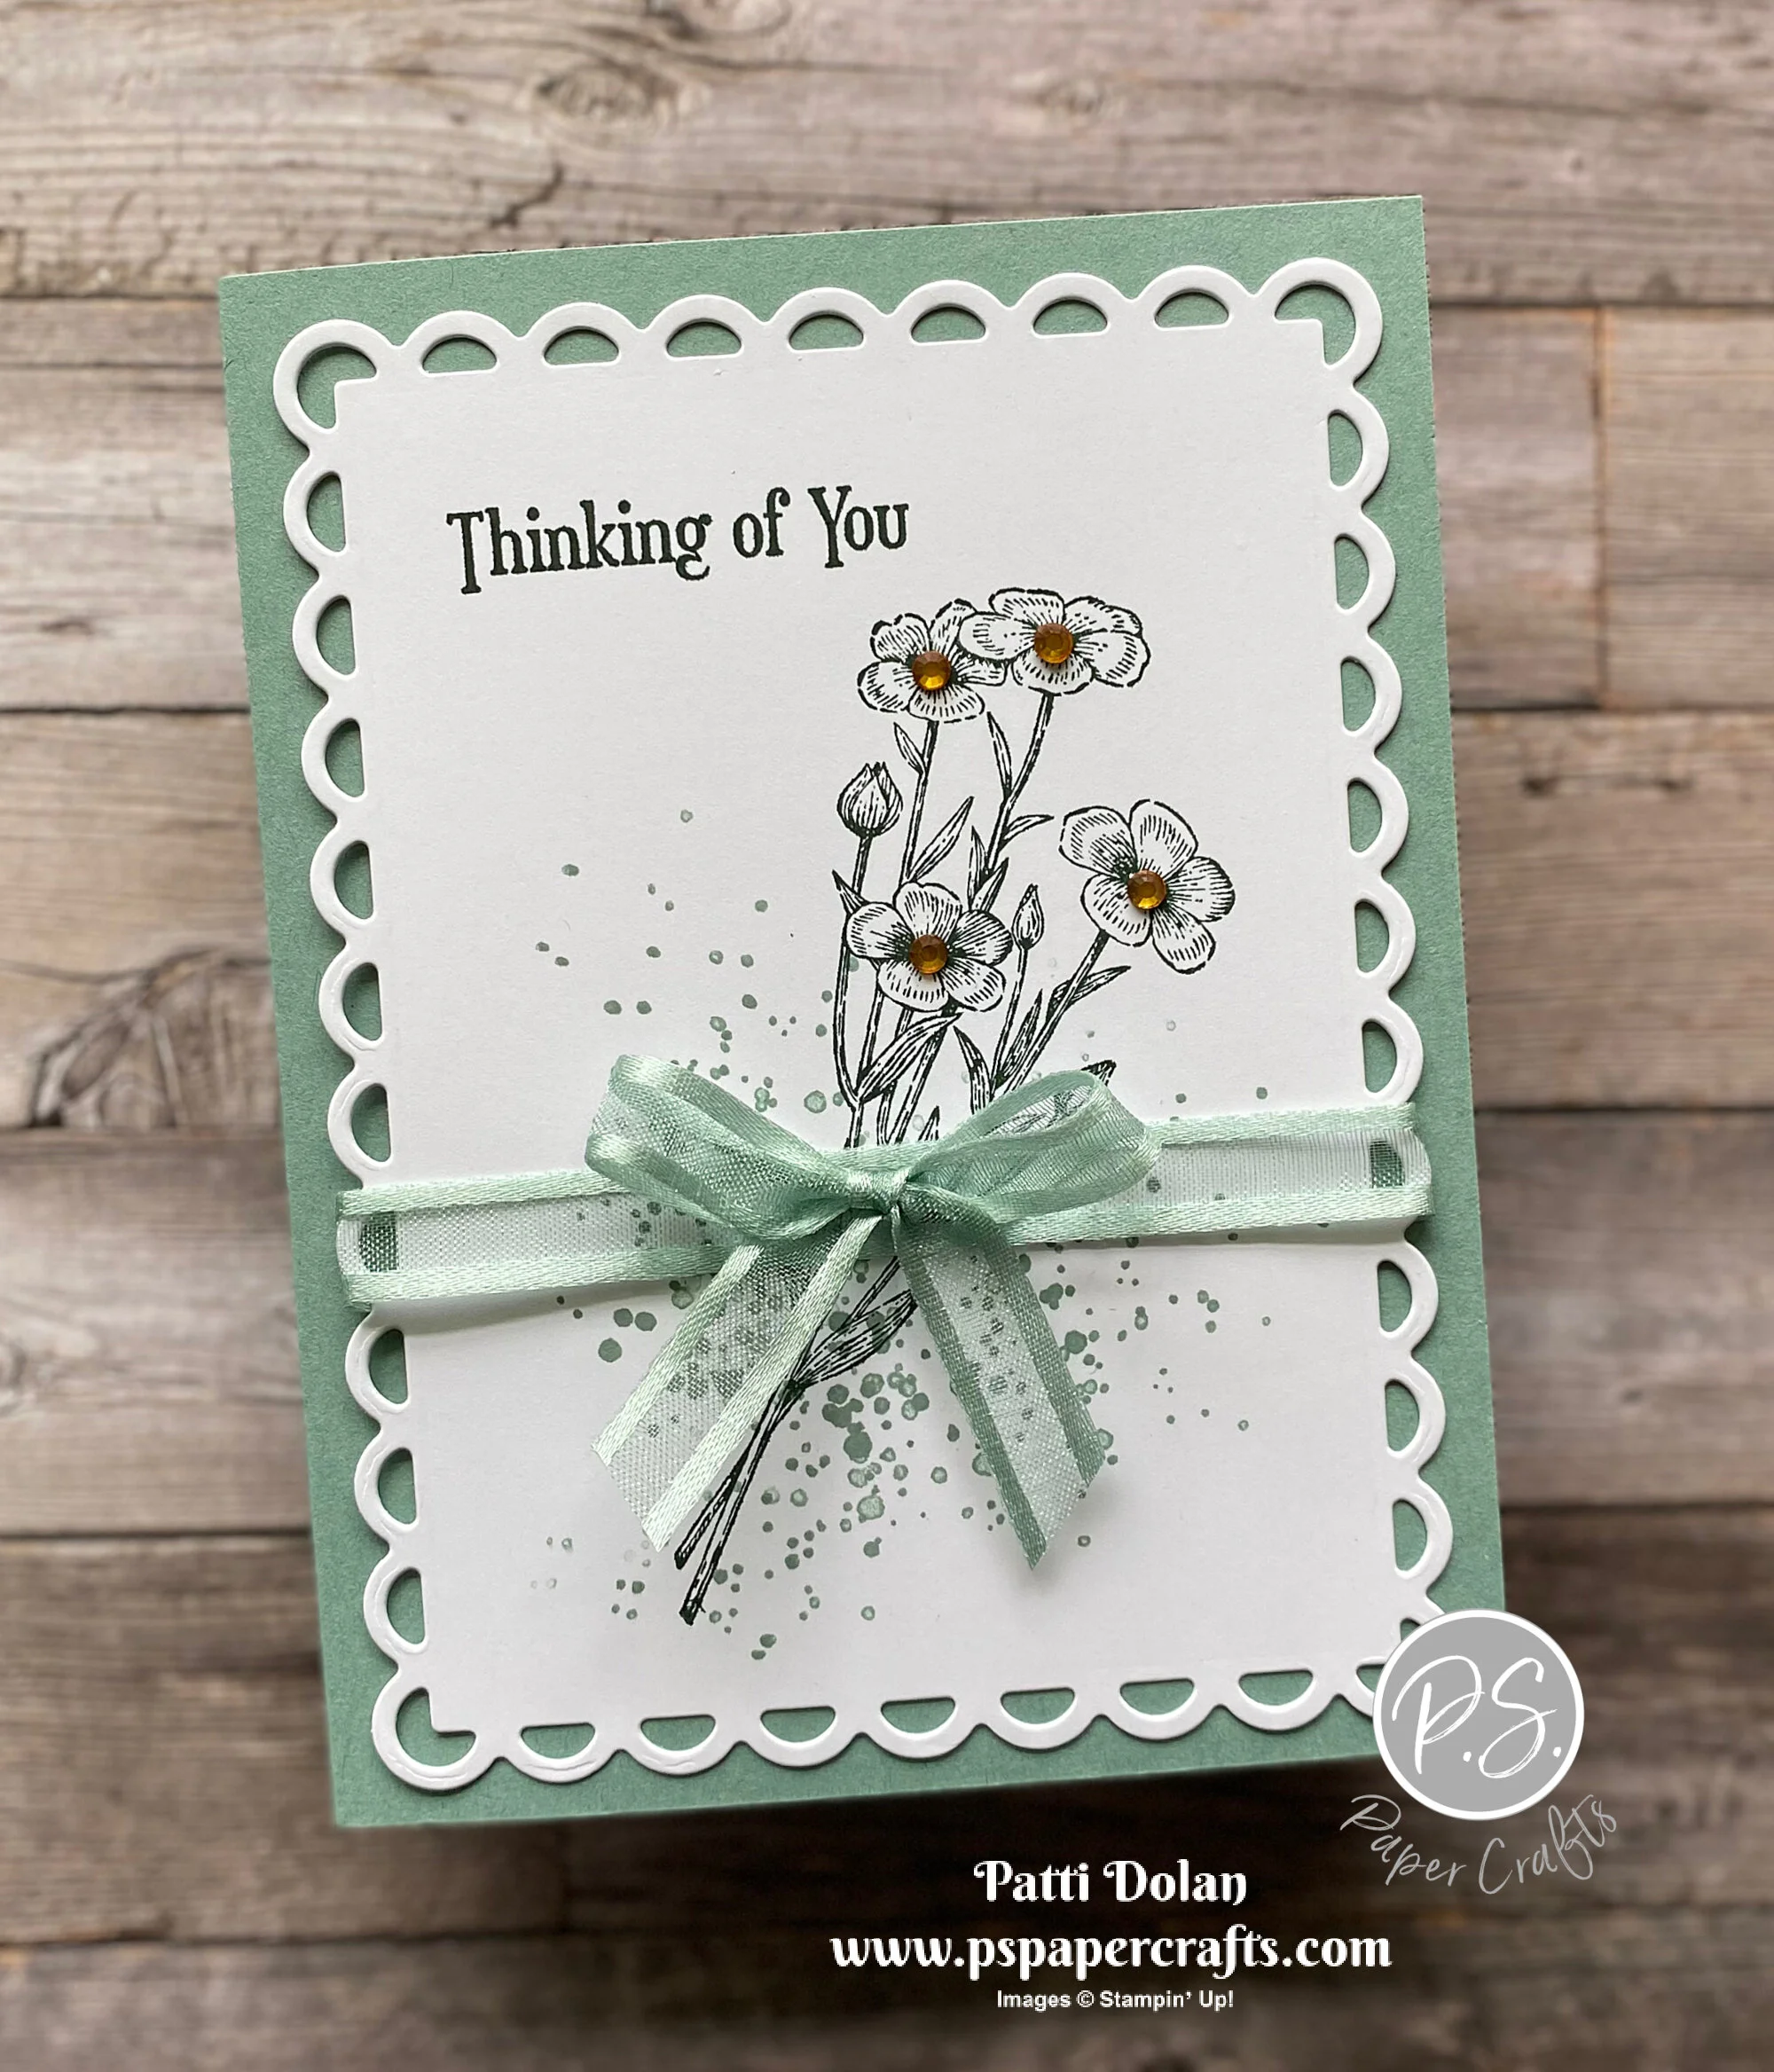
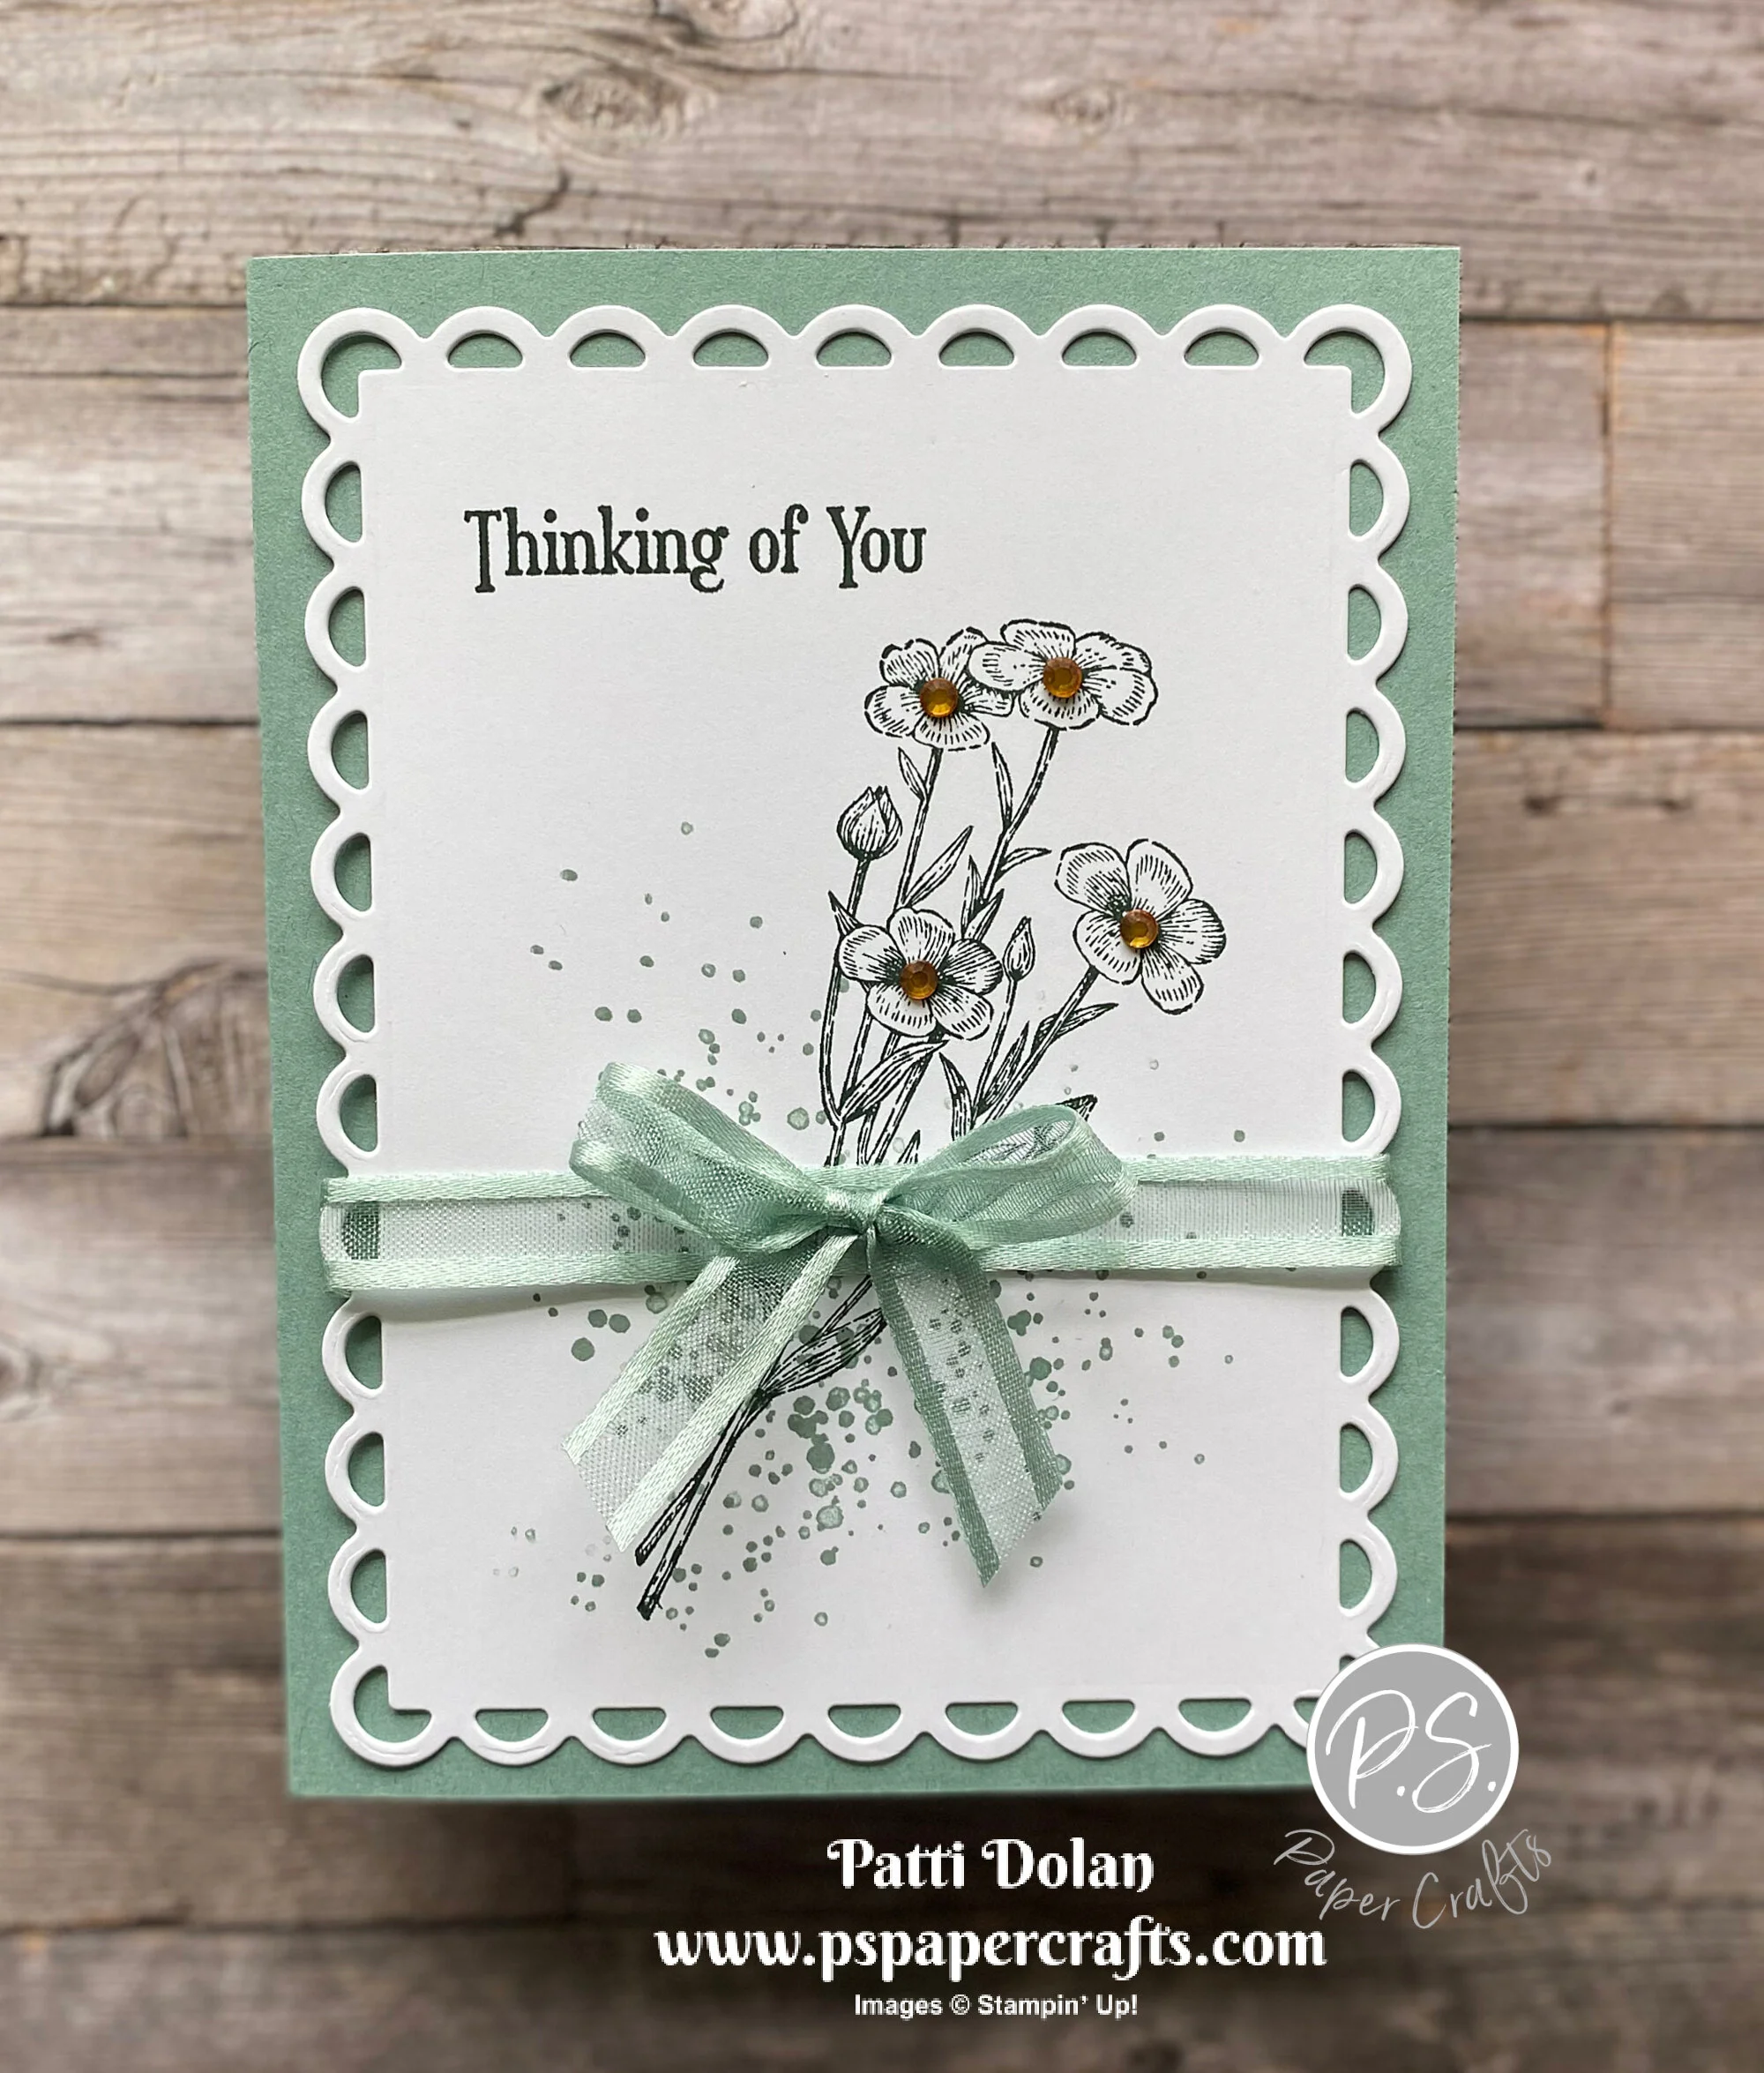
  • Using 2nd largest scalloped Layering Circle Die, cut Basic White Cardstock and stamp Puffin Image wth Black Memento Ink. Color hat with Dark Fresh Freesia and Dark Polished Pink Stampin’ Blends. Color beak and feet with Dark Pale Papaya Stampin’ Blend.

  • Lay circles out and adhere to card using Liquid Glue. I used my finger to rub the glue around to get a sheer look for the vellum circles. Adhere the Polished Pink and Fresh Freesia circles, then the Polished Pink Cardstock Layer, then the Pale Papaya Circle. Finally, adhere the stamped scalloped circle using Dimensionals.

  • Stamp sentiment on 1/2” strip of Basic White Cardstock using Polished Pink Ink and adhere using Dimensionals.

  • Add some Wink Of Stella to the hat and Pale Papaya Jewels to the stamped circle.

 
Sketch Saturday - Party Puffins card1.jpeg
 

On the inside stamp the sentiment with Polished Pink Ink. Stamp the cake with Black Memento Ink. Color the cake with Polished Pink, Fresh Freesia and Pale Papaya Stampin’ Blends. Add some Wink Of Stella to the icing and the candles.

 
Sketch Saturday - Party Puffins inside.jpeg
 

Supply List

Love Patti.png
Shop Here
 

Fun Pinwheel Cards

This was such a fun card to make. It’s called a Pinwheel Card and it’s much easier to make than it looks. I used the Sweet As A Peach Stamp Set and You’re A Peach Designer Series Paper.

 
Pinwheel Card full.jpeg
 

In the video I’ll walk you through all the steps to make a pinwheel card. Change the paper and stamps to make it for any occasion.


Here’s a view from the top. See, it’s a pinwheel!

 
Pinwheel Card top.jpeg
 

Tips & Instructions (see video for demonstration)

  • Basic White Cardstock - 5 3/4 x 4 1/4, score on the 5 3/4 at 3/4, 1 1/2, 2 1/4 and 3. Fold, burnish and adhere the end to create a square column.

  • Basic White Cardstock - 3 pieces at 4 1/4 x 2 3/4. Adhere to each of the sides of the square column to create the pinwheel.

  • Basic measurements for layers to decorate for each page. Lay out your pieces to see how they look and make sure they aren’t too busy. Use solid cardstock to help with this.

    • 4 1/4 x 2

    • 4 1/4 x 2 3/4

    • Stitched Rectangle that will fit and be hidden when closed

I’m considering this one the front of the card. The striped panel is 4 1/4 x 2 and the Calypso Coral panel is 4 1/4 x 2 3/4. Use the largest of the narrow Rectangle Stitched Dies to cut piece of Basic White Cardstock. Stamp the sentiment with Calypso Coral, the branches with Pear Pizzaz and the peaches with Pale Papaya.


For this page the polka dot panel is 4 1/4 x 2 and the floral panel is 4 1/4 x 2 3/4. Use the largest of the narrow Rectangle Stitched Dies cut piece of Basic White Cardstock. Stamp the sentiment with Calypso Coral, the branches with Pear Pizzaz, the flowers with Pale Papaya and the flower centers with Calypso Coral.

 
Pinwheel Card flowers.jpeg
 

For this panel the polka dot panel is 4 1/4 x 2 and the Balmy Blue panel is 4 1/4 x 2 3/4. I added a 4 1/2 x 2 patterned panel. Use the single small Rectangle Stitched Dies to cut Basic White Cardstock. Stamp the sentiment with Calypso Coral and some flowers with Pale Papaya. Stamp the flower centers with Calypso Coral. Stamp some small flowers with Balmy Blue Ink, stamping off first to get a lighter shade.

 
Pinwheel Card blue.jpeg
 

I’m considering this page the inside of the card where you can write on it. The blue flower panel is 4 1/4 x 2 and the striped panel is 4 1/4 x 1. I masked the sentiment to separate the Happy and Birthday so they fit.

 
Pinwheel Card inside.jpeg
 

Supply List

Love Patti.png
Shop Here
 

Catalog Case - Just Fluttering By

I saw this card in the Annual Catalog and those butterflies jumped out at me. I never noticed them in the Hippo Happiness Stamp Set. I love to make cards with wreaths on them so I knew I had to try it. Of course, I had to change it up a bit.

 
Catalog Case - Hippo & Friends Card2.jpeg
 

These butterflies are so cute and I love the sentiment “fluttering by just to say hi"!” There are coordinating Hippo & Friends Dies to cut the butterflies.

 
Screen Shot 2021-06-28 at 8.04.48 PM.png
 

I used the Hand-Penned Designer Series Paper for the butterflies. I chose the yellow, pink and orange papers, stamped the butterflies in Black Memento Ink and cut them out. This gave them a very soft, subtle look.

 
Screen Shot 2021-06-28 at 8.05.16 PM.png
 

Tips & Instructions

  • So Saffron Card Base - 5 1/2 x 8 1/2, score at 4 1/4

  • Hand-Penned Designer Series Paper Layer - 5 x 3 3/4, adhere to card base.

  • Basic White Cardstock - cut with 2nd smallest and 4th smallest Stitched Rectangle Die to create a frame.

  • So Saffron Cardstock - 3 1/4 x 2, adhere behind rectangle frame and adhere to card.

  • Create the wreath base by cutting ring from Basic White Cardstock using the 3rd largest and 5th largest Layering Circle Dies.

  • Stamp butterflies using Black Memento Ink on Hand-Penned Designer Series Paper and cut using coordinating die. I used the yellow with the white wavy lines, Pale Papaya with white polka dots and Blushing Bride with white floral pattern and cut about 6 of each.

  • Adhere a layer of butterflies to white ring and then add another layer using Mini Dimensionals to create the wreath.

  • Adhere wreath to card.

  • Blushing Bride - 3/8” strip, stamp sentiment using Versamark Ink and heat emboss with White Embossing Powder. Punch both ends using the Banners Pick A Punch and adhere to card with Dimensionals - only put Dimensionals in the middle of the banner so it lays over the wreath flat.

  • Add some Opal Rounds.

 
Catalog Case - Hippo & Friends Card1.jpeg
 

I love how this wreath turned out, it’s so happy and the sentiment is great to send to anyone just to say “hi!”.

 
Catalog Case - Hippo & Friends closeup.jpeg
 

On the inside adhere some butterflies.

 
Catalog Case - Hippo & Friends inside.jpeg
 

Supply List

Love Patti.png
Shop Here
 

Sketch Saturday - Dragonfly Garden

I used the Dragonfly Bundle and Dandy Garden Designer Series Paper to make this week’s card for the sketch challenge.

This paper is on the retiring list and won’t be available after June 30. It has some great patterns!

 
Sketch Saturday - Dragonfly Garden.jpeg
 

The sketch I used to create this card is from the Atlantic Hearts Sketch Challenge. I wasn’t sure how these different patterns would work but I think it turned out okay.


Tips & Instructions

  • Bumblebee Cardstock - 5 1/2 x 8 1/2, score at 4 1/4

  • Dandy Garden Designer Series Paper - cut 3 patterns at 5 1/4 x 4

    • Cut 2 of the patterns diagonally from point to point.

    • Adhere the diagonally cut layers over the full layer as shown.

  • Punch dragonfly from the Designer Series Paper. You can stamp and cut instead if you want.

  • Adhere dragonfly to card using Dimensionals.

  • Stamp sentiment on 3/4” strip of Basic White Cardstock with Black Memento Ink and cut to size. Adhere to card using Dimensionals.

 
Sketch Saturday - Dragonfly Garden2.jpeg
 

On the inside stamp floral image with Black Memento Ink and small dragonflies image with Bumblebee Ink.

 
Sketch Saturday - Dragonfly Garden inside.jpeg
 

Supply List

Love Patti.png
Shop Here
 

Plentiful Plants - Just A Note Card

I made this card using the Plentiful Plants Bundle and the Macrame 3D Embossing Folder. I love these products; they create such a natural look.

 
Plentiful Plants Just A Note card2.jpeg
 

Watch the video to see how I made this card. I’ll share a few tips along the way.


Isn’t this bundle great? There are so many options with the plants and pots. You can purchase these separately or bundle together and save 10%.

 
Screen Shot 2021-06-24 at 9.58.30 PM.png
 

I am really loving this Macrame 3D Embossing Folder. It looks so natural.

 
Screen Shot 2021-06-24 at 9.59.22 PM.png
 

Tips & Instructions

  • Blackberry Bliss Card Base - 5 1/2 x 8 1/2, score at 4 1/4

  • Sahara Sand Layer - 5 1/4 x 4, emboss with Macrame 3D Embossing Folder.

  • Basic White Cardstock, cut with largest Hippo & Friends Die.

  • Blackberry Bliss scrap - cut plant hanger.

  • Basic White Cardstock - stamp pot using Bumblebee Ink and plant with Granny Apple Green Ink. Cut with coordinating dies.

  • Lay hanger and plant on white label to get placement. Draw a light pencil line across the top of the pot. Place a Post-It Note across the line and stamp hanging greenery with Just Jade Ink. Lift Post-It Note and adhere pot so the greenery hangs on both sides (see video for demonstration.)

  • Adhere the plant and hanger to label and then attach to card using Dimensionals. Add Genial Gems.

  • Color the “A Little Note” part of the stamp using Blackberry Bliss Stampin-Write Marker. Stamp on 3/8” strip of Basic White and punch both ends with the Banners Pick A Punch. Adhere to card using Dimensionals.

 
Plentiful Plants Just A Note card1.jpeg
 

On the inside stamp pot with Bumblebee Ink and plant with Just Jade Ink.

 
Plentiful Plants Just A Note inside.jpeg
 

Supply List

Love Patti.png
Shop Here
 

Pretty Quiet Meadow Thinking Of You Card

I made this simple Thinking Of You card using the pretty Quiet Meadow Stamp Set and Scalloped Contours Dies. These go so well together. Add Soft Succulent Ribbon and some Holiday Rhinestones to finish it off.

 
Pretty Quiet Meadow Thinking Of You card2.jpeg
 

I love the floral image in this stamp set but there are other stamps like the splatter and the typed words that you can use to add some interest to your card.

 
Pretty Quiet Meadow Thinking Of You stamp.jpeg
 

Tips & Instructions

  • Soft Succulent Card Base - 5 1/2 x 8 1/2, score at 4 1/4

  • Basic White Scalloped Layer - cut using the largest die from the Scalloped Contours Dies.

  • Stamp sentiment and floral image on white layer using Evening Evergreen Ink.

  • Stamp splatter image multiple times using Soft Succulent Ink. I stamped and then stamped again without re-inking a few times to get different shades.

  • Wrap Soft Succulent Ribbon around the stamped layer and adhere to the back. Tie bow and adhere using a Glue Dot.

  • Add rhinestones to flower centers. I used the Holiday Rhinestones.

 
Pretty Quiet Meadow Thinking Of You card1.jpeg
 

On the inside stamp the floral image using Evening Evergreen Ink. You can add a sentiment if you want. I’m not sure who I will send this to and for what reason so I left off the sentiment.

 
Pretty Quiet Meadow Thinking Of You inside.jpeg
 

Supply List

Love Patti.png
Shop Here
 

Easy Masculine Gift Bags

These are great gift bags for a guy! I used the Beauty Of The Earth Designer Series Paper and Campology Stamp Set. They are a good size to fit a gift card and maybe some chocolates!


In the video I’ll show you how easy it is to make these little treat bags. You can change up the paper and stamp set to create these for any occasion.


The Campology Stamp Set is perfect for anyone who loves outdoors activities like camping and hiking.


Tips & Instructions

  • Beauty Of The Earth Designer Series Paper - 9 x 5 1/2

    • Score the 9” side at 1” for the bottom of the bag (make sure you look at the pattern to get the bottom part scored)

    • Score the 5 1/2 side at 3, 4, 7 and 8

  • Burnish all score lines and cut the bottom right square off. Snip each of the score lines from the bottom up to the score line. Snip at angle the right tab and the square tabs. It should look like this.


  • Using a strong adhesive on the tabs put bag together See video for demonstration.

  • Punch hole in top and feed piece of Fine Art Ribbon through and tie a bow around it with a piece of Linen Thread.

  • Basic White - 2 x 1 1/2, stamp sentiment with Bumblebee Ink and image with Mossy Meadow Ink. Adhere to piece of Mossy Meadow Cardstock cut to 2 1/8 x 1 5/8 and adhere to bag using Dimensionals.


For this one I stamped the treetops from the Campology Stamp Set twice just below the Happy Trails sentiment.


Supply List

Shop Here
 

Pansy Patch Corner Fold Card

I love the pansies on this card. The Designer Series Paper and the Pansy Dies create such a pretty look.

 
Pansy Patch Corner Fold Card2.jpeg
 

The Pansy Petals Designer Series Paper has beautiful patterns. It works so well to have the floral pattern on the front and fold down a corner to have the more subdued pattern visible.

 
Screen Shot 2021-06-21 at 7.59.59 PM.png
 

These dies are amazing. You can use them to cut the large pansy from the Designer Series Paper, stamp and cut a pansy or cut the pieces and put together a pansy like I did on the card. You get all the pieces to cut and build a pansy, they cut and emboss with these dies; so cool!

 
Screen Shot 2021-06-21 at 7.59.30 PM.png
 

Tips & Instructions

  • Bumblebee Card Base - 5 1/2 x 8 1/2, score at 4 1/4

  • Pansy Petals Designer Series Paper 5 1/2 x 4, fold down and burnish top corner and adhere to keep it down.

  • Basic White Layer - 5 1/4 x 4, stamp sentiment with Evening Evergreen Ink at top right corner.

  • Adhere Designer Series Paper to White Layer and then adhere to card base.

  • Cut large pansy using Blackberry Bliss, Fresh Freesia, Basic White and Bumblebee Cardstock. Cut leaves using Soft Succulent and Evening Evergreen Cardstock. Assemble pieces gluing them together using Liquid Glue. Adhere to card using Dimensionals.

  • Add Bee Trinket to card using Glue Dot.

 
Pansy Patch Corner Fold Card2.jpeg
 

On the inside:

  • Stamp the sentiment with Evening Evergreen Ink.

  • Stamp the small flowers using Fresh Freesia and Bumblebee Ink.

    • Stamp the edges with Fresh Freesia directly and stamp the filler with Fresh Freesia but stamp off first to get a lighter shade.

    • Stamp the inside with Fresh Freesia directly.

    • Stamp the center with Bumblebee.

 
Pansy Patch Corner Fold Card inside.jpeg
 

Supply List

Love Patti.png
 
Shop Here

Sketch Saturday - A Good Man

This is the card I made for this week’s sketch challenge using the A Good Man Stamp Set. The strips of paper are the woodgrain patterns from the In Good Taste Designer Series Paper.


The sketch is from the Atlantic Hearts Weekly Sketch Challenge. They have great sketches which push me out of my comfort zone a little bit!

 
Screen Shot 2021-06-18 at 9.38.20 PM.png
 

I love all the images in this stamp set. They are great for Father’s Day or any masculine card. I made this one a birthday card.

 
Sketch Saturday - A Good Man stamp.jpeg
 

Tips & Instructions

  • Early Espresso Card Base - 5 1/2 x 8 1/2, score at 4 1/4

  • Basic White Layer - 5 1/4 x 4

  • Cut 1/4” strips of the woodgrain patterns from the In Good Taste Designer Series Paper.

  • Adhere the strips diagonally across the Basic White Layer alternating between light and dark pieces. They will hang over the side, just snip them off from the back.

  • Adhere layer to card base.

  • Basic White Layer - 3 x 2 1/2, stamp sentiment with Early Espresso Ink. Stamp image with Black Memento Ink and color with Stampin’ Blends. I used Light Misty Moonlight, Light Poppy Parade, Dark Soft Seafoam, Light Petal Pink, Light Crumb Cake and Light Pool Party.

  • Adhere stamped image to Early Espresso Layer cut to 3 1/8 x 2 3/8. Adhere to card using Dimensionals.

 
Sketch Saturday - A Good Man2.jpeg
 

Adhere a strip of the dark woodgrain paper cut to 4 x 3/4 to inside layer. Stamp sentiment (from the Handsomely Suited Stamp Set) on a piece of Basic White cut to 2 x 1. Adhere sentiment to woodgrain strip.

 
Sketch Saturday - A Good Man inside.jpeg
 

Supply List

Love Patti.png
Shop Here
 

Cute Turtle Friends Cards!

I found this design on Pinterest and knew I wanted to make it using the turtle. They turned out so cute! Watch the video to hear about a funny turtle encounter I had.

 
Cute Turtle Friends Cards Both.jpeg
 

In the video, I’ll show you how to make this fun layer with the circle cutout for the turtle. The Turtle Friends Bundle has a stamp set and a coordinating Turtle Punch to make it easy to cut out the turtle.


This is the beautiful turtle that was in my yard last week. It’s a Box Turtle and the shell is so pretty although I think there may be something going on with it. You can see that white area on the top, poor little guy.

 
image 123.jpg
 

Tips & Instructions

  • Fresh Freesia Card Base - 5 1/2 x 8 1/2, score at 4 1/4

  • Basic White Layer - 5 1/4 x 4

  • Pansy Petals Designer Series Paper - cut with largest rectangle from the Scalloped Countours Dies. Cut bottom corner using the largest Layering Circle Die.

  • Stamp turtle with Black Memento Ink and punch with the Turtle Punch. Color with Light Mint Macaron Stampin’ Blend. Color tail with Light Just Jade Stampin’ Blend. Color toenails with Light Fresh Freesia and add some Wink Of Stella.

  • Stamp shell with Just Jade Ink and punch with the Turtle Punch. Fussy cut and color with Light Just Jade.

  • Stamp the hat with Black Memento Ink, color with Fresh Freesia Stampin’ Blends and fussy cut. Add some Wink of Stella to the pompom. Adhere to turtle.

  • Wrap White Bakers Twine around the gingham layer and tie a bow.

  • Arrange your layers and turtle to see where to stamp the sentiment on the white layer with Fresh Freesia Ink.

  • Adhere layers and pieces, using Dimensionals to the gingham layer and turtle.

 
Cute Turtle Friends fresh freesia.jpeg
 

On the inside stamp the sentiment with Just Jade Ink and the hearts with Fresh Freesia Ink. Stamp small turtle and shell with Just Jade Ink and add the little bird with Fresh Freesia Ink if you want.

 
Cute Turtle Friends fresh freesia inside.jpeg
 

I followed the same steps to make this card using Hand-Penned Designer Series Paper and Just Jade Cardstock. I stamped the sentiment with Just Jade Ink.

 
Cute Turtle Friends green.jpeg
 

On the inside I stamped three turtles across the bottom with Just Jade Ink. The hearts were stamped using Real Red Ink. I added some grass using Mint Macaron Ink. You can use Just Jade instead and just stamp it off first.

 
Cute Turtle Friends green inside.jpeg
 

Supply List (for both cards)

Love Patti.png
Shop Here
 

You're A Peach Birthday Cards!!!

Aren’t these cards pretty? I love the You’re A Peach Designer Series Paper. It pretty much makes the cards for you :)

 
Sweet As A Peach Birthday both.jpeg
 

This Designer Series Paper is so vibrant. Here’s a look at the different peachy patterns.

 
Screen Shot 2021-06-16 at 5.09.41 PM.png
 

I used the Basic Border Dies to cut the edge on the card front. There are lots of choices to pick from.

 
Screen Shot 2021-06-16 at 5.10.21 PM.png
 

Tips & Instructions

  • Calypso Coral Card Base - 5 1/2 x 8 1/2, score at 4 1/4

  • Calypso Coral Layer - 5 1/2 x 4 1/4, stamp sentiment with Versamark an heat emboss with White Embossing Powder.

  • Basic White Layer and Designer Series Paper Layers - 5 1/2 x 4 1/4, lay them together and cut the bottom with a Basic Border Die. If you cut them together you can be sure they line up perfectly.

  • Arrange the the layers on the Calypso Coral Layer and adhere. You may have to trim the top of the layers to fit them above the sentiment depending on how much you cut off with the border die. Make sure you have the white layer showing a little bit. Adhere layers to card base.

  • Wrap White Baker’s Twine around the top twice and tie a bow.

 
Sweet As A Peach Birthday1.jpeg
 

On the inside stamp sentiments and peaches using Pear Pizzazz and Calypso Coral Inks.


I changed the Designer Series Paper and the Border to make this card. I was going to use Balmy Blue as the card base with felt it was too much blue.

 
Sweet As A Peach Birthday2.jpeg
 

Here’s a different set of sentiments for the inside. There are lots of ways to use these sentiments.

 
Sweet As A Peach Birthday2 - inside.jpeg
 

Supply List

Love Patti.png
Shop Here
 

In Color Sending Hugs Card

Each month I participate with a group of demonstrators to create a tutorial based on a suite or theme. For the month of June we focused on the new In Colors. Here’s the card that I made for the tutorial.

 
Simply Suite In Color card2.jpeg
 

In the video below I’ll show you how to make this simple card using all the new In Colors and the Sending Hugs Bundle.


Get this Tutorial Bundle for FREE by placing an order from my Online Store. You can also purchase it by going to the Tutorials tab on this website.

 
Screen Shot 2021-06-15 at 10.29.58 PM.png
 
Shop Here

Tips & Instructions

  • Evening Evergreen Card Base - 5 1/2 x 8 1/2, score at 4 1/4

  • Basic White Layer - 5 1/4 x 4, adhere to card base

  • Cut a strip 5 1/4 x 1/2 of each of the In Colors (Evening Evergreen, Soft Succulent, Pale Papaya, Fresh Freesia and Polished Pink). Adhere each strip to the Basic White layer and adhere layer to card base.

  • Cut large floral piece from Evening Evergreen Cardstock

  • Cut HUGS sentiment from Soft Succulent Cardstock and adhere over the letters on the floral piece. Adhere to card using Dimensionals. I cut the Dimensionals to small pieces and adhered to the back of the letters.

  • Stamp sentiment on scrap of white with Evening Evergreen Ink and cut with small rectangle die.  Adhere with to the floral piece.

  • Add some In Color Jewels.

 
Simply Suite In Color card1.jpeg
 

On the inside stamp sentiment with Evening Evergreen Ink. Stamp flowers with Black Memento Ink and color with Stampin’ Blends. I used Light Soft Succulent and Dark Polished Pink.

 
Simply Suite In Color inside.jpeg
 

Supply List

Love Patti.png
Shop Here
 

Beauty of Friendship Father's Day Card

I made this rustic Father’s Day Card using the Beauty Of Friendship Bundle. The Bark 3D Embossing Folder creates this great texture for the background layer.


The Beautiful Trees Dies in this bundle are so amazing. You can cut different trees and treetops.

 
Screen Shot 2021-06-14 at 8.55.45 PM.png
 

I always look through my Designer Series Papers to see how I can use them. When I saw the green with the gold pattern in the Expressions In Ink, I thought it would make a great treetop.

 
Screen Shot 2021-06-14 at 8.56.11 PM.png
 

Tips & Instructions

  • Shaded Spruce Card Base - 5 1/2 x 8 1/2, score at 4 1/4

  • Gold Foil Sheet - 5 1/8 x 3 7/8

  • Very Vanilla Layer - 5 x 3 3/4, emboss with Bark 3D Embossing Folder and adhere to Gold Foil Sheet.

  • Cut large tree from Gold Foil Sheet

  • Cut large treetop from Expressions In Ink Designer Series Paper and adhere to tree. I used Liquid Glue.

  • Cut DAD from Shaded Spruce Cardstock using the Alphabet Dies.

  • Adhere DAD and tree to embossed layer.

  • Adhere Layer to card base. I used a Foam Adhesive Sheet that I cut to fit. This gave it a very stable layer. You can use Dimensionals as well.

 
Beauty of Friendship Father's Day Card1.jpg
 

On the inside stamp the sentiment and smaller tree with Soft Suede Ink. Stamp small treetop with Shaded Spruce Ink.

 
Beauty of Friendship Father's Day Card inside.jpeg
 

Supply List

Love Patti.png
Shop Here
 

Sketch Saturday - Birds & Branches

I made this cute little birdie card for this week’s sketch challenge. I used the Birds & More Dies along with the Birds & Branches Stamp Set.

 
Sketch Saturday - Birds & Branches.jpeg
 

This is the sketch I followed from the Atlantic Hearts Sketch Challenge. I love wreaths so this was a great sketch for me this week.

 
Screen Shot 2021-06-12 at 4.13.09 PM.png
 

I used the Birds & More Dies to create the wreath but wanted to cut the entire circle out. See how the wreath cuts out just the inside? I cut it out using the largest scalloped circle from the Layering Circle Dies.

 
Screen Shot 2021-06-12 at 4.36.41 PM.png
 

Tips & Instructions

  • Early Espresso Card Base - 5 1/2 x 8 1/2, score at 4 1/4

  • Bloom Where You’re Planted Designer Series Paper Layer - 5 1/4 x 4, adhere to card base.

  • Evening Evergreen Cardstock - cut wreath and then use the largest scalloped circle from the Layering Circle Dies to cut out the wreath. Adhere to card.

  • Stamp bird on Basic White scrap with Daffodil Delight and cut with coordinating die

  • Stamp feet with Soft Suede Ink and cut with coordinating die. Adhere to bird. Adhere to card using Dimensionals.

  • Stamp sentiment (from Peaceful Moments Stamp Set) with Evening Evergreen Ink on 1/2” strip of Basic White. Using the Banners Pick A Punch punch both ends. Adhere to card using Dimensionals.

  • Add small Evening Evergreen Jewel to eye of bird.

 
Sketch Saturday - Birds & Branches2.jpeg
 

On the inside stamp sentiment with Evening Evergreen Ink. Stamp heart with Poppy Parade Ink.

 
Sketch Saturday - Birds & Branches inside.jpeg
 

Supply List

Love Patti.png
Shop Here
 

Shimmery Friendship Card

I am loving the Stitched Greenery Die and the Shimmer Vellum Paper so I decided to use them together. Wouldn’t you love to receive a card like this from one of your friends?

 
Shimmery Friendship Card stamp.jpeg
 

In the video I’ll show you how to make this pretty card. I’ll give you some tricks on using the vellum with the die and gluing it to the layer. I’ll also show you how to color the stamp to get the green and pink floral image.


The flower was cut from Polished Pink Shimmer Vellum and some Matte Black Dots were added to the center.

 
Shimmery Friendship Card2.jpeg
 

Tips & Instructions

  • Evening Evergreen Card Base - 5 1/2 x 8 1/2, score at 4 1/4.

  • Basic White Layer - 5 3/8 x 4 1/8, adhere to card base.

  • Evening Evergreen Shimmer Vellum - 5 1/4 x 4, cut/emboss with the Stitched Greenery Die and adhere to piece of 5 1/4 x 4 Basic White. Watch the video to see how to use some liquid glue and a Silicon Mat to adhere the layers. Adhere to card.

  • Basic White Layer - 3 3/4 x 2 3/4, stamp sentiment with Evening Evergreen Ink at bottom right corner.

  • Color the floral stamp using Stampin’ Write Markers. Use Polished Pink to color the 2 small flowers and Evening Evergreen to color the stems and leaves. Don’t color the large flower. Breath on the stamp and then stamp onto the layer.

  • Punch 2 large flowers from Polished Pink Shimmer Vellum using the Flowers & Leaves Punch. Adhere together, offsetting and then adhere to the card.

  • Add some Matte Black Dots to center of flower

 
Shimmery Friendship Card1.jpeg
 

For the inside layer color the floral stamp with the Stampin’ Write Markers. I used Evening Evergreen for the stems and leaves and the flowers with Polished Pink. Breath on it and stamp.

 
Shimmery Friendship Card inside.jpeg
 

Supply List

Love Patti.png
Shop Here
 

Cute Birthday Card using Turtle Friends!

I made this fun birthday card for my grandson using the Turtle Friends Stamp Set. He loves nature and I think he will love this card.

 
Turtle Friends Birthday Card2.jpeg
 

Aren’t these images and sentiments so fun! I love that there is a belated birthday sentiment. There’s a punch that coordinates with the turtle and if you purchase them together as a bundle, you’ll save 10%. I’ve listed both in the Supply List so you can either purchase just the stamp set or the bundle.

 
Screen Shot 2021-06-10 at 12.01.50 PM.png
 

The Snail Mail Designer Series Paper is what I used for the background layer and is on the retiring list. Products from the Mini Catalog will retire June 30, 2021.

 
Screen Shot 2021-06-10 at 12.02.38 PM.png
 

Tips & Instructions

  • Bermuda Bay Card Base - 5 1/2 x 8 1/2, score at 4 1/4.

  • Basic White Layer - 5 1/4 x 4, adhere to card base.

  • Snail Mail Designer Series Paper - 5 x 3 3/4, adhere to card.

  • Bermuda Bay Layer - 3 3/4 x 3

  • Basic White Layer - 3 1/2 x 2 3/4

  • Stamp images on the Basic White layer. I stamped the turtle with Bermuda Bay, the sentiment and grass with Coastal Cabana, the hat with Daffodil Delight and the hearts with Real Red Inks.

  • Adhere stamped layer to Bermuda Bay Layer and then adhere the layers to card using Dimensionals.

 
Turtle Friends Birthday Card1.jpeg
 

On the inside stamp sentiments and turtle with Bermuda Bay, grass and turtle shell with Coastal Cabana and hearts with Real Red Inks. I think this sentiment is so fun.

 
Turtle Friends Birthday Card inside.jpeg
 

Supply List

Love Patti.png
Shop Here
 

Elegantly Said Birthday Card

I made this beautiful Birthday Card using the Elegantly Said Bundle. Elegant is a perfect description for this bundle.

 
Elegantly Said Birthday Card2.jpeg
 

In the video I’ll show you how to make this card and a tip to create a longer label using the punch.


This images are gorgeous and I love the sentiments with the mix of script and type fonts. The punch makes it easy to quickly punch out a pretty label.


Tips & Instructions

  • Basic Gray Card Base - 4 1/4 x 11, score at 5 1/2

  • Basic Gray Layer - 5 x 3 3/4

  • Stamp the large flourish image at the top and bottom corners on the layer using Versamark Ink. Heat emboss using White Embossing Powder.

  • Basic White Strip - slightly under 1 3/4”, feed in back of the punch and punch the top. Stamp the sentiment with Basic Gray Ink. Stamp the flower with Polished Pink Ink, stamping off first to get a lighter shade. Trim the bottom of the strip if necessary and feed in the back of the punch and punch the bottom. (See video for a demonstration.)

  • Adhere label to layer and then adhere layer to card base using Dimensionals.

  • Tie Bow and adhere using Glue Dots. You can add some Glue Dots to the tails if you want to secure them in place.

  • Add some Elegantly Faceted Gems.

 
Elegantly Said Birthday Card1.jpeg
 

On the inside stamp flower with Polished Pink Ink, stamping off first. Stamp border image with Basic Gray Ink, stamping off first. Stamp sentiment with Basic Gray Ink, sentiment is from the Sunny Sentiments Stamp Set.

 
Elegantly Said Birthday inside.jpeg
 

Supply List

Love Patti.png
Shop Here
 

Simple Flowers Of Friendship Hello Card

This was a very easy card to make but I think it turned out really pretty. Sometimes simple is just what you need.

 
Flowers Of Friendship Hello Card2.jpeg
 

I used the Flowers of Friendship Stamp Set (on the left) for the floral image. Aren’t the sentiments in the Sunny Sentiments Stamp Set (on the right) great? I will definitely be using it a lot!

 
Screen Shot 2021-06-07 at 10.40.42 PM.png
 
Screen Shot 2021-06-07 at 10.41.08 PM.png
 

I simply stamped the floral images and colored them with some of the new In Color Stampin’ Blends - Polished Pink and Soft Succulent.

 
Flowers Of Friendship Hello Card blends.jpeg
 

Tips & Instructions

  • Polished Pink Card Base - 5 1/2 x 8 1/2, score at 4 1/4

  • Basic White Cardstock - cut using the largest Scalloped Contour Dies.

  • Stamp the sentiment at the top corner using Black Memento Ink.

  • Stamp flowers twice using Black Memento Ink. Color with Dark Polished Pink and Soft Succulent Stampin’ Blends.

  • Add some Wink Of Stella to the flowers and leaves.

  • Adhere to card base using Dimensionals.

  • Add Polished Pink Jewels to top corner.

 
Flowers Of Friendship Hello Card1.jpeg
 

On the inside stamp the floral image and color like you did the front and adding Wink Of Stella to finish them off.

 
Flowers Of Friendship Hello inside.jpeg
 

Supply List

Love Patti.png
Shop Here
 

Sketch Saturday - Hand-Penned Petals

I made a birthday card for this week’s sketch challenge using the Hand-Penned Stamp Set and Designer Series Paper.

 
Sketch Saturday - Hand-Penned Card1.jpeg
 

This is the sketch I used from the Atlantic Hearts weekly challenge. I had a bit of a struggle with this one but that’s what I like about these sketch challenges; they push me to make something a little different than I normally would make.

 
Screen Shot 2021-06-04 at 4.32.43 PM.png
 

The images in the Hand-Penned Petals Stamp Set look like they were water-colored and they match so well with the paper.

 
Sketch Saturday - Hand-Penned stamp.jpeg
 

Tips & Instructions

  • Garden Green Card Base - 5 1/2 x 8 1/2, score at 4 1/4.

  • Hand-Penned Designer Series Paper - large floral piece 4 x 3 1/4 and polka dot square 2 x 2

  • Basic White Cardstock - 2 x 2, emboss with Tasteful Textile 3D Embossing Folder.

  • Lay the pieces on the card base and adhere.

  • Basic White Layer 2 3/4 x 2 1/4, stamp floral image with Black Memento Ink. Stamp filler images with Misty Moonlight, Garden Green and Pale Papaya Inks stamping off first to get a lighter shade.

  • Garden Green Cardstock - 3 x 2 1/2, adhere to stamped layer and adhere to card using Dimensionals.

  • Stamp sentiment (from Sweet As A Peach Stamp Set) with Black Memento Ink on 1/2” strip of Basic White Cardstock. Punch both ends using the Banners Pick A Punch. Adhere using Dimensionals.

  • Add some In Color Jewels to card. I used the Evening Evergreen Jewels.

 
Sketch Saturday - Hand-Penned Card2.jpeg
 

Stamp sentiment (from Sweet As A Peach) with Black Memento Ink. Stamp flower and filler like you did on the front panel.

 
Sketch Saturday - Hand-Penned Inside.jpeg
 

Supply List

Love Patti.png
Shop Here
 

Sweet As A Peach Birthday Card

I made this “sweet” Birthday Card using the Sweet As A Peach Stamp Set and the You’re A Peach Designer Series Paper!

 
Sweet As A Peach Birthday card2.jpg
 

In the video I’ll show you how to add some darker color to the peach and flower stamps with a dauber to get a natural look.


The You’re A Peach Designer Series Paper has great images of peaches and flowers. I love the orange and blue colors in the patterns.

 
Screen Shot 2021-06-03 at 10.43.50 PM.png
 

The sentiments in this stamp set are so prett. I love the Happy Birthday sentiment and will be using that lots. You can stamp and cut the flower or peach grouping with the leaves.

 
Screen Shot 2021-06-03 at 10.35.02 PM.png
 

Tips & Instructions

  • Calypso Coral Card Base - 5 1/2 x 8 1/2, score at 4 1/4

  • You’re A Peach Designer Series Paper Layer - 5 1/4 x 4

  • Basic White Layer 5 1/4 x 4, cut edge using the Basic Border Dies.

  • Stamp branches multiple times on white layer with Granny Apple Green Ink.

  • Stamp the flower groupings to fit in with the leaves. I inked the stamp with Pale Papaya Ink and then added a touch of Calypso Coral Ink to the flower centers with a Sponge Dauber. Stamp flower centers with Calypso Coral Ink.

  • Adhere layer to Designer Series Paper and then adhere to card base.

  • On a scrap of Basic White Cardstock stamp two large peaches. I inked the stamp with Mango Melody Ink and added some Calypso Coral with a Sponge Dauber before I stamped them. Cut with coordinating die.

  • On a scrap of Basic White Cardstock stamp two sets of leaves with Granny Apple Green and cut with coordinating die.

  • Adhere the peaches and leaves with Dimensionals.

  • On a 3/4” strip of Basic White stamp sentiment with Black Memento Ink and punch both ends using the Banners Pick A Punch. Adhere to card using Dimensionals.

 
Sweet As A Peach Birthday card3.jpeg
 

On the inside stamp leaves and peach using the same technique as you used on the front layer. Stamp sentiments with Black Memento and Calypso Coral Inks.

 
Sweet As A Peach Birthday inside.jpeg
 

Supply List

Love Patti.png
Shop Here