Embossed Foil Christmas Trees

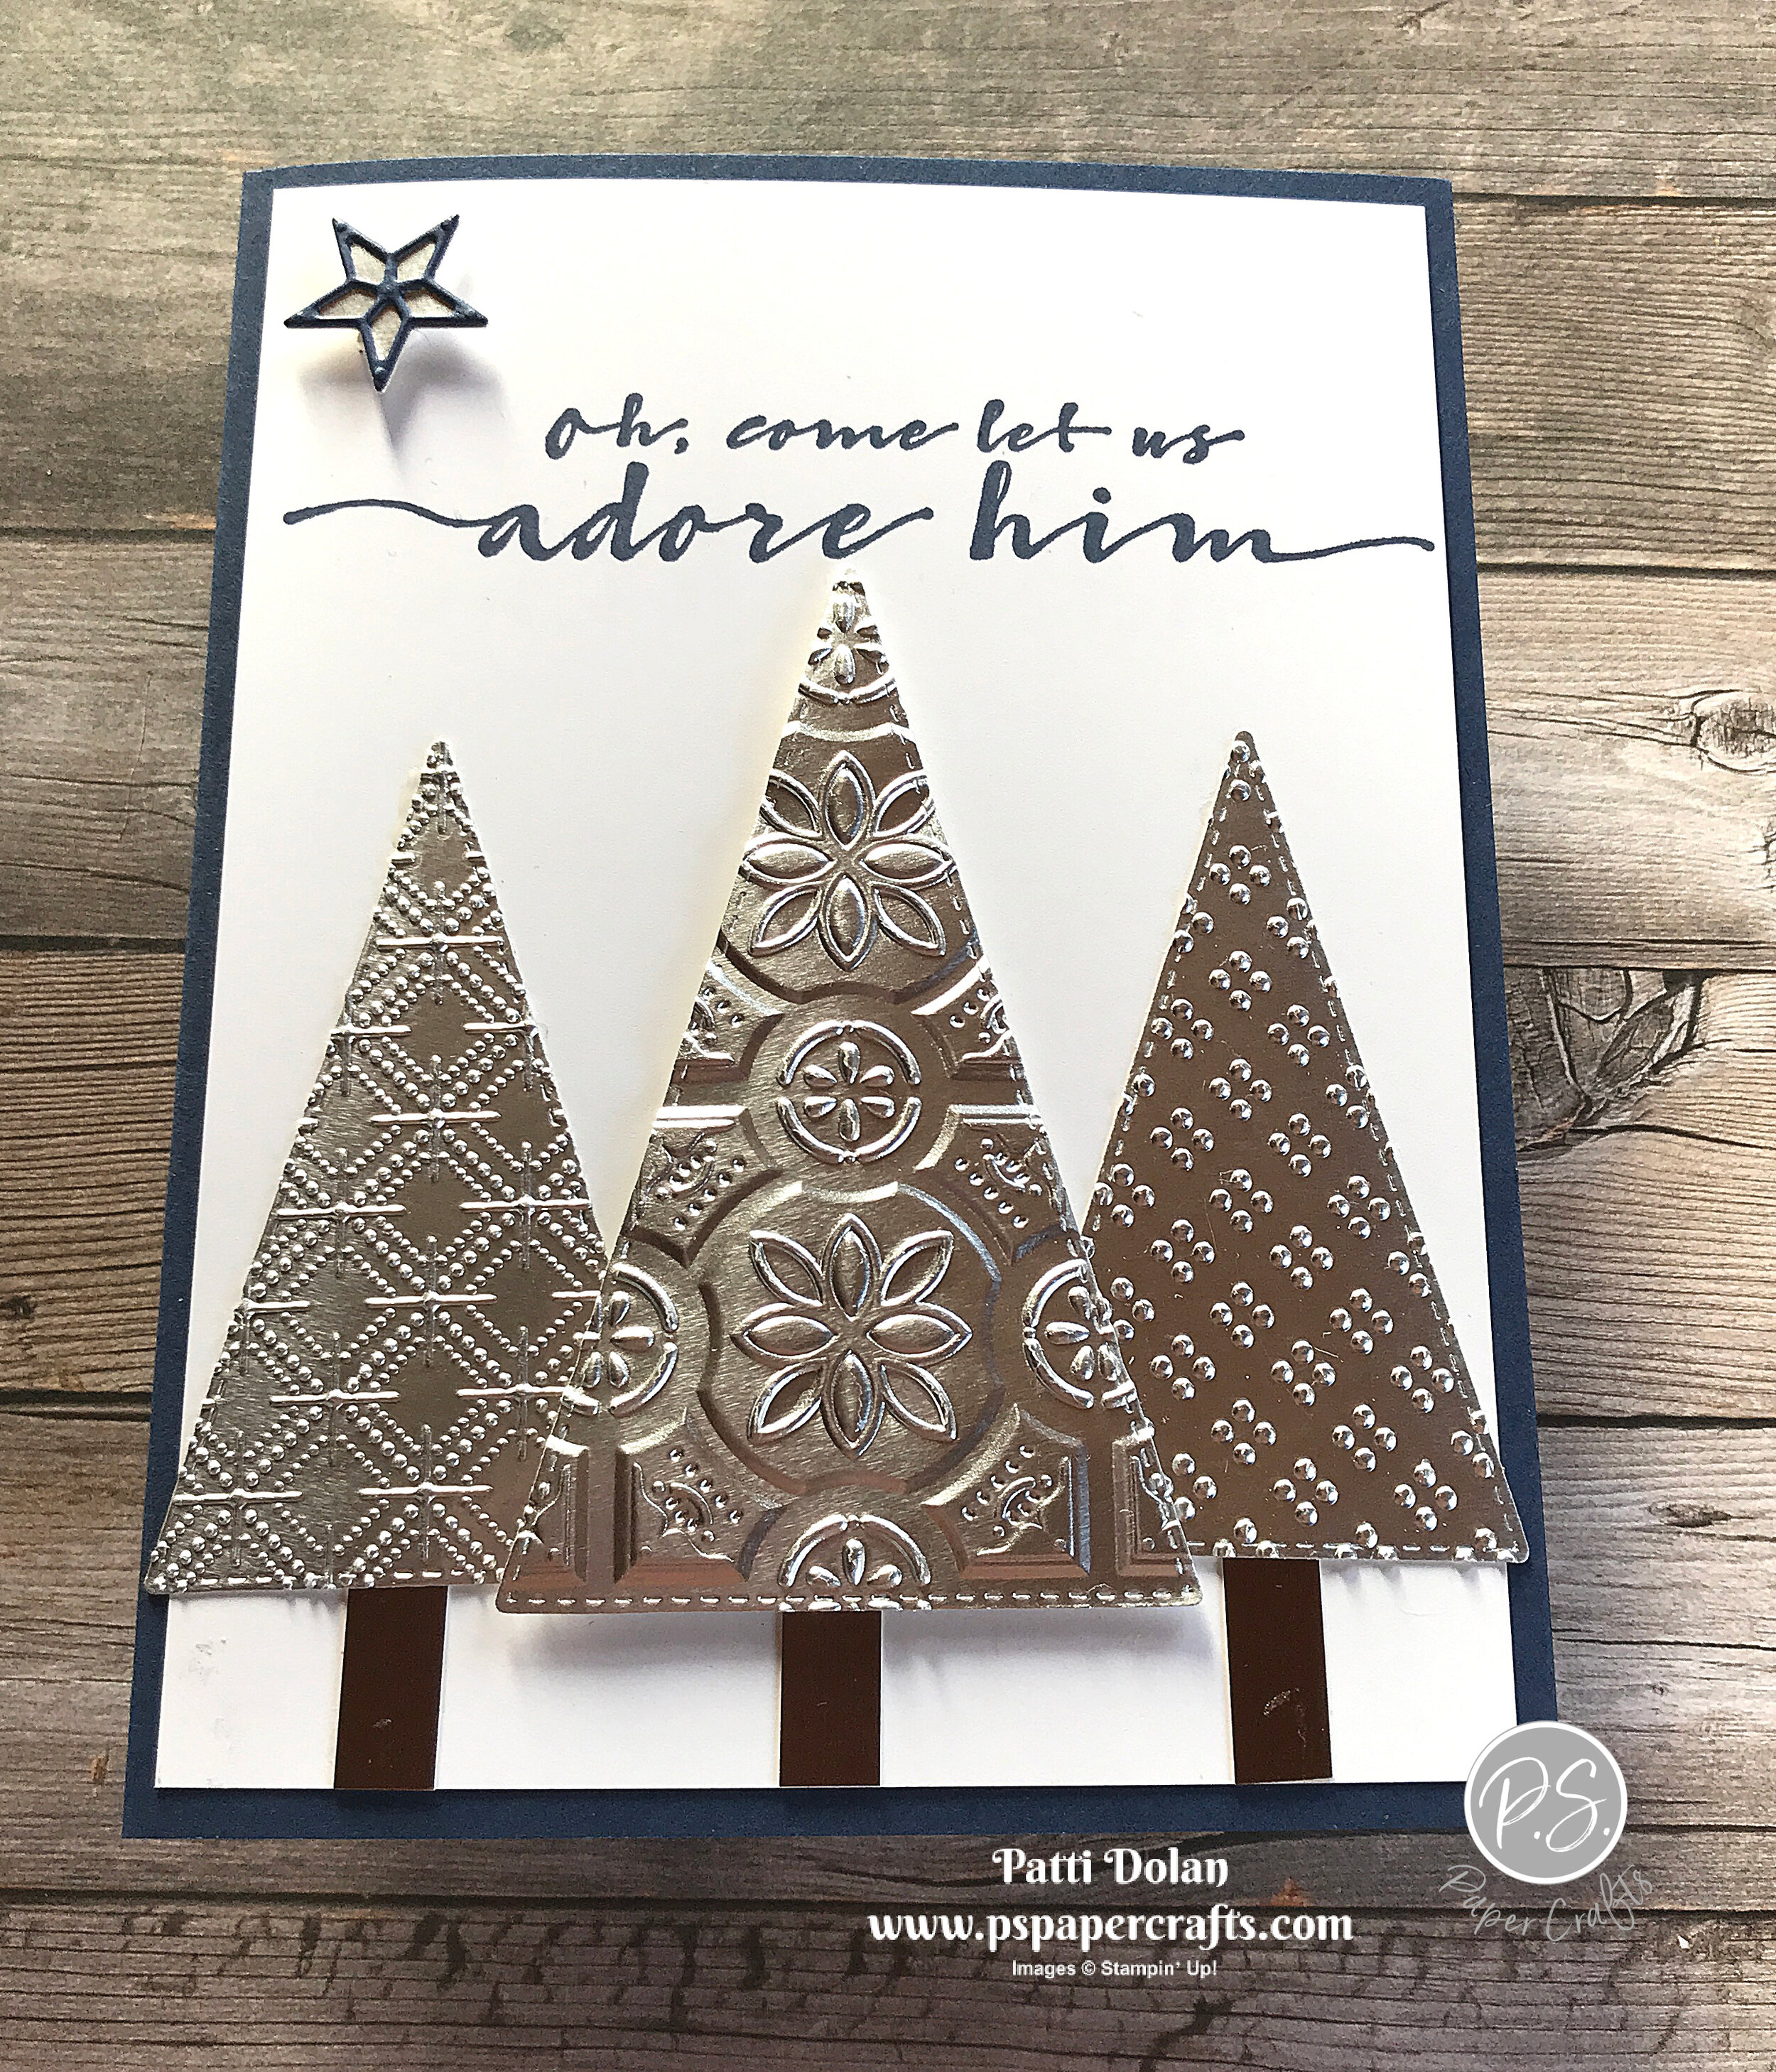
Embossing Silver Foil creates such a beautiful, elegant look. I used 3 different embossing folders on the trees and love how they turned out.

 
Embossed Foil Christmas Trees card2.jpg
 

I’ll show you how to use the Stampin’ Cut & Emboss Machine to emboss three different types of Embossing Folders to make this card.


Tips & Instructions

  • Night Of Navy Card Base - 5 1/2 x 8 1/2, score at 4 1/4

  • Whisper White Layer - 5 1/4 x 4, stamp sentiment with Night Of Navy Ink

  • Cut 1 of the second largest Stitched Triangles and 2 of the third largest Stitched Triangles from Silver Foil Sheets.

  • Emboss each triangle using a different Embossing Folder. I used the Tin Tile for the larger and the Wrapped In Texture and Dainty Diamonds for the two smaller triangles.

  • Cut narrow strip from a piece of Brushed Metallic Paper (I used copper) and cut into 3 small pieces for the trunks.

  • Adhere the trunks and trees to the Whisper White layer using Dimensionals on the larger triangle.

  • Cut star from Silver Foil and the detailed star from Night Of Navy and adhere. I used a piece of Adhesive Sheet to back the Night Of Navy so it was easy to adhere to the silver star. Adhere star to card using Dimensional.

 
Embossed Foil Christmas Trees card3.jpg
 

On the inside, stamp sentiment with Night Of Navy Ink and star with Daffodil Delight Ink.

 
Embossed Foil Christmas Trees inside.jpg
 

Supply List

Love Patti.png
Shop Here
 

Gather Together - Perfect Thanksgiving Card

I wanted to make one last card for Thanksgiving. I used the Gather Together Bundle and Plaid Tidings Designer Series Paper to make it.

 
Gather Together Thanksgiving Card2.jpg
 

The great thing about these leaf dies is that they cut and emboss in one pass through the Die Cut and Emboss Machine. I’m not sure the pictures do them justice but the leaves are all embossed.

 
Screen Shot 2020-11-18 at 8.18.13 PM.png
 

The Plaid Tidings 6 x 6 Designer Series Paper has wonderful plaid designs in colors that can be used for Autumn and Christmas.

 
Screen Shot 2020-11-18 at 8.18.46 PM.png
 

Tips & Instructions

  • Blackberry Bliss - 5 1/2 x 8 1/2, score at 4 1/4

  • Crushed Curry Layer - 5 1/4 x 4

  • Plaid Tidings Designer Series Paper - pick some patterns you like and cut a bunch of leaves using the 3 leaf dies that cut and emboss.

  • Stamp sentiment on scrap of Whisper White Cardstock using Blackberry Bliss Ink and punch with Label Me Fancy Punch.

  • Punch scrap of Blackberry Bliss Cardstock with Label Me Lovely Punch. Adhere label pieces together.

  • Arrange leaves and sentiment on Crushed Curry Layer and adhere.

  • Adhere layer to card base.

  • Tie bow using Embroidered Ribbon and adhere using Glue Dot.

 
Gather Together Thanksgiving Card1.jpg
 

On the inside stamp sentiment using Blackberry Bliss Ink. Adhere two leaves to inside as shown.

 
Gather Together Thanksgiving Card inside.jpg
 

Supply List

Love Patti.png
Shop Here
 

Lovely You - Just Because Card

The great thing about the Lovely You Stamp Set is that you can change the look of your card by changing the colors you use for the images. I used some darker colors on this card and think it turned out very pretty.

 
Lovely You - Just Because card2.jpg
 

This is an easy card to make and I’ll walk you through it on my video.


Tips & Instructions

  • Night Of Navy Card Base - 5 1/2 x 8 1/2, score at 4 1/4

  • Whisper White Layer - 5 3/8 x 4 1/8

  • Night Of Navy Layer - 4 5/8 x 3 5/8

  • Whisper White Layer - 4 1/2 x 3 1/2

  • Stamp the leaf and flower images as shown on top left and bottom right areas of the layer. I used Gray Granite (stamped off first), Bumblebee, Garden Green, Night Of Navy and Merry Merlot.

  • Adhere the stamped layer and Night Of Navy layers together. Wrap piece of Bumblebee Gingham Ribbon around layers and adhere to the back. Adhere to card.

  • Stamp sentiment with Night Of Navy Ink on Whisper White Cardstock and punch with Rectangle Postage Stamp Punch. Adhere to card using Dimensionals.

  • Tie bow with ribbon and adhere using Glue Dot.

  • Add some Holiday Rhinestones to sentiment label.

 
Lovely You - Just Because card1.jpg
 

On the inside stamp flowers on top and bottom corners.

 
Lovely You - Just Because inside.jpg
 

Supply List

Love Patti.png
Shop Here
 

To A Wild Rose - Blessed and Grateful

This has been a crazy year but there are so many things that I am grateful for. I am blessed to have some very close friends and I made this card for one of them.

 
To A Wild Rose card2.jpg
 

I love the 3 step stamping with the To A Wild Rose set. The flowers have a detailed outline that I stamped in black ink. Then I stamped the next flower that has some design using a color. Lastly I stamped the plain flower stamp using the same color but stamping off first to get a lighter shade. Aren’t they pretty?

 
To A Wild Rose - stamp.jpg
 

Tips & Instructions

  • Basic Black Card Base - 5 1/2 x 8 1/2, score at 4 1/4

  • Whisper White Layer - 5 1/4 x 4

  • Tip: On scrap paper, stamp each of the flower stamps to determine the right position to stamp them. Using a Sharpie, I put a dot on the back each stamp on the same petal for each one so I can easily line them up.

  • Stamp 2 flowers (detailed, outline stamp) and 3 sets of leaves (detailed, outline stamp) with Black Memento Ink on Whisper White Cardstock.

  • On one of the flowers stamp the next layer with Calypso Coral ink and then the final plain layer with Calypso Coral but stamp off first on a piece of scrap paper to get a lighter shade.

  • Follow the steps above for the other flower using Bumblebee Ink.

  • Stamp the leaves using Just Jade ink, stamping off first to get a lighter shade.

  • Cut flowers and leaves using the coordinating Wild Rose Dies. I cut some of the leaves apart so I could place them where I wanted them behind the flowers.

  • Stamp the sentiment using Black Memento Ink.

  • Adhere the leaves and Calypso Coral flower on the bottom.

  • Adhere the Bumblebee flower using Dimensionals (just in the center of the flower). Adhere leaves behind this flower.

  • Using the Detailed Trio Punch, punch top and bottom right corners. Add Pearl to each.

  • Adhere to card base.

 
To A Wild Rose card1.jpg
 

On the inside stamp sentiment with Black Memento Ink. I love this sentiment! Stamp flower with either color at the bottom corner.

 
To A Wild Rose inside.jpg
 

Supply List

Love Patti.png
Shop Here
 

Sketch Saturday - Arrange A Wreath

It’s not a partridge in a pear tree, but a partridge tree LOL! I made this card for this week’s sketch challenge from Splitcoaststampers and I really like how it turned out.

 
Sketch Challenge - Arrange A Wreath card1.jpg
 

This is the sketch for the challenge.

 
Screen Shot 2020-11-13 at 9.41.57 PM.png
 

The Arrange A Wreath Stamp Set is one of my favorites but I never thought about using it to make a tree until I saw the sketch. I added some hearts between to fill in the empty spots.

 
Sketch Challenge - Arrange A Wreath stamp set.jpg
 

Tips & Instructions

  • Poppy Parade Card Base - 5 1/2 x 8 1/2, score at 4 1/4

  • Whisper White Layer - 4 3/4 x 3 3/4

  • Stamp the partridges using Granny Apple Green Ink. I started with the center one on the bottom and then stamped the one on either side. Then I moved up to the next row of two and then the top one.

  • Stamp hearts between the partridges using Poppy Parade Ink. I carefully inked up just the one heart and stamped it. Be sure you don’t get ink on the other heart.

  • Stamp sentiment using Poppy Parade Ink.

  • Adhere to card base.

 
Sketch Challenge - Arrange A Wreath card2.jpg
 

On the inside stamp the sentiment (from Wrapped In Christmas) using Poppy Parade Ink. Stamp one heart just above the sentiment using Poppy Parade Ink. Stamp the partridge using Granny Apple Green Ink.

 
Sketch Challenge - Arrange A Wreath inside.jpg
 

Supply List

Love Patti.png
Shop Here
 

Christmas Gift Card Holders

Do you give out lots of gift cards at Christmas? I sure do and these cards are perfect for this kind of gift. The have a slot inside to place a gift card.

 
Christmas Gift Card Holders both.jpg
 

In today’s video, I’ll show you how to create this fun card with the little secret slot inside for a gift card.


Tips & Instructions

  • Pear Pizzazz Card Base - 4 1/4 x 11, score at 5 1/2 & 9 1/4, fold card in half and then fold flap to inside of card.

  • Using the Label Me Lovely Punch, punch just a portion of the inside flap so the gift card will show. Adhere the edges of flap using strong adhesive (Tear & Tape or Stampin’ Seal Plus).

  • Real Red Layer - 4 x 3 1/2 and Strip - 4 x 1 1/2

  • Heartwarming Hugs Designer Series Layer - 3 7/8 x 3 3/8 and Strip - 3 7/8 x 1 3/8

  • Adhere Layers and Strips together.

  • Wrap ribbon around layer and adhere to back. Adhere layer and strip to card base.

  • Stamp sentiment with Real Red on scrap of Whisper White and punch with 1” Circle Punch.

  • Punch scrap of Real Red Cardstock with Label Me Lovely Punch and adhere circle to it. Adhere to card front using Dimensionals.

  • Tie bow and adhere to top of label using Glue Dot.

 
Christmas Gift Card Holder Green.jpg
 

On inside stamp sentiment with Real Red Ink on 4 x 3 1/2 piece of Whisper White Cardstock

 
Christmas Gift Card Holder inside2.jpg
 

Follow the same instructions for this one using Real Red for the card base, Pear Pizzazz for the background layers and the red pattern Designer Series Paper.

I used the Stitched So Sweetly Dies for the sentiment label the Real Red Braided Linen Trim for the bow.

 
Christmas Gift Card Holder Red.jpg
 

I cut the inside flap with the large Stitched So Sweetly Die, just cutting a piece on the edge.

 
Christmas Gift Card Holder inside.jpg
 

Supply List

Love Patti.png
Supply List
 

Trimming The Town Christmas Tags

I made these pretty Christmas Tags using the Trimming The Town Designer Series Paper and I think they’re so cute.

 
Coming Home Christmas Tags Both.jpg
 

The Trimming The Town Designer Series Paper has such fun patterns. I fussy cut those little houses and trees for the first tag. The red and white polka dots makes me think of Minnie Mouse and I think this pattern is so bright and cheerful.

 
Screen Shot 2020-11-11 at 7.22.13 PM.png
 

Tips & Instructions - Tag 1

  • Trimming The Town Designer Series Paper - 1 7/8 x approx. 6

  • Whisper White Cardstock - 1 7/8 x approx. 6

  • Adhere together and then punch the top with the Delightful Tag Topper Punch

  • Stamp sentiment on scrap of Whisper White using Misty Moonlight Ink. Cut with banner die from Tasteful Labels Dies.

  • Cut smallest scalloped oval from the Layering Ovals Dies

  • Fussy cut the small house and trees from the Trimming The Town Designer Series Paper and adhere to oval.

  • Lay out the pieces to determine placement and then punch bottom of tag using the Triple Banner Punch so you get the length you want. Mine is 4 1/2 from top to bottom point.

  • Adhere the sentiment banner to tag. Adhere the oval using Dimensionals.

  • Feed piece of Whisper White Faux Linen Ribbon through the top and tie 2 strands of Misty Moonlight/silver Baker’s Twine around it, tying in a bow.

 
Coming Home Christmas Tag1.jpg
 

Tips & Instructions - Tag 2

  • Trimming The Town Designer Series Paper - 1 7/8 x approx. 5

  • Whisper White Cardstock - 1 7/8 x approx. 5

  • Adhere together and then punch the top with the Scalloped Tag Topper Punch.

  • Punch bottom of tag using the Triple Banner Punch so you get the length you want. Mine is 4 from top to bottom point.

  • Stamp sentiment on scrap of Whisper White Cardstock using Real Red Ink (Sentiment is from Itty Bitty Christmas). Cut using the small circle from the Tasteful Labels Dies.

  • Cut larger circle from scrap of Shaded Spruce Cardstock. Adhere circles together and adhere to tag using Dimensionals.

  • Tie bow with a piece of Braided Linen Trim and adhere to circles using Glue Dot. Add some Real Red Rhinestones around the circles so it looks like a wreath.

  • Feed piece of Sheer Ribbon through the top.

 
Coming Home Christmas Tag2.jpg
 

On the back stamp the sentiments using Misty Moonlight on the first and Real Red on the second. I stamped the backs before I put everything together so it wasn’t bumpy.

 
Coming Home Christmas Tags backs.jpg
 

Supply List

Love Patti.png
Shop Here
 

Winter Woods & Nature's Beauty Christmas Card

Two beautiful Stamp Sets make one beautiful Card. I used the Winter Woods and the Nature’s Beauty Stamp Sets for this rustic Christmas Card.

 
Winter Woods & Natures Beauty Christmas Card2.jpg
 

In today’s video I’ll show you how to create this great background using the tree trunks from the Winter Woods Stamp Set.


If you like nature and the outdoors, you will love these stamp sets. They are great on their own or easily can be coordinated with other sets.

 
Winter Woods & Natures Beauty Christmas Stamp.jpg
 

Tips & Instructions

  • Old Olive Card Base - 4 1/4 x 11, score at 5 1/2 (top folding)

  • Crumb Cake Layer - 5 1/2 x 3 1/4

  • Stamp the snow dots using Old Olive Ink on both sides of the card base.

  • Stamp tree trunks across the Crumb Cake Layer using Crumb Cake Ink. Stamp them from top to bottom.

  • Cut largest scalloped circle from Old Olive Cardstock and 2nd largest circle from Whisper White Cardstock using the Layering Oval Dies.

  • Stamp deer using Soft Suede Ink on white Oval. Adhere ovals together.

  • Wrap Braided Linen Trim around Crumb Cake Layer and adhere to the back. Adhere layer to the card base.

  • Adhere the Oval to the card using Dimensionals.

  • Tie bow with Trim and adhere with Glue Dot and add some Elegant Faceted Gems.

  • Stamp sentiment on scrap of Whisper White using Soft Suede Ink. Punch with Classic Label Punch. Adhere to card using Dimensionals.

 
Winter Woods & Natures Beauty Christmas Card1.jpg
 

On the inside stamp bunny and sentiment using Soft Suede Ink. Stamp the branch using Old Olive Ink. Stamp a second time to get lighter shade. Re-ink and stamp off again and then stamp on layer.

 
Winter Woods & Natures Beauty Christmas inside.jpg
 

Supply List

Love Patti.png
Shop Here
 

Stitched Stars Gift Holder - November 3D Blog Hop

It's time for the November 3-D Blog Hop! I’m participating again this month with a group of Demonstrators to offer you 3-D projects and instructions directly on our blogs each month. This month we are featuring 3-D Christmas projects for you so be sure to "hop along" to see the creative projects designed for you to use this holiday season!

My project is a pretty little package using the Stitched Stars Dies. This is a shimmery, shiny project!

 
3D Stitched Star Gift Package4.jpg
 

I love all these dies in the Stitched Stars Dies.

  • I cut two of the largest stars from Silver Foil Paper.

  • Back a 2 x 4 piece of Balmy Blue Glimmer Paper with a piece of an Adhesive Sheet and cut two of the largest intricate stars.

 
3D Stitched Star Gift Package1.jpg
 
  • Adhere the glimmer stars to the larger stars.

  • Cut a strip of Silver Foil Sheet and a strip of Whisper White at 4 1/2 x 1/2.

 
3D Stitched Star Gift Package2.jpg
 
  • Pull each strip through your fingers to form a ring.

  • Adhere ends of the Silver strip making sure it fits in the center of the star.

  • Adhere the Silver ring to back of one of the stars using tiny dots of Liquid Glue.

  • Make ring from the Whisper White Strip and push it inside the silver ring, making sure it’s snug. Take it out and adhere ends.

  • Adhere the white ring to the back of the second star using tiny dots of Liquid Glue.

 
3D Stitched Star Gift Package3.png
 
  • The front and back should fit snugly together to create a little place to hold a treasure.

  • Stamp a sentiment with Balmy Blue Ink on a 1/2 strip of Whisper White Cardstock. My sentiment came from the Toile Christmas Stamp Set and I punched a banner on one end using the Triple Banner Punch. Adhere to top of star.

  • Tie a bow using a piece Metallic Mesh Ribbon and adhere to sentiment label using a Glue Dot.

  • Add a Rhinestone to the center of each star.

 
3D Stitched Star Gift Package5.jpg
 

You can put a small gift inside like a necklace or bracelet or ring.

 
3D Stitched Star Gift Package6.jpg
 

Hop along with this month’s 3D Blog Hop Here:

Supply List

Love Patti.png
Shop Here
 

November Ordering Special!!!

I’m excited to share my November 2020 ordering special with you!

 
November Ordering Special.png
 

Place a $50 order (before shipping & tax) from my Online Store and I will sent you a FREE package of Elegant Faceted Gems. These gems are gorgeous and will add a touch of elegance as you finish off your project.

* 90 pieces
* 15 each in 3 colors and 2 sizes
* 4 mm, 5 mm

Product colors: Clear, Petal Pink, pearlescent white

Love Patti.png
Shop my Online Store
 

Sketch Saturday - Ornamental Envelopes

For today’s sketch challenge, I used the Ornamental Envelopes Bundle. I stamped and cut out just one of the ornaments in Pacific Point, Cherry Cobbler and Shaded Spruce Inks.

 
Sketch Saturday - Ornamental Envelopes Card1.jpg
 

This is the sketch I used from the CAS(E) This Sketch Challenge from Splitcoaststampers.

 
Screen Shot 2020-11-07 at 12.39.51 PM.png
 

This is such a great stamp set. Look at my blog post from yesterday to see a video on how to use this set along with the coordinating dies to create a beautiful card and decorated envelope to go with it.

 
Sketch Saturday - Ornamental Envelopes Stamp Set.jpg
 

These are great colors to use for Christmas ornaments, don’t you think?

 
Sketch Saturday - Ornamental Envelopes Ink.jpg
 

Tips & Instructions

  • Cherry Cobbler Card Base - 5 1/2 x 8 1/2, score at 4 1/4

  • Whisper White Layer - 5 1/2 x 3 1/2

  • Gold Foil Strips - 2 strips cut to 5 1/2 x 3/4

  • Stamp ornaments on scraps of Whisper White in Pacific Point, Cherry Cobbler and Shaded Spruce Inks. Cut just the ornament shown on the card.

 
Sketch Saturday - Ornamental Envelopes die cut.jpg
 
  • Lay out the ornaments to determine placement for sentiment and stamp sentiment with Cherry Cobbler Ink. The sentiment I used is from the Poinsettia Place Stamp Set but you can use whatever one you want.

  • Adhere the ornaments. I used Liquid Glue but you can pop them up with Dimensionals if you want.

  • Adhere the Gold Foil Strips behind the white layer on each side. (Tip: using the strips instead of a full layer will save paper.)

  • To finish off the card tie 3 bows using the Gold Metallic Trim and adhere to each ornament with a Glue Dot. Add a Holiday Rhinestone to the center of each ornament. It’s so nice that these rhinestones come in a blue, red and green to match the ornaments.

 
Sketch Saturday - Ornamental Envelopes Card2.jpg
 

On the inside, stamp the sentiment (from Poinsettia Place) with Cherry Cobbler Ink. Then stamp the small ornament in Cherry Cobbler, Pacific Point and Shaded Spruce Inks across the top as shown.

 
Sketch Saturday - Ornamental Envelopes inside.jpg
 

Supply List

Love Patti.png
Shop Here
 

Ornamental Envelopes Christmas Card

Need a Christmas Card with a beautiful matching envelope? Ornamental Envelopes to the rescue!

 
Ornamental Envelopes Christmas Card1.jpg
 

I’ll show you all the products in this bundle in the video below. At first I thought I just wanted it for the envelope liners, but there is so much more!


This Bundle can be used all year long. Yes, it has the Christmas ornaments but you can make cards for many occasions. The envelope liners and intricate dies for the flaps can also be used for pretty much any type of card.

 
Screen Shot 2020-11-05 at 11.02.50 PM.png
 

Tips & Instructions

Card

  • Cherry Cobbler Card Base - 4 1/4 x 11, score at 5 1/2 (top folding)

  • Classic Christmas Designer Series Paper - 5 1/2 x 4

  • Cherry Cobbler Layer - 5 1/2 x 2 3/4

  • Whisper White Layer 5 1/2 x 2 1/2

  • Stamp ornaments with Cherry Cobbler Ink on white layer. Stamp the string of pearls with Sahara Sand Ink and sentiment with Cherry Cobbler Ink. Sentiment is from the Joyful Holly Stamp Set.

  • Adhere layers, you can use Dimensionals to add the focal layer.

  • Using 2 strands of Linen Thread, tie small bow and adhere using a Glue Dot.

  • Add some Holiday Rhinestones.

Envelope

  • Stamp ornaments with Cherry Cobble Ink and the address lines with Sahara Sand Ink on front of envelope.

  • On flap of envelop, stamp string of pearls with Sahara Sand Ink and small ornament with Cherry Cobble Ink.

  • Using middle envelope liner from the Envelope Dies cut liner from 5 1/2 x 3 1/2 piece of coordinating Designer Series Paper. You’ll have to snip it on both sides to remove the excess piece.

  • Place liner in envelope leaving some of the adhesive showing so you can seal the envelope.

  • Using your Paper Trimmer, line up the envelope and score on fold for flap.

  • Fold flap, then adhere the liner to just the flap of the envelope.

 
Ornamental Envelopes Christmas Card2.png
 

The inside layer is 5 3/8 x 4 so it matches the card front. Stamp sentiment and the flowers using Cherry Cobbler Ink. Sentiment is from the Joyful Holly Stamp Set.

 
Ornamental Envelopes Christmas Card inside.jpg
 

Supply List

Love Patti.png
Shop Here
 

Life Is Beautiful Christmas Card

I made this pretty Christmas Card using the Life Is Beautiful Stamp Set and the Plush Poinsettia Specialty Paper for the background. The flocked designs on this paper are gorgeous!

 
Life Is Beautiful Christmas Card2.jpg
 

This is one of my favorite stamp sets and can be used for all different seasons and occasions.

 
Life Is Beautiful Christmas Card - Stamp.jpg
 

Tips & Instructions

  • Pacific Point Card Base - 5 1/2 x 8 1/2, score at 4 1/4

  • Whisper White Layer - 5 3/8 x 4 1/8

  • Plush Poinsettia Specialty Paper - 5 3/8 x 4 1/8, adhere to white layer using small dots of liquid glue behind the design so it doesn’t show through.

  • Wrap piece of Silver Metallic Edge Ribbon around layers and adhere in the back. Adhere layer to card base.

  • Cut largest Stitched Nested Label Dies from Pacific Point Cardstock and 2nd largest from Whisper White Cardstock.

  • Stamp partial tree on white label using Soft Suede Ink.

  • Stamp circle grouping using Pacific Point Ink but stamp off first to get a lighter shade. Repeat to fill in the treetop.

  • Stamp sentiment using Pacific Point Ink (from Wrapped In Christmas Stamp Set).

  • Adhere label pieces and adhere to card using Dimensionals.

  • Tie bow with ribbon and adhere with a Glue Dot.

  • Add some Rhinestones.

 
Life Is Beautiful Christmas Card1.jpg
 

On the inside stamp sentiment using Pacific Point Ink. Stamp some snowflakes using Pacific Point Ink, stamping off first to get a lighter shade.

 
Life Is Beautiful Christmas Card inside.jpg
 

Supply List

Love Patti.png
Shop Here
 

Beautiful Cardinal Christmas Wishes Card

I’ve spent so much time using new Christmas products that I almost forgot about the Toile Christmas Stamp Set and Christmas Cardinal Dies in the Annual Catalog. This cardinal is so beautiful!

 
Beautiful Cardinal Christmas Wishes Card2.jpg
 

Watch the video to see all the products I used, how I colored and cut out the pieces to create this card.


The Toile Christmas Stamp Set has everything you need for stamping this card. Great images and beautiful sentiments. I used a piece of Poinsettia Place Designer Series Paper for the background layer.

 
Beautiful Cardinal Christmas Wishes stamp.jpg
 

These are the Stampin’ Blend's that I used to color the cardinal and the branch with the berries. I love coloring with these blends.

 
Beautiful Cardinal Christmas Wishes Blends.jpg
 

Tips & Instructions

  • Old Olive Card Base - 4 1/4 x 11, score at 5 1/2 (top folding)

  • Whisper White Layer - 5 1/8 x 3 7/8

  • Poinsettia Place Designer Series Paper - 5 x 3 3/4, adhere to White Layer and to card base.

  • Stamp cardinal and branch on Whisper White Cardstock using Black Memento Ink and color with Stampin’ Blends (Dark Real Red for the cardinal and berries, Dark Basic Black to darken around the face, Soft Suede (light or dark) for the branch, Dark Old Olive for the leaves and Dark Pumpkin Pie for the beak).

  • Stamp sentiment with Soft Suede Ink on Whisper White Cardstock.

  • Cut pieces with coordinating dies.

  • Arranges pieces to determine placement. Adhere branch to card. Adhere cardinal and sentiment using Dimensionals.

 
Beautiful Cardinal Christmas Wishes Card3.jpg
 

On the inside stamp sentiment using Soft Suede Ink. Stamp branch at top and bottom corner with Black Memento Ink. Color berries, leaves and branch using the same colors as card front.

 
Beautiful Cardinal Christmas Wishes inside.jpg
 

Supply List

Love Patti.png
Shop Here
 

Quite Curvy Birthday Card

The new Curvy Celebrations Products are now available for purchase! I love birds and these 3 are so cute sitting on the vine.

 
Quite Curvy Birthday Card2.jpg
 

The Quite Curvy Stamp Set has beautiful images and curvy sentiments that coordinate so well with the Curvy Dies. These products are available for purchase starting November 3rd and are an early-release from the Spring Mini Catalog.

 
Quite Curvy Birthday Card Stamp.png
 

Tips & Instructions

  • Daffodil Delight Card Base - 5 1/2 x 8 1/2, score at 4 1/4

  • Basic Black Layer - 5 3/8 x 4 1/8

  • Whisper White Layer - 5 1/4 x 4

  • Stamp vine on scrap of Whisper White Cardstock using Black Memento Ink.

  • Color leaves with Watercolor Pencils. I used Garden Green for the center of the leaves and Granny Apply Green for the outside. Blend using Blender Pens.

 
Quite Curvy Birthday Card pencils.jpg
 
  • Cut with coordinating die.

 
Quite Curvy Birthday Card die.jpg
 
  • Granny Apple Green Layer 5 1/4 x 4

  • Lay the vine over the Granny Apple Green layer and fussy cut along the edge of the Granny Apple Green layer so the vine will fit nicely along it. (NOTE: Make sure you angle it so the vine will fit on the card without handing over.) Emboss using the Tasteful Textures 3D Embossing Folder.

 
Quite Curvy Birthday Card layer.jpg
 
  • Stamp the 3 birds on scrap of Whisper White Cardstock using Black Memento Ink and cut with coordinating dies.

  • Color birds using Watercolor Pencils and blend with Blender Pens. I used Daffodil Delight and Pacific Point.

  • Stamp sentiment on Whisper White Layer using Black Memento Ink.

  • Adhere layers together and adhere to card base. Adhere vine along the green edge.

  • Adhere the birds using Mini Dimensionals.

 
Quite Curvy Birthday Card1.png
 

On the inside stamp sentiment, birds and small branches with Black Memento Ink. Color leaves with Watercolor Pencils (Garden Green, Daffodil Delight and Pacific Point). Blend with Blender Pens.

 
Quite Curvy Birthday Card inside.jpg
 

New Curvy Celebrations Products

Quite Curvy Bundle is an early release from the Spring Mini Catalog

Purchase separately or as a Bundle (save 10% on the Bundle)

 
Screen Shot 2020-11-02 at 10.24.53 PM.png
 

The Curvy Christmas Stamp Set and Classic Christmas Designer Series Paper are available through January 4, 2021.

Screen Shot 2020-11-02 at 10.25.11 PM.png

Supply List for Today’s Card

Love Patti.png
Shop Here
 

Sketch Saturday - Peace & Joy

I made another card using the Snowflake Splendor Designer Series Paper. I just love this paper! This is the card that I made for this week’s sketch challenge.

 
Sketch Saturday - Peace & Joy card1.jpg
 

The sketch challenge is the CAS(E) This Sketch from Splitcoaststampers. Here’s the sketch.

 
Screen Shot 2020-10-31 at 11.36.45 AM.png
 

I used the Peace & Joy Bundle to make this card. The Joy Dies can cut out 3 layers of the words Peace, Joy and Bright. There are coordinating sentiments in the stamp set to go with each.

 
Sketch Saturday - Peace & Joy stamp.jpg
 

Tips & Instructions

  • Pacific Point Card Base - 4 1/4 x 11, score at 5 1/2 (top folding)

  • Whisper White Layer - 5 1/4 x 4

  • Snowflake Splendor Layer - 5 1/8 x 3 7/8

  • Cut a piece of Pacific Point Cardstock about 3 x 1 1/2 and back with Adhesive Sheet. Cut the thinest “peace” word using the Joy Dies. Using the Adhesive Sheet really helps since it’s so thin.

  • Cut the next size “peace” word from Whisper White Cardstock. Remove backing from thin “peace” and adhere to white “peace”.

  • Stamp “on earth” sentiment using Pacific Point Ink on scrap of Whisper White Cardstock. Fussy cut leaving a small rim of white around it.

  • Adhere layers to card base and adhere sentiment to card.

 
Sketch Saturday - Peace & Joy card2.jpg
 

On the inside stamp sentiment and star using Pacific Point Ink. I stamped off first (stamp on scrap to remove layer of ink) to get a lighter shade for the star. Stamp large star and then smaller one offsetting a little.

 
Sketch Saturday - Peace & Joy inside.jpg
 

Supply List

Love Patti.png
Shop Here
 

Tailored Tag Snowflake Card

This was a fun card to make. Using the Tailored Tag Punch, I punched pieces of Snowflake Splendor Designer Series Paper and then pieced them together.

 
Tailored Tag Snowflake Card4.jpg
 

I’ll take you through all the steps on the video below. It was easy to do!


The Snowflake Splendor Designer Series Paper has great snowflake patterns and this paper is on sale during the month of October, 2020. You can save 15%.

 
Screen Shot 2020-10-29 at 5.40.34 PM.png
 

Tips & Instructions

  • Pacific Point Card Base - 5 1/2 x 8 1/2, score at 4 1/4

  • Whisper White Layer - 5 1/4 x 4

  • Whisper White Layer (pieces will be adhered to this layer) 5 1/8 x 3 7/8

  • Punch a bunch of pieces of Snowflake Splendor Designer Series Paper using the Tailored Tag Punch.

  • Adhere pieces to the smaller of the Whisper White Layers, leaving a narrow gap between each. I used Multipurpose Liquid Glue and a Silicone Craft Sheet for this. Cut pieces that hang over, cutting from the back.

  • Adhere layer to larger Whisper White Layer.

  • Stamp sentiment on scrap of Whisper White using Pacific Point Ink. The “Let It Snow” sentiment is from the Snowman Season" Stamp Set and the “It’s The Most Wonderful Time Of The Year” sentiment is from the Wrapped In Christmas Stamp Set.

  • Punch sentiment with Tailored Tag Punch.

  • Punch a piece of Pacific Point Cardstock using the Tailored Tag Punch. Cut tag in half and adhere each half behind the sentiment tag to give it a border.

  • Wrap piece of Snowflake Splendor Ribbon around layers and adhere to the back.

  • Adhere sentiment label over ribbon using Dimensionals.

  • Adhere layer to card base.

  • Add some Adhesive-Backed Snowflakes.


On the inside, stamp sentiment and some snowflakes using Pacific Point Ink.

 
Tailored Tag Snowflake inside2.jpg
 

Supply List

Love Patti.png
Shop Here
 

Magic In This Night Anniversary Card

The Magic In This Night Designer Series Paper isn’t just for Halloween! I love these black flowers, they look classy to me so I made an Anniversary Card using it.

 
Magic In This Night Anniversary Card2.jpg
 

During the month of October, Stampin’ Up! is having a Designer Series Paper sale. You can save 15% on select designs. The Magic In This Night Designer Series Paper is one of the papers on sale.

 
Screen Shot 2020-10-28 at 8.53.50 PM.png
 

Tips & Instructions

  • Basic Black Card Base - 5 1/2 x 8 1/2, score at 4 1/4

  • Silver Foil Layer - 5 1/4 x 4

  • Magic In This Night Designer Series Paper - 5 1/8 x 3 7/8

  • Basic Black Cardstock, cut using Detailed Bands Die

  • Whisper White scrap, wipe with Embossing Buddy, then stamp sentiment (from Many Mates Stamp Set) using Versamark Ink. Pour Silver Embossing Powder on and heat with Heat Tool

  • Cut sentiment with oval from Detailed Bands Die and adhere to the black band.

  • Adhere layers and band to card base.

  • Add some Rhinestones to sentiment label and center of flowers.

 
Magic In This Night Anniversary Card1.jpg
 

Wipe inside layer with Embossing Buddy. Stamp sentiment (from Many Mates) and flower from (Band Together) using Versamark Ink. You can use any flower stamp that you have. Pour Silver Embossing Powder on and heat with Heat Tool.

 
Magic In This Night Anniversary inside.jpg
 

Supply List

Love Patti.png
Shop Here
 

Curvy Celebrations Christmas Card

Stampin’ Up! has some new products coming out November 3 called Curvy Celebrations. The stamps and dies are so fun and I love the Christmas Papers.

 
Curvy Celebrations Christmas Card2.jpg
 

Watch the video below to see all the new products and when they will be available for purchase. I’ll show you how I made this card as well.


Tips & Instructions

  • Cherry Cobbler Card Base - 5 1/2 x 8 1/2, score at 4 1/4

  • Whisper White Layer - 5 1/4 x 4

  • Whisper White Curvy Layer - 5 1/4 x 4, cut with Curvy Die as shown in video (you can use a piece that’s shorter than 5 1/4 because you will cut most away).

  • Stamp trees along the curve using Shaded Spruce Ink. You can shape the stamp around the curve and then pick it up with the clear block.

  • Classic Christmas Designer Series Paper - 4 x 3, cut with Curvy Die as shown in video

  • Lay curvy pieces on Whisper White Layer leaving a gap between for the sentiment. You can draw a light pencil mark to help with placement. Curve the sentiment stamp along the curve of the paper and mount it. Move the layers away and stamp sentiment using Cherry Cobbler Ink.

  • Adhere layers above and below sentiment. You may need to trim after adhering.

  • Stamp stars using Daffodil Delight Ink.

  • Adhere to card base.

 
Curvy Celebrations Christmas Card3.jpg
 

On the inside, stamp a portion of the trees at bottom corner with Shaded Spruce Ink. Stamp sentiment with Cherry Cobbler Ink. Stamp greenery at top corner with Shaded Spruce Ink, stamping a second and third time without re-inking.

 
Curvy Celebrations Christmas Card inside.jpg
 

Supply List - Come Back November 3rd to shop for these products!

Love Patti.png
Shop Here
 

Merry Moose Christmas Card

I was so happy that the Merry Moose Bundle came back in the Winter Mini Catalog. I made this rustic Christmas Card for my brother and I know he will love it.

 
Merry Moose Christmas Card2.jpg
 

The stamp set can be bundled with a punch that cuts out both the moose images. The sentiments are so fun and the tree images stamp beautifully.

 
Screen Shot 2020-10-26 at 5.27.19 PM.png
 

Tips & Instructions

  • Early Espresso Card Base - 5 1/2 x 8 1/2, score at 4 1/4

  • Whisper White Layer - 5 1/4 x 4, emboss with Hammered Metal 3D Embossing Folder

  • Early Espresso Layer - 3 7/8 x 3 3/8

  • Crumb Cake Layer - 3 3/4 x 3 1/4, stamp large trees across using Shaded Spruce Ink.

  • Adhere all layers to card base.

  • Stamp moose image on scrap of Whisper White with Early Espresso Ink and punch with Moose Punch.

  • Stamp sentiment on scrap of Whisper White with Early Espresso Ink and cut with Tasteful Labels Dies.

  • Adhere moose and sentiment using Dimensionals.

 
Merry Moose Christmas Card1.jpg
 

On the inside stamp moose and sentiment with Early Espresso Ink. Stamp large and small tree with Shaded Spruce Ink.

 
Merry Moose Christmas Card - Inside.jpg
 

Supply List

Love Patti.png
Shop Here