Sketch Saturday - Nature's Sweetness Hope Card

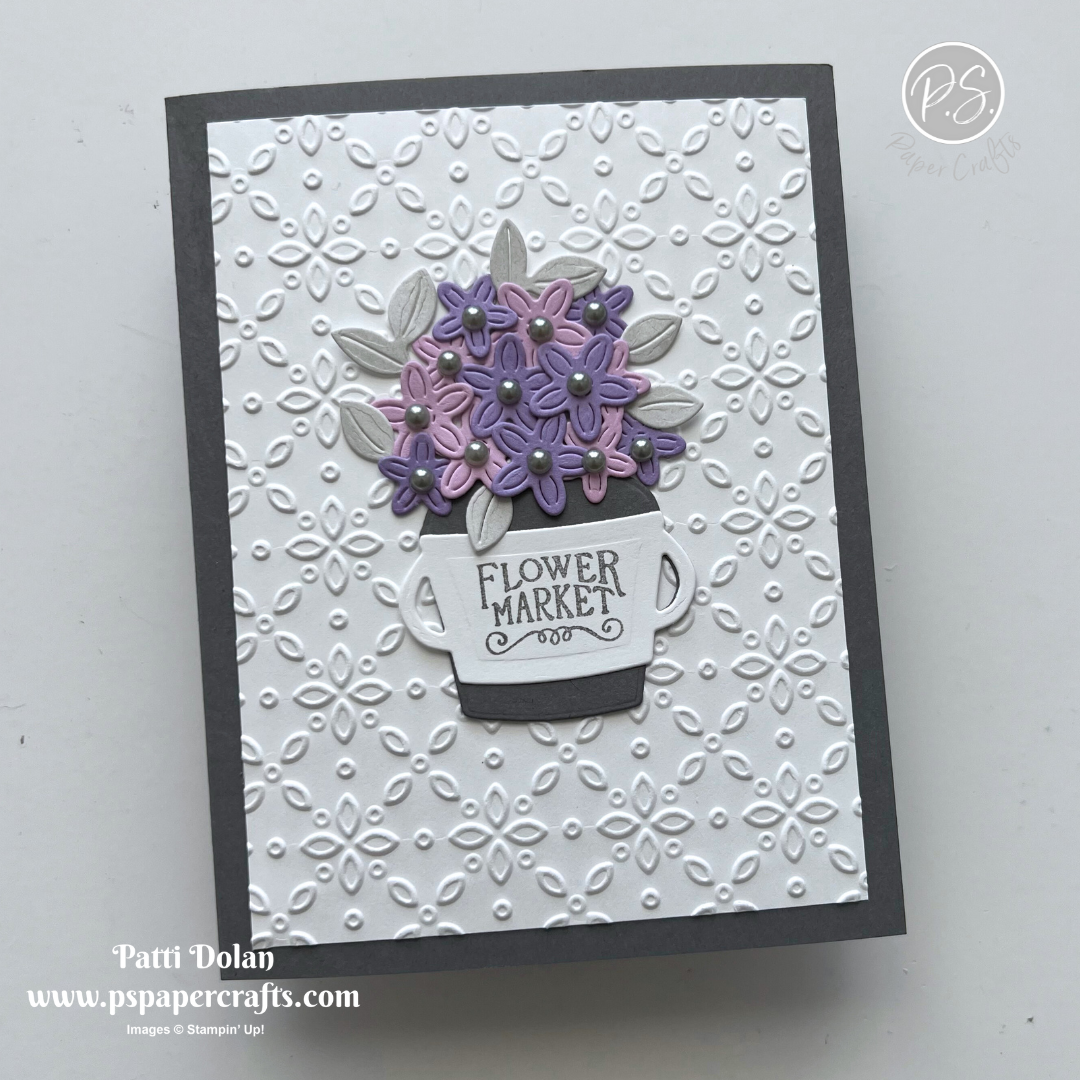
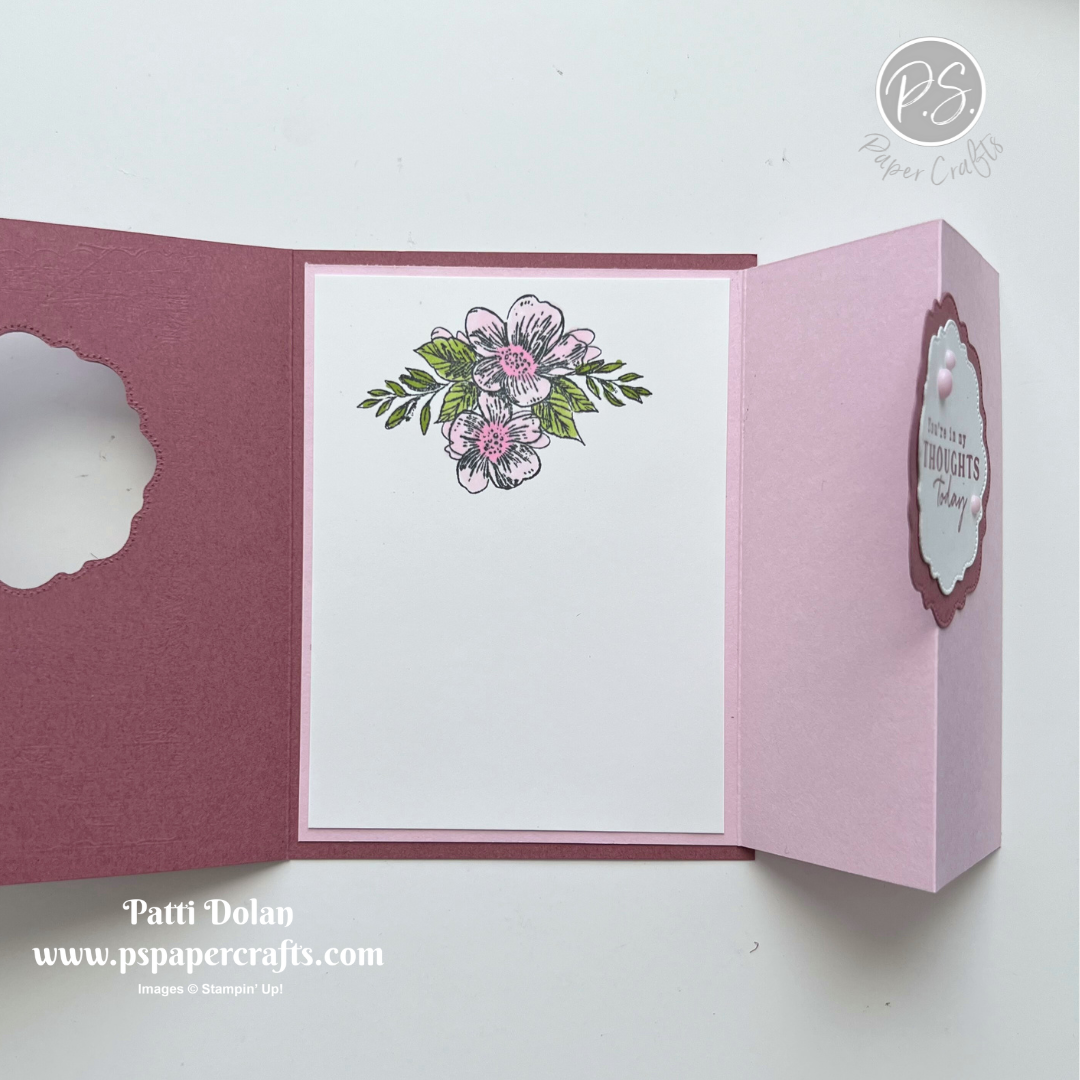
The pattern on this piece of the Nature’s Sweetness Designer Series Paper was perfect for this week’s sketch challenge. I used the Unbounded Love Stamp Set and Dies for the sentiment along with the Nested Essential Dies for the banner.


Here’s the sketch from the weekly Atlantic Hearts Sketch Challenge.


Tips & Instructions

  • Pebble Path Card Base - 4 1/2 x 11, score at 5 1/2 (Top Folding)

  • Basic White Layer - 5 1/4 x 4, adhere to the card base.

  • Nature’s Sweetness Designer Series Paper - 3 7/8 x 5 1/8, adhere to the card.

  • Basic White - cut using the largest banner die from the Nested Essentials Dies.

  • Pebbled Path - cut using the 2nd largest banner die.

  • Stamp sentiment on Basic White in Pebbled Path ink. The sentiment is from the Unbounded Love Stamp Set. Die cut the the circle die from the Unbounded Love Dies.

  • Die cut the flower sprigs from Basic White using the Unbounded Love Dies. Adhere to the back of the sentiment label and then adhere the labe with Dimensionals.

  • Add some Iridescent Basic Pearls.


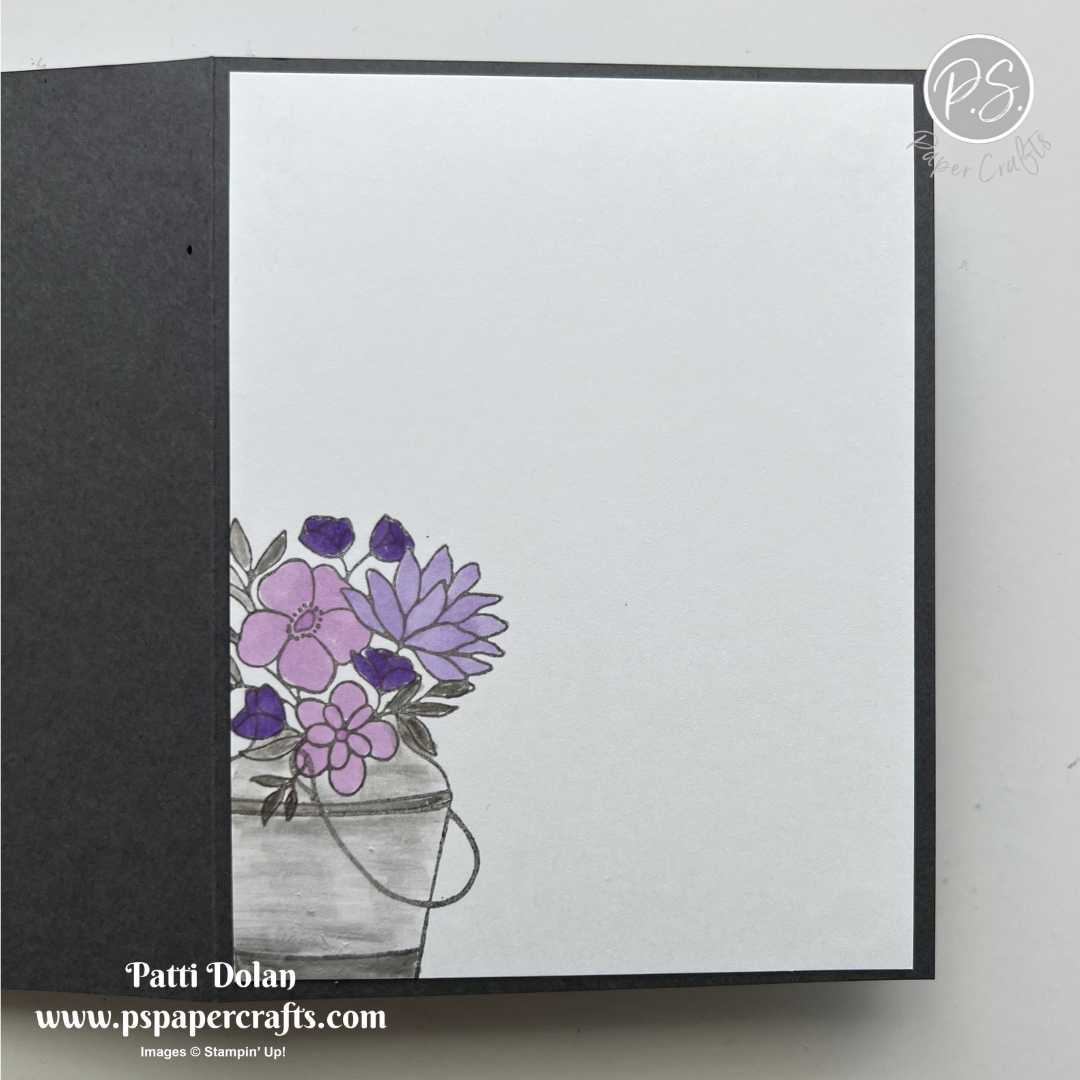
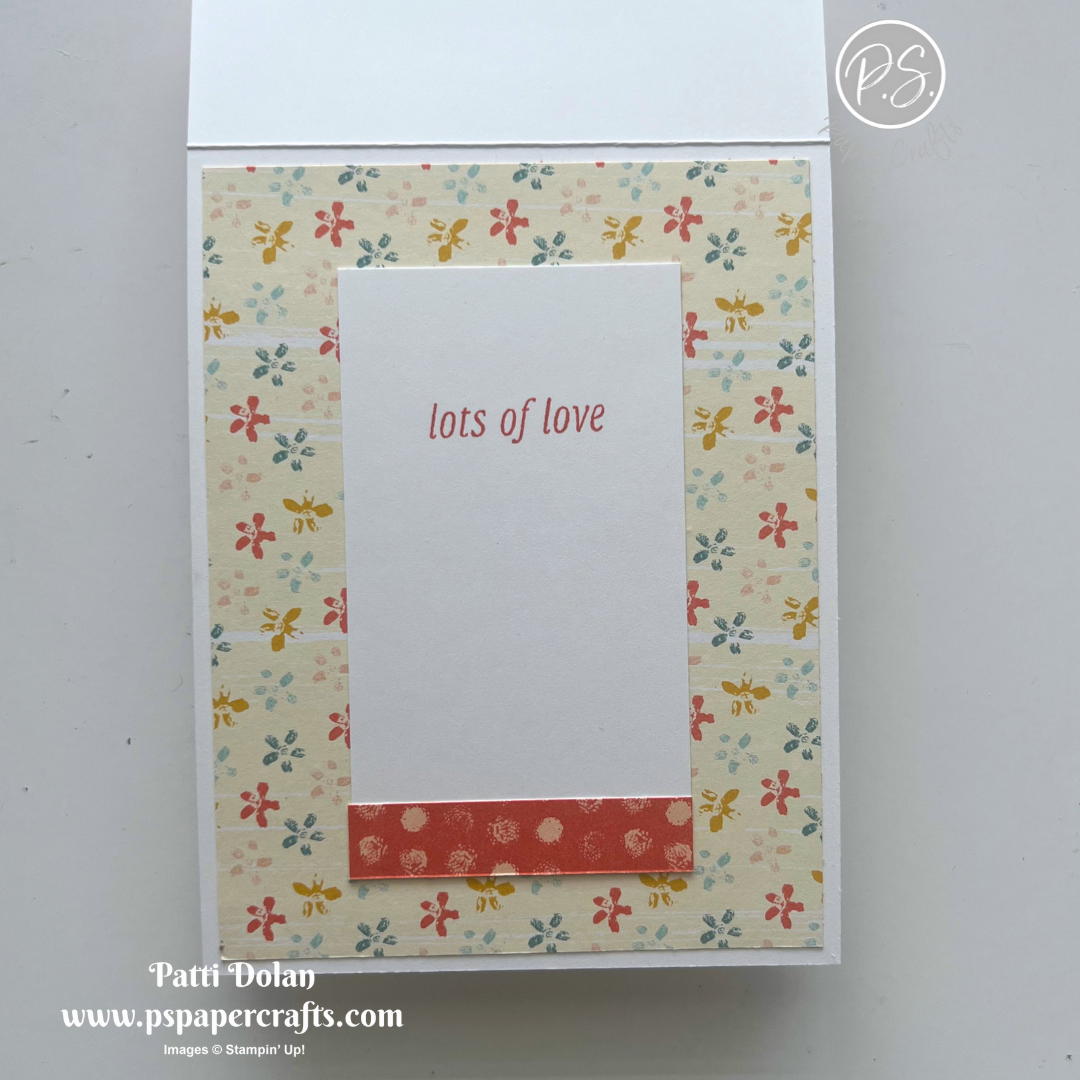
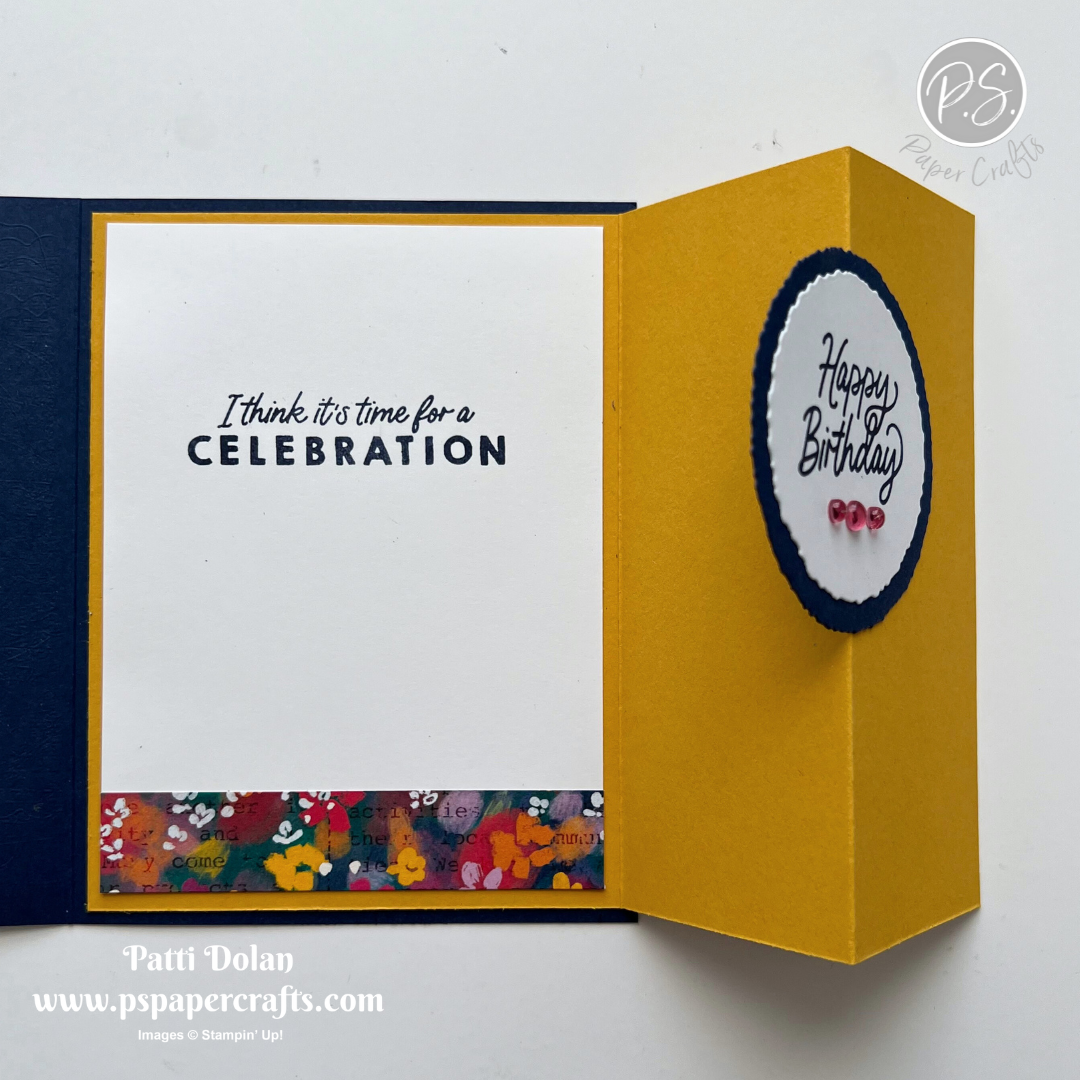
On the inside layer (4 x 5 1/4) stamp sentiment in Pebbled Path and add a 3/4 x 4 strip of the Designer Series Paper.


I think this is so elegant. It could be made for a wedding or sympathy card.


Supply List

You can click on the item to purchase it from my Online Store.

Double Point Fun Fold Cards

I made these Double Point Fun Fold Cards on my YouTube video today using some of the new products from the upcoming Annual Catalog. This is a great fun fold, easy to make and so cute.


Watch the video to see step by step instructions to make this design.

Click on the button below to get a printable pdf with measurements and instructions.


This card was made using the new Country Woods Designer Series Paper. The Country Birdhouse Bundle has great dies to create a fun birdhouse. I used Petunia Pop and Pretty In Pink for the pretty flowers.


I made this card using the Unbounded Beauty Designer Series Paper and Unbounded Love Bundle. The front panel was made using the Countryside Corners Dies.


Pretty Country Flowers Card

I love how this card turned out. It’s simple but so pretty. I used the new Eyelet 3D Embossing Folder and the Country Flowers Bundle.


The color combo is from my April Inspiration Calendar - Highland Heather, Fresh Freesia and Basic Gray. You can get my calendar each month when you subscribe to my email list.


Tips & Instructions

  • Basic Gray Card Base - 5 1/2 x 8 1/2, score at 4 1/4

  • Basic White Layer - 4 x 5 1/4 , emboss using the Eyelet 3D Embossing Folder and adhere to the card base.

  • Using the Country Flowers Dies, die cut the jug from Basic Gray and the label piece from Basic White. Stamp the sentiment on the white piece in Basic Gray Ink and adhere to the jug. Adhere to card.

  • Die cut a bunch of flowers from Fresh Freesia and Highland Heather Cardstock.

  • Using a Blending Brush, lightly blend ink on a scrap of Basic White large enough to die cut the leaves. This will give you a very light look. Die cut a bunch of leaves.

  • Adhere the flowers and leaves to the card using Glue Dots.

  • Add some Smoky Slate Pearls to the flower centers.


On the inside layer (4 x 5 1/4) stamp the bucket and flowers in Basic Gray ink. To color the jug and leaves I pressed a clear block into the Basic Gray ink pad and then used a Blender Pen to pick up ink to color with. Start coloring on scrap paper to get some ink off for a lighter color. (Note, I did this because I wanted a lighter shade and we don’t carry Basic Gray in our Stampin’ Blends collection.

Color the flowers with Fresh Freesia and Highland Heather Stampin’ Blends Markers.


The embossed layer and embossing on the flowers and leaves really make this card so pretty!


Supply List

You can click on the item to purchase it from my Online Store.

Note - The Country Flower Bundle, Eyelet 3D Embossing Folder and Basic Gray & Smoky Slate Pearls will be available starting May 1, 2024.

Sketch Challenge - Country Birdhouse

I made this fun card for the weekly Sketch Challenge. The pocket reminds me of the Flower Power days.


The sketch is from the weekly Splitcoaststampers Sketch Challenge. You can click on the sketch to see other projects posted for this week’s challenge.


Tips & Instructions

  • Boho Blue Card Base - 5 1/2 x 8 1/2, score at 4 1/4

  • Basic White Layer - 3 3/4 x 5, stamp sentiment in Petunia Pop ink. The sentiment is from the Country Birdhouse Stamp Set.

  • Poetic Expressions pocket piece - 2 3/4 x 3 1/4, cut corners off the bottom to create a point. What I did was used a piece of scrap cut to 2 3/4 x 3 1/4, then folded it in half and cut the bottom at an angle. I used this as a template for the pocket.

  • Petunia Pop Glimmer Paper - 1/2 x 2 3/4, adhere to the top of the pocket. Cut a 1/2 x 1/2 piece of Pretty In Pink and adhere to the side of the pocket so it looks like a tag. Adhere the pocket to the white layer.

  • Die cut 2 of the flowers from Pretty In Pink using the Simply Zinnias Dies. Die cut the flower center from Petunia Pop Glimmer Paper. Adhere the 2 flowers together offsetting a little bit. Bend up the petals a little bit to give it some dimension. Adhere the flower center and then adhere to the pocket.


On the inside layer (4 x 5 1/4) add a 3/4 x 4 strip of the Poetic Expressions Designer Series Paper.


I love the new Glimmer Paper, it adds a nice sparkle to the card. It comes in all the new In Colors!


Supply List

You can click on the item to purchase it from my Online Store.

Note the Country Birdhouse, Petunia Pop and Pretty In Pink products will be available for purchase starting May 1, 2024.

Sketch Saturday - So Sincere

I made this card for the weekly Splitcoaststampers Sketch Challenge using the Countryside Inn Designer Series Paper. I love the dark blue against the white, so classic.


Here’s the sketch I used. Pretty simple but there’s always so many ideas with these challenges. I love to see everyone’s projects.


Tips & Instructions

  • Thick Basic White Card Base - 5 1/2 x 8 1/2, score at 4 1/4

  • Countryside Inn Designer Series Paper

    • Bottom piece - 1 3/4 x 5 1/4, adhere to card front.

    • Top piece - 1 x 5 1/4, adhere to card front.

  • Night of Navy Strip - 1/2 x 5 1/4, emboss using the crosshatch folder from the Basics 3D Embossing Folder. Adhere to card.

  • Stamp sentiment on scrap of Basic White and cut using the smallest open die from the Country Corner Dies.

  • Cut a scrap of Night Of Navy with the next size up die. Adhere behind the sentiment label.

  • Punch 4 small branches from Balmy Blue and 2 leaf branches from Basic White using the Bough Punch.

  • I put a piece Foam Adhesive Sheet that I cut down to the back of the sentiment label and adhered the branches to it, then adhere to the card. You can use Dimensionals instead of the Foam Adhesive Sheet.

  • Add some Iridescent Pearls.


On the inside layer (4 x 5 1/4) stamp sentiment in Night of Navy ink. Add a 3/4 x 5 1/4 strip of the Designer Series Paper to the bottom.


I love all the blues on this card.


Supply List

You can click on the item to purchase it from my Online Store.

Joy Fun Fold Cards

Look at how bright and cheerful these Joy Fun Fold Cards are. I love how the patterned papers are highlighted with this design.


Watch the video to see step by step instructions to make this fun fold. It’s a very simple one but turns out beautiful.

Click on the button below to get a printable pdf with measurements and instructions.


This card was made using one of the new In Colors. It’s called Petunia Pop. The sentiment is from the new Unbounded Love Bundle. I used the stamp and the die from this bundle to create the sentiment label.


I made this card using the Lighter Than Air Designer Series Paper and the Hot Air Balloons Bundle.


Are you interested in joining my In Color Club or Designer Series Paper Share? Just click on the button below to get all the details.

Supply List

You can click on the item to purchase it from my Online Store.

Note - The new In Color products and Unbounded Love Bundle will be available staring May 1, 2024 with the launch of the new Annual Catalog.

Sign Up Today

With every new Annual Catalog Stampin' Up! releases 5 new In Colors.  This year's colors are bright and fun.

An easy way to get all the products for each color is to join my In Color Club.  Each month receive products for one new color and after 5 months, you'll have them all.  Below are the details.  

Email patti@pspapercrafts.com to join.


Each Month receive the following for one new In Color: 

  • Full Pack of Cardstock

  • Ink Pad

  • Ink Refill

  • Stampin' Write Marker

  • 6 x 6 Designer Series Paper

  • Bordered Ribbon

  • In Color Shimmer Gems 

Here's how it works: 

  • $60 each month, I will send you a PayPal request.

  • 5 month commitment

  • Add on Stampin' Blends Combo for $11 each month

  • Get Free In Color Glimmer Paper 5 sheets (6 x 6) with your 5th month.

Email patti@pspapercrafts.com to join.


Reservations are now open for my Designer Series Paper Share.  It's a great way to see all the papers and decide which ones you like.  Stampin' Up!'s Designer Series Paper is one of my favorite products and I'm always surprised at the patterns I like that I would never have thought to purchase.


Pay $60.00 and receive 143 pieces of 6×6 Designer Papers listed below:

* Country Lace - 12 sheets
* Country Woods - 12 sheets
* Frames & Flowers - 6 sheets plus Die Cuts 
* Full Of Life - 12 sheets
* Lilly Pond Lane - 12 sheets
* Mediterranean Blooms - 12 sheets 
* Take To The Sky - 12 sheets 
* Thoughtful Designs Specialty - 5 sheets 
* Thoughtful Journey - 12 sheets 
* To Market - 12 sheets 
* Unbounded Beauty - 12 sheets 
* Wildly Flowering  - 12 sheets 
* Wood Texture Specialty Paper - 2 sheets 
* 2024-2026 In Color Glimmer Specialty Paper - 5 sheets
* Silver Foil - 2 sheets  
* Textured Metallic Specialty Paper - 3 sheets     

FREE - 10 new In Color Card Bases (2 each of 5 colors)

Order by April 26, pay by April 30.

Schedule:

  • April 30 - deadline to pay (I will send you a PayPal Invoice to be paid by April 30)

  • May -  I will order  the paper

  • I will cut, label and package all paper shares

  • May 20 (or earlier): I will start shipping paper shares (assuming there are no backorders)

Email patti@pspapercrafts.com to reserve your spot.


Country Birdhouse Birthday Card

I’m so excited to start using some of the products from the new Annual Catalog. I made this card using the Country Birdhouse Bundle.


I used the Color Combo from my April Inspiration Calendar - Starry Sky, Lemon Lime Twist and Gorgeous Grape.


Tips & Instructions

  • Gorgeous Grape Card Base - 5 1/2 x 8 1/2, score at 4 1/4

  • Basic White - 5 1/4 x 4, emboss using the crosshatch pattern from the Basics 3D Embossing Folder.

  • Stamp the birdhouse from the Country Birdhouse Stamp Set in Black Memento ink on a piece of Basic White. Color with a Light Lemon Lime Twist Stampin’ Blends Marker. I colored just the main part of the birdhouse since I covered the top and bottom with pieces that I die cut. You can trim off any white that is showing on the edges. Color the large circle with a Smoky Slate Stampin’ Blends Marker.

  • Die cut the bottom and top pieces of the birdhouse from Lemon Lime Twist Cardstock using the coordinating dies. Emboss the bottom piece and the very top piece using the crosshatch embossing folder.

  • Adhere the pieces to the birdhouse. I had to trim a little bit off the base birdhouse that was showing through.

  • Die cut the small circle from Basic Black and adhere to the birdhouse for the perch.

  • Stamp the bird in Black Memento ink on a scrap of Basic White and die cut. Color the bird with a Light Starry Sky Stampin’ Blends Marker. Use the Color Lifter marker to remove some ink from it’s belly. Color the beak and feet with a Light Lemon Lime Stampin’ Blends Marker. Adhere bird to the birdhouse with Dimensionals.

  • Die cut flowers from Gorgeous Grape and leaves from Lemon Lime Twist and adhere to the birdhouse. Add some Rhinestones to the flower centers.

  • Adhere birdhouse to the card.

  • Stamp sentiment on scrap of Basic White with Starry Sky ink and die cut using the Happy Little Things Dies. Adhere to the card with Dimensionals.


On the inside layer (4 x 5 1/4) stamp sentiment in Starry Sky ink. Stamp the flower in Gorgeous Grape ink and color the center with a Light Lemon Lime Twist Stampin’ Blends Marker.


I love all the texture on this card. That bird just makes me happy.


Supply List

You can click on the item to purchase it from my Online Store.

Note: The Country Birdhouse Bundle (Stamp Set & Dies) will be available starting May 1, 2024.

Sketch Challenge - Garden Meadow

Here’s my card for this week’s Sketch Challenge from Splitcoaststampers. I used the pretty Poetic Expressions Designer Series Paper and the Scalloped Contours Dies.


Here’s the sketch I used. You can click on it to see the other projects posts for this week’s challenge.


Tips & Instructions

  • Wild Wheat Card Base - 5 1/2 x 8 1/2, score at 4 1/4

  • Basic White Layer - 5 1/2 x 4, cut edge using the Scalloped Contours Dies (mine measures 5 1/2 x 3 5/8 after I cut but this doesn’t have to be exact.)

  • Lay the white layer on the card front to figure out where you want to cut the card front’s edge and put the die there. You may want to use Post-It Tape or Washi Tape to keep it in place. Open the card and die cut the edge.

  • Poetic Expressions Designer Series Paper - 5 1/2 x 3 3/4. Lay over the white layer to figure out where you want to put the die so the scallops line up and die cut.

  • Adhere the Designer Series Paper to the white layer, shifting it to the left so you can see the white scalloped layer. Cut the edge of the Designer Series Paper that hangs over the left side.

  • Wrap a piece of Wild Wheat Ribbon around the layers and adhere to the back of the layer. Adhere layers to the card front. (I forgot the add the ribbon before adhering to the card front so I just wrapped it around and used the bow to cover the ends.) Tie bow and adhere with a Glue Dot.

  • Stamp sentiment on a 1/2” strip of Basic White in Wild Wheat and adhere to card with Dimensionals. The sentiment is from the Garden Meadow Stamp Set.


On the inside layer (5 1/4 x 3) stamp sentiment in Wild Wheat ink. The sentiment is from the Flower Cart Stamp Set. Adhere a 3/4 x 3 strip of Designer Series Paper to the bottom of the layer.


I love how delicate and dainty this card is. It reminds me of my grandma.


Supply List

You can click on the item to purchase it from my Online Store.

Let's Go Fishing - Retirement Card

I made this great retirement card using the Let’s Go Fishing products for the April Simple Suite Stampers Tutorial Bundle.


This month’s Tutorial Bundle features the Let’s Go Fishing Suite and is full of great ideas for masculine cards.

You can get the Tutorial for free when you place an order for $35 or more from my Online Store or you can purchase the Tutorial right here on my website. Just click on the Tutorials button at the top of this page.


The colors I used are Very Vanilla and Pebbled Path. I embossed the cardstock layer using the Twisted Rope Embossing Folder.


Here’s the inside of the card. The stamp set has such great sentiments.


I love how the Designer Series Paper looks like netting and coordinates so well with the embossed piece. I fussy cut the fish from the Designer Series Paper.


Supply List

You can click on the item to purchase it from my Online Store.

Sketch Saturday - Notes Of Nature

I made this card for the weekly sketch challenge. It’s so delicate and pretty. I used the Lifetime of Love Dies to cut out the oval and flower pieces.


Here’s the sketch I used from the Atlantic Hearts Sketch Challenge.


Tips & Instructions

  • Wild Wheat Card Base - 5 1/2 x 8 1/2, score at 4 1/4

  • Poetic Expressions Designer Series Paper - 4 x 5 1/4, adhere to the card base.

  • Using the Lifetime Of Love Dies cut the oval piece from Wild Wheat, Basic White and Bubble Bath.

  • Adhere the Wild Wheat Oval to the card. Adhere the Basic White cut out piece to the inside of the oval (the piece that was cut out). Then add the small cut out pieces of the Bubble Bath flowers.

  • Stamp sentiment in Wild Wheat Ink on a 3/4 strip of Basic White. The sentiment is from the Notes Of Nature Stamp Set. Punch both ends of the strip using the Banners Pick A Punch.

  • Adhere the sentiment to the card using Dimensionals.

  • Add some pink Blooming Pearls.


On the inside layer (4 x 5 1/4) stamp sentiment in Wild Wheat ink. The sentiment is from the Thoughtful Expressions Stamp Set. Stamp the floral image in Wild Wheat ink. This image is from the Notes Of Nature Stamp Set.


It was a little tedious to glue all the cut out pieces into the flowers but well worth it.


Supply List

You can click on the item to purchase it from my Online Store.

Double Decker Z Fold Cards

I learned how to make these Double Decker Z Fold Cards from Patty Bennett. It’s a great fun fold and very easy to make. I love how they stand up so nicely.


Watch the video to see step by step instructions to make this design.

Click on the button below to get a printable pdf with measurements and instructions.


This card was made using the pretty Nature’s Sweetness Specialty Designer Series Paper. The sentiment is from the Perennial Postage Stamp Set and was stamped on a label cut using the Something Fancy Dies.


I made this card using the beautiful Hello, Irresistible Designer Series Paper. The flower was cut from the paper using the Irresistible Blooms Dies.


Supply List

You can click on the item to purchase it from my Online Store.

Color Combo - Let's Chat

This is such a fun stamp set. It’s called Let’s Chat and has old fashioned phone images with some cute sentiments.


I used the colors from my April Inspiration Calendar on this card - Tahitian Tide, Berry Burst and Melon Mambo. You can get my calendar each month when you subscribe to my email list.


This stamp set is retiring and marked down, available while supplies last.


Tips & Instructions

  • Thick Basic White Card Base 5 1/2 x 8 1/2, score at 4 1/4

  • Flowering Zinnia Designer Series Paper - 5 1/4 x 4, adhere to the card base.

  • Basic White - 3 1/2 x 4, stamp the telephone in Tahitian Tide ink and the sentiment in Melon Mambo ink.

  • Adhere the stamped layer to the card using a Foam Adhesive Sheet that you cut down to fit behind the layer.


On the inside layer (4 x 5 1/4) add a strip of the Designer Series Paper cut to 3/4 x 4.


I used a stamp positioning tool to get a good solid image of the phone.


Supply List

You can click on the item to purchase it from my Online Store.

Sketch Challenge - Flowering Zinnia

Here’s my card for this week’s sketch challenge. I used the Simply Zinnia Dies to cut those pretty flowers and the Zinnia 3D Embossing Folder for the background layer.


The sketch is from the weekly Splitcoaststampers Sketch Challenge. You can click on the sketch to see other projects posted this week.


Tips & Instructions

  • Highland Heather Card Base - 5 1/2 x 8 1/2, score at 4 1/4

  • Basic White Layer - 5 1/4 x 4, emboss using the Zinnia 3D Embossing Folder and adhere to the card base.

  • Flowering Zinnias Designer Series Paper (leafy pattern) - 1 3/4 x 5 1/4, adhere to the right side of the embossed layer.

  • Using the Simply Zinnia Dies, die cut flowers to make the 3 flowers. I used both flower dies for each flower and cut 2 of each die from Highland Heather and 1 of each die from Fresh Freesia. Adhere the two different flowers together, offsetting a little bit to create 2 Highland Heather and 1 Fresh Freesia flower.

  • Die cut 3 flower centers from Lemon Lolly and adhere to the center of the card. Adhere the flowers to the card with Dimensionals

  • Basic White - 1 3/4 x 1, stamp sentiment in Highland Heather. The sentiment is from the Filled With Happiness Stamp Set. Adhere to the card with Dimensionals.

  • Add a Fine Purple Shimmer Gem.


On the inside layer (4 x 5 1/4) stamp the zinnias in Highland Heather Ink.


I love how the dies cut and add some details to the flowers in one pass through the machine!


Supply List

You can click on the item to purchase it from my Online Store.

Sketch Saturday - Thoughtful Expressions

Here’s my card for this week’s Sketch Challenge using the beautiful Poetic Expressions Designer Series Paper and Thoughtful Expressions Stamp Set. I added an embossed layer behind the strips of patterned paper and love how it turned out.


The the sketch I used is from the weekly Atlantic Hearts Sketch Challenge


Tips & Instructions

  • Moody Mauve Card Base - 5 1/2 x 8 1/2, score at 4 1/4

  • Bubble Bath Layer - 5 1/4 x 4, emboss using the Fun Patterns Embossing Folder. You’ll have to run it though twice to cover the full layer but it doesn’t matter if it’s lined up in the middle because you’ll cover it with the strips.

  • Cut 4 strips of Poetic Expressions Designer Series Paper that coordinate with each other - 3/4 x 4. Adhere them to the embossed layer. Adhere layer to card base.

  • Basic White layer - 3 1/2 x 2, stamp sentiment and floral image in Black Memento ink. Color with Stampin’ Blends. I used Dark Bubble Bath, Light Moody Mauve and Dark & Light Old Olive.

  • Adhere stamped layer to a piece of Moody Mauve cut at 3 3/4 x 2 1/4 and then adhere to the card with Dimensionals.

  • Add some Adhesive-Backed Dragonflies.


On the inside layer (4 x 5 1/4) stamp the floral images in Black Memento Ink and color with Stampin’ Blends.


The embossed layer just continues the fun patterns across the card.


Supply List

You can click on the item to purchase it from my Online Store.

Bridge Fun Fold Cards

The Bridge Fun Fold cards are so easy to make and I love how they turned out. You can use any shape for the bridge piece.


Watch the video to see step by step instructions to make this design. You’ll cut off pieces from the card base and use them to create the bridge.

Click on the button below to get a printable pdf with measurements and instructions.


This card was made using the Countryside Inn Designer Series Paper which is so pretty. The sentiment is from the Good Feelings Stamp Set.


I made this card using the Inked Botanicals Designer Series Paper along with the Inked & Tiled Stamp Set.


Supply List

You can click on the item to purchase it from my Online Store.

Color Combo - Thoughtful Moments

This is such a fun spring card to send to someone just to say hello. I made it using the Fun Patterns Embossing Folder which is one of our new Online Exclusive products.


I used the color combo from my April Inspiration Calendar - Lemon Lolly, Pool Party and Soft Sea Foam. These are perfect pastel colors for spring.

You can get my April Inspiration Calendar each month when you subscribe to my email list.


Tips & Instructions

  • Pool Party Card Base - 5 1/2 x 8 1/2, score at 4 1/4

  • Basic White Layer 5 1/4 x 4, adhere to the card base.

  • Basic White Layer to adhere the strips to - 5 x 3 3/4

  • Three strips of cardstock - 1 1/4 x 5 (I used Lemon Lolly, Soft Sea Foam and Pool Party).

  • Emboss the strips using the Fun Patterns Embossing Folder and adhere to the 5 x 3 3/4 white layer.
    The alternative is to adhere the strips and then emboss as one piece but you will need a larger embossing folder or run it through twice, lining it up correctly on the second pass.

  • Adhere the layer to the card.

  • Use the Thoughtful Moments Hybrid Embossing Folder to create the sentiment. This includes a die that works with the folder.

    • Using a brayer, roll it on a Pool Party Ink Pad to ink it up.

    • Next, roll the inked up brayer over the Embossing Folder. I only added ink to the word I wanted to use (Hello), not the entire folder.

    • Lay the die on the side that you inked up. It should fit in and lock into place.

    • Place a scrap of Basic White over the word that you want to use (Hello) and close the folder.

    • Run it through your Stampin’ Cut & Emboss Machine.

  • Adhere the word to the card front using Dimensionals.

  • Add some Lemon Lolly Rainbow Adhesive-Backed Dots.


On the inside layer (4 x 5 1/4) add a 4 x 3/4 strip of Pool Party that was embossed with the Fun Patterns Embossing Folder.


This embossing folder makes such a nice pattern, doesn’t it?


Supply List

You can click on the item to purchase it from my Online Store.

Sketch Challenge - Something Fancy

I made this elegant Wedding Card using the Something Fancy Stamp Set and Dies along with the Forever Love Specialty Designer Series Paper for this week’s Splitcoaststampers Sketch Challenge.


Here’s the sketch. You can click on it to see the other projects posted for this week’s challenge.


Tips & Instructions

  • Pretty Peacock Card Base - 5 1/2 x 8 1/2, score at 4 1/4

  • Gold Foil Sheet - 4 x 5 1/4

  • Forever Love Specialty Designer Series Paper - 3 7/8 x 5 1/8

  • Adhere the Designer Series Paper to the Gold Foil Layer and then adhere layers to the card base.

  • Die cut label from Basic White using the Something Fancy Dies. Put the small leaf design die in the top area of the die to get the cut out.

  • Stamp the sentiment in Versamark ink and heat emboss with Gold Embossing Powder.

  • Cut a small piece of the Gold Foil Sheet and tape it behind the leaf cutout.

  • Adhere the sentiment label to the card with Dimensionals.

  • Add some gold Blooming Pearls.


On the inside layer (4 x 5 1/4) stamp sentiment in Versamark ink and heat emboss with Gold Embossing Powder. Add a 4 x 3/4 strip of the Designer Series Paper.


I love all the gold on this card, it’s beautiful for a wedding card.


Supply List

You can click on the item to purchase it from my Online Store.

Sketch Saturday - Artistically Inked

The Artistically Inked Stamp Set is one of my favorites for creating a beautiful watercolor look. It’s on the retiring list and I’ll be sorry to see it go.


I made this card for the weekly Atlantic Hearts Sketch Challenge. Below is the sketch for the challenge.


Tips & Instructions

  • Pretty Peacock Card Base - 5 1/2 x 8 1/2, score at 4 1/4

  • Basic White Layer - 4 1/4 x 4 1/2

  • Basic White Sentiment Strip - 1 1/2 x 4 1/2

  • Lay the white strip on the white layer, centering it. Draw a light pencil line along the top and bottom of the strip.

  • Stamp the images so they will show above and below the pencil lines. It’s ok for them to be in between the pencil lines, you’ll cover that with the sentiment strip. I used Gorgeous Grape, Fresh Freesia, Pretty Peacock and Blackberry Bliss inks.

  • Stamp the sentiment on the strip in Blackberry Bliss ink. I used the Happy Little Things Stamp Set. Stamp the small flowers in Fresh Freesia.

  • Adhere the sentiment label on the layer and then add the layer to the card base.

  • Add some Rhinestones to the flowers on the sentiment strip.


On the inside layer (4 x 5 1/4), stamp the flowers across the bottom using the same colors you used on the card front.


Isn’t this beautiful! This stamp set does all the work for you.


Supply List

You can click on the item to purchase it from my Online Store.

Peekaboo Cards with a Twist

I made some Peekaboo Cards with a little twist to them. There’s an inside folded piece that the sentiment sits on to make it more of a fun fold design.


Watch the video to see step by step instructions to make this design.

Click on the button below to get a printable pdf with measurements and instructions.


This card was made using the Masterfully Made Designer Series Paper. The sentiment is from the Beautiful Balloons Stamp Set and I used the Deckled Circle Dies for the peekaboo hole and label.


I made this card using the pretty Poetic Expressions Designer Series Paper. The sentiment and dies are from the Thoughtful Expressions Bundle.


Supply List

You can click on the item to purchase it from my Online Store.