Sketch Saturday - Sunny Sentiments

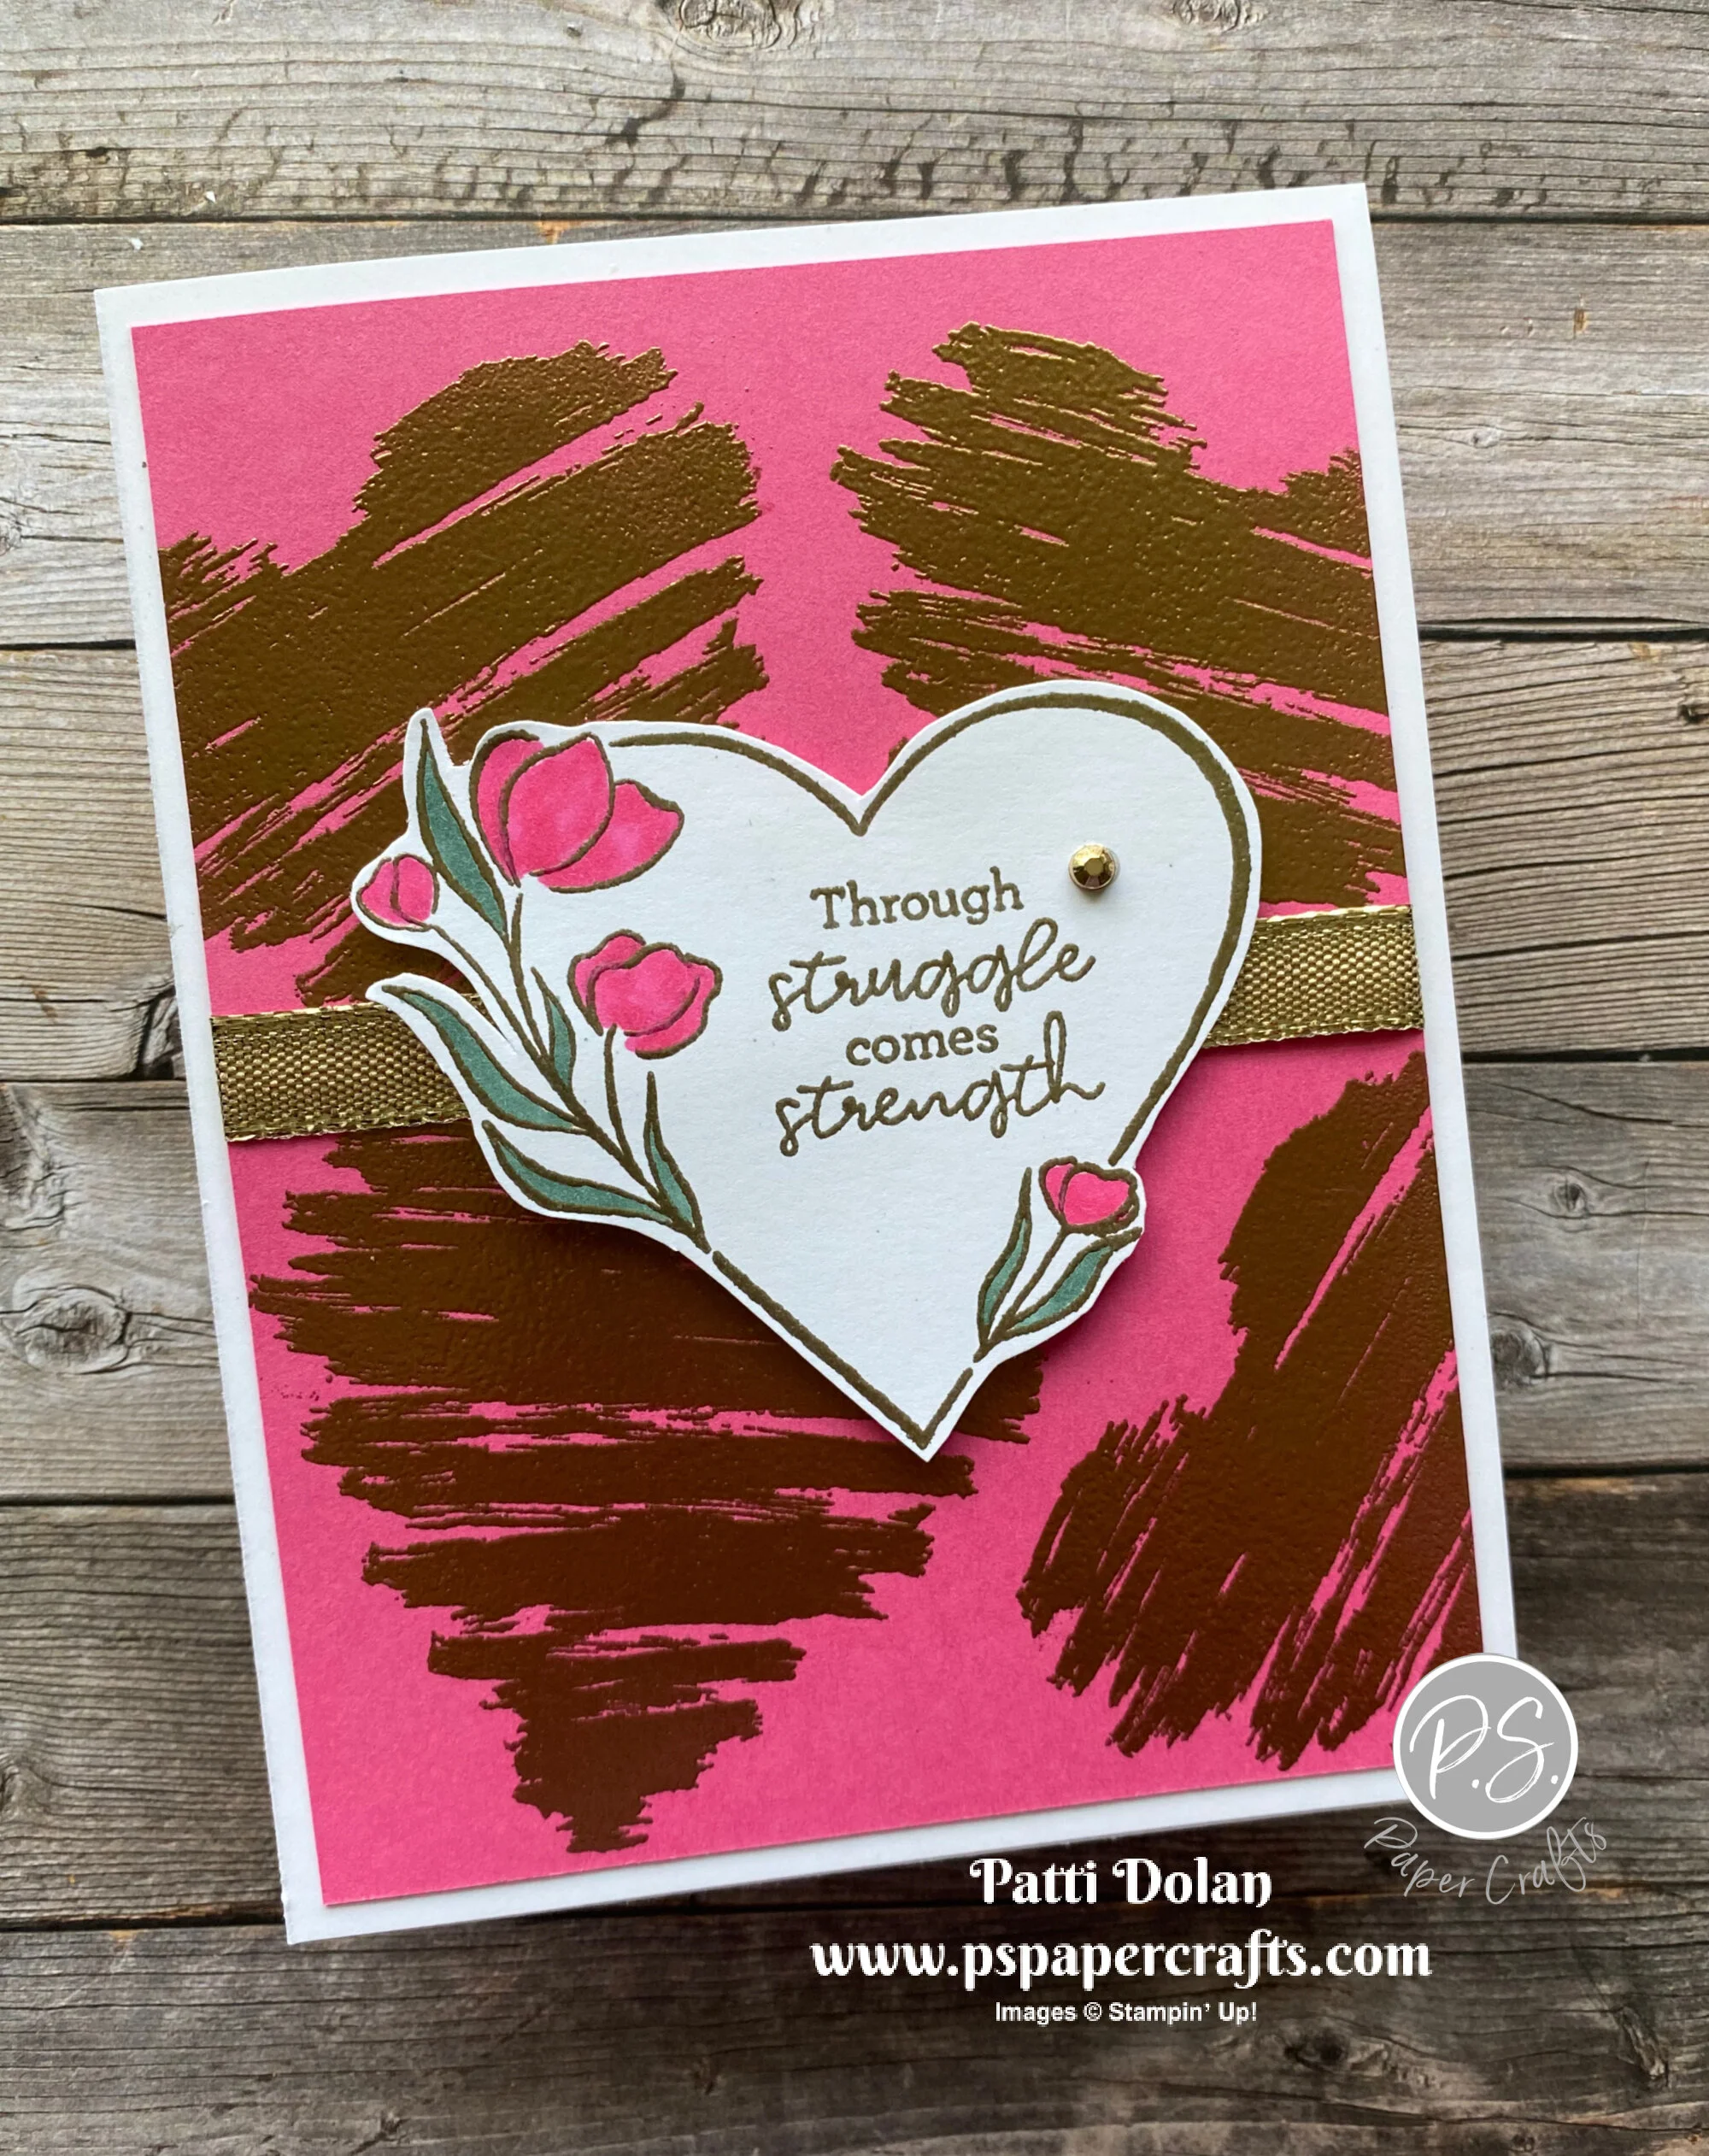
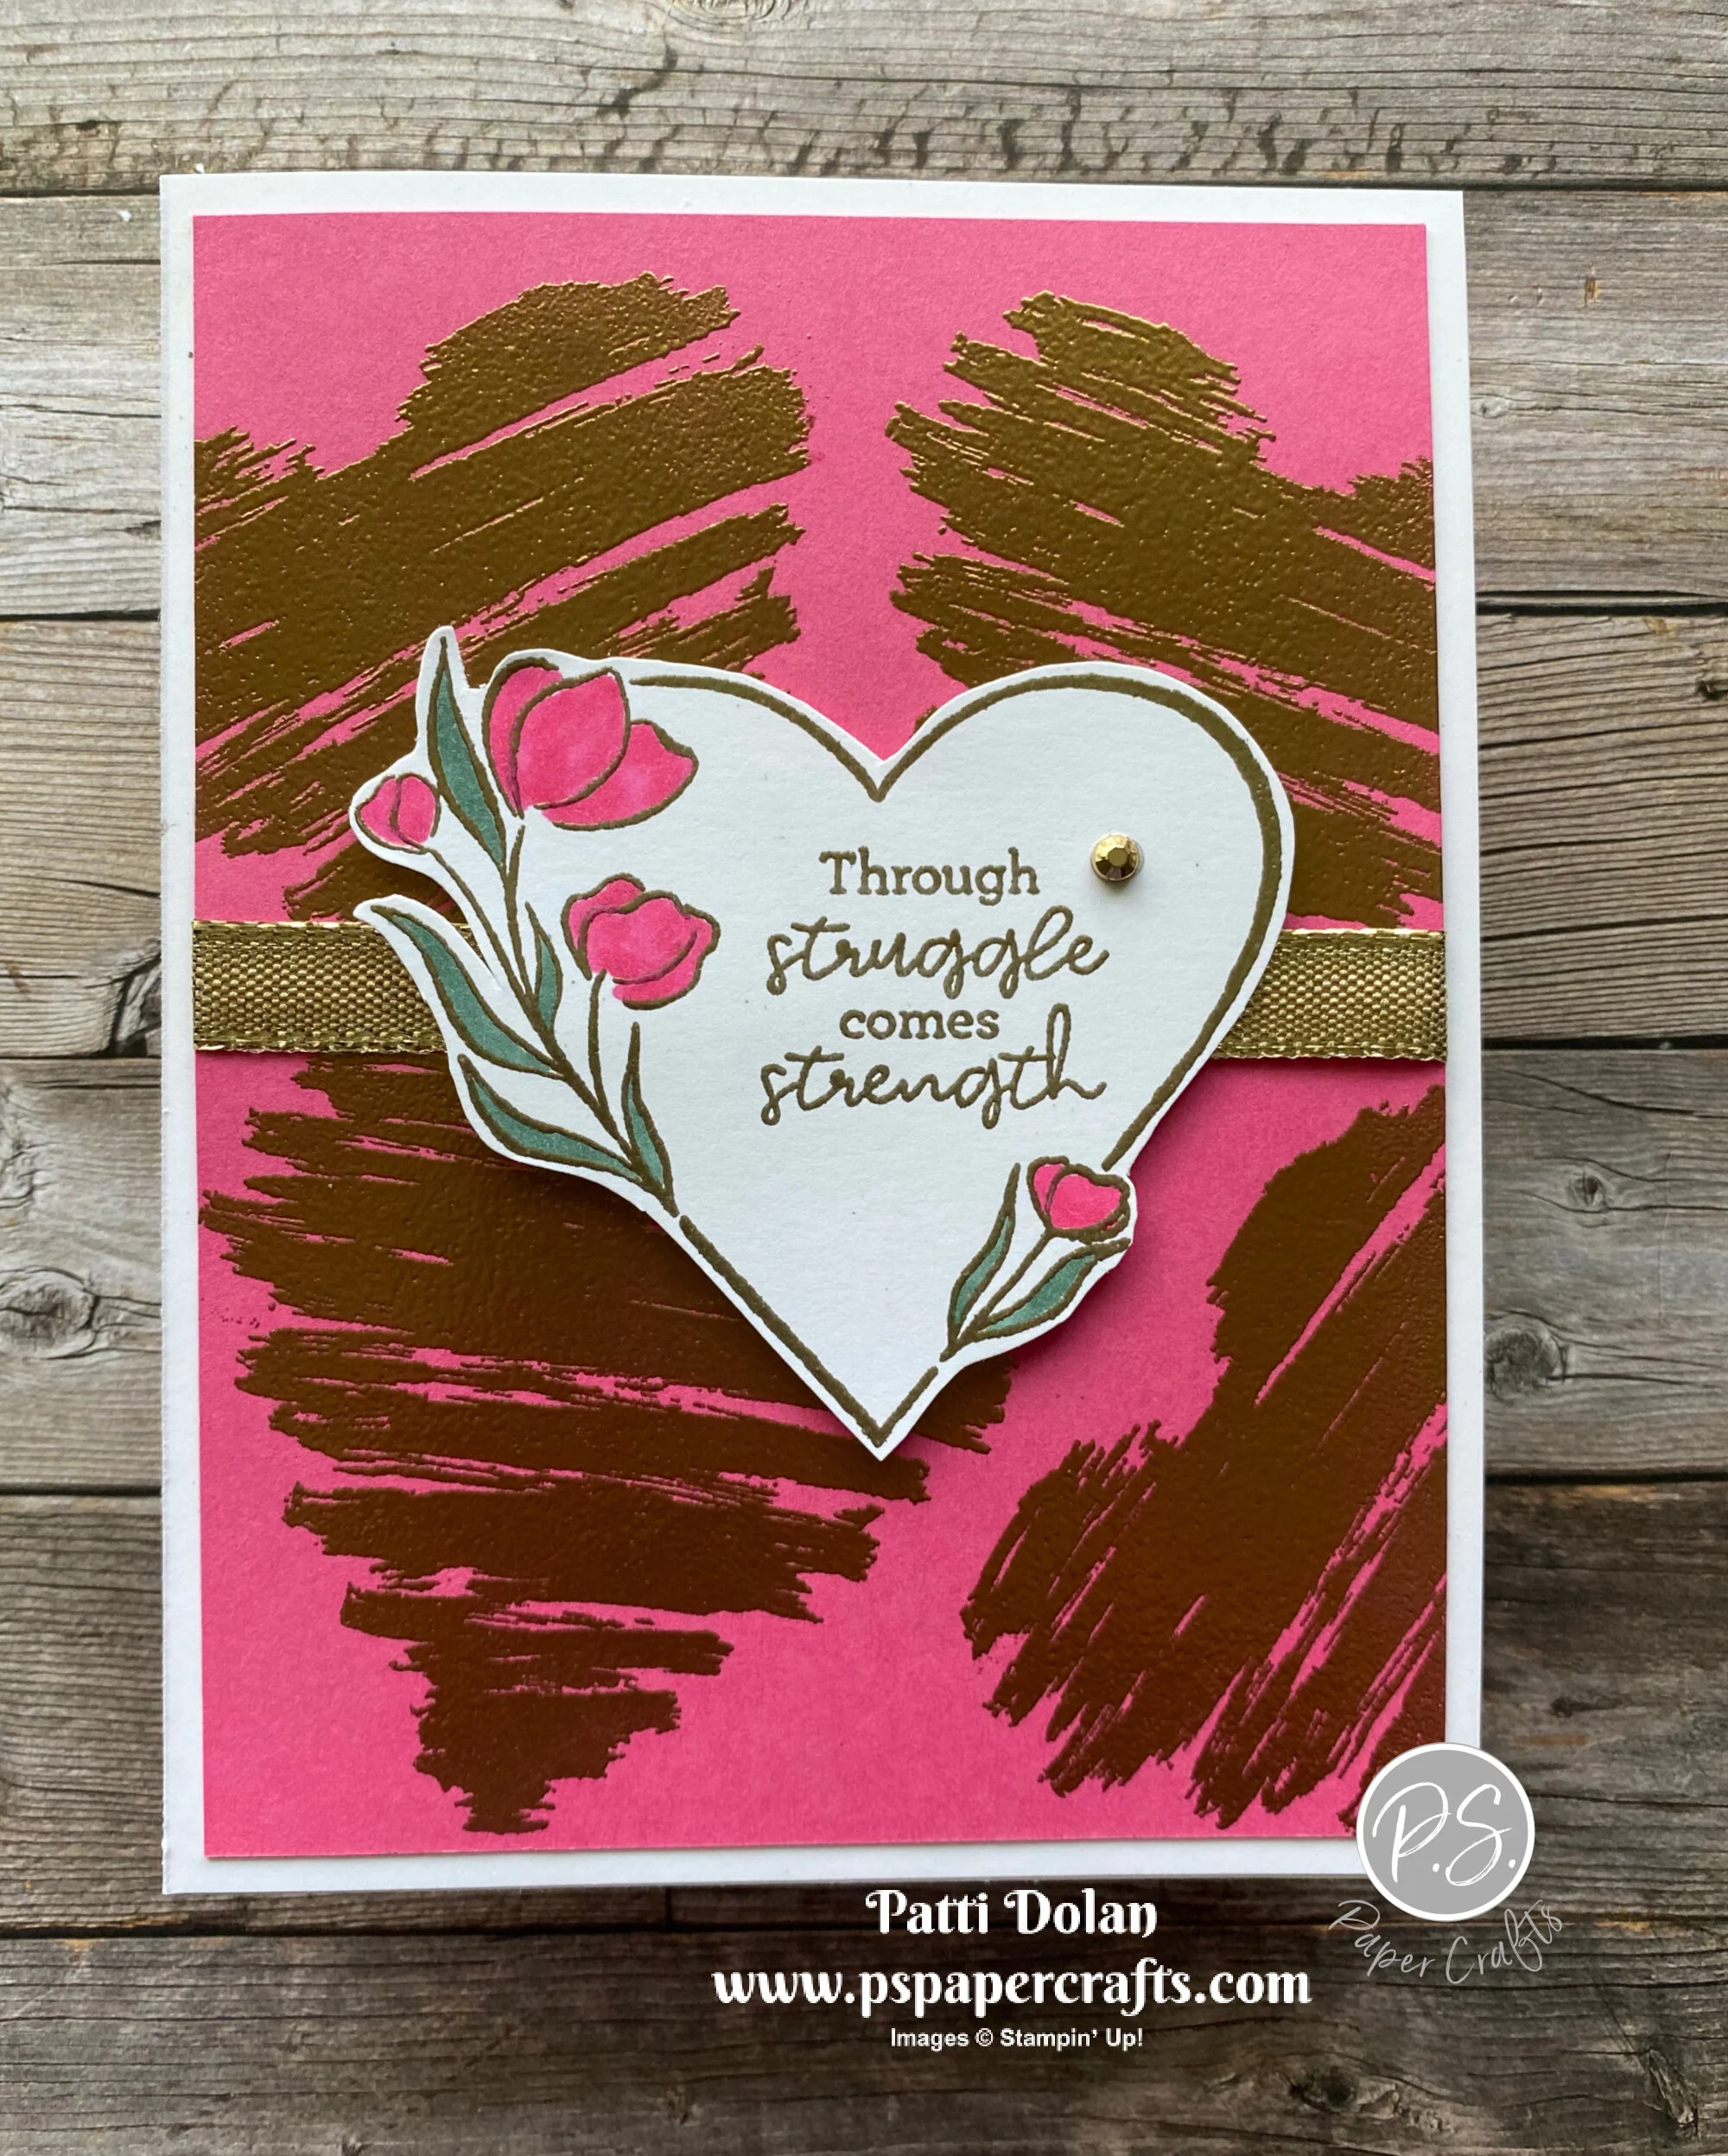
Time for another sketch! I just love the sentiment that I used on yesterday’s card and decided to use it again today.

 
Sketch Saturday - Sunny Sentiments card1.jpeg
 

I pretty much followed the sketch from the Atlantic Hearts Sketch Challenge to a “T”! I punched the flower from a scrap of Harvest Meadow Designer Series Paper and then used the same pattern for one of the layers.

 
Screen Shot 2021-10-08 at 2.14.16 PM.png
 

The Sunny Sentiments Stamp Set has great sentiments. I love the Happy Hello and Sunny Thoughts sentiments!

 
Screen Shot 2021-10-08 at 3.21.13 PM.png
 

Tips & Instructions

  • Bumblebee Card Base - 5 1/2 x 8 1/2, score at 4 1/4

  • Basic White Layer - 5 1/4 x 4

  • Bumblebee Layer - 3 3/4 x 2 3/8, emboss using the Ornate Floral 3D Embossing Folder

  • Harvest Meadow Designer Series Paper Layer - 3 3/4 x 2 3/8

  • Adhere the embossed layer and the patterned layer to the Basic White layer leaving a border around and between. Adhere layer to card base.

  • Stamp sentiment with Early Espresso ink on Basic White Cardstock and cut using the Stitched So Sweetly Dies. Adhere to card.

  • Punch 2 daisies from the Harvest Meadow Designer Series Paper. Glue them together, offsetting to make a full flower. Punch Early Espresso Cardstock using a 1/2” punch and adhere to center of flower. Add some Wink Of Stella to the center to give it some shine. Adhere flower to card using a Dimensional.

  • Punch a scrap of Pear Pizzazz Cardstock using the Sprig Punch and adhere behind the flower.

  • Add 3 Bumblebee Square Gems to label.

 
Sketch Saturday - Sunny Sentiments card2.jpeg
 

On the inside layer adhere a 5 1/4 x 3/4 strip of the patterned paper.

 
Sketch Saturday - Sunny Sentiments inside.jpeg
 

Supply List

Love Patti.png
 

Baby Wipe Technique using Gorgeous Leaves

I love doing the Baby Wipe Technique to create beautiful Fall leaves. I seem to make these cards every Fall.

 
Baby Wipe Fall Leaves card2.jpeg
 

This is a very easy technique and I’ll walk you through all the steps in the video below.


I used the Gorgeous Leaves Stamp Set. These leaf images stamp beautifully on their own but with the variation in color using this technique they are so pretty.

 
Baby Wipe Fall Leaves stamp.jpeg
 

Just squeeze some drops of ink on a baby wipe and then ink up your stamp. I put the wipes in a stamp case just to keep my area clean.

 
Baby Wipe Fall Leaves ink.jpeg
 

Tips & Instructions

  • Crushed Curry Card Base - 5 1/2 x 8 1/2, score at 4 1/4

  • Very Vanilla Layer - 5 1/4 x 4

  • Place a couple of baby wipes in a stamp case or lay on plastic and squeeze some ink drops randomly on the wipe. I used Crushed Curry, Merry Merlot and Calypso Coral.

  • Starting with the largest leaf image, ink it up and stamp randomly on the Very Vanilla layer. Follow these steps with the second largest, then the smallest.

  • Fill in with the tiny leaves by stamping them with Crushed Curry Ink.

  • Wrap Bumblebee Gingham Ribbon around the stamped layer and adhere to card base.

  • Cut 2 labels, one from Very Vanilla Cardstock and one from Crushed Curry Cardstock using the Tasteful Labels Dies.

  • Stamp sentiment from the Sunny Sentiments Stamp Set with Crushed Curry Ink on the Very Vanilla Label. Cut the Crushed Curry Label in half, spread it and adhere the pieces behind the stamped label. Adhere over the ribbon with Dimensionals.

  • Tie bow with ribbon and adhere using a Glue Dot.

  • Add a Playing With Patterns Resin Dot to label.

 
Baby Wipe Fall Leaves card1.jpeg
 

Stamp two of the small leaves on the inside layer.

 
Baby Wipe Fall Leaves inside.jpeg
 

I decided to keep stamping and stamped some leaves on the envelope front and flap on the back.

 
Baby Wipe Fall Leaves envelopes.jpeg
 

Supply List

Love Patti.png
 

Pretty Pumpkins Sitting On A Wall!

This Clean And Simple (CAS) card came together so easily. I had those pumpkins leftover from another card I was making and decided not to use them. I had an idea of putting them on a brick wall and voila this card was designed.

 
Pretty Pumpkins Sitting On A Wall2.jpeg
 

The Pretty Pumpkins Stamp Set has some great images and I just love the coordinating dies. Save 10% when you purchase them in a bundle.

 
Screen Shot 2021-10-07 at 2.53.48 PM.png
 

Tips & Instructions

  • Cinnamon Cider Card Base - 5 1/2 x 8 1/2, score at 4 1/4

  • Basic White Layer - 5 1/4 x 4, using a Cinnamon Cider Stampin’ Write Marker “flick” some ink splatters on the layer mainly at the top part. Stamp sentiment with Pumpkin Pie Ink.

  • Bloom Where You’re Planted Designer Series Paper - 4 x 2 1/2, adhere to white layer and adhere layers to card.

  • Cinnamon Cider Strip - 4 1/4 x 3/4, emboss using the Tasteful Textiles Embossing Folder. Adhere over the seam.

  • Stamp pumpkin image with Cinnamon Cider Ink on scrap of Pumpkin Pie Cardstock and cut with coordinating die. Adhere using Dimensionals.

 
Pretty Pumpkins Sitting On A Wall.jpeg
 

On the inside adhere a 4 x 1/2 strip of the Bloom Where You’re Planted Designer Series Paper. Stamp the pumpkin image on Pumpkin Pie Cardstock with Cinnamon Cider Ink and cut with coordinating die. Fussy cut just the medium sized pumpkin and adhere on top of wall.

 
Pretty Pumpkins Sitting On A Wall inside.jpeg
 

Supply List

Love Patti.png
 

October Card Class To Go!

This month's Card Class To Go uses the Blackberry Beauty Specialty Designer Series Paper.  This paper is so rich and beautiful with gold accents that create an elegant look.

You'll get kits to make 8 beautiful cards, 4 designs, 2 of each. 

Here’s a sneak peak of the cards you’ll make.

 
October Card Class To Go Ad.jpeg
 

Email patti@pspapercrafts.com to sign up!!!
Deadline October 16, 2021

Here's what you get:

  • 8 card kits, including envelopes, layers and die cuts

  • Product goody bag (you'll use to make the cards)

  • PDF & videos with complete measurements & instructions

Class Fee Options:

  • October Card Class To Go - $38 ($32 for local pickup)

  • Add on Pretty Pumpkins Stamp Set - $60.00

  • Add on Pretty Pumpkins Bundle - $83.75

Other Info:

  • Email me and I will send you a PayPal Invoice.

  • Payment due by October 16.

  • I will pick up the shipping and tax for any Add-Ons.

  • You will require stamps, ink and adhesive to complete the cards.

  • If there is a backordered product, there may be a delay in shipping but I don't see a problem at this time.

  • Invite a friend and I will include a free gift with your kits.

Email patti@pspapercrafts.com to sign up!!!
Deadline October 16, 2021


October Ordering Special.jpeg
 

Don't forget my October Ordering Special.

When you order $50 in product (before shipping & tax), I will send you a sample of some of the Designer Series Papers from the Sale-a-bration Brochure.

You'll get 6x6 samples of:

  • Penguin Playmates

  • Peaceful Prints

  • Be Dazzling Specialty Paper

Use Host Code: DZJH4DQS

Love Patti.png
 

Scrappy Birthday Card - Blackberry Beauty

This was a fun card to make and it was great to use up some scraps in the process. I love how rich and beautiful these colors are, especially for the fall season.

 
Scrappy Birthday Card2.jpeg
 

Watch a replay of my YouTube Live to see how easy it is to make this design.


The scraps are from the Blackberry Beauty Specialty Designer Series Paper. There are gold accents on some of the sheets which add elegance to whatever projects you use them on.

 
Screen Shot 2021-10-06 at 4.32.33 PM.png
 

Tips & Instructions

  • Blackberry Bliss Card Base - 5 1/2 x 8 1/2, score at 4 1/4

  • Very Vanilla Cardstock - 5 1/4 x 4

  • Gold Foil Sheet - 5 1/4 x 4 (you will cut down to 5 1/8 x 3 7/8)

  • Blackberry Beauty Specialty Designer Series Paper - cut strips at angles (larger than 4” long).

  • Adhere the strips to the Gold Foil Sheet leaving a space between each strip.

  • Cut ends from behind to get a straight edge and cut down to 5 1/8 x 3 7/8. Adhere to card Very Vanilla layer and adhere layers to card.

  • Stamp sentiment on scrap of Very Vanilla Cardstock with Blackberry Bliss Ink. Fussy cut around the edge. If you want you can use a Blackberry Bliss Marker around the edges to make sure there is no white showing.

  • Cut Gold Foil Scrap to 1 1/2 x 1 1/8 and adhere behind the sentiment. Adhere to card using Dimensionals.

  • Add Gilded Gem to sentiment label.

 
Scrappy Birthday Card1.jpeg
 

On the inside stamp sentiment with Blackberry Bliss Ink. Adhere a 3/4 x 5 1/4 strip of Designer Series Paper along the bottom.

 
Scrappy Birthday inside.jpeg
 

Supply List

Love Patti.png
 

Enjoy The Moment Card

There’s something about this stamp set that I love. These images remind me of fall in NY. They stamp such beautiful images.

 
Enjoy The Moment stamp.jpeg
 

This was a simple card to make but the gold makes it look elegant and beautiful!

 
Enjoy The Moment Card2.jpeg
 

I finally broke out the Blackberry Beauty Specialty Designer Series Paper and it is gorgeous. The colors are so rich and there are gold foil accents on some of the papers.

 
Screen Shot 2021-10-04 at 8.34.14 PM.png
 

Tips & Instructions

  • Blackberry Bliss Card Base - 5 1/2 x 8 1/2, score at 4 1/4

  • Basic White Cardstock - 5 1/4 x 4

  • Blackberry Beauty Specialty Designer Series Paper - 5 1/8 x 3 7/8, adhere to Basic White Layer. Wrap piece of gold trim around 3 times and adhere to back of layer. Adhere to card base.

  • Cut Basic White Cardstock using the large Tasteful Labels Die. Stamp image with Versamark Ink and heat emboss with Gold Embossing Powder.

  • Stamp sentiment with Blackberry Bliss Ink. I only used the word “ENJOY” from the sentiment stamp. (Cover the words you don’t want Post-It Note, then ink it up, remove the Post-It Note and stamp just what you want.)

  • Stamp the seed images around using Cinnamon Cider Ink, stamping a second time without re-inking to get different shades.

  • Adhere label to card using Dimensionals.

  • Tie a bow using two strands of gold trim and adhere with a Glue Dot.

 
Enjoy The Moment Card1.jpeg
 

On the inside stamp sentiment with Versamark Ink and heat emboss with Gold Embossing Powder. Stamp images with Blackberry Bliss Ink and Cinnamon Cider Ink.

 
Enjoy The Moment inside.jpeg
 

Supply List

Love Patti.png
 

Sketch Saturday - Gorgeous Leaves

Today’s card for this week’s sketch challenge has lots of texture to it. I love the embossed layer and the Cork Specialty Paper.


The sketch I followed is from the weekly Atlantic Hearts Sketch Challenge. This one was a little more difficult for me but I love to just play until I figure out what to make.

 
Screen Shot 2021-10-02 at 4.39.40 PM.png
 

The leaves in this stamp set are so beautiful. They have little splatters around the edges. I cut them with the coordinating Intricate Leaves Dies.

 
Screen Shot 2021-10-02 at 4.53.04 PM.png
 

Tips & Instructions

  • Rich Razzleberry Card Base - 5 1/2 x 8 1/2, score at 4 1/4

  • Basic White Layer - 5 1/4 x 4, emboss using the Timeworn Type 3D Embossing Folder. Adhere to card base.

  • Cork Specialty Paper - 5 1/2 x 1 1/4, adhere to card.

  • Rich RazzleBerry Square - 3 1/4 x 3 1/4

  • Basic White Square - 3 x 3, adhere to Rich Razzleberry Square and adhere to card.

  • Cut Cork Specialty Paper using the 4th from largest Layering Circles Dies and adhere to square.

  • Stamp the leaves on Basic White Cardstock using Bumblebee, Cajun Craze and Rich Razzleberry Inks. Cut with coordinating dies and glue together. Adhere to circle using Dimensionals.

  • Stamp sentiment (from the Quiet Moments Stamp Set) on scrap of Basic White Cardstock with Rich Razzleberry Ink and cut with Tasteful Labels Dies.

 
Sketch Saturday - Gorgeous Leaves card2.jpeg
 

I love these fall colors. This is a great card to send to a guy; it’s rustic and has a masculine feel to it.

 
Sketch Saturday - Gorgeous Leaves closeup.jpeg
 

On the inside stamp sentiment with Rich Razzleberry Ink and the leaves with Bumblebee and Cajun Craze Inks.


Supply List

Love Patti.png
 

Pretty Pumpkins Hey Friend Card

I love this pumpkin image with the leaves on it from the Pretty Pumpkins Stamp Set. I embossed it in gold; so pretty!

 
Pretty Pumpkins Hey Friend Card2.jpeg
 

In my video I’ll show you how to make this card using Gold Embossing Powder and my Heat Tool. The scalloped vellum piece is a great layer to highlight the pumpkin but have the patterned paper show through.


You can purchase the Pretty Pumpkins Stamp Set with the Detailed Pumpkin Dies as a bundle and save 10%. There are some wonderful pumpkin dies in this set that can be used with the stamp set or on their own.

 
Screen Shot 2021-10-01 at 3.33.38 PM.png
 

Tips & Instructions

  • Early Espresso Card Base - 5 1/2 x 8 1/2, score at 4 1/4

  • Beauty Of The Earth Designer Series Paper - 5 1/4 x 4, wrap a piece of Early Espresso Faux Suede Trim around layer and adhere to the back. Adhere layer to card base.

  • Cut piece of Vellum Cardstock using the Scalloped Contours Dies.

  • Stamp pumpkin on Pale Papaya Cardstock using Versamark Ink and heat emboss with Gold Embossing Powder.

  • Stamp greenery on Old Olive Cardstock using Versamark Ink and heat emboss with Gold Embossing Powder.

  • Cut pumpkin and greenery with coordinating dies.

  • Stamp sentiment (from the In Symmetry Stamp Set) on 1/2” strip of Basic White Cardstock and punch one end with the Banners Pick A Punch. Adhere to pumpkin.

  • Adhere pumpkin and greenery to Vellum and then adhere layer to card.

  • Tie bow and adhere using a Glue Dot.

 
Pretty Pumpkins Hey Friend Card1.jpeg
 

On the inside stamp pumpkin with Pumpkin Pie Ink.

 
Pretty Pumpkins Hey Friend Card inside.jpeg
 

I have an October Ordering Special going on. When you place a $50 product order from my Online Store, I’ll send you a FREE sample pack of Designer Series Paper from the Sale-a-bration Brochure.

 
October Ordering Special.jpeg
 

Supply List

Love Patti.png
 

Pretty Pumpkins Thankful Card

Fall is here so it’s time for pumpkin cards. I used the Pretty Pumpkin Stamp Set to create this pretty thankful card.

 
Pretty Pumpkins Thankful Card2.jpeg
 

The Pretty Pumpkin Stamp Set is perfect for this time of year. I’ll be making a video tomorrow showing another card using this set along with the Detailed Pumpkin Dies that coordinate with it.

 
Pretty Pumpkins Thankful stamp.jpeg
 

Tips & Instructions

  • Thick Basic White Card Base - 5 1/2 x 8 1/2, score at 4 1/4

  • Merry Merlot Cardstock - cut with the largest Scalloped Contours Die

  • Basic White Cardstock - cut with next size down Scalloped Contours Die

  • Stamp the pumpkins image with Pumpkin Pie Ink and color with Stampin’ Blends (Light Pumpkin Pie, Dark Crumb Cake, Dark Granny Apple Green)

  • Stamp sentiment with Merry Merlot Ink

  • Flick Ink around the layer using a Merry Merlot Stampin’ Write Marker. Using the flair end, flick against cap.

  • Adhere stamped layer to Merry Merlot layer and then adhere to card base using Dimensionals.

  • Tie 3 strands of Bakers Twine into a bow and adhere using Glue Dot.

 
Pretty Pumpkins Thankful Card1.jpeg
 

On the inside stamp some leaves across the bottom. Add a sentiment if you want.

 
Pretty Pumpkins Thankful inside.jpeg
 

Supply List

Love Patti.png
 

Encircled In Warmth - YouTube Live

Today I did a YouTube Live to demonstrate how to use the Encircled In Warmth Stamp Set with the Encircled In Beauty Dies. These are such wonderful products!

 
Encircled In Warmth YouTube Live both.jpeg
 

Watch the replay below to see all the steps to make the card with the gold wreath using Gold Shimmer Vellum. It’s so beautiful!


Tips & Instructions

  • Cherry Cobbler Card Base - 5 1/2 x 8 1/2, score at 4 1/4

  • Gold Shimmer Vellum - 5 1/4 x 4 (Tip: cut out the center with a die to use for another project). Adhere to card base.

  • Basic White Cardstock - 5 x 3 3/4, emboss using the Tasteful Textiles 3D Embossing Folder and adhere to card.

  • Gold Shimmer Vellum - 4 x 4, back with a piece of Adhesive Sheet (I cut the sheet slightly smaller than 4 x 4).

  • Cut gold vellum using the Encircled in Beauty Dies, peel off the adhesive backing and adhere to card.

  • Stamp sentiment on piece of Basic White Cardstock with Cherry Cobbler Ink and cut with 4th from largest Layering Circles Die. Adhere using Dimensionals.

  • Tie bow with Cherry Cobbler & Gold Ribbon and adhere with a Glue Dot.

 
Encircled In Warmth YouTube Live Card1.jpeg
 

Follow the same steps as above making these changes:

  • Basic White Layer is 5 1/4 x 4 and embossed using the Hammered Metal 3D Embossing Folder.

  • Cut doily from Green Foil Sheet

  • Wrap ribbon around the embossed layer and adhere to the back before adhering layer to card.

 
Encircled In Warmth YouTube Live Card2.jpeg
 

On the inside stamp sentiment with Cherry Cobbler Ink. Stamp holly leaves with Evening Evergreen Ink and berries with Cherry Cobbler Ink.

I realized after I was finished that I should have had the holly at the the bottom rotated, with the berries on the bottom.

 
Encircled In Warmth YouTube Live inside.jpeg
 

Supply List For Both Cards

Love Patti.png
 

Beautifully Penned Get Well Card

I love black and white patterned paper so when I saw the Beautifully Penned Designer Series Paper was a free Sale-a-bration product, I knew I had to get a pack.

 
Beautifully Penned Get Well Card2.jpeg
 

You’ll get 12 sheets of patterned paper: 4 each of 3 double-sided designs in this paper pack. I used both sides of one sheet for this card. You can color the paper or just leave it as black and white.

If you want this paper pack, you need to place a $50 product order by September 30, 2021 or you’ll miss out on it.

 
Screen Shot 2021-09-28 at 8.25.35 PM.png
 

This paper was designed to coordinate with the Hand-Penned Petals Bundle. I stamped and colored the floral piece to give the card a pop of color.

 
Beautifully Penned Get Well Card stamp.jpeg
 

Tips & Instructions

  • Basic Black Card Base - 5 1/2 x 8 1/2, score at 4 1/4

  • Basic White layer - 5 1/4 x 4

  • Beautifully Penned Designer Series Paper pieces - one at 5 1/4 x 2 3/4 and one at 5 1/4 x 1 1/2. Adhere to white layer.

  • Wrap piece of Whisper White Crinkled Seam Binding around the layers at the seam and adhere to back. Adhere layer to card base.

  • Stamp large floral image on Basic White Cardstock with Black Memento Ink. Cut with coordinating die.

  • Color flowers with Stampin’ Blends.

  • Stamp sentiment with Black Memento Ink on Basic White Cardstock and cut with Tasteful Labels Die. Adhere label behind floral piece and adhere to card using Dimensionals.

  • Tie bow and adhere using a Glue Dot.

 
Beautifully Penned Get Well Card1.jpeg
 

Stamp floral image on inside with Black Memento Ink and color with Stampin’ Blends.

 
Beautifully Penned Get Well inside.jpeg
 

Supply List

Love Patti.png
 

Sketch Saturday - Cutest Halloween

This Cute Halloween Designer Series Paper is so fun. I used it to create this week’s card for the sketch challenge.

 
Sketch Saturday - Cutest Halloween.jpeg
 

The sketch I followed is from the weekly Atlantic Hearts Sketch Challenge. I love creating cards from sketches and Atlantic Hearts has some great ones.

 
Screen Shot 2021-09-25 at 12.24.55 PM.png
 

The Cutest Halloween Stamp Set has such adorable images; those ghosts, skeletons, pumpkins and cats…those faces!!!! The sentiments are so fun.

 
Sketch Saturday - Cutest Halloween stamp.jpeg
 

Tips & Instructions

  • Highland Heather Card Base - 4 1/2 x 11, score at 5 1/2 (top folding)

  • Basic White Layer - 5 3/8 x 4 1/8

  • Cute Halloween Designer Series Paper - 5 1/4 x 4, then cut on diagonal, rotate and cut on diagonal again. You can mix and match patterns to get what you want and if you use 2 pieces, you can make 2 cards with the triangles.

  • Adhere the pieces to the white layer making sure to leave a border around it. Adhere layer to card base.

  • Stamp sentiment on Basic White scrap with Black Memento Ink and cut using the 5th from largest Layering Circle Die.

  • Cut scalloped circle from the Black Glitter Paper using the 4th from largest scalloped Layering Circle Die and adhere behind white circle. Adhere to card using Dimensionals.

  • Fussy cut the ghost and adhere to sentiment label.

  • Add 3 Matte Black Dots.

 
Sketch Saturday - Cutest Halloween2.jpeg
 

On the inside stamp the sentiment, ghost and spider with Black Memento Ink. Stamp 3 pumpkin outlines with Pumpkin Pie Ink, then stamp the filler with Pumpkin Pie Ink but stamping off first to get a lighter shade. Stamp the face on the middle pumpkin with Black Memento Ink.

 
Sketch Saturday - Cutest Halloween inside.jpeg
 

Supply List

Love Patti.png
 

Peaceful Prints Dutch Door Fun Fold

I did a Facebook live today to show you how to make a quick and easy Fun Fold Card. It’s call a Dutch Door Fold.

 
Peaceful Prints Dutch Door Fun Fold card2.jpeg
 

In the video I’ll walk you through the process of making this card fun fold. I used the Peaceful Prints Designer Series Paper which has some great rustic, masculine patterns.


The Peaceful Prints Designer Series Paper is FREE with a $50(US) order during Sale-a-bration. Hurry though, Sale-a-bration ends September 30, 2021.

 
Screen Shot 2021-09-24 at 2.58.44 PM.png
 

Tips & Instructions

  • Basic Black Card Base - 5 1/2 x 8 1/2, score at 4 1/4. Cut at 2 3/4 and then along the fold to cut out the top half of the card front (see video for demonstration).

  • Basic White (inside layer) - 5 3/8 x 4 1/8

  • Peaceful Print (snowflake) Layer - 5 1/4 x 4, adhere to white layer and adhere to card inside.

  • Basic White (bottom of card front) - 4 1/8 x 2 5/8

  • Peaceful Print (plaid) Layer - 4 x 2 1/2, adhere to white layer and adhere to bottom of card front.

  • Peaceful Print deer piece - cut to 3 3/4 x 2 1/4 (cut so you have the one deer and not any of the others). Alternative, punch the deer and layer on white layer and stamp your own snowflakes or whatever you want.

  • Stamp sentiment with Real Red Ink. Adhere to the black piece that was cut from the card front. Adhere to card front making sure you only put adhesive on the bottom.

  • Add some red Holiday Rhinestones.

 
Peaceful Prints Dutch Door Fun Fold card1.jpeg
 
  • For the inside cut a piece of Basic White Cardstock at 4 1/8 x 2 1/8.

  • Stamp sentiment with Real Red Ink. I used a Post-It Note to mask the sentiment to separate it to 2 rows (see video for demonstration).

  • Adhere using Liquid Glue so you can move it behind the card front so it doesn’t show through.

 
Peaceful Prints Dutch Door Fun Fold inside.jpeg
 

Supply List

Love Patti.png
 

Peaceful Place Christmas Card

I made this simple but beautiful Christmas card using the Peaceful Place Designer Series Paper and Peaceful Cabin Stamp Set. I love the snowy scene of the cabin in the woods.

 
Peaceful Cabin Christmas2.jpeg
 

The Peaceful Place Designer Series Paper is gorgeous. The muted grays and black have touches of silver and white to give a tranquil feel to your project.

 
Screen Shot 2021-09-22 at 8.58.49 PM.png
 

I used this sheet for the card. You can cut it into 4 separate pieces and then cut to fit your card front.

 
Peaceful Cabin Christmas - DSP.jpeg
 

The stamp set has this rustic cabin and some sweet sentiments.

 
Peaceful Cabin Christmas stamp.jpeg
 

Tips & Instructions

  • Merry Merlot Card Base - 5 1/2 x 8 1/2, score at 4 1/4

  • Peaceful Place Designer Series Paper - cut to 5 1/4 x 4 (I cut a little from the top, bottom and both sides, paying attention to where I would stamp the cabin).

  • Stamp the cabin with Merry Merlot Ink.

  • Adhere layer to card base.

  • Stamp sentiment on Basic White Cardstock with Merry Merlot Ink and punch with Essential Tag Punch. Adhere tag to card using Dimensionals.

  • Tie bow with a piece of silver Simply Elegant Trim and adhere to label with a Glue Dot.

  • Add some Subtle Shimmer Sequins.

 
Peaceful Cabin Christmas1.jpeg
 

On the inside stamp 2 of the evergreen trees using Evening Evergreen Ink. Stamp sentiment with Merry Merlot Ink. The sentiment is from the Christmas To Remember Stamp Set.

 
Peaceful Cabin Christmas card inside.jpeg
 

Supply List


Strong Of Heart Card

I love how beautiful these gold embossed hearts turned out. I used the Strong Of Heart Stamp Set to create this card. The sentiment is so true, isn’t it?

 
Strong Of Heart Card2.jpeg
 

Watch the video to see beautifully these large hearts turned out using Gold Embossing Powder on Polished Pink Cardstock.


As part of Stampin' Up!'s commitment to giving back to the community, for each Strong of Heart Stamp Set purchased, they will donate $3 to support heart health. Go ahead! Have a heart (stamp) and make a difference too.

 
Screen Shot 2021-09-21 at 9.17.16 PM.png
 

Tips and Instructions

  • Thick Whisper White Card Base - 5 1/2 x 8 1/2, score at 4 1/4

  • Polished Pink Layer - 5 1/4 x 4, stamp hearts randomly on layer using Versamark Ink and emboss them with Gold Embossing Powder.

  • Wrap Gold Shimmer Ribbon around layer and adhere to the back. Adhere layer to card base.

  • Stamp the heart with flowers image with Versamark Ink on a piece of Basic White Cardstock. Heat emboss with Gold Embossing Powder. Add the sentiment and emboss as well.

  • Color the flowers with Stampin’ Blends (Dark Polished Pink for the flowers and Dark Soft Succulents for the leaves).

  • Fussy cut the heart and adhere using Dimensionals.

  • Add a Gilded Gem.

 
Strong Of Heart Card1.jpeg
 

On the inside stamp sentiment with Versamark Ink and heat emboss with Gold Embossing Powder. Stamp 2 small hearts with Polished Pink Ink.

 
Strong Of Heart Card inside.jpeg
 

Supply List

Love Patti.png
 

Simple Stamping using Delicate Dahlias

This was such an easy card to make. It’s basically stamps, ink and cardstock. I had to add a little bling to it just to dress it up a bit.


The Delicate Dahlias Stamp Set has such beautiful images. You can use the outline stamp or the filler stamp or both; your choice. I love the way the filler stamp looks on this card stamping it with Blackberry Bliss Ink.

The best part is that this stamp set is free during Sale-a-bration with a $100 order (before shipping and tax) but hurry, this promotion ends September 30, 2021.

 
Screen Shot 2021-09-20 at 8.31.30 PM.png
 

I used the Biggest Wish Stamp Set for the sentiment and love that it’s BIG and fit across the entire top of the card.

 
Screen Shot 2021-09-20 at 8.33.48 PM.png
 

Tips & Instructions

  • Blackberry Bliss Card Base - 5 1/2 x 8 1/2, score at 4 1/4

  • Basic White Layer - 5 1/4 x 4

  • Stamp sentiment (from Biggest Wish Stamp Set) across the top using Blackberry Bliss Ink. Tip - put stamps together on a large block and stamp on grid paper first to get them lined up the way you want them.

  • Stamp 3 dahlias across the card using Blackberry Bliss Ink.

  • Stamp leaves using Old Olive Ink filling in the white spaces.

  • Punch top corners with the Detailed Trio Punch.

  • Adhere layer to card base.

  • Add medium sized Basic Pearl Jewel to each corner.


On the inside stamp sentiment with Blackberry Bliss Ink. I used the sentiment from the Pansy Patch Stamp Set. Stamp two small flowers with Blackberry Bliss Ink. Stamp some small leaves using Old Olive Ink.


Supply List

Love Patti.png
 

Sketch Saturday - Frosted Gingerbread

I can’t believe it’s Saturday again already and time for another Sketch Challenge. The weeks are going by too fast.

 
Sketch Saturday - Frosted Gingerbread card1.jpeg
 

The sketch I followed is from the weekly Atlantic Hearts Sketch Challenge. I love doing their sketch challenges. It’s great to see all the different interpretations of a sketch.

 
Screen Shot 2021-09-17 at 8.34.23 PM.png
 

The sentiment is from the Frosted Gingerbread Stamp Set. I heat embossed it in white on a Real Red tag.

 
Sketch Saturday - Frosted Gingerbread stamp.jpeg
 

My inspiration for this card is the Gingerbread & Peppermint Designer Series Paper. When I saw the peppermint candy and the sentiment, I knew I wanted to use it for this challenge.

 
Screen Shot 2021-09-17 at 8.49.46 PM.png
 

Tips & Instructions

  • Real Red Card Base - 5 1/2 x 8 1/2, score at 4 1/4

  • Gingerbread & Peppermint Designer Series Paper Layer - 5 1/4 x 4

  • Real Red Cardstock - cut second from largest tag from the Tailor Made Tags Dies. Cut a round hole reinforcement from a scrap of Basic White and adhere over the hole in the tag.

  • Stamp the sentiment toward the right side of the tag with Versamark Ink and heat emboss with White Embossing Powder. Cut left edge of the tag.

  • Thread piece of Real Red Double-Stitched Satin Ribbon behind the tag and up through the hole. Wrap one end around the back of the patterned paper layer and adhere in the back. Put some Dimensionals behind the tag and when wrap the other end of the ribbon behind the patterned paper and adhere. Adhere the layer to the card base.

  • Tie bow with ribbon and adhere with the Glue Dot.

  • Add some Gingerbread & Peppermint Acrylic Shapes with some Liquid Glue.

 
Sketch Saturday - Frosted Gingerbread card2.jpeg
 

On the inside stamp the sentiment and 3 peppermint candies with Real Red Ink.

 
Sketch Saturday - Frosted Gingerbread inside.jpeg
 

Supply List

Love Patti.png
 

Encircled In Friendship Card

Isn’t this a pretty card? No sentiment needed on the front. I didn’t want to cover that beautiful embossed layer. I used the Snowy White Velvet Paper and the Pretty Flowers Embossing Folder and the results are amazing!

 
Encircled In Friendship Card card2.jpeg
 

In the video I’ll show you this bundle and all the steps to make this card.


The Encircled In Friendship Stamp Set has beautiful sentiments and the coordinating Encircled In Beauty Dies create delicate doilies that can be used to create a pretty focal piece for your project. Bundle them together and save 10%.

 
Screen Shot 2021-09-17 at 2.30.48 PM.png
 

The Encircled In Warmth Stamp Set in the Mini Catalog coordinates perfectly with the Encircled In Beauty Dies.

 
Screen Shot 2021-09-17 at 2.31.41 PM.png
 

Tips & Instructions

  • Old Olive Card Base - 5 1/2 x 8 1/2, score at 4 1/4

  • Snowy White Velvet Sheet - 5 1/4 x 4, emboss with the Pretty Flowers Embossing Folder. Wrap piece of Highland Heather Grosgrain Ribbon around and adhere to back with Scotch Tape. Adhere layer to card base.

  • Stamp flower image on piece of Basic White Cardstock using Black Memento Ink. Color with Old Olive and Highland Heather Stampin’ Blends. Cut with 4th larges Layering Circles Die.

  • Cut Old Olive Cardstock using the 3rd largest doily from the Encircled In Beauty Dies. Adhere behind stamped image. Adhere to card using Dimensionals.

  • Add some Pastel Pearls to the ribbon.

 
Encircled In Friendship Card card1.jpeg
 

On the inside stamp the sentiment and flowers with Black Memento Ink. Color the flowers with Old Olive and Highland Heather Stampin’ Blends.

 
Encircled In Friendship Card inside.jpeg
 

Supply List

Love Patti.png
 

Merriest Moments Using White Velvet Paper

I just love the Merriest Moments Bundle. I used it in a Facebook live yesterday and you can see that card it here on my Blog if you go back to my last project.

 
Merriest Moments White Velvet stamp.jpeg
 

The dies and embossing folder create a gorgeous floral piece that covers the entire front of your card. You don’t need much more than a sentiment and ribbon. So easy!

 
Merriest Moments White Velvet Card2.jpeg
 

I used the Snowy White Velvet Sheets for the floral piece. I’m not sure if the picture really does it is justice. It is amazing!

 
Merriest Moments White Velvet closeup.jpeg
 

Tips & Instructions

  • Thick Basic White Card Base - 5 1/2 x 8 1/2, score at 4 1/4

  • Cherry Cobbler Layer - 5 3/8 x 4 1/8, emboss using the Merriest Frames Hybrid Embossing Folder and adhere to card base.

  • Snowy White Velvet Sheet - 5 1/2 x 4 1/4, cut and emboss using the Merriest Frames Hybrid Embossing Folder. Adhere to Cherry Cobbler Layer using adhesive on just the center rectangle making sure to line up all the greenery.

  • Cut Basic White Cardstock using the stitched rectangle die and stamp sentiment with Cherry Cobbler Ink, toward the top. Adhere label to center of greenery. Use a strong adhesive like Liquid Glue or Stampin’ Seal+.

  • Tie bow with a piece of Cherry Cobbler & Gold Metallic Ribbon and adhere with a Glue Dot.

  • Add some Gilded Gems.

 
Merriest Moments White Velvet Card1.jpeg
 

On the inside stamp sentiment with Cherry Cobbler Ink. Stamp greenery with Shaded Spruce Ink, stamping again without re-inking.

 
Merriest Moments White Velvet inside.jpeg
 

Supply List

Love Patti.png
 

Facebook Live - Merriest Moments Christmas Card

I made this beautiful Christmas Card Using the Merriest Moments Bundle and Painted Christmas Designer Series Paper.

 
Merriest Moments card2.jpeg
 

Watch my Facebook Live to see how to cut and emboss the main focal piece from the Painted Christmas Designer Series Paper using this bundle. It is really amazing!


The Merriest Moments Bundle has a stamp set which coordinates with the Merriest Frames Hybrid Embossing Folder. If you purchase as a bundle, you save 10%.

 
Screen Shot 2021-09-15 at 3.07.52 PM.png
 

Tips & Instructions

  • Cherry Cobbler Card Base - 5 1/2 x 8 1/2, score at 4 1/4

  • Basic White Layer - 5 3/8 x 4 1/8, emboss using the Merriest Frames Hybrid Embossing Folder.

  • Painted Christmas Designer Series Paper - 5 1/2 x 4 1/4, cut using the large, detailed floral die.

  • Adhere floral piece over the white layer lining up the leaves. Adhere layer to card base.

  • Basic White Cardstock - cut stitched rectangle and stamp sentiment with Cherry Cobbler Ink towards the right side and adhere to center of floral piece.

  • Stamp large and small poinsettia with Cherry Cobbler Ink and cut with coordinating dies. Adhere together, offsetting a little bit.

  • Stamp leaves (I used the medium size) with either Soft Succulent or Soft Sea Foam Ink and cut with coordinating dies.

  • Adhere leaves and flower to card. Add a Wonderful Gem to flower center.

 
Merriest Moments card1.jpeg
 

On the inside stamp the sentiment with Cherry Cobbler Ink. Stamp 3 leaves at the top and bottom corners with Soft Succulent or Soft Sea Foam Ink. Stamp berries with Cherry Cobbler Ink.

 
Merriest Moments inside.jpeg
 

Supply List

Love Patti.png