Simple Sympathy Card using Sale-A-Bration Products

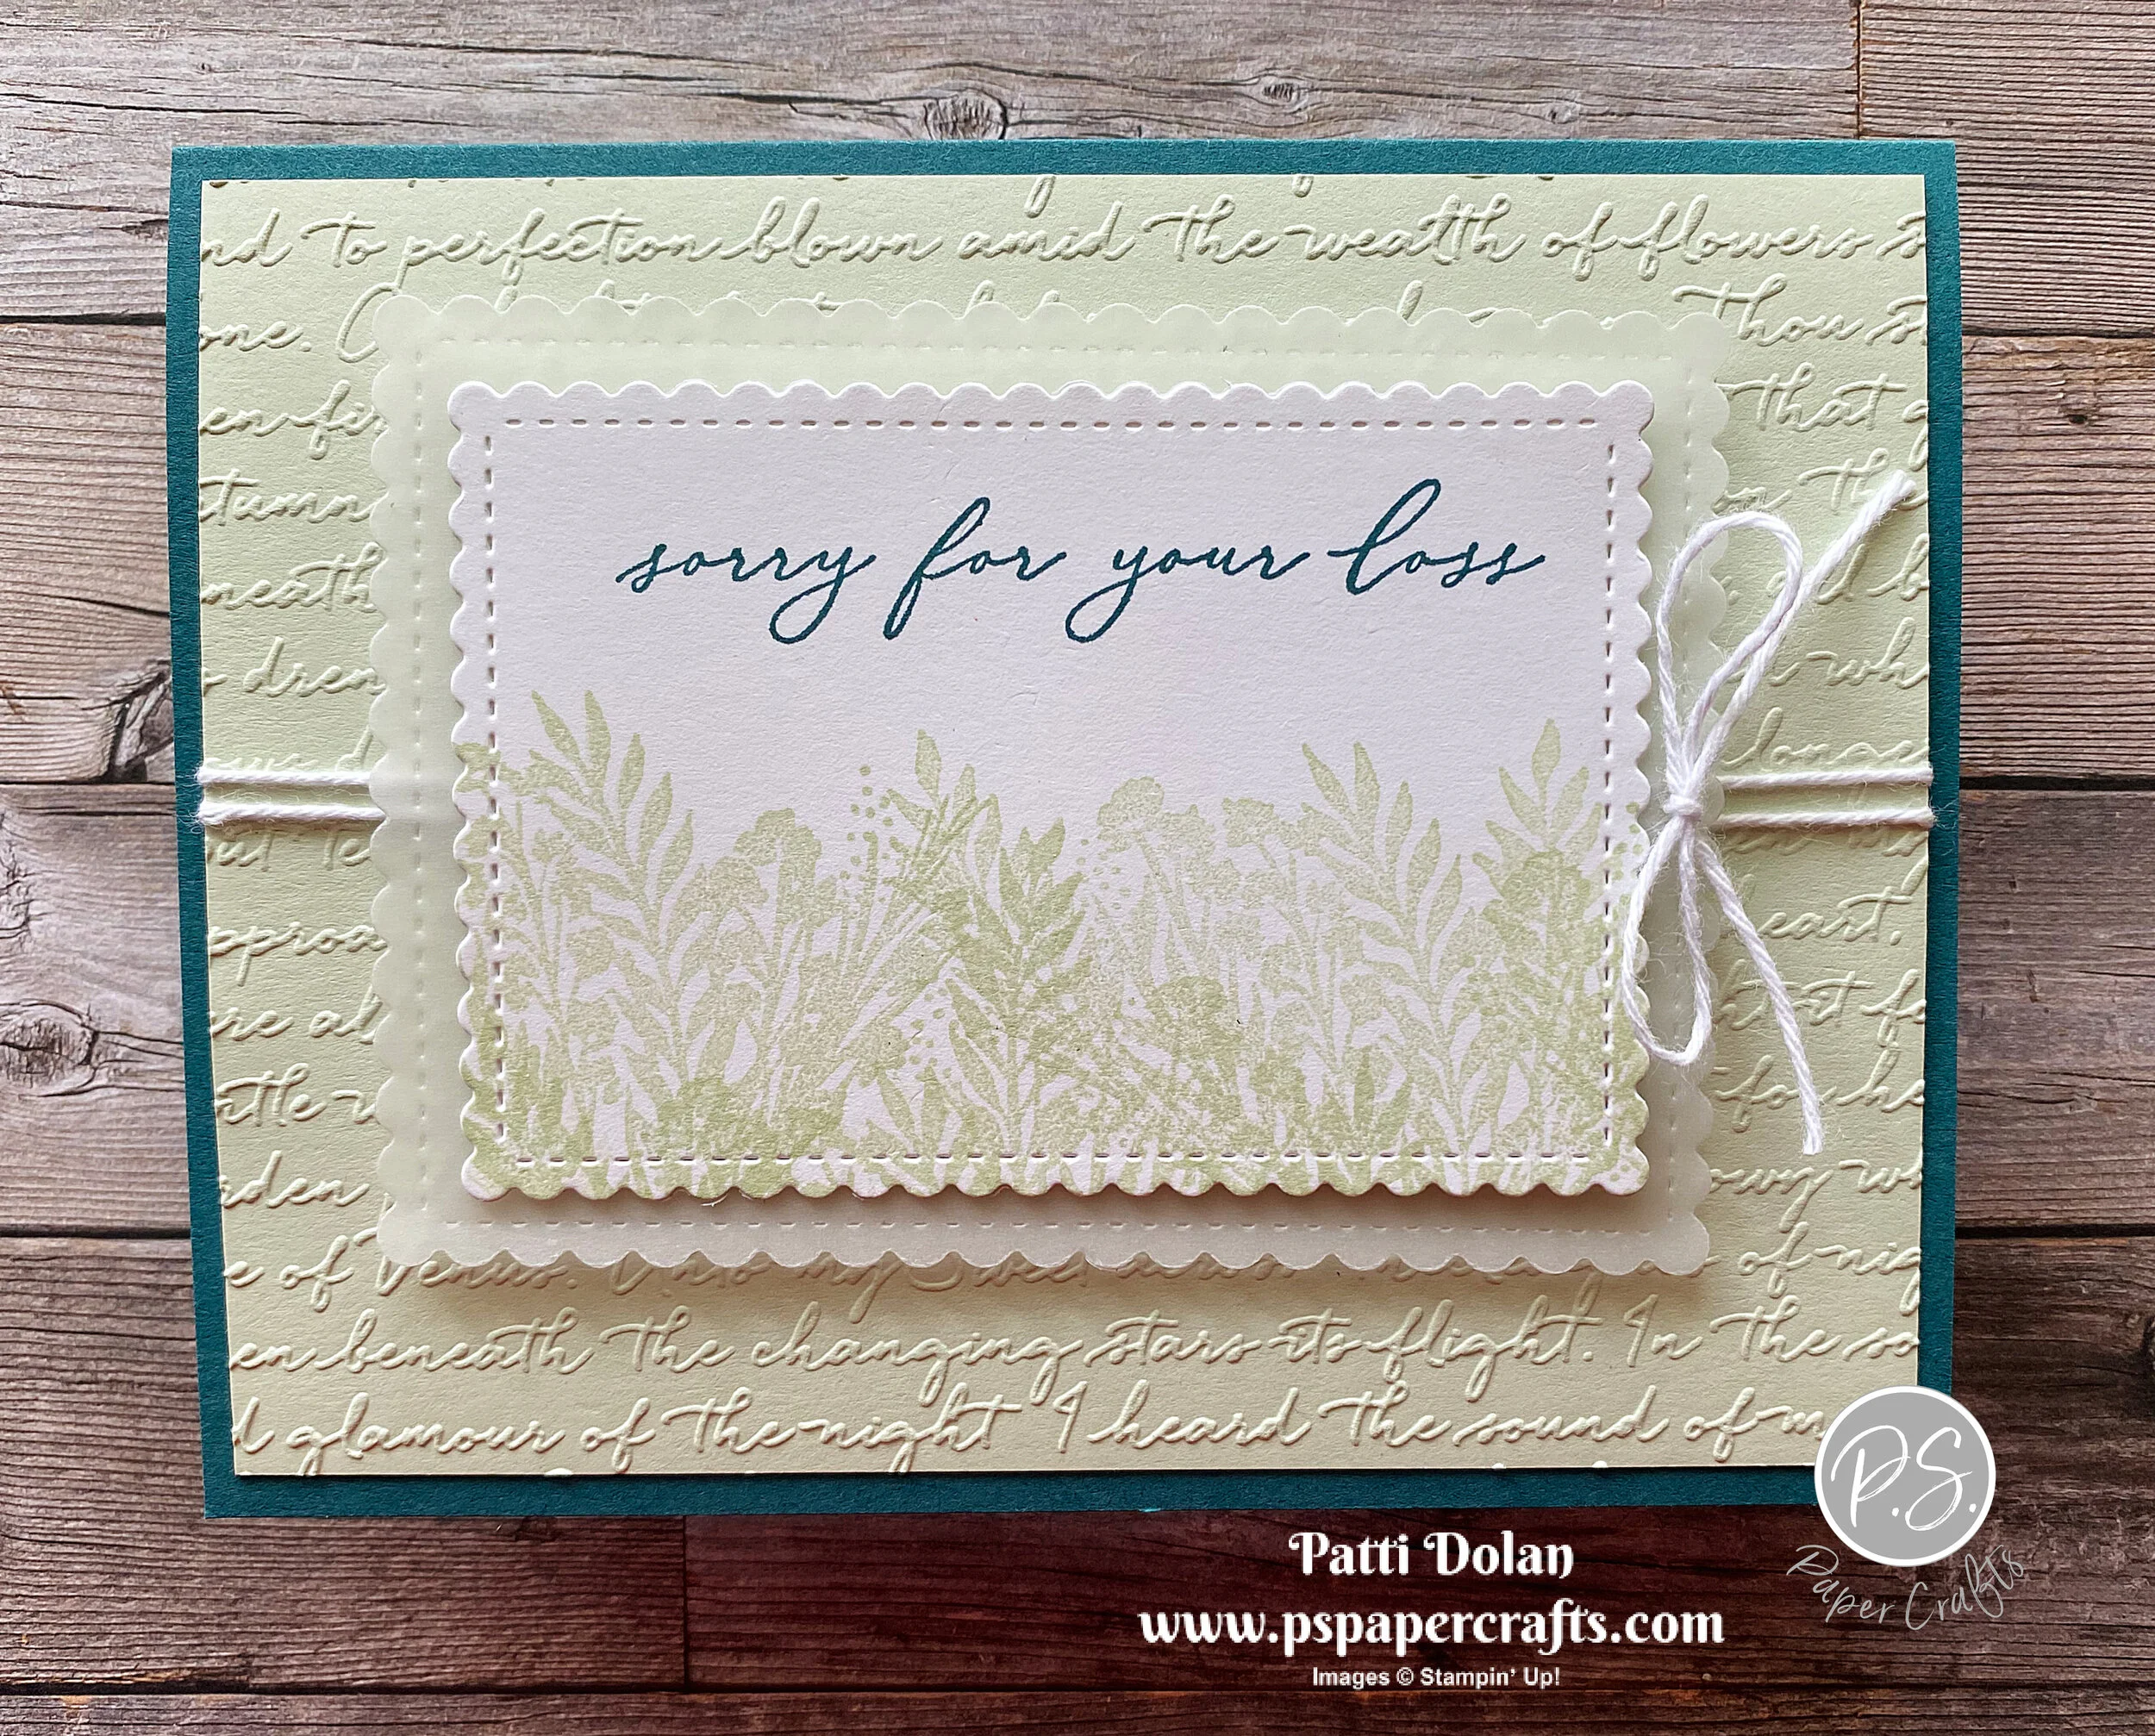
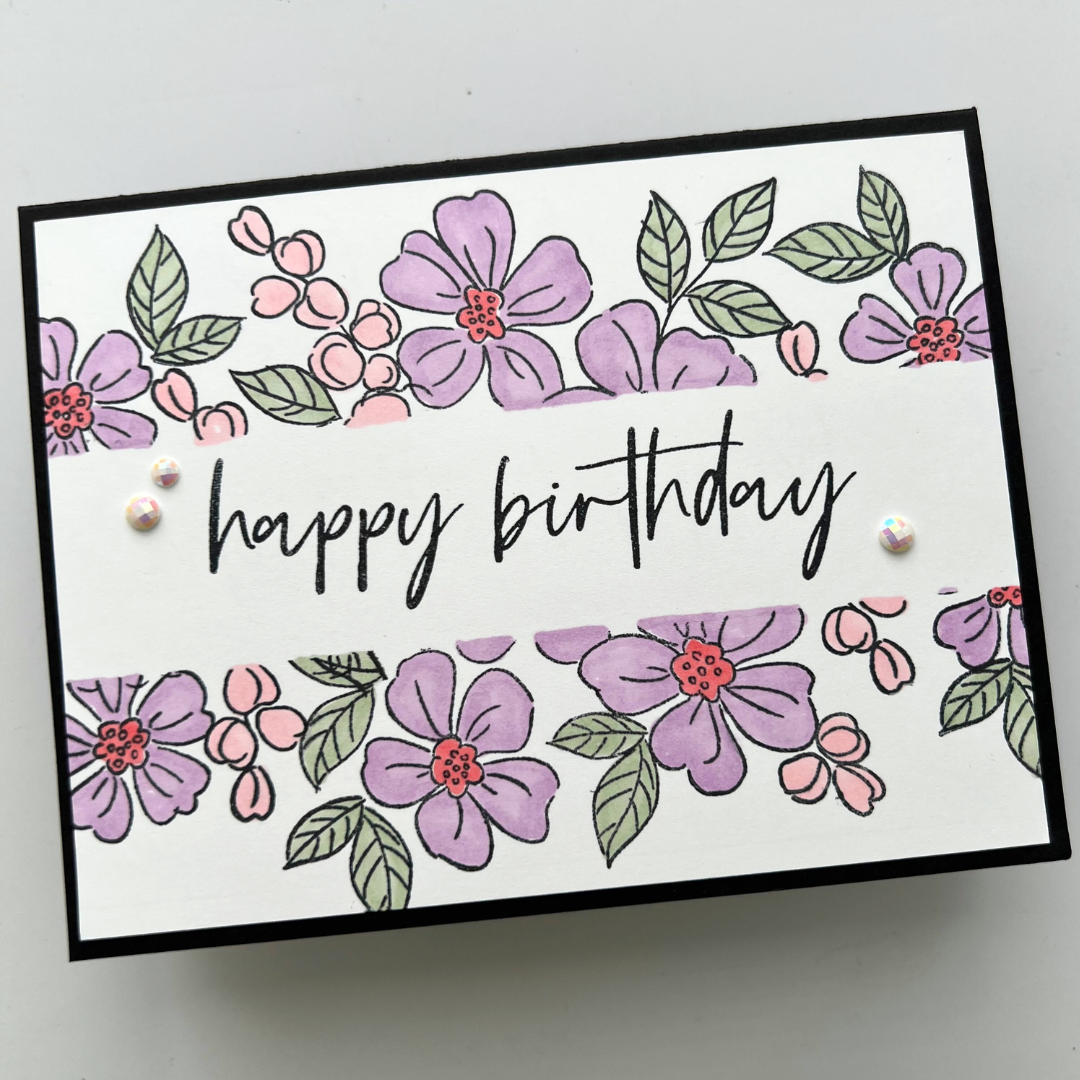
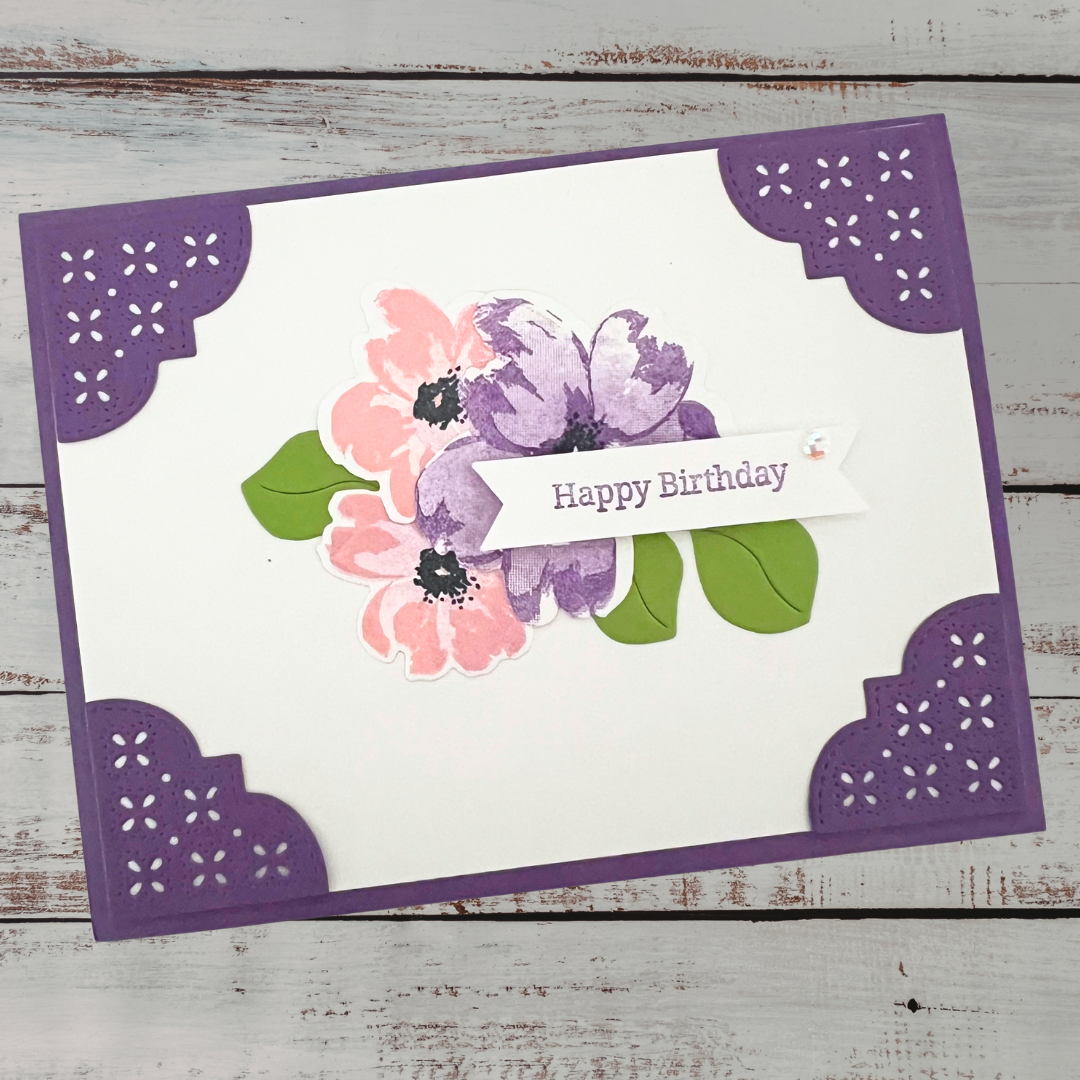
I love how delicate and pretty this card is using the Corner Bouquet and Heal You Heart Stamp Sets.

 
Simple Sympathy Card2.jpg
 

During Sale-A-Bration you can get one of these Stamp Sets for free when you purchase $50 worth of Stampin’ Up! products. Purchase $100 and you can get both sets. Hurry though, this ends February 28, 2021.

 
Simple Sympathy Card stamps.jpg
 

Tips & Instructions

  • Pretty Peacock Card Base - 5 1/2 x 8 1/2, score at 4 1/4

  • Soft Sea Foam Layer - 5 1/4 x 4, emboss using the Scripty 3D Embossing Folder. Wrap white twine around twice and adhere to back of layer. Adhere layer to card base.

  • Vellum Cardstock - cut with largest scalloped rectangles from the Stitched So Sweetly Dies.

  • Basic White Cardstock - cut with 2nd largest scalloped rectangles from the Stitched So Sweetly Dies.

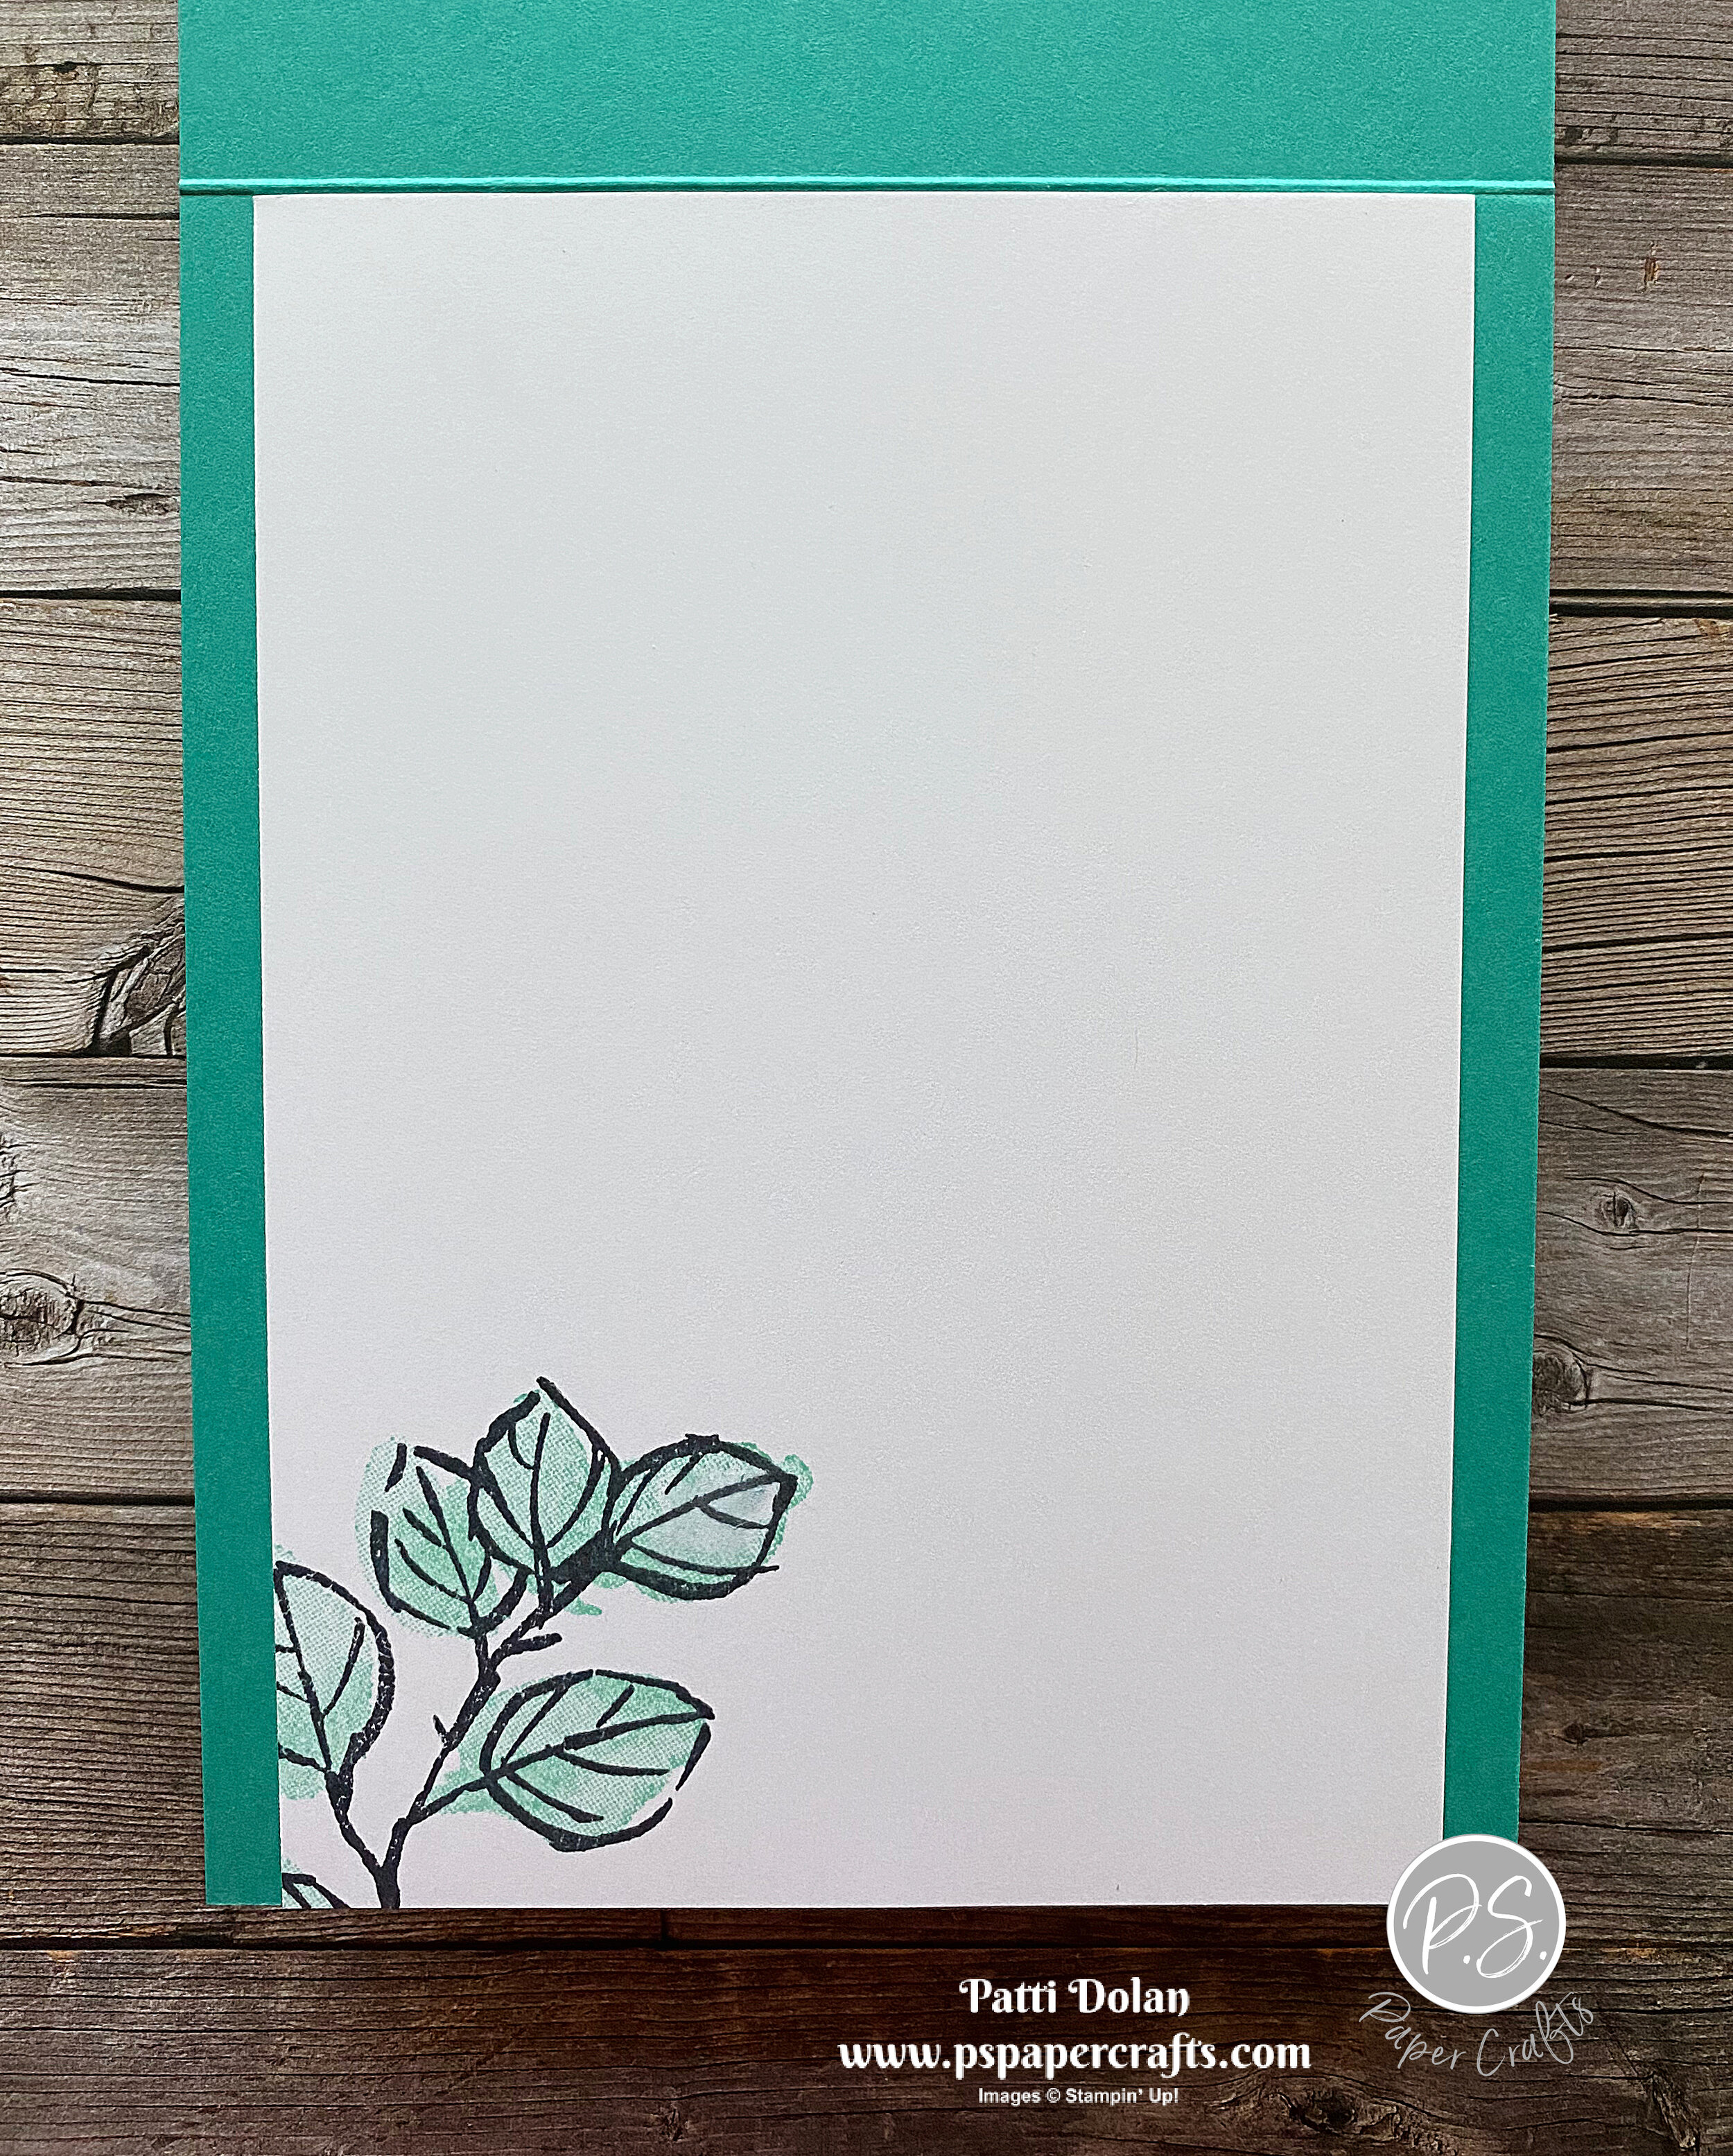
  • On white rectangle, stamp sentiment with Pretty Peacock Ink. Stamp greenery with Soft Sea Foam Ink, stamping multiple times across the bottom.

  • Adhere stamped layer to vellum rectangle and adhere to card using Dimensionals.

  • Tie bow using twine and adhere using Glue Dot.

 
Simple Sympathy Card1.jpg
 

On the inside stamp sentiment with Pretty Peacock Ink. Stamp floral image to top and bottom corner using Soft Sea Foam Ink.

 
Simple Sympathy Card inside.jpg
 

Supply List

Love Patti.png
Shop Here
 

Sale-A-Bration Ends February 28

Just a reminder that Sale-A-Bration ends on February 28 which is right around the corner. You still have time to earn FREE stamps with a qualifying order.

Click on the image below to view the brochure online.


The best part of Sale-A-Bration is the Starter Kit Promotion. You'll get an exclusive gift from the new Annual Catalog in your Starter Kit. It's five packages of 6x6 Designer Series Paper. The Starter Kit is the best deal on it's own but this added gift is amazing.

Here's the breakdown:

  • You purchase the Starter Kit for $99 and choose $125 worth of products.

  • You get the 5 packages of 6x6 Designer Series Paper.

  • Free shipping on this order.

  • 20% discount on future orders as an active demonstrator with the opportunity to get a 25% discount.

  • Access to awesome Facebook Groups with prize patrols, give-aways and lots of fun.

  • Ability to view and pre-order Stampin' Up! products before they are available to customers

 
Screen Shot 2021-02-14 at 8.29.43 PM.png
 

I would love to talk to you about the Starter Kit and answer any questions you may have. Email me and we can set up a time.

patti@pspapercrafts.com

Purchase Starter Kit and Join My Team
Love Patti.png
Shop Here
 

Sketch Saturday - Enjoy The Moment

Here’s my card for this week’s sketch challenge. I used the Enjoy The Moment Stamp Set. For this sketch challenge, I had to follow the sketch and use Granny Apple Green, Daffodil Delight and Balmy Blue in the card. I was allowed to use one neutral color and I chose Merry Merlot.

 
Sketch Saturday - Enjoy The Moment card1.jpg
 

The sketch challenge is from a Stampin’ Up! Team Facebook Group. This was a little more complicated that the card sketches I usually use and I had to use scrap paper to get the measurements figured out.

 
Screen Shot 2021-02-10 at 1.55.19 PM.png
 

I love the Enjoy The Moment Stamp Set. I’ve heard comments about this set that people didn’t like it so much but I love these images. They remind me of the fall back where I lived in NY.

I would never have thought to use these colors with this stamp set but I think they really work well with it.

 
Sketch Saturday - Enjoy The Moment stamp.jpg
 

Tips & Instructions

  • Merry Merlot Card Base 5 1/2 x 8 1/2, score at 4 1/4

  • Basic White Layer - 5 3/8 x 4 1/8, adhere to card base

  • Merry Merlot Layers - larger one is 4 7/8 x 2 7/8 and smaller one is 3 7/8 x 1 5/8

  • Basic White Layers - larger one is 4 3/4 x 2 3/4 and smaller one is 3 3/4 x 1 1/2

  • Stamp the images using Daffodil Delight, Granny Apple Green and Balmy Blue Inks. I started with the larger image in Daffodil Delight and then filled in with the other images. The small seeds were stamped with Merry Merlot Ink. Adhere stamped pieces to the Merry Merlot background layers and adhere to card.

  • Cut Basic White oval and Merry Merlot scalloped oval using the Layering Oval Dies. Stamp sentiment with Merry Merlot Ink and images as you did on the other pieces. Adhere ovals and adhere to card using Dimensionals.

  • Color 3 pearls with a Dark Daffodil Delight Stampin’ Blends Marker and adhere to top left corner.

  • Tie Bow with Ruched Daffodil Delight Ribbon and adhere with Glue Dot.

 
Sketch Saturday - Enjoy The Moment card2.jpg
 

On the inside stamp some of the images using the colors you used on the cardfront.

 
Sketch Saturday - Enjoy The Moment inside.jpg
 

Supply List

Love Patti.png
Shop Here
 

Friendly Flamingo Birthday Card

This flamingo is sow pretty with her wreath of flowers on her head. I was on the fence with the Friendly Flamingo Bundle and I’m so happy I got it.

 
Friendly Flamingo Birthday Card2.jpg
 

The stamp set has pretty images and the sentiments are great. I made this a birthday card but I love the “stand tall & stand out” and “just be YOU” sentiments.

 
Friendly Flamingo Birthday Card stamp.jpg
 

Watch the video to see how I made this card. I added some extra water to fill out the space.


Tips & Instructions

  • Granny Apple Green Card Base - 4 1/4 x 11, score at 5 1/2 (top folding)

  • Basic White Layer - 5 1/4 x 4

  • On Basic White Cardstock stamp flamingo with Flirty Flamingo Ink, 5 flowers with Gorgeous Grape Ink and head wreath with Gorgeous Grape Ink. Cut pieces using coordinating dies.

  • Stamp water with Pacific Point Ink, stamping multiple times to add more water (see video).

  • Stamp greenery across top at different lengths.

  • Adhere stamped layer to card base. Adhere flamingo using Dimensionals. Adhere head wreath and flowers using Glue Dots.

  • Stamp sentiment on 1/2” strip of Basic White with Gorgeous Grape Ink and punch one end with Triple Banner Punch. Adhere with Dimensionals.

  • Add Rhinestones to center of flowers.

 
Friendly Flamingo Birthday Card1.jpg
 

On the inside stamp sentiment with Gorgeous Grape Ink and floral image with Granny Apple Green Ink.

 
Friendly Flamingo Birthday Card inside.jpg
 

Supply List

Love Patti.png
Shop Here
 

Fun Puzzle Cards - So Easy To Make!

I found this design on Pinterest. They are called Puzzle Cards and are so easy to make. It’s a great way to use up some of your leftover patterned paper.

 
Puzzle Cards All2.jpg
 

Basic Tips & Instructions

  • Card Base - 5 1/2 x 8 1/2, score at 4 1/4

  • Basic White Layer - 5 1/4 x 4

  • Cardstock pieces - Cut 3 1/2 x 4 1/2, then cut into four 1 3/4 x 2 1/4 pieces

  • Designer Series Paper pieces - Cut 3 1/4 x 4 1/4, then cut into four 1 5/8 x 2 1/8 pieces

  • Adhere Designer Series Paper pieces to cardstock pieces.

  • Lay out 3 of them on card front to determine positioning.

  • Stamp sentiment.

  • Adhere the 3 pieces using Dimensionals.

  • Add some pearls or gems.

This card base is Poppy Parade with the Fine Art Floral Designer Series Paper.

I used Happy Birthday from the Peaceful Moments Stamp Set.

I added some Opal Rounds.

 
Puzzle Card Fine Art Floral.jpg
 

This card base is Granny Apple Green with the Flower & Field Designer Series Paper.

I used Happy Birthday from the Peaceful Moments Stamp Set.

I added some Pastel Pearls.

 
puzzle card flower & field.jpg
 

This card base is Bumblebee with the Dandy Garden Designer Series Paper.

I used Thinking Of You from the Beautiful Moments Stamp Set.

I added some In Color Enamel Dots (Bumblebee).

 
puzzle card dandy garden .jpg
 

Here’s the inside of the Fine Art Floral card. I used that 4th piece and added a sentiment.

 
Puzzle Card Fine Art Floral inside.jpg
 

Supply List

Love Patti.png
Shop Here
 

Fun Snailed It Cards!

The Snailed It Bundle is so cute. I was really drawn to these sweet mushrooms and decided to use it for my project for the monthly Simple Suite Stampers Tutorial PDF.

 
Snailed It Birthday Card.jpg
 

I collaborate with fellow Demonstrators each month to create a pdf full of great projects. If you order from me in February, you will receive this pdf for free. It contains pictures, measurements and instructions for 12 projects. Just click to Shop Now Button to start shopping with me and I’ll send you the pdf.

 
Screen Shot 2021-02-09 at 9.31.21 PM.png
 

I’ll show you how to create this card. The great thing is that you only need a 4x4 piece of Designer Series Paper. You can get 6 card fronts from one 12x12 sheet of paper.


Tips & Procedures

  • Bermuda Bay Card Base - 5 1/2 x 8 1/2, score at 4 1/4

  • Basic White Layer - 5 3/8 x 4 1/8

  • Snail Mail Designer Series Paper - 4 x 4, cut on a diagonal as shown in video. Separate on Basic White Layer and stamp sentiment with Bermuda Bay Ink.

  • Adhere the Designer Series Paper leaving a very small border and adhere to card base.

  • Cut 2nd largest circle from the Stitched Shapes Dies from a piece of Snail Mail Designer Series Paper.

  • On scrap of Basic White, stamp mushrooms with Black Memento Ink and cut with coordinating die.

  • Color with Light Bermuda Bay and Light Real Red Stampin’ Blends Markers. For the pink, I pressed a Clear Block into a Blushing Bride Ink Pad. Using a Blender Pen to pick up some ink and color. I colored on a scrap first to get off some of the ink to lighten it up.

  • Adhere mushrooms to stitched circle and adhere to card using Dimensionals.

 
Snailed It Hello Card.jpg
 

On the inside stamp the sentiment (from A Grand Kid Stamp Set) with Bermuda Bay Ink. Cut mushrooms with coordinating dies from Real Red Cardstock and adhere.

 
Snailed It Birthday Card inside.jpg
 
Love Patti.png
Shop Here
 

Oh Snap - It's Your Birthday

This is such a cute card. I got the idea of stamping the crocodile directly on a piece of Artistry Blooms Designer Series Paper from the catalog. It’s a great source for ideas.

 
Oh Snap - It's Your Birthday card2.jpg
 

The images and sentiments are so fun. I’m making this for my grandson who loves alligators and crocodiles.

 
Oh Snap - It's Your Birthday stamp.jpg
 

Tips & Instructions

  • Night Of Navy Card Base - 5 1/2 x 8 1/2, score at 4 1/4

  • Basic White Layer - 5 1/4 x 4, adhere to card base.

  • Artistry Blooms Designer Series Paper - cut with largest Stitched Rectangle Die and adhere to card.

  • Stamp crocodile on green piece of Artistry Blooms Designer Series Paper with Garden Green Ink. Fussy cut the image and adhere to card.

  • Stamp “Oh Snap” sentiment with Night Of Navy Ink.

  • Stamp “It’s You Birthday” sentiment on 3/4” strip of Basic White Cardstock with Night Of Navy Ink and punch end with Triple Banner Punch. Adhere to card.

 
Oh Snap - It's Your Birthday card1.jpg
 

Add some Whale Of A Time Sequins to card.

 
Oh Snap - It's Your Birthday card3.jpg
 
  • On the inside, stamp sentiment with Night Of Navy Ink.

  • On bottom corner, stamp water with Night Of Navy stamping off 2 times on scrap first to get a lighter shade.

  • Stamp frog with Garden Green Ink.

  • Stamp bird with Night Of Navy Ink.

 
Oh Snap - It's Your Birthday inside.jpg
 

Supply List

Love Patti.png
Shop Here
 

Sketch Saturday - A Touch Of Ink

For this week’s sketch, I used the A Touch Of Ink Stamp Set. This is a free stamp set with a $100 order during Sale-A-Bration and it has some great images.

 
Sketch Saturday - A Touch Of Ink card1.jpg
 

I found this sketch on Pinterest and liked the layout. Sketches give you a start for designing a card and then you can use whatever products you want and make it your own.

 
Screen Shot 2021-02-04 at 5.44.44 PM.png
 

I used Watercolor Pencils to color the butterfly and flower and then blended with a Blender Pen. This technique creates a nice, soft look.

 
Sketch Saturday - A Touch Of Ink pencils.jpg
 

Tips & Instructions

  • Bermuda Bay Card Base - 4 1/4 x 11, score at 5 1/2 (top folding)

  • Basic White Layer - 5 1/2 x 3 3/4, emboss using the Ornate Floral 3D Embossing Folder

  • Stamp butterfly and flower on Basic White Cardstock and cut using the largest Layering Circle.

  • Color using Watercolor Pencils and blend using a Blender Pen. I used Daffodil Delight, Bermuda Bay, Melon Mambo and Early Espresso for the butterfly and Old Olive and Calypso Coral for the flowers.

  • Cut Bermuda Bay Cardstock using the largest scalloped circle from the Layering Circles Dies and adhere to back of white circle and adhere to card.

  • Stamp sentiment on 1/2 x 3 3/4 strip of Basic White and adhere to 3/4 x 3 3/4 strip of Bermuda Bay Cardstock. Adhere together and adhere to card.

  • Add some Rhinestones to the center of the flowers.

 
Sketch Saturday - A Touch Of Ink card2.jpg
 

The inside layer was cut at 5 1/2 x 3 3/4 (cut the length a tiny bit shorter than 5 1/2 so it accommodates the fold). Stamp leaves using Black Memento Ink and then stamp the filler for the leaves using Coastal Cabana Ink, stamping off first to get a lighter shade.

 
Sketch Saturday - A Touch Of Ink inside.jpg
 

Supply List

Love Patti.png
Shop Here
 

Easy Z-Fold Hummingbird Card

This was such a simple fun fold card to make. The Dandy Garden Designer Series Paper worked perfectly with the pretty hummingbird. I love how it came together.

 
Easy Z-FOld Hummingbird Card2.jpg
 

I’ll show you how to create this z-fold card on my video.


The stamp set I used is one of the Sale-A-Bration products. It’s called A Touch Of Ink and it’s free with a $100 purchase. I love the hummingbirds and butterflies in this set and it’s great that you can stamp the detailed image and then fill in with the background stamp.

 
Screen Shot 2021-02-04 at 8.52.23 PM.png
 

Tips & Instructions

  • Thick Basic White Card Base - 5 1/2 x 8 1/2, score at 4 1/4 and again at 1 1/2. Fold in half and then fold back the 1 1/2 flap.

  • Dandy Garden Designer Series Paper - 5 1/2 x 2 11/16 (that’s one mark before the 2 3/4 so it fits better with the fold. Adhere to card front.

  • Dandy Garden Designer Series Paper - 5 1/2 x 1 9/16 (that’s one mark after 1 1/2). Adhere to card inside.

  • Basic White diamond - 2 1/2 x 2 1/2. Stamp sentiment, hummingbird and flowers with Black Memento Ink. Color with Stampin’ Blends (Light Flirty Flamingo, Light Granny Apple Green, Light Misty Moonlight and Light & Dark Daffodil Delight).

  • Misty Moonlight diamond - 2 3/4 x 2 3/4, adhere to white diamond and adhere to card putting adhesive just in the middle of the diamond.

 
Easy Z-FOld Hummingbird Card1.jpg
 

This is what the inside looks like. You can add a sentiment or some flowers if you want.

 
Easy Z-FOld Hummingbird Card inside.jpg
 

Supply List

Love Patti.png
Shop Here
 

Arrange A Wreath Valentine's Day Card

One of my favorite products in the Annual Catalog is the Arrange A Wreath Bundle. I’ve used it for spring, fall and Christmas wreaths and now it’s time for a Valentine wreath.

 
Arrange A Wreath Valentine's Day Card2.jpg
 

Most of this card was made using the Wreath Builders Dies from this bundle. I used the stamp for the inside sentiment.

The pretty papers are from the Love You Always Specialty Designer Series Paper and Foil Sheets. They are so shiny, it was hard to get a picture without my reflection LOL!

 
Screen Shot 2021-02-04 at 1.21.57 PM.png
 

Tips & Instructions

  • Sahara Sand Card Base - 5 1/2 x 8 1/2, score at 4 1/4

  • Love You Always Foil Sheets (Rococo Rose) - 5 3/8 x 4 1/8

  • Love You Always Specialty Designer Series Paper (Sahara Sand) - 5 1/4 x 4

  • Using Wreath Builder Dies, cut background wreath with the Blushing Bride Foil Sheet and the leafy wreath from a piece of Soft Sea Foam Cardstock.
    HINT: Cut the foil sheet to 3 1/4 x 3/14 before running it through your die cutting machine so you don’t get impressions from your plates on the excess foil sheet.

  • Cut large Love Heart and some small hearts from the Rococo Rose Foil Sheet.
    Hint: Cut in the center of the sheet that will be used as a layer to save on foil sheets.

  • Cut small hearts from the Sahara Sand Foil Sheet

  • Adhere 1 1/4 x 3/8 strip of the Blushing Bride Foil Sheet behind the LOVE cutout. I used scotch tape to adhere it.

  • Adhere layers together. Adhere wreaths together and adhere to card.

  • Adhere LOVE heart in center of wreath using Dimensionals.

  • Tie bow with Blushing Bride Metallic Ribbon and adhere to bottom of wreath using Glue Dots. Add Glue Dots to tail if you need to keep it in place.

  • Add small hearts to wreath.

 
Arrange A Wreath Valentine's Day Card1.jpg
 

On the inside, stamp sentiment with Rococo Rose Ink. Add two foil hearts as shown.

 
Arrange A Wreath Valentine's Day Card - inside.jpg
 

Shop Here

Love Patti.png
Shop Here
 

Fun Hey Chick Card using the new Chick Dies

I’m so excited to show you the new Chick Dies that coordinate with the Hey Chick Stamp Set. These images and sentiments are so fun!

 
Hey+Chick+Card2.jpg
 

In my video, I’ll go over all the new “chick” related products that became available on February 2, 2021 and show you how I made this card.


Stampin’ Up! brought back the Hey Chick Stamp Set from a year ago and added some great dies to coordinate with it.

 
Screen Shot 2021-02-03 at 4.33.02 PM.png
 

In addition, there’s a new Hey Birthday Chick Stamp Set with coordinating dies. You can use both of these bundles together or on their own.

 
Screen Shot 2021-02-03 at 4.35.09 PM.png
 

Tips & Instructions

  • Early Espresso Card Base - 5 1/2 x 8 1/2, score at 4 1/4

  • So Saffron Layer - 5 3/8 x 4 1/8

  • Basic White Layer - 5 1/4 x 4

  • Ink henhouse die and stump die with Crumb Cake Ink and cut from Crumb Cake Cardstock (see video).

  • Cut sign from Early Espresso Cardstock. Stamp sentiment on 3/8 x 1 1/8 strip of Basic White Cardstock using Black Memento Ink and adhere to sign.

  • Cut corn from So Saffron Cardstock and leaves from Pear Pizzazz Cardstock. Adhere together.

  • Stamp chicken on Basic White Cardstock using Black Memento Ink and color with So Saffron and Pumpkin Pie Stampin’ Blends Markers. Cut using coordinating die.

  • Lay the henhouse on the Basic White Layer to determine where to cut with the feed die. Cut 3 times using the feed die.

  • Adhere corn to card. Adhere the henhouse, chicken stump and sign using Dimensionals.

 
Hey Chick Card1.jpg
 

On the inside stamp chicken with balloon and sentiment with Black Memento Ink using the Hey Birthday Chicks Stamp Set. Color chicken with So Saffron and Pumpkin Pie Stampin’ Blends Markers. Color balloon with Flirty Flamingo or Seaside Spray Stampin’ Blends Marker.

 
Hey Chick Card inside.jpg
 

Supply List

Love Patti.png
Shop Here
 

Happy Birthday Chick Card

I made this birthday card for my sister who lives on a farm and has chickens, ducks and goats. I love going to visit her; it’s so peaceful there.

 
Happy Birthday Chick Card2.jpg
 

The Hey Birthday Chick Stamp Set has some really cute images and sentiments. For the background layer I used the Oh So Ombre Designer Series Paper which is free during Sale-A-Bration with a $50 purchase.

 
Happy Birthday Chick Card stamp.jpg
 

Starting today, February 2, you can purchase coordinating dies for the Hey Birthday Chick Stamp Set. I’ll definitely be using these dies; they’re so fun.

 
Screen Shot 2021-02-01 at 10.49.56 PM.png
 

Tips & Instructions

  • Granny Apple Green Card Base - 5 1/2 x 8 1/2, score at 4 1/4

  • Basic White Layer - 5 1/4 x 4

  • Oh So Ombre Designer Series Paper Layer - 5 x 3 3/4

  • Adhere layers to card base.

  • Stamp chicken images on designer series paper using Black Memento Ink and color using Daffodil Delight and Pumpkin Pie Stampin’ Blends Markers.

  • Punch balloon from Rainbow Glimmer Paper using the Bouquet Balloon Punch and adhere over balloon using Dimensionals.

  • Stamp sentiment on 1 1/2 strip of Basic White Cardstock using Black Memento Ink. Punch end with Triple Banner Punch and adhere to card using Dimensionals.

 
Happy Birthday Chick Card1.jpg
 

On the inside stamp sentiment and chickens with Black Memento Ink. Color using Daffodil Delight, Pumpkin Pie and Flirty Flamingo Stampin’ Blends Markers.

 
Happy Birthday Chick Card inside.jpg
 

Supply List

Love Patti.png
Shop Here
 

Sketch Saturday - Pampered Pets

I used the Pampered Pets Stamp Set and the Playful Pets Designer Series Paper to make this cute card for this week’s sketch challenge. I think this would be a great card to give for Valentine’s Day!

 
Sketch Saturday - Pampered Pets card1.jpg
 

Here’s the sketch I used. It’s from the Mojo Monday Challenge. I love that it has all the measurements on it and I followed them exactly as shown.

 
Screen Shot 2021-01-30 at 5.51.47 PM.png
 

Tips & Instructions

  • Basic Black Card Base - 5 1/2 x 8 1/2, score at 4 1/4

  • Basic White Layer - 5 1/4 x 4

  • Playful Pets Designer Series Paper Layer (black with words) - 5 x 3 3/4

  • Real Red Strip - 1 x 4 1/2

  • Basic White Strip - 3/4 x 4, emboss with Tasteful Textile 3D Embossing Folder

  • Playful Pets Designer Series Paper Layer (hearts & paw prints) - 2 1/4 x 3

  • Adhere all layers

  • Stamp dog image on scrap of Basic White with Black Memento Ink. Cut circle using Stitched Shapes Dies. Color dog with Dark & Light Smoky Slate Stampin Blends Markers. Color collar with Dark Red Stampin’ Blends Marker.

  • Stamp sentiment on 1/2 x 2 strip of Basic White Cardstock with Real Red Ink. Punch end using Triple Banner Punch.

  • Adhere circle and sentiment strip using Dimensionals.

 
Sketch Saturday - Pampered Pets card2.jpg
 

On the inside stamp sentiment and dog with Black Memento Ink. Color dog and color with Stampin’ Blends the same as the dog on the card front. Stamp some hearts with Real Red Ink.

 
Sketch Saturday - Pampered Pets inside.jpg
 

Supply List

Love Patti.png
Shop Here
 

Purple Hydrangea Valentine Card

If you love purple, you will love this card. I cut the floral heart from a piece of the Hydrangea Hill Designer Series Paper and then went purple from there!!!

 
Purple Hydrangea Valentine Card2.jpg
 

In the video below, I’ll show you how to cut the floral heart and inside heart to make this card. I used the leftover cutout for the inside. It’s so pretty!


There are some pretty floral images and dies in the Always In Your Heart Bundle. I love the pieces I used on this card, the large die and the “You Had Me At Hello” sentiment.

 
Screen Shot 2021-01-28 at 10.09.25 PM.png
 

Tipes & Instructions

  • Gorgeous Grape Card Base - 5 1/2 x 8 1/2, score at 4 1/4

  • Highland Heather Layer - 5 1/4 x 4 and adhere to card base.

  • Cut floral heart from Hydrangea Hill Designer Series Paper and adhere to card.

  • Stamp Heart Sentiment on Basic White Cardstock with Gorgeous Grape Ink and cut out lining up the inside of the floral heart die. Adhere to heart center using Dimensionals.

  • Tie bow with piece of Gorgeous Grape Satin Ribbon and adhere at bottom of the heart with a Glue Dot.

  • Add some Pastel Pearls.

 
Purple Hydrangea Valentine Card1.jpg
 

On the inside adhere the heart that was cut out of the Hydrangea Hill Designer Series Paper. Stamp sentiment with Gorgeous Grape Ink.

 
Purple Hydrangea Valentine Card inside.jpg
 
Love Patti.png
Shop Here
 

Kangaroo & Company Card with a Secret Message!

This kangaroo is just so sweet. It can hold different items in it’s pouch; hearts, presents, flowers and a baby kangaroo.

 
Kangaroo & Company Card - Stamp.jpg
 

You can add a little hidden message to whatever is in her pouch. I added Love You Much that you can pull up. It’s so cute.

 
Kangaroo & Company Card2.jpg
 

Tips & Instructions

  • Real Red Card Base - 5 1/2 x 8 1/2, score at 4 1/4

  • Whisper White Layer - 5 1/4 x 4

  • Snail Mail Designer Series Paper - 5 1/8 x 3 7/8

  • Adhere layers together and wrap piece of Real Red Double Stitched Satin Ribbon around layers and adhere to the back. Adhere layer to card base.

  • Stamp kangaroo, hearts and sentiment on Basic White Cardstock with Black Memento Ink and cut with coordinating Kangaroo Dies.

  • Color kangaroo using Dark and Light Soft Suede Stampin Blends Markers. Color inside of ear, chest and pouch with Light Petal Pink Stampin Blends Marker.

  • Color hearts with Light Real Red Stampin’ Blends Marker. Attach hearts to top of sentiment piece and slip inside pouch.

  • Cut largest circle from Basic White Cardstock using the Stitched Shapes Dies and stamp sentiment with Black Memento Ink. Adhere kangaroo making sure the sentiment can be pulled up and down. Adhere to card using Dimensionals.

  • Tie bow and adhere to Glue Dot.

 
Kangaroo & Company Card1.jpg
 

Adhere 4 x 3/4 strip of Snail Mail Designer Series Paper to inside layer. I didn’t add a sentiment because I’m not sure who I will be sending this to…probably one of my grandkids.

 
Kangaroo & Company Card inside.jpg
 

Supply List

Love Patti.png
Shop Here
 

How To Make Simple, Sweet Treat Holders

These treat holders are really cute and so easy to make. They would be such a nice little gift to give out for Valentine’s Day or just to let someone know you appreciate them.

 
Sweet Treat Boxes both.jpg
 

In the video I’ll show you how to make these treat holders. There are great patterns in the Delightful Berry and the True Love Designer Series Papers to make these treat holders.


I used the True Love Designer Series Paper and Blushing Bride Metallic Ribbon on this one. The heart was cut from a piece of Love You Always Foil Sheets using the Be Mine Stitched Dies.

I punched the top with the Scalloped Tag Topper Punch. The sentiment was stamped with Poppy Parade Ink on a 7/8 strip of Basic White and punched to create a banner end with the Triple Banner Punch.

 
Sweet Treat Box Heart1.jpg
 

A piece of Ghirardelli Chocolate fits perfectly in this holder.

 
Sweet Treat Box Heart2.jpg
 

Here’s the template I used with the measurements.

  • Designer Series Paper - 7 x 3 1/2

  • Score on the 7” side at 1/4 and 3/4, then flip and score the other side at 1/4 and 3/4

  • Score on the 3 1/2 side at 1/2, 2 1/2 and 3

  • Cut away from the longer end to the 2 1/2 score line on both sides.

  • Fold and adhere as shown on the video.

 
Sweet Treat Box template.jpg
 

I used the Berry Delightful Designer Series Paper which is part of the Berry Blessings Bundle, a Free Sale-A-Bration product with a qualified order. The ribbon is from the Flowers For Every Season Ribbon Combo Pack.

I punched the top with the Scalloped Tag Topper Punch. The sentiment was stamped with Poppy Parade Ink on a 7/8 strip of Basic White and punched to create a banner end with the Triple Banner Punch.

 
Sweet Treat Box Berry2.jpg
 

I love how bright and cheerful this one is with the berry paper.

 
Sweet Treat Box Berry1.jpg
 

Supply List for both

Love Patti.png
Shop Here
 

Be My Valentine Card

This combination of Rococo Rose, Blushing Bride and Gold Foil is just perfect for a beautiful Valentine’s Day Card!

 
Be My Valentine Card2.jpg
 

I used the Always In My Heart Bundle. I think my favorite part of this card is the little hearts cut out across the bottom of the card. The die cuts along the tops of the heart but I just adhered both together on the card base.

This is one of the bundles in featured in my January Simple Stampers Tutorial pdf that you can get for FREE with an order from my Online Store during the month of January.

 
Screen Shot 2021-01-25 at 9.59.54 PM.png
 
Shop Here

Tips & Instructions

  • Blushing Bride Card Base - 5 1/2 x 8 1/2, score at 4 1/4

  • Rococo Rose Layer - 5 1/2 x 4 1/4, using the small hearts die, cut across the bottom of the layer.

  • Adhere the Rococo Rose layers to the card base. It will be in 2 pieces but is easily lined up.

  • Using the Heart Punch Pack punch heart from Blushing Bride Cardstock and scalloped heart from a Gold Foil Sheet. Sponge the edges of the pink heart using Blushing Bride Ink. Adhere hearts together and adhere to card.

  • On a piece of Rococo Rose Cardstock, stamp sentiment with Versamark and heat emboss with Gold Embossing Powder. Fold along score lines and adhere to card. I used Dimensionals in the center and Liquid Glue on the ends.

  • Cut hearts from Gold Foil and Blushing Bride Cardstock and adhere to card using Liquid Glue.

 
Be My Valentine Card1.jpg
 

On the inside stamp sentiment and hearts using Rococo Rose Ink.

 
Be My Valentine Card inside.jpg
 

Supply List

Love Patti.png
Shop Here
 

Sketch Saturday - Floating & Fluttering

For this week’s sketch card I used the Fluttering Dies to cut and emboss these pretty butterflies from the Love You Always Foil Sheets.

 
Sketch Saturday - Floating & Fluttering card1.jpg
 

This is the sketch I used for this card. It’s from the CAS(E) This Sketch Challenge from Splitcoaststampers and it’s the last one they are doing. I’m so sad that they are no longer doing these challenges.

 
Screen Shot 2021-01-22 at 9.37.49 PM.png
 

I cut and embossed scraps of Love You Always Foil Sheets. I then cut a plain butterfly from Basic Black Cardstock and then adhered them together which gives you a perfect outline for the butterfly.

 
Sketch Saturday - Floating & Fluttering collage.png
 

Tips & Instructions

  • Basic Black Card Base - 5 1/2 x 8 1/2, score at 4 1/4

  • Fine Art Floral Designer Series Paper - 5 1/4 x 4, wrap piece of Blushing Bride Metallic Ribbon around layer, adhering to the back and then adhere layer to card base.

  • Cut 3 plain butterflies from Basic Black Cardstock using the Fluttering Dies.

  • Cut and emboss 3 butterflies from Love You Always Foil Sheets (I cut 2 from the Blushing Bride sheet and 1 from the Rococo Rose sheet). Adhere butterflies to plain black butterflies.

  • Adhere butterflies to card over ribbon using Dimensionals.

  • Stamp sentiment with Black Memento Ink on scrap of Basic White Cardstock and punch with Plain Double Oval Punch. The sentiment is from the Oval Occasions Stamp Set.

  • Punch Rococo Rose Foil Sheet with the scalloped punch and adhere behind label. Adhere to card using Dimensionals.

 
Sketch Saturday - Floating & Fluttering card2.jpg
 

On the inside stamp sentiment with Black Memento Ink. Cut and emboss butterfly like the ones on the front and adhere above sentiment.

 
Sketch Saturday - Floating & Fluttering inside.jpg
 

Supply List

Love Patti.png
Shop Here
 

Woodland Wonder Fun Fold Birthday Card

This was such a fun card to make. I CASEd it from the Mini Catalog and I think it turned out so cute.

 
Woodland Wonder Fun Fold Birthday card2.jpg
 

In the video I’ll show you how to stamp the tree and add some extra trunk to make it fit the card. I colored everything with Stampin’ Blends.


Tips & Instructions

  • Seaside Spray Card Base - 5 1/2 x 8 1/2, score at 4 1/4

  • Whisper White Layer - 4 x 10 3/4, score at 5 1/4 and 8

  • Stamp tree images with Black Memento Ink. I stamped the top, then the middle and then part of the bottom to extend the length of the tree. Stamp the full bottom at the end. Watch the video to see how I did this.

  • Stamp whatever images you like. I added the bunny, sign, balloon, music notes and some butterflies. Stamp sentiment.

  • Stamp clouds with Seaside Spray Ink.

  • Color using Stampin’ Blends - Granny Apple Green, Crumb Cake, Seaside Spray, Daffodil Delight, Smoky Slate and Flirty Flamingo.

  • Fold on score lines and adhere the top 5 1/4 x 4 portion to card base.

 
Woodland Wonder Fun Fold Birthday card1.jpg
 

These critters in the tree are so cute. You can make the tree long or short and add whatever images you want.

 
Screen Shot 2021-01-21 at 10.22.44 PM.png
 

On the inside stamp the sentiment and some balloons. Color the balloons with Light Stampin’ Blends.

 
Woodland Wonder Fun Fold Birthday inside.jpg
 

Supply List

Love Patti.png
Shop Here
 

Art Gallery - I Miss You Card

Can’t you think of a bunch of people you could send an I Miss You Card to? During this pandemic, who wouldn’t love to get a pretty card letting them know they are missed.

 
Art Gallery - I Miss You card2.jpg
 

I’ve been playing with the Art Gallery Bundle and I love how beautiful the flower image stamps. It’s a 2-step stamp so you can use two colors or do what I did and stamp with the same color ink; one direct and one by stamping off first.

You can bundle the stamp set with the coordinating dies to save 10%. It’s well worth it to get both the stamp set and the dies.

 
Screen Shot 2021-01-20 at 8.51.53 PM.png
 

Tips & Instructions

  • Merry Merlot Card Base - 5 1/2 x 8 1/2, score at 4 1/4

  • Fine Art Floral Designer Series Paper - 5 1/4 x 4

  • Stamp floral image on designer paper with Merry Merlot Ink, stamping off first to get a lighter shade. Stamp multiple times making sure you stamp off first. Adhere layer to card base.

  • On scrap of Basic White Cardstock stamp leaf image with Garden Green Ink. Stamp the detailed flower image (one with fewer petals) using Merry Merlot Ink. Stamp the full flower image with Merry Merlot but stamp off first to get the lighter shade.

  • Cut leaf and flower image using the Floral Gallery Dies and adhere to card with Dimensionals.

  • Stamp sentiment on scrap of Basic White Cardstock with Merry Merlot Ink and cut with Floral Gallery Dies. Adhere to card with Dimensionals.

  • Tie bow with piece of Bumblebee Gingham Ribbon and adhere with a Glue Dot.

 
Art Gallery - I Miss You card1.jpg
 

On the inside stamp leaf image with Garden Green Ink and flower with Bumblebee Ink following the same steps as you did for the flower on the card front.

 
Art Gallery - I Miss You inside.jpg
 

Supply List

Love Patti.png
Shop Here