

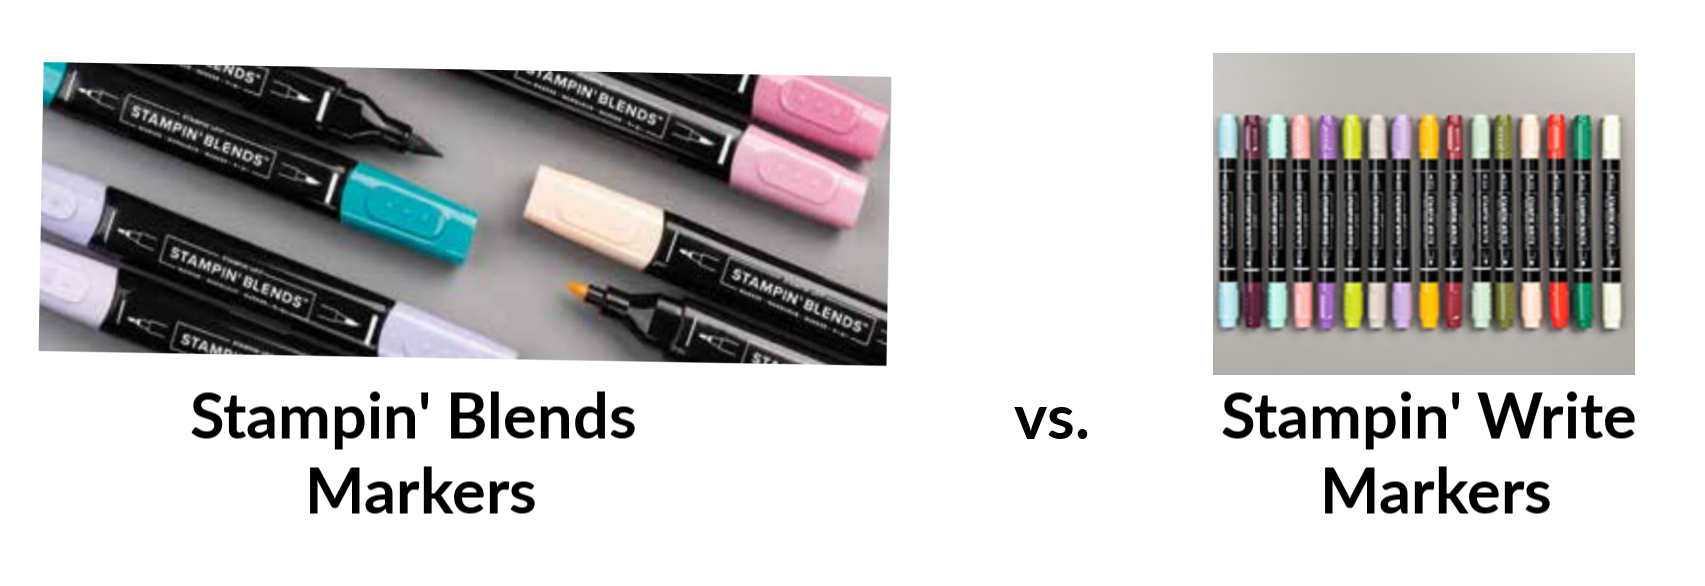
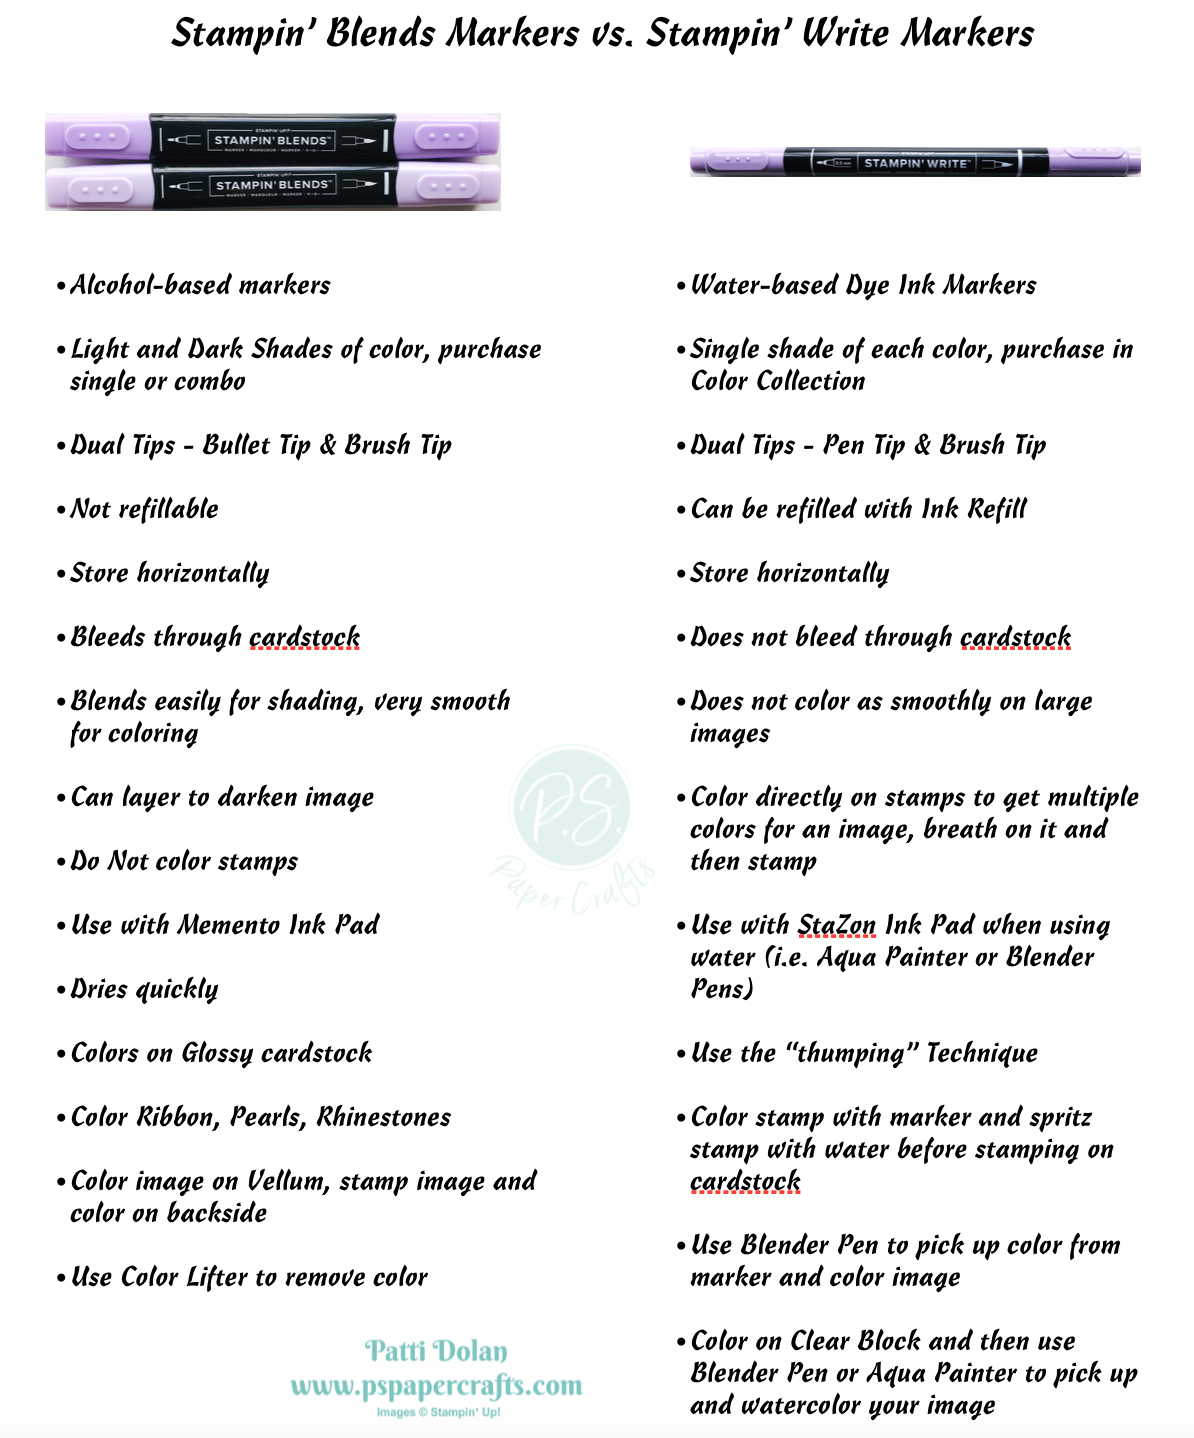
Sometimes there is confusion about what type markers to use for what purpose so I created this cheat sheet for you to use. Below is a comparison between Stampin' Blends and Stampin' Write Markers. Both have specific benefits and I'm not going to say one is better than the other. I use both types regularly!

Sketch Saturday - Best Dressed
I had to use the Best Dressed Designer Series Paper again for today’s sketch. The floral patterns are so pretty!

The Sketch is from the CAS(E) This Sketch Challenge from Splitcoaststampers.

Tips & Instructions
Old Olive Card Base - 5 1/2 x 8 1/2, score at 4 1/4
Blackberry Bliss Layer 5 1/4 x 4
Start with the floral design from the Best Dressed Designer Series Paper and using your Paper Trimmer cut a piece 5 1/8 and diagonal angles so it comes to a point at the bottom, mine is 1 1/2 at the top
Using the floral piece as a guide cut the green with white dots piece, mine is 1” at the top and 1 7/16 a the bottom
Emboss a piece of Purple Posy Cardstock with the Subtle Embossing Folder and cut diagonal using the floral piece as a guide, mine is 1 3/8 at the top and 2 3/8 at the bottom
Lay the pieces on the Blackberry Bliss layer spreading them slightly and leaving a border around and adhere each piece. You may have to trim the pieces to get them to fit.
Adhere layer to cardbase
Stamp sentiment (from Itty Bitty Birthdays) on Whisper White Scrap with Old Olive Ink and cut with All Dressed Up Die (or you can just stamp on strip of cardstock if you don’t have the dies)
Adhere sentiment to card using Dimensionals
Add Noble Peacock (Old Olive) Rhinestones
On the inside, stamp sentiment with Old Olive Ink. Cut 2 strips of another floral pattern from the Best Dressed Designer Series Paper 1/2 x 5 1/4 and adhered to each side of the inside layer.

Supply List

Simple Birthday Gift Card Holder
I’m so excited to show you how to make this birthday card that has a pocket inside to hold a gift card. This Designer Series Paper with the Blackberry Bliss Cardstock is just gorgeous!
Watch the video to see how easy it is to make this card.
Tips & Instructions
Blackberry Bliss Card Base - 4 1/4 x 11, score at 5 1/2 & 9 1/4
Best Dressed Designer Series Paper (floral) - 3 1/2 x 4
Best Dressed Designer Series Paper (striped) - 1 1/2 x 4
Fold Card base in half and fold at the 9 1/4 end and punch with edge of Label Me Lovely Punch
Adhere striped piece to right edge of card base, centering as shown in video
Stamp sentiment on scrap of Whisper White Cardstock with Blackberry Bliss Ink and punch with Label Me Lovely Punch
Wrap piece of ribbon around the floral paper and adhere to back, then adhere layer to card base
Adhere stamped label over ribbon using Dimensionals
Make bow and adhere using a Mini Glue Dot
Color 2 Rhinestones with Dark Blackberry Bliss Blends Marker and adhere to label

On the inside, stamp sentiment and flowers on piece of 3 1/2 x 4 Whisper White Cardstock with Blackberry Bliss Ink.

Supply List

Sending Healing Hugs
I made another card using the Woven Threads Designer Series Paper which is FREE with a $50 order through March 31, 2020. Check yesterday’s blog post for a video showing this paper; it’s so pretty!

Today’s card was made using the The So Sentimental Bundle. It has nice big sentiments and coordinating dies to cut the sentiment and have a background layer.

Tips & Instructions
Terracotta Tile Card Base - 5 1/2 x 8 1/2, score at 4 1/4
Whisper White Layer - 5 3/8 x 4 1/8
Woven Threads Designer Series Paper Layer - 5 1/4 x 4, adhere only to the Whisper White Layer
Stamp sentiment using Terracotta Tile Ink on scrap of Whisper White Cardstock and cut with Stitched So Sweetly Label
Cut scrap of Terracotta Tile Cardstock using larger Label and punch each end with Label Me Fancy Punch to create a slit on each end.
Feed piece of ribbon through the slits and adhere the label to layer, wrapping the ends of the ribbon and adhering to the back. Adhere layer to card base
Adhere stamped label over the ribbon using Dimensionals
Add 3 Faceted Dots

On the inside adhere a 1/2 x 5 1/4 strip of the Designer Series Paper along the right side of inside layer. I left it blank so I can write my own note.

Supply List
Note: Woven Heirlooms Designer Series Paper is FREE until March 31, 2020. Use Item #155883. After March 31, 2020, use Item #149497 until it retires

Woven Heirlooms Thinking Of You
I made these beautiful Thinking Of You cards using the Woven Heirlooms Stamp Set and Woven Threads Designer Series Paper.

The Woven Threads Designer Series Paper is a FREE item during Sale-A-Bration with a $50 order. Make sure you use Item #155883 by March 31, 2020 to get this free item.

Watch my video to see how to make these cards.
Tips & Instructions
Pretty Peacock or Terracotta Tile Card Base
Pretty Posy or Seaside Spray Layer - 5 1/4 x 4
Woven Heirlooms Designer Series Paper - 2 pieces 5 1/8 x 3 7/8
On one piece of the Designer Series Paper mark the middle of 5 1/8 side with a pencil (at 2 9/16)
Using Paper Trimmer cut one point to the pencil mark and then cut the other point to pencil mark as shown in the video
Adhere layers aligning to left side and then adhere centered on the card base
Whisper White strip - 1 x 2 3/4, stamp sentiment with either Pretty Peacock or Terracotta Tile Ink
Adhere sentiment strip to 1 1/8 x 2 13/16 piece of Purple Posey or Seaside Spray Cardstock
Adhere sentiment to card using Dimensionals
Add Faceted Gems

I made one as a sympathy card and one a well wishing card. I love how both came out.

Supply List
Note: Woven Heirlooms Designer Series Paper is FREE until March 31, 2020. Use Item #155883. After March 31, 2020, use Item #149497 until it retires.

Dog Birthday Card!
Here’s a Birthday Card for a special friend! Lots of people are celebrating their pet’s birthday and I made this card to send to a friend’s dog. Isn’t it fun?

I used the Happy Tails Stamp Set and the coordinating Dog Builder Punch along with the Birthday Bonanza Designer Series Paper.


Tips & Instructions
Bermuda Bay Card Base - 5 1/2 x 8 1/2, score at 4 1/4
Birthday Bonanza Designer Series Paper - 5 1/4 x 4, adhere to card base
Daffodil Delight Tag Layer - 2 x 4 1/2 after punched, punch with Tag Topper and Banner Triple Punch
Stamp dog and spots on Whisper White Cardstock with Soft Suede Ink and collar with Bermuda Bay Ink and punch
Stamp heart on Whisper White Cardstock with Real Red Ink and punch
Cut hat from Birthday Bonanza Designer Series Paper (I cut one from one of the Toucan Images)
Adhere heart to dog and adhere dog and hat to tag using Dimensionals, adhere Pom Pom to hat (I used Multipurpose Liquid Glue, let it set for a few minutes)
Stamp paw prints on tag with Soft Suede Ink
Stamp sentiment (from Timeless Tulips) with Bermuda Bay Ink and punch with Classic Label Punch and adhere with Mini Dimensionals
Feed Ribbon through topper and tie with piece of Bakers Twine
Adhere tag layer to card

On the inside stamp sentiment with Bermuda Bay Ink and some paw prints along the bottom with Soft Suede Ink.

Supply List

Sale-A-Bration 3rd Release
Stampin' Up! has launched its 3rd Release of Sale-A-Bration Items. You can earn these product for FREE with a qualifying order through March 31, 2020.

Below are the additional products that were added to Sale-A-Bration. Please note that you need to use the item numbers listed below in order for the products to be redeemed as Sale-A-Bration items. These products have different item numbers in the catalog which don't register as part of Sale-A-Bration.

Don't forget, the best deal going on right now is to purchase the Starter Kit. The cost is $99 and you get:
$125 worth of product, your choice
Mini Paper Cutter
6 x 6 Designer Series Paper sample
Your Choice of Stamp Set (Host stamp sets and Sale-A-Bration stamp sets not included)
Free Shipping
20% discount on future orders
Access to team FaceBook pages, challenges, wonderful crafting community
What's stopping you? You can become a Stampin' Up! Demonstrator and just enjoy the discount and community or make it a business. No pressure, just lots of fun!!!

March Paper Pumpkin
The March Paper Pumpkin Kit is so fun! It’s the seven year anniversary so Stampin’ Up! included a second stamp set in this month’s kit.

I did a Facebook Live to show you the March Kit. You get all you need to create 12 cards with matching envelopes. If you have your kit, follow along.
Each month you will receive an orange box filled with all the stamps, ink, and paper you need to create a fun project, without any stress. Everything is precut and ready to go so you can skip to the fun part of crafting! You’ll always have cards and cute gifts on hand for every occasion. Your first kit includes a free gift — a clear stamping block. You’ll also build a collection of stamps and ink to use on other projects. There’s no pressure—you can cancel or suspend at any time. Subscribe by the 10th of the month to get started!
These are the 3 designs for this months kit. You can make 4 of each design.


I added the raindrops after the video. They really add so much to the card.

Click the Subscribe Here button below for a month-to-month subscription or click on the icons to purchase a pre-paid subscription.
PLEASE let me know if you subscribed so I can make sure the subscription is under me.

Sketch Saturday - Honey Bee
When I saw this week’s sketch I immediately thought of the Honey Bee Stamp Set. This was so easy to make, I just stamped the smaller bees across the card and added the “queen” bee as the focal.

Here’s the sketch from the CAS(E) This Sketch Challenge from Splitcoaststampers. It was an easy one this week.

The Honey Bee Bundle has some really cool images and nice sentiments and there are coordinating dies you can use. Unfortunately this is not orderable as a bundle until April 13 because it has been so popular. You can get the Stamp Set now if you want.

Tips & Instructions
Seaside Spray Card Base - 4 1/4 x 11, score at 5 1/2 (top folding)
Basic Black Layer - 4 x 5 1/4
Whisper White Layer - 3 7/8 x 5 1/8
Stamp small bee images across bottom (I left a small space between the first two) with Black Memento Ink
Stamp larger bee image on scrap of Whisper White with Black Memento Ink and cut with coordinating die
Color small bee stripes with Light Daffodil Delight Stampin’ Blends Marker
Color large bee stripes with Dark Daffodil Delight and wings with Light Seaside Spray Stampin’ Blends Markers
Stamp sentiment with Black Memento Ink
Adhere large bee to card with Dimensionals
Add Wink Of Stella to large bee’s wings and yellow stripes
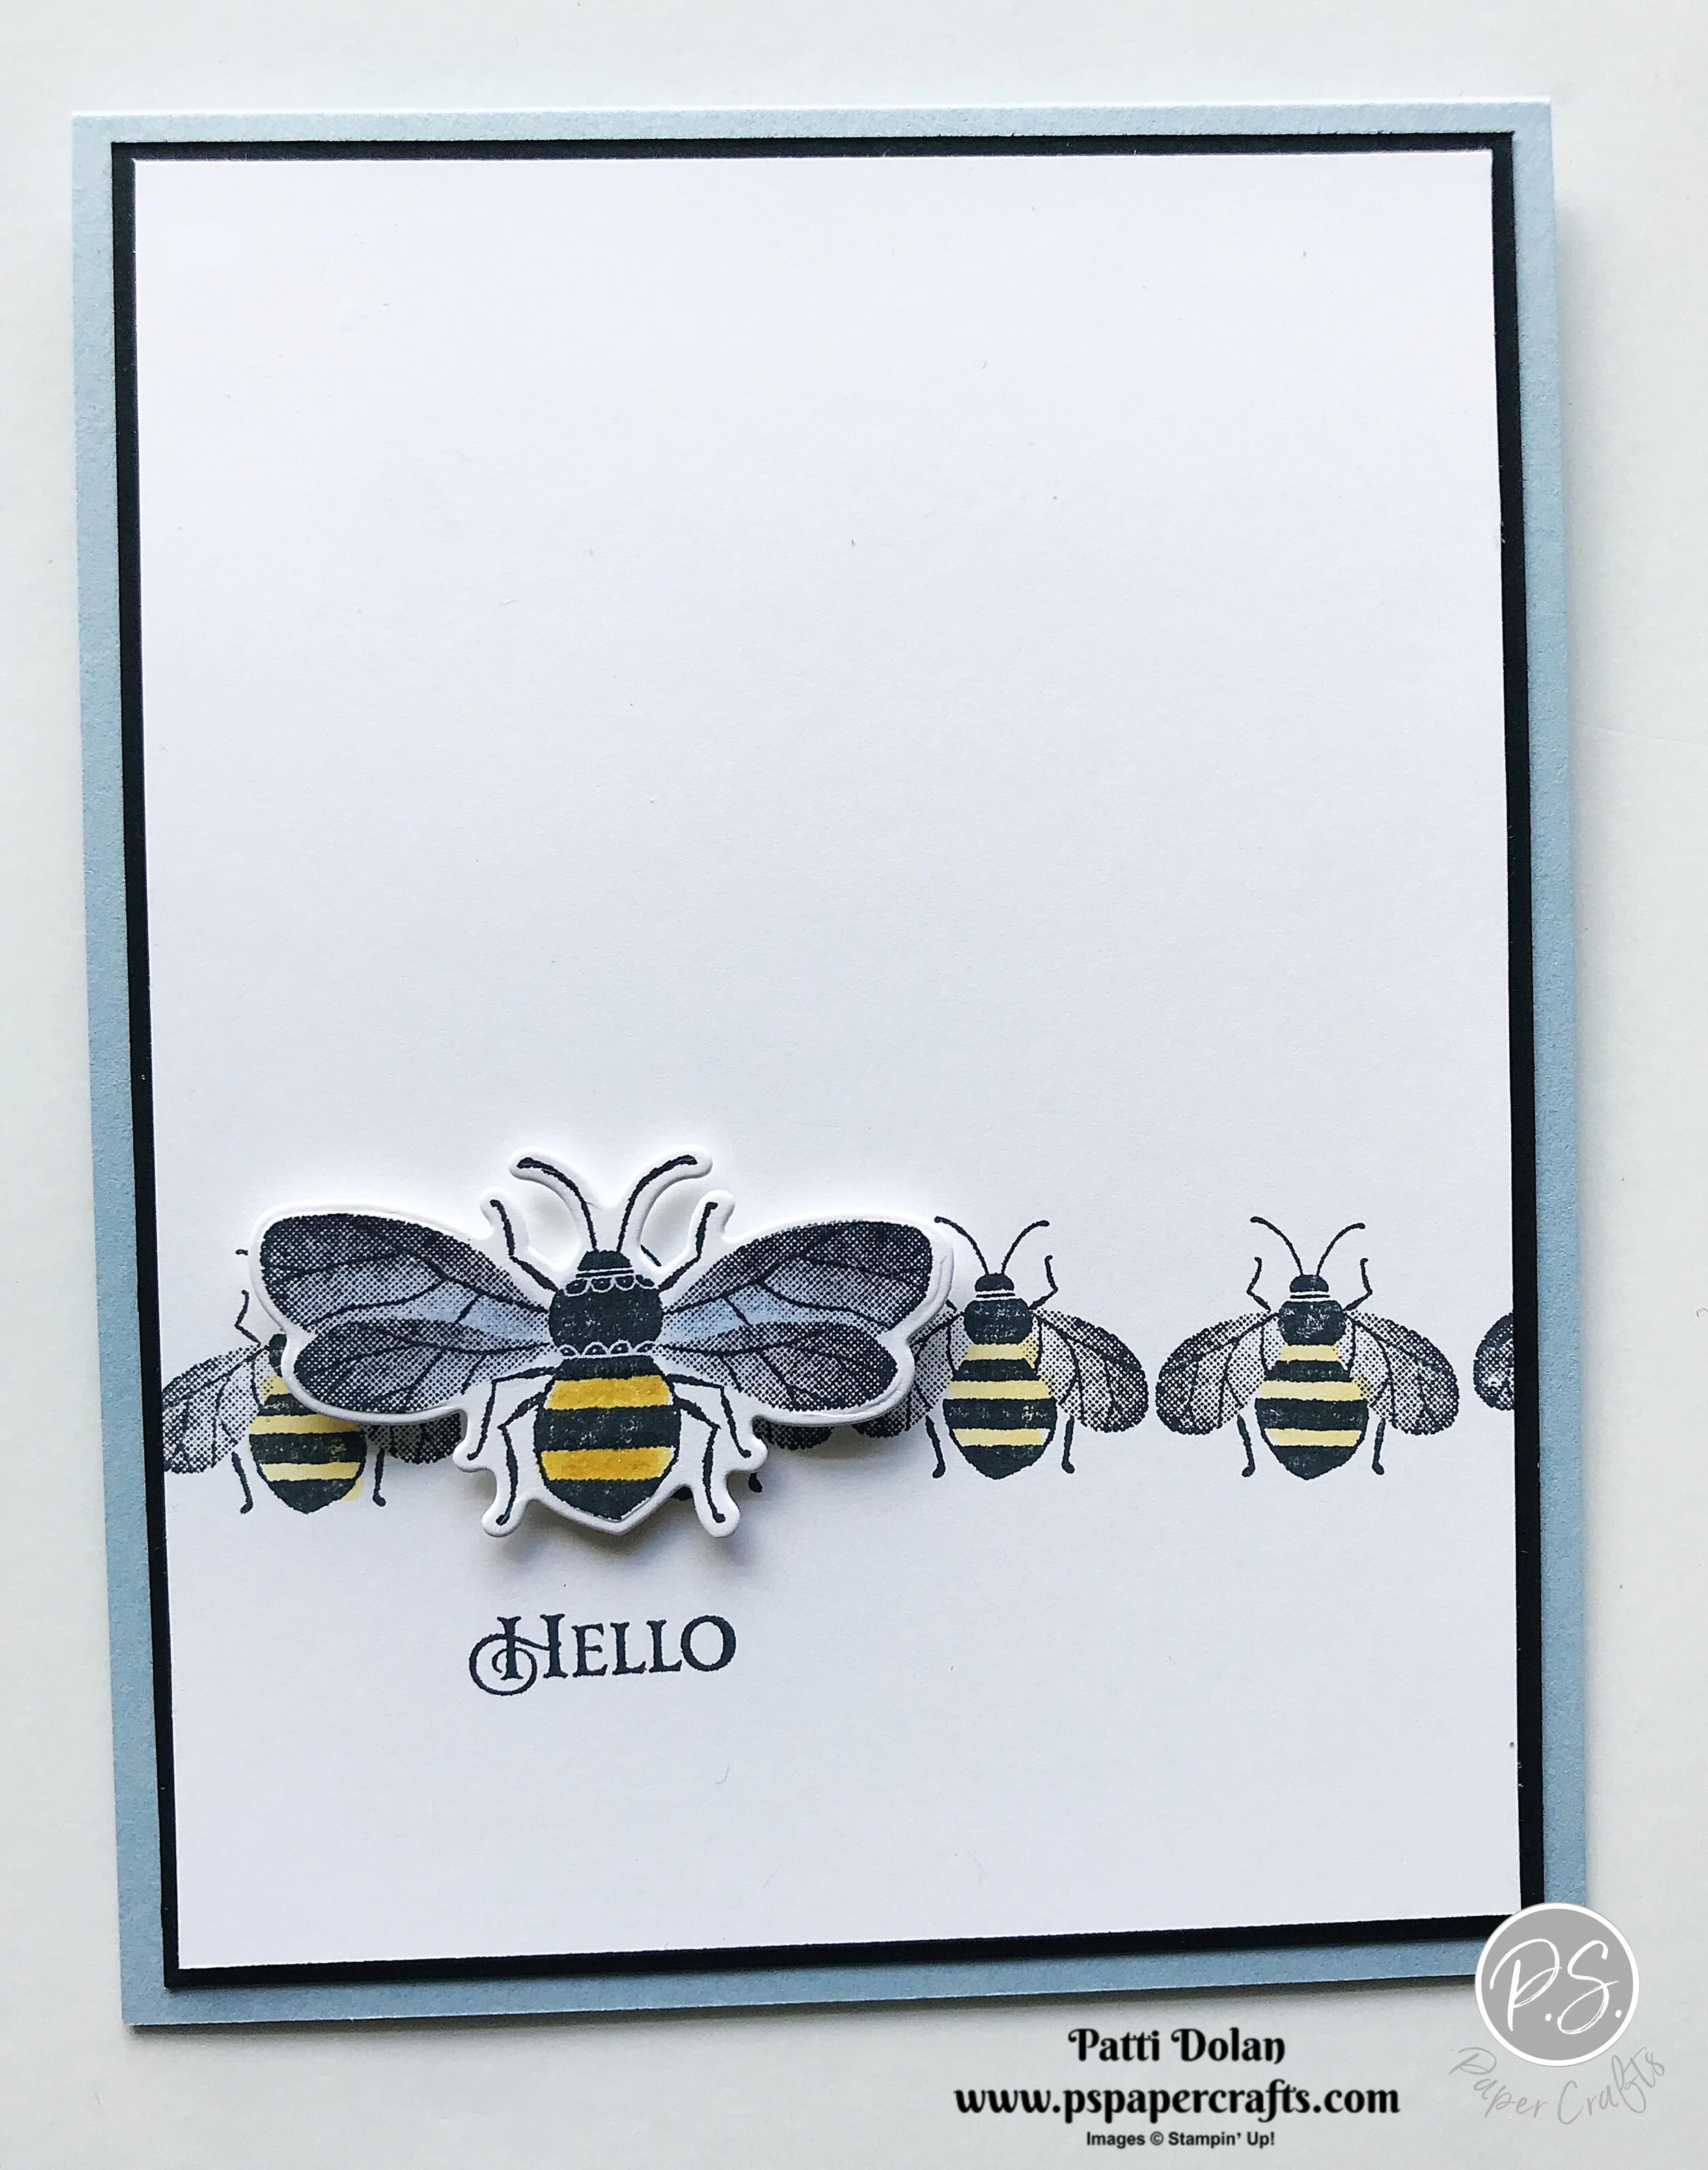
Stamp sentiment and flowers on the inside and color the flowers with a Light Seaside Spray Stampin’ Blends Marker.

Supply List

Timeless Tropical Masculine Birthday Card
I am loving the way the Coastal Weave 3D Embossing Folder embosses Whisper White Cardstock. It is so beautiful!

In the video, I’ll show you how I used the tops of the the pineapple to create this nice leafy embellishment. I used a Sponge Dauber to add some color to the tips.
Tips & Instructions
Pretty Peacock Card Base - 4 1/4 x 11, score at 5 1/2
Whisper White Layer - 5 1/4 x 4, emboss with Coastal Weave 3D Embossing Folder (Be sure to use the 3D Embossing Folder Plate) and adhere to card base
Cut largest oval from Pretty Peacock Cardstock and 2nd largest oval from Whisper White Cardstock using the Stitched Shapes Dies, stamp sentiment with Pretty Peacock Ink and adhere ovals
Cut 2 pineapple tops from Old Olive Cardstock and ink the edges of the leaves with a Sponge Dauber and Pretty Peacock Ink
Cut small leaves with Pretty Peacock and Old Olive Cardstock
Assemble leaves behind sentiment oval and then adhere oval with Dimensionals
Stamp flower with Black Memento Ink and color with Daffodil Delight Stampin’ Blends, cut and adhere to card
Add Noble Peacock Rhinestones
On the inside, stamp sentiment with Pretty Peacock Ink. Color trunk of palm trees with Soft Suede and tree top with Old Olive Stampin’ Write Markers directly on the stamp. Using Dauber, add some Pretty Peacock around the edges of the tree top. Breath on your stamp and then stamp.

Supply List

Elegant Wedding Card using the Parisian Flourish Embossing Folder
I love how the embossed vellum layer came out and how soft and pretty the card is. Perfect for a wedding card.

I started with a small piece of the Parisian Blossoms Specialty Designer Series Paper and the Embossing Folder and started to build my card.

Tips & Instructions
Pool Party Card Base - 5 1/2 x 8 1/2, score at 4 1/4
Vellum Layer - 5 1/4 x 4, emboss with Parisian Flourish 3D Embossing Folder (be sure to use the 3D Embossing Folder Plate)
Cut piece of Parisian Blossoms Designer Series Paper using 3rd largest Stitched Nested Label Die
Stamp sentiment with Black Memento Ink on Whisper White scrap and cut with smallest Stitched Nested Label Die
Cut piece of Pool Party with 2nd smallest Stitched Nested Label Die and adhere to sentiment layer
Adhere sentiment to Designer Series Paper using Dimensionals
Adhere to Vellum layer and then to card base putting adhesive only behind Designer Series Paper to hide it as it shows through on Vellum
Add Pearls

On the inside, stamp sentiment and cherry branch image with Black Memento Ink. Color flowers with Light & Dark Pool Party Stampin’ Blends and leaves with Light Mossy Meadow Stampin’ Blends.

Supply List

Spring is in the Air with Timeless Tulips
These tulips remind me of spring and the Highland Heather color just makes them that much more “springy”!
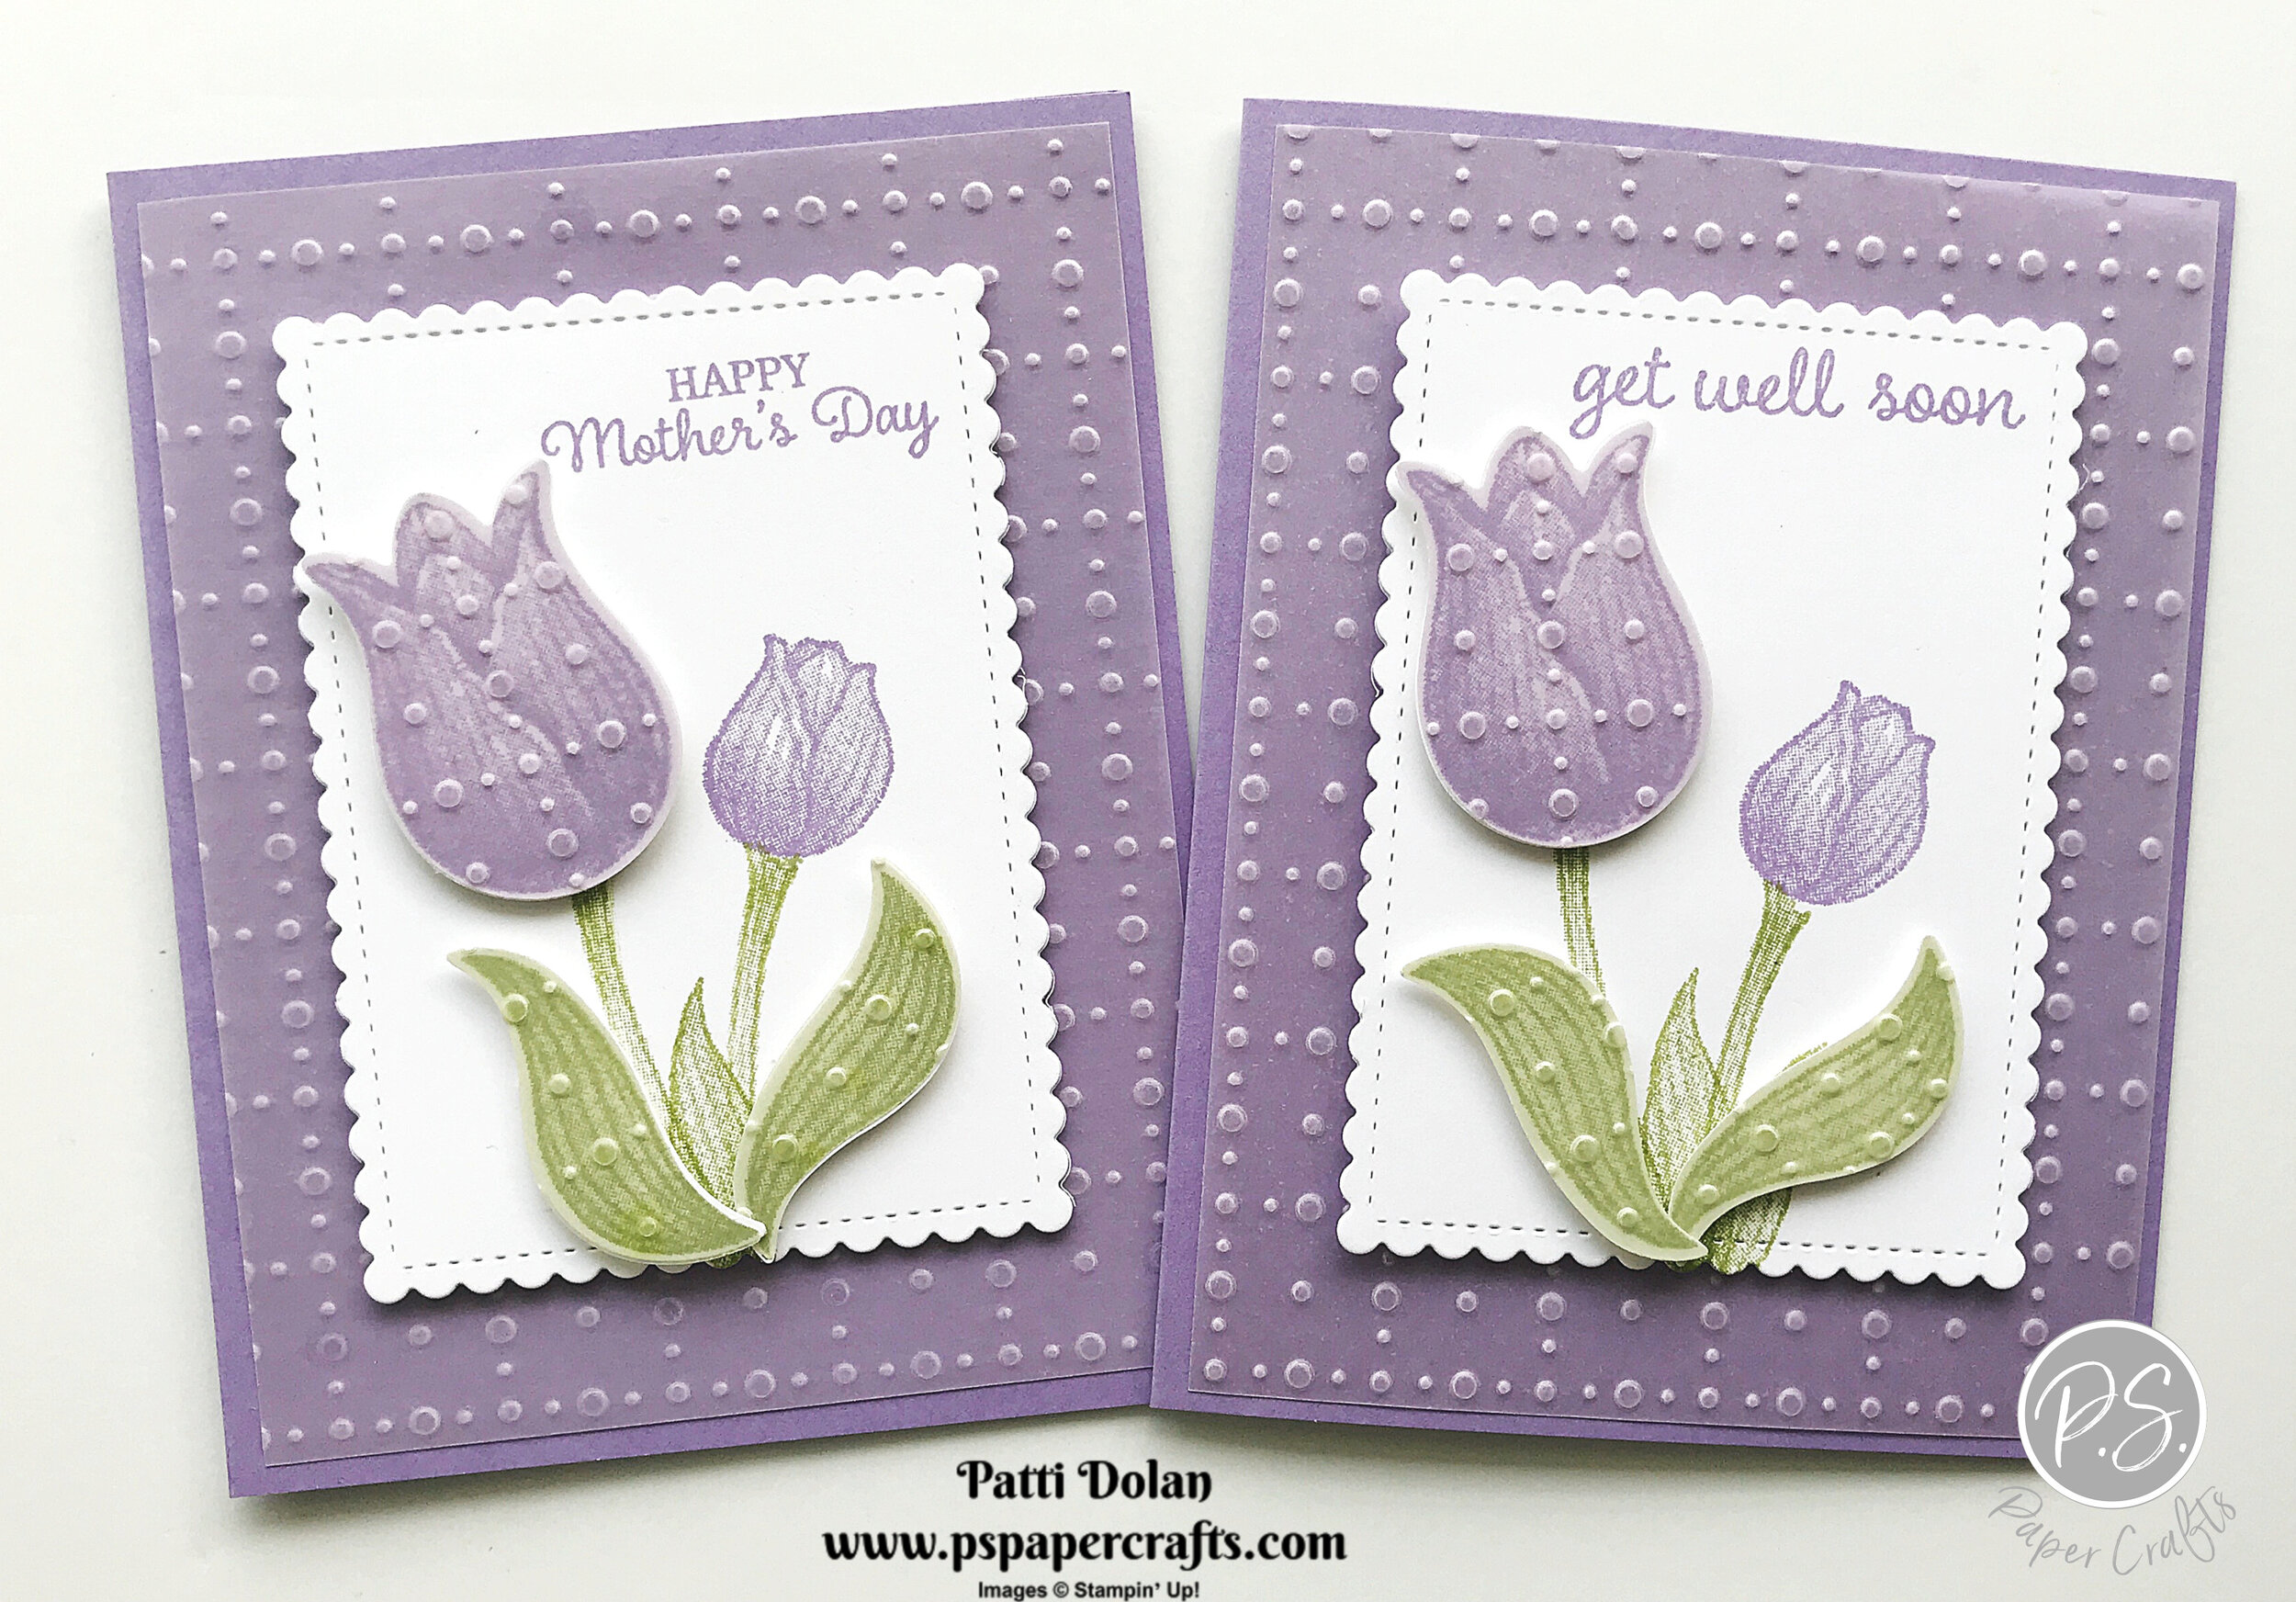
In the video below, I’ll show you how to make these cards. The So Very Vellum Cardstock has a great embossed look and adds some fun texture to the tulip and leaves.
Tips & Instructions
Highland Heather Card Base - 5 1/2 x 8 1/2, score at 4 1/4
So Very Vellum Layer - 5 1/4 x 4
Cut Whisper White layer using the largest rectangle from Stitched So Sweetly Dies
Stamp largest tulip with Highland Heather and two leaves with Pear Pizzazz Inks and punch with coordinating Tulip Builder Punch
Punch tulip and leaves from Vellum and adhere to punched pieces
Stamp sentiment, stems and leaves on rectangle and then adhere punched items using Dimensionals
Adhere rectangle to vellum layer and adhere vellum layer to card base

This is a great card for Mother’s Day, Get Well Soon, Easter or Birthdays!

I didn’t add a sentiment but stamped some tulips on the inside. I’ll write my own little note.

Supply List

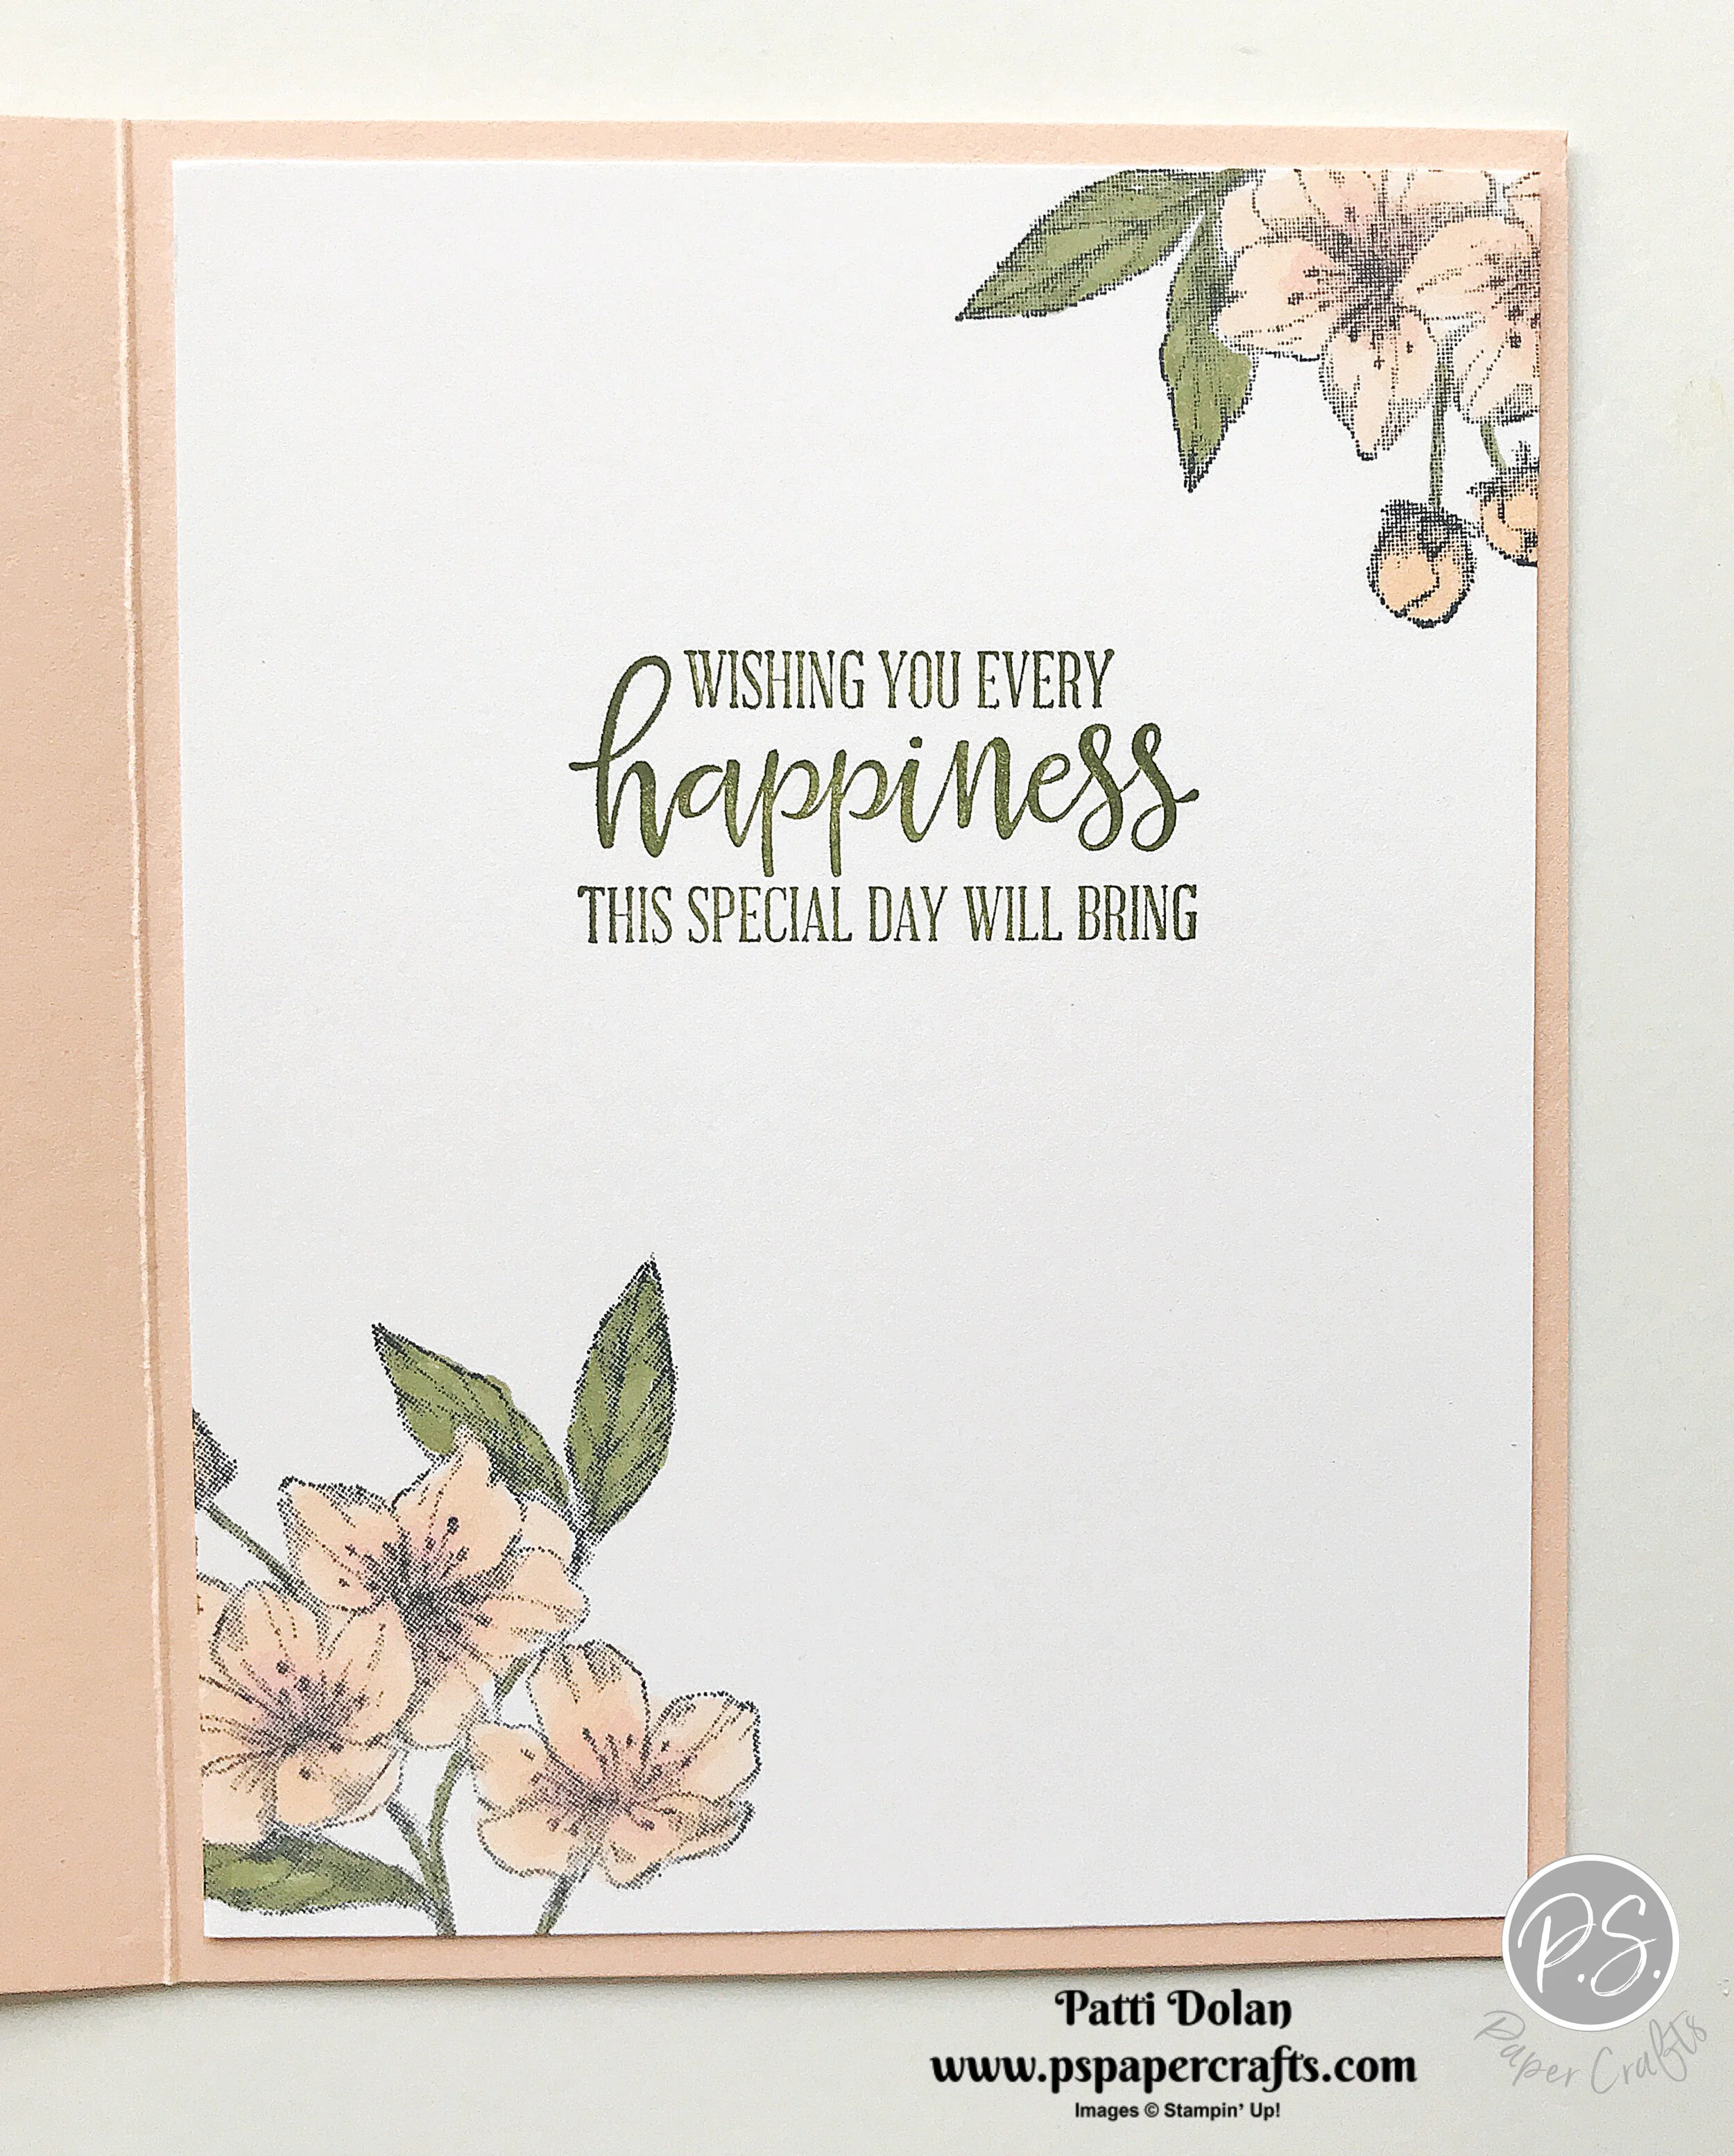
Gorgeous Forever Blossoms Birthday Card
The Forever Blossoms Images are beautiful and the coordinating Cherry Blossom Dies have lots of flowers you can cut out.
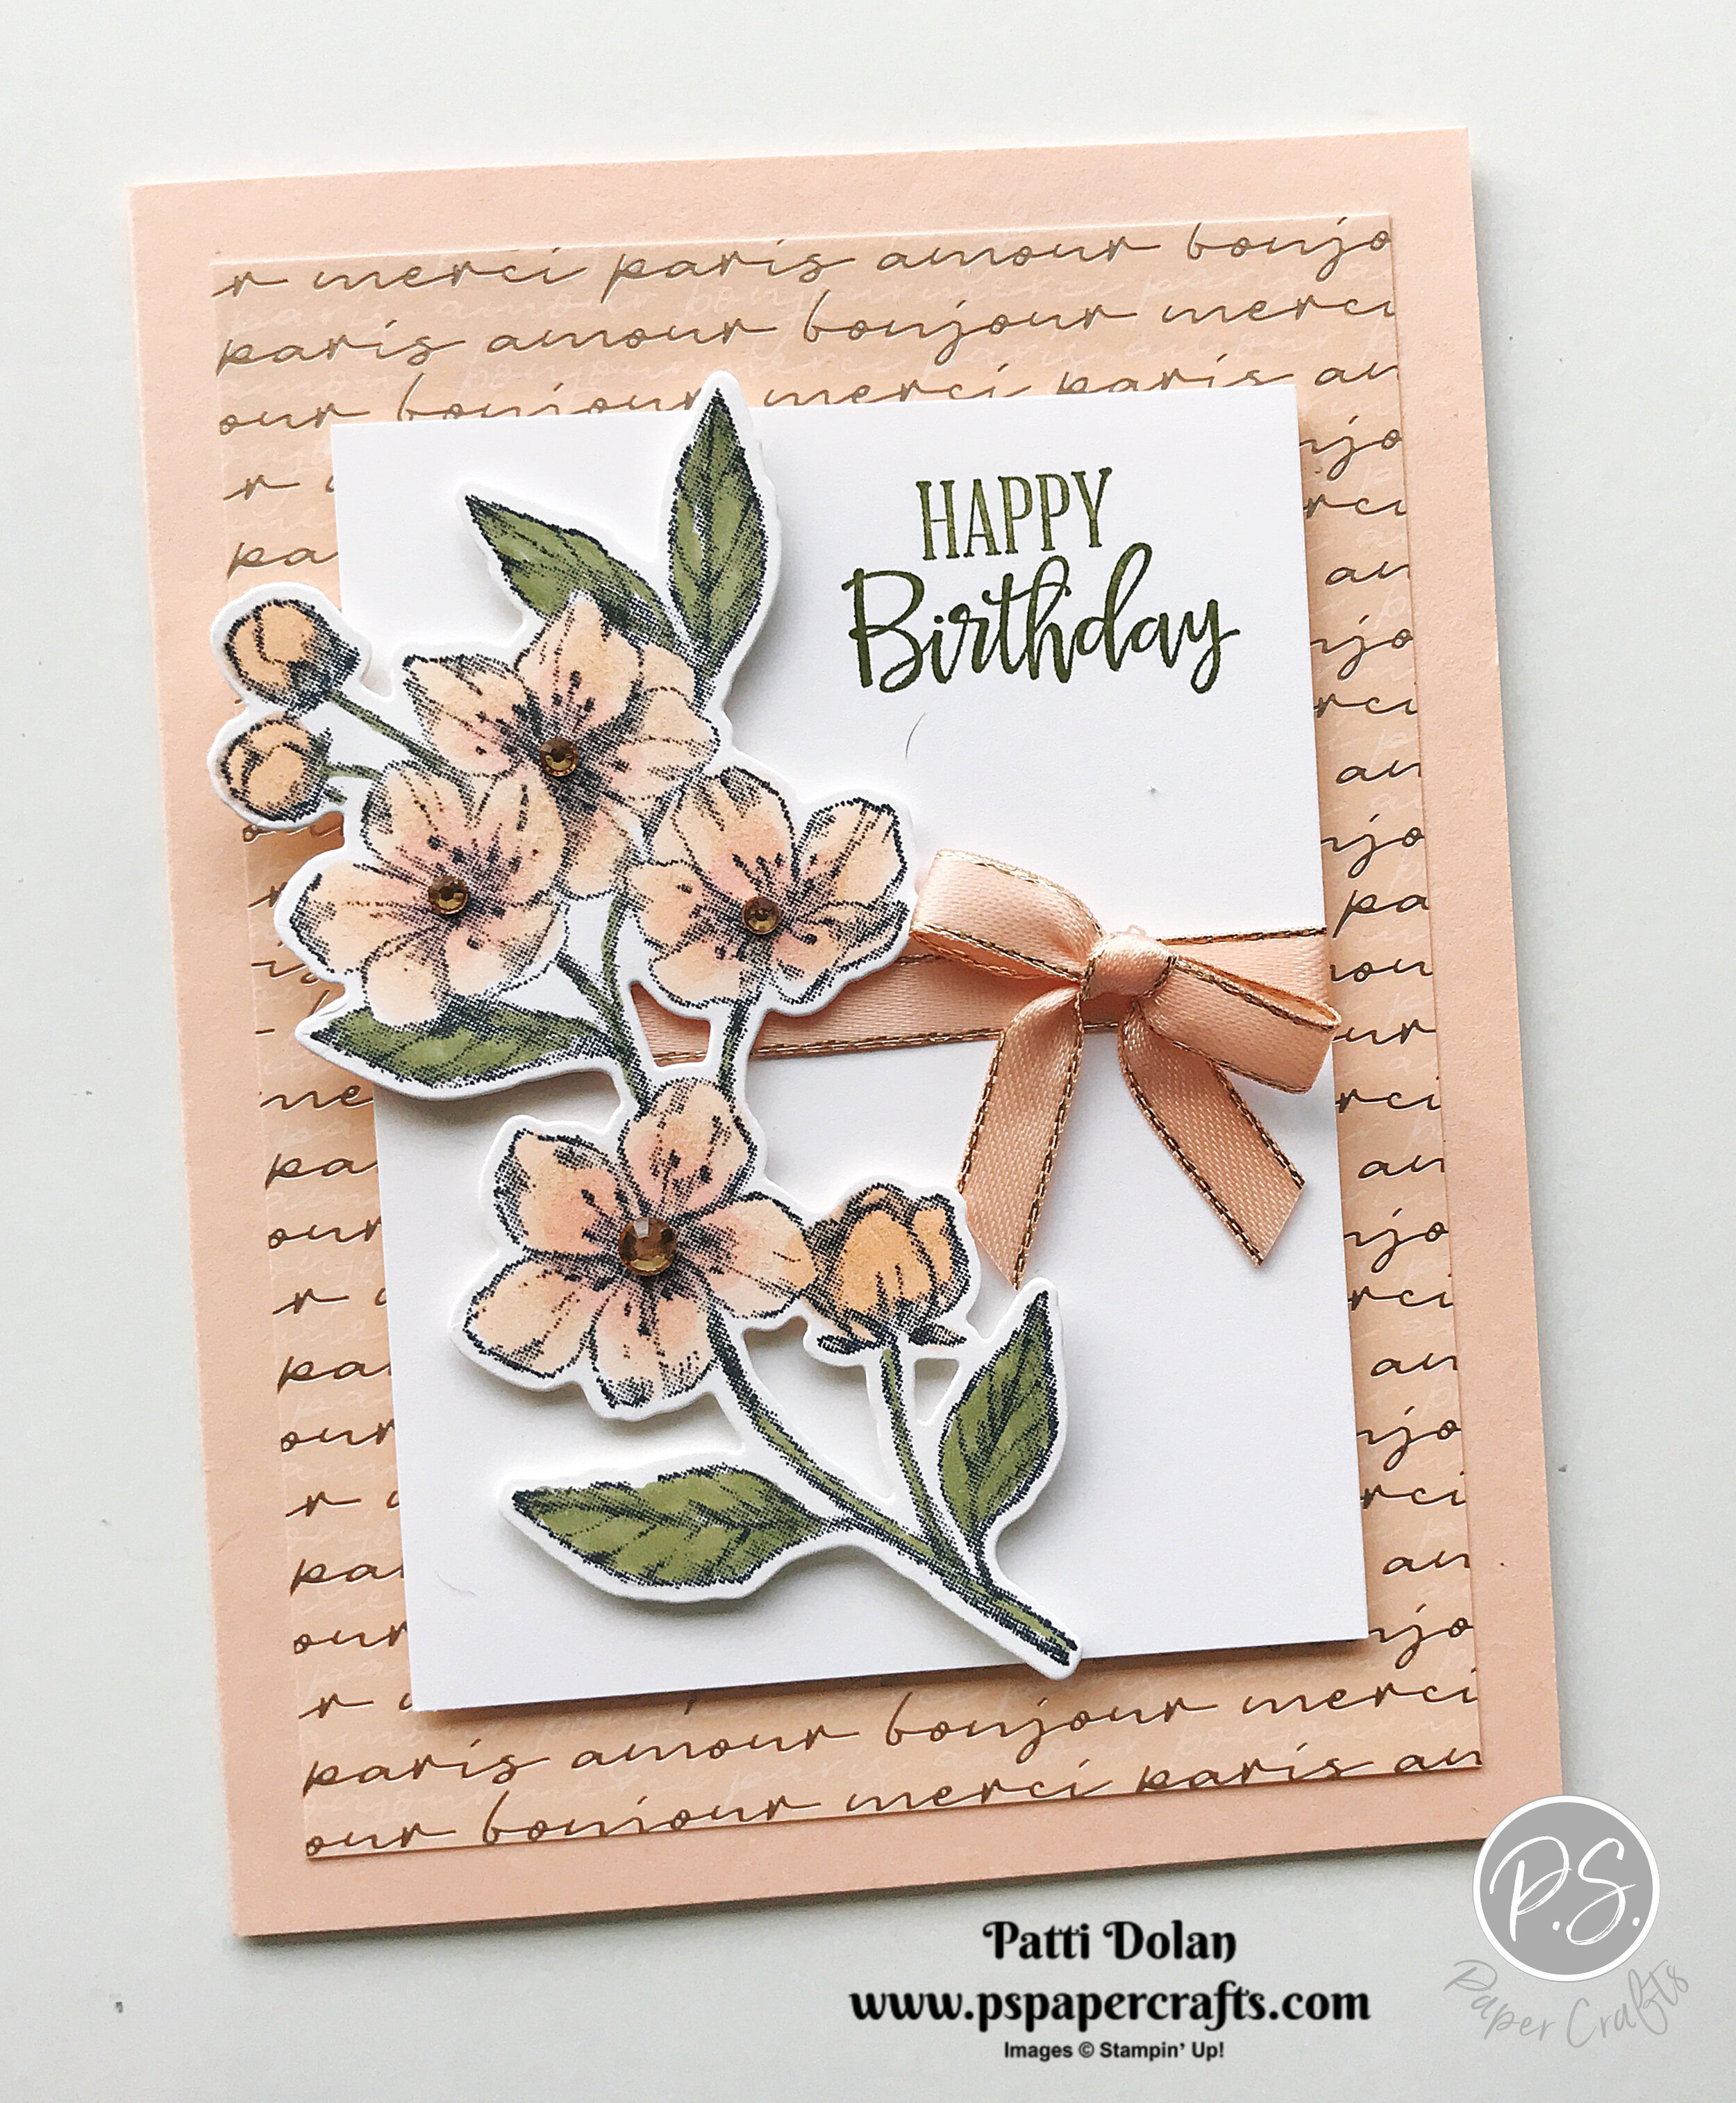
The Parisian Blossoms Specialty Designer Series Paper has pretty champagne foil accents that add just a little shimmer to your card.

Tips & Instructions
Petal Pink Card Base - 5 1/2 x 8 1/2, score at 4 1/4
Parisian Blossoms Specialty Designer Series Paper Layer - 3 3/4 x 5, adhere to card base
Whisper White Layer - 3 x 4, stamp sentiment in top corner with Mossy Meadow Ink
Stamp cherry blossom branch image on Whisper White Cardstock with Black Memento Ink and cut with coordinating Cherry Blossom Die
Color leaves with Light Mossy Meadow Stampin’ Blends Marker and flowers with Dark Petal Pink Stampin’ Blends Marker, coloring the buds multiple times to get a darker shade. Color lightly the center of the flowers with Light Flirty Flamingo Stampin’ Blends Marker and then blend with the Petal Pink Marker.
Wrap Petal Pink Metallic-Edge Ribbon around white layer and adhere to back
Adhere white layer to card using Dimensionals
Adhere branch with Dimensionals
Tie bow and adhere with Mini Glue Dot
Add Champagne Rhinestones to center of flower

On the inside stamp sentiment with Mossy Meadow Ink. Stamp portion of cherry blossom branch at top and bottom corner and color with Stampin’ Blends.
Supply List

Sketch Saturday - Pleased As Punch
For today’s card sketch, I used the Pleased As Punch Designer Series Paper. It’s so bright and cheerful, I just love it!

Here’s the sketch I used. It’s another CAS(E) This Sketch from Splitcoastampers.

The Pleased As Punch Paper has flowers on one side and stripes on the other so I was able to use the same sheet for this card. There’s a Small Bloom Punch that coordinates with it and is FREE during Sale-A-Bration with a qualifying order.

Tips & Instructions
Pool Party Card Base - 5 1/2 x 8 1/2, score at 4 1/4
Whisper White Layer - 5 1/4 x 4
Pleased As Punch Designer Series Paper Strip - 5 1/2 x 1
Highland Heather Strip - 5 1/2 x 1 1/4
Adhere layers as shown below
Punch 3 flowers using Small Bloom Punch and arrange on card for placement of the sentiment
Stamp sentiment (Music From The Heart Stamp Set) with Highland Heather Ink
Bend flower petals a little bit to give them some dimension and adhere to card
Add Rhinestones to the center of the flowers

On the inside, adhere more flowers. Add a sentiment if you want.

Supply List

Cute Gift Card Purses
Aren’t these so cute? You can put a gift card or candy or jewelry in them and give them to someone special.
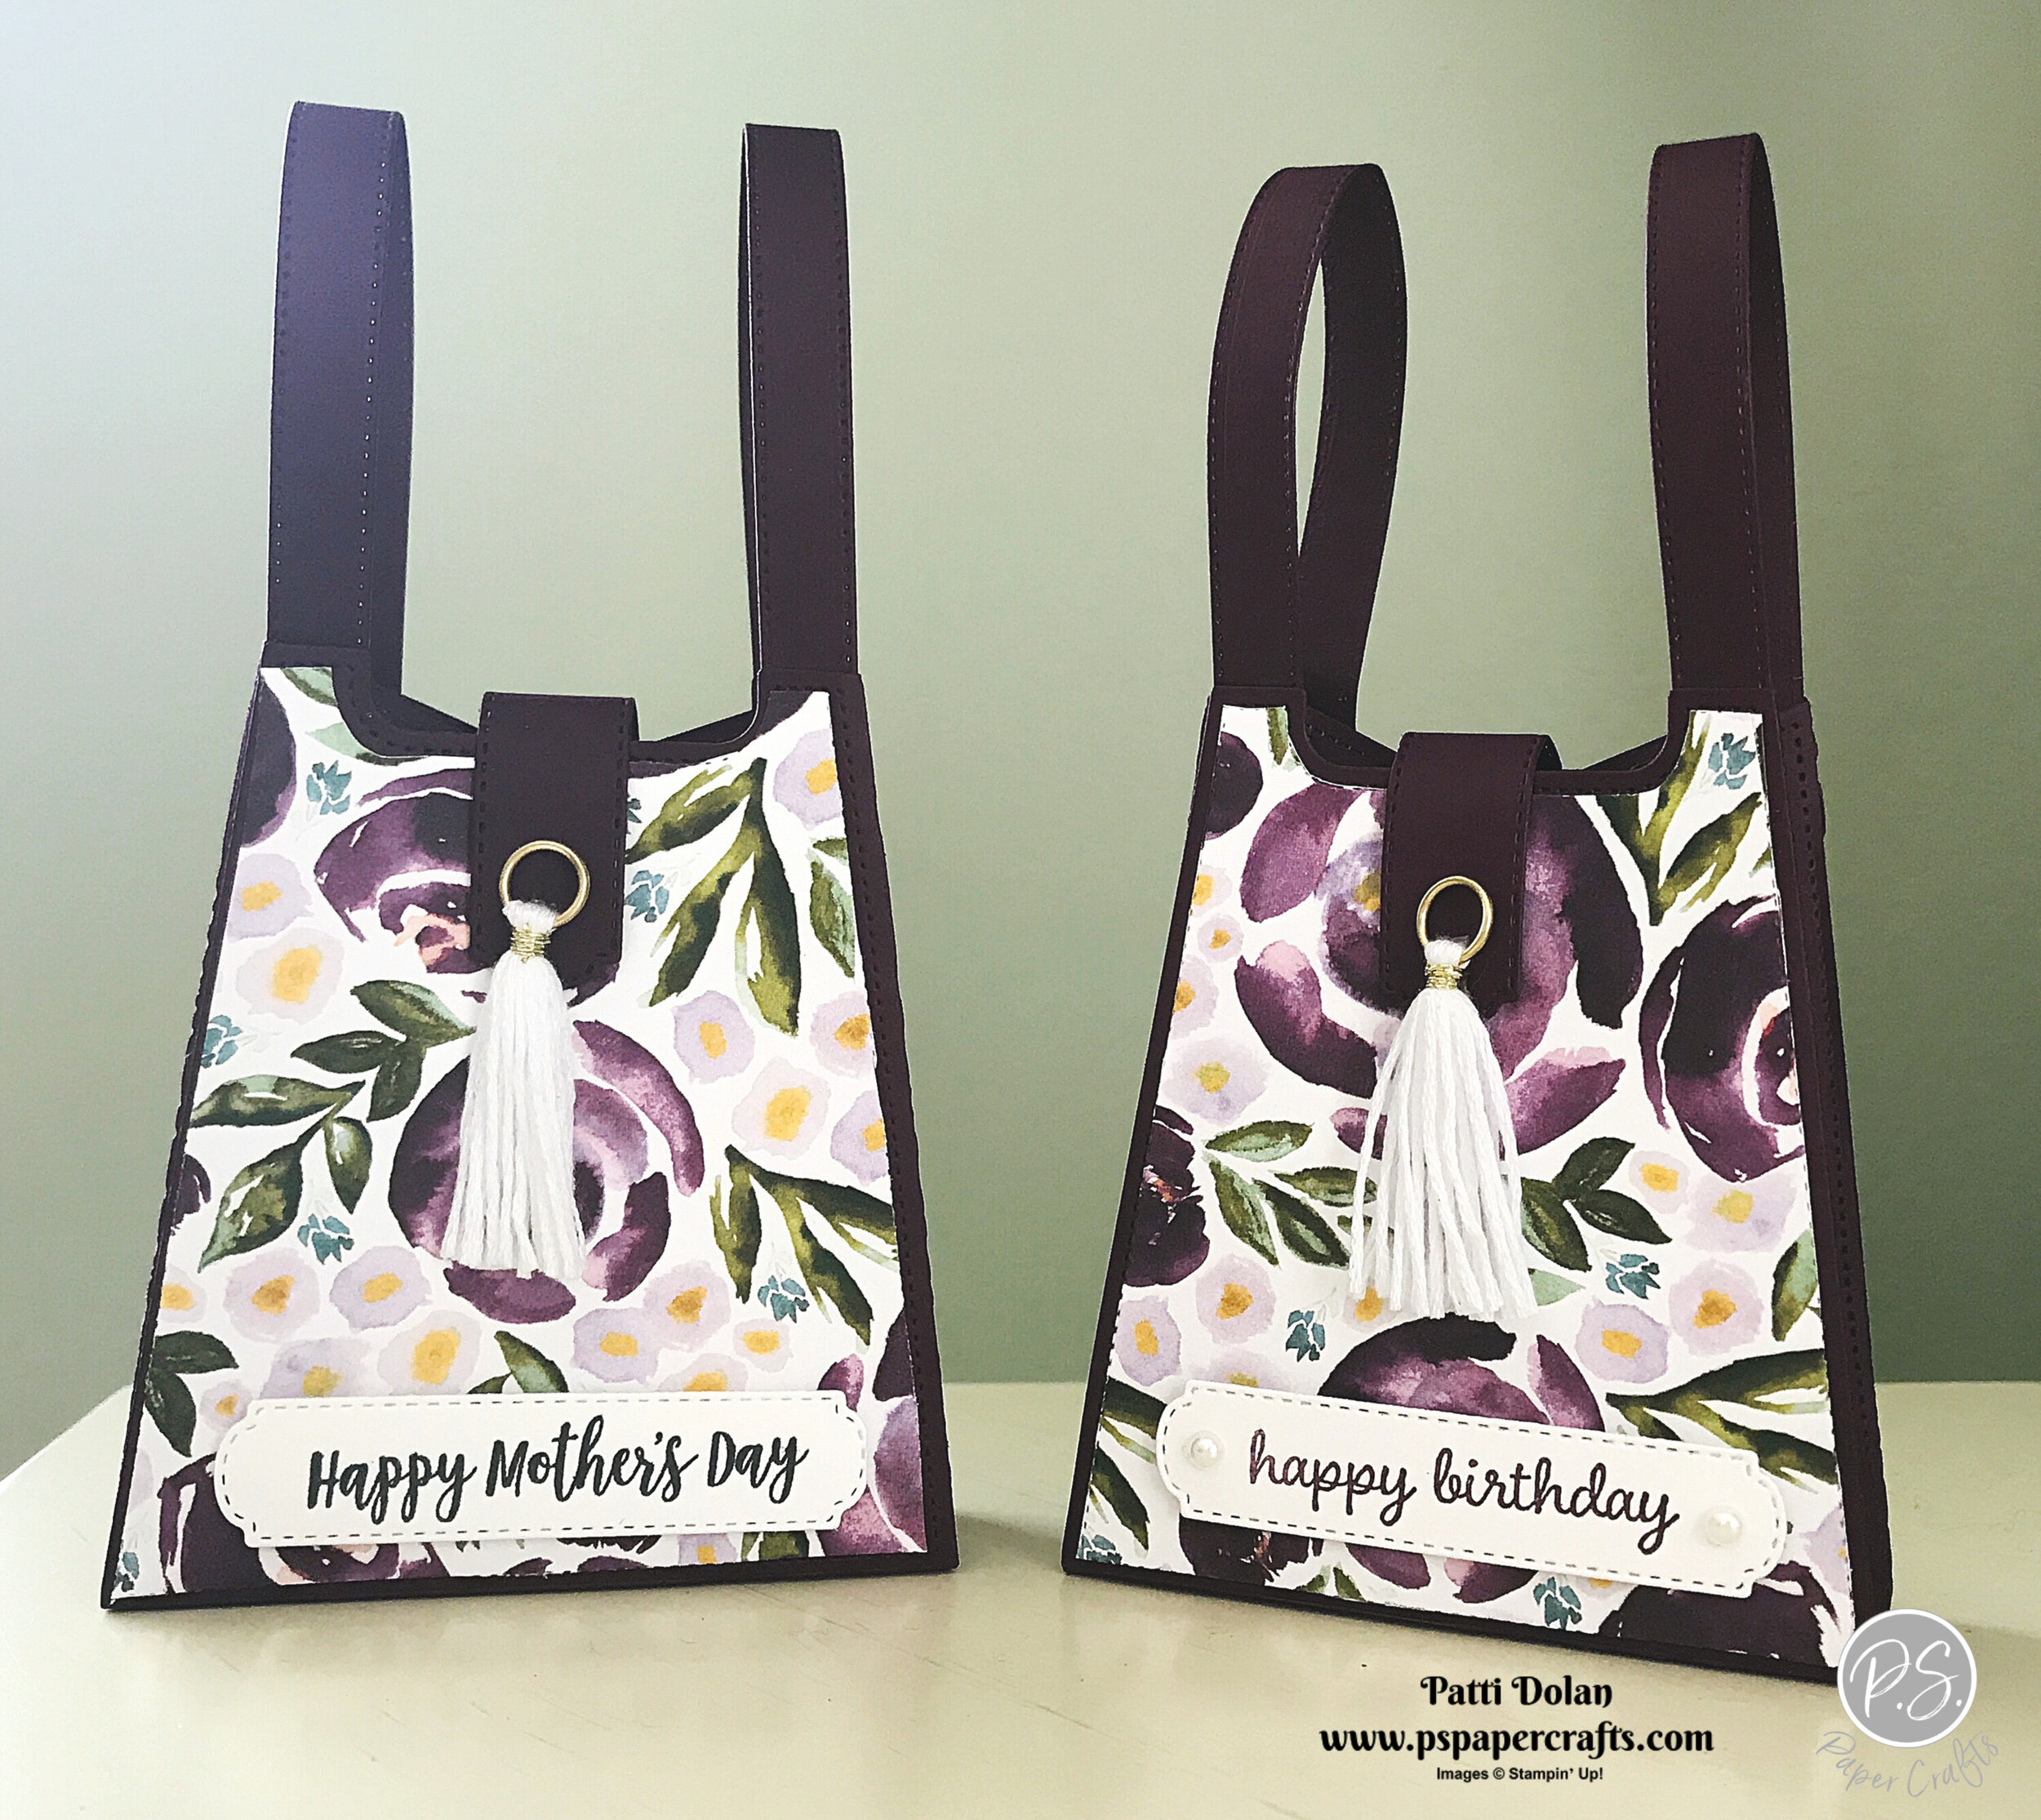
I used some of the products from the Best Dressed Suite. I’ll walk you through these products and show you how to make these purses in the video below.
Tips & Instructions
Sheet of Blackberry Bliss Cardstock - cut 2 purse pieces, 2 straps, 1 closure piece
Sheet of Best Dressed Designer Series Paper - cut face of purse, then fussy cut along the stitched lines
Whisper White Scrap - cut sentiment label, stamp with Blackberry Bliss Ink
Assemble purse and adhere Designer Series Paper to front
Adhere handles front to back or one piece front and one piece back
Using small magnets, adhere closure strap, attaching with adhesive in back
Adhere tassel using Mini Glue Dots
Adhere sentiment using Dimensionals and add Pearls if you want

The happy birthday sentiment is from the Timeless Tulips Stamp Set and the Happy Mother’s Day sentiment is from the Dressed To Impress Stamp Set which can be bundled with the All Dressed Up Dies to save 10%

Supply List

you're the music in my heart!!!
What a great sentiment! Wouldn’t you love to receive a card like this!!!

I love this Music From The Heart Stamp Set. The images and sentiments are perfect for any music lover.
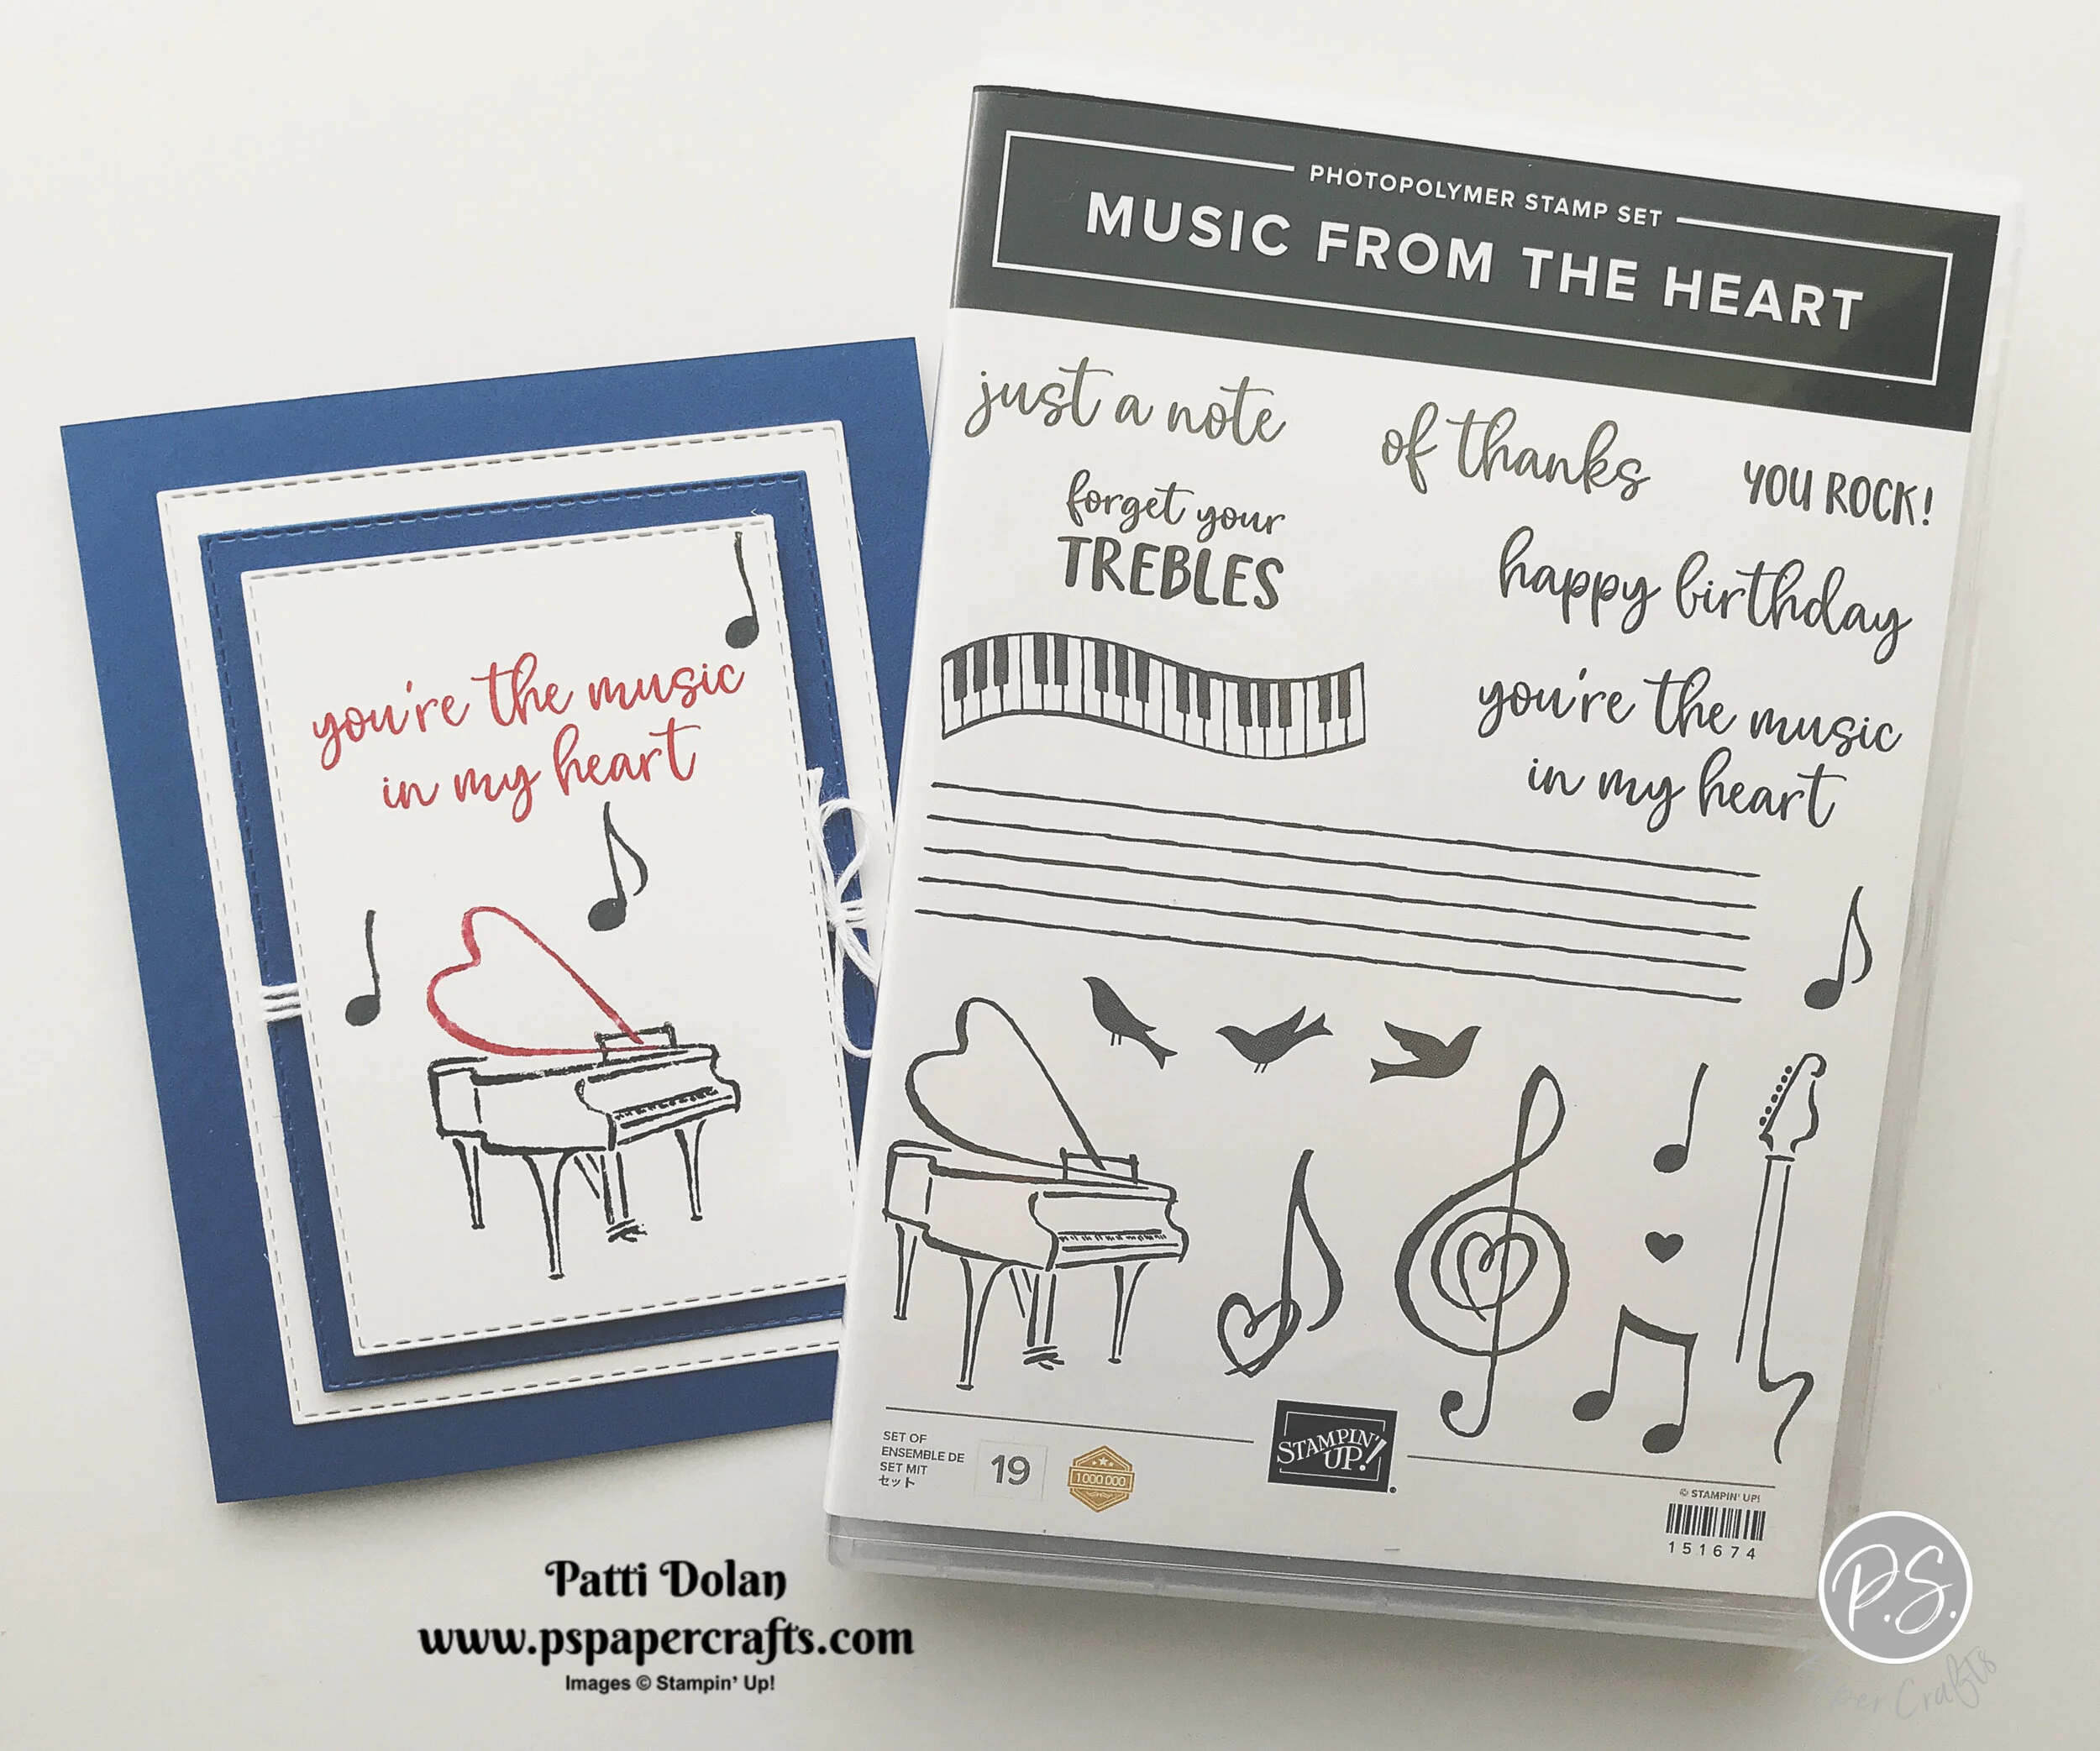
Tips & Instructions
Blueberry Bushel Card Base - 5 1/2 x 8 1/2, score at 4 1/4
Cut 2 rectangles from Whisper White Cardstock and 1 rectangle from Blueberry Bushel Cardstock using the Stitched Rectangle Dies
On the piano stamp, color the piano with a Basic Black Stampin’ Write Marker and the heart with a Lovely Lipstick Stampin’ Write Marker and stamp the image. (Note: do not color your stamp with Stampin’ Blends which are alcohol based markers)
Stamp sentiment with Lovely Lipstick Ink
Stamp Notes with Black Memento Ink
Tie Whisper White Bakers Twine around Blue stitched layer 3 times and tie a bow
Assemble layers, using DImensionals for the top layer

I wasn’t sure who I am giving this card to and for what occasion so I didn’t stamp a sentiment on the inside. I stamped the 3 notes with Black Ink and colored the hearts with a Lovely Lipstick Stampin’ Write Marker.

Supply List

Happy St. Patrick's Day - Make a Shamrock Background Paper
I wanted to make a St. Patrick’s card but didn’t have any shamrock stamps or dies. I had an idea!!! I used 3 hearts together to make these shamrocks. They came out great!
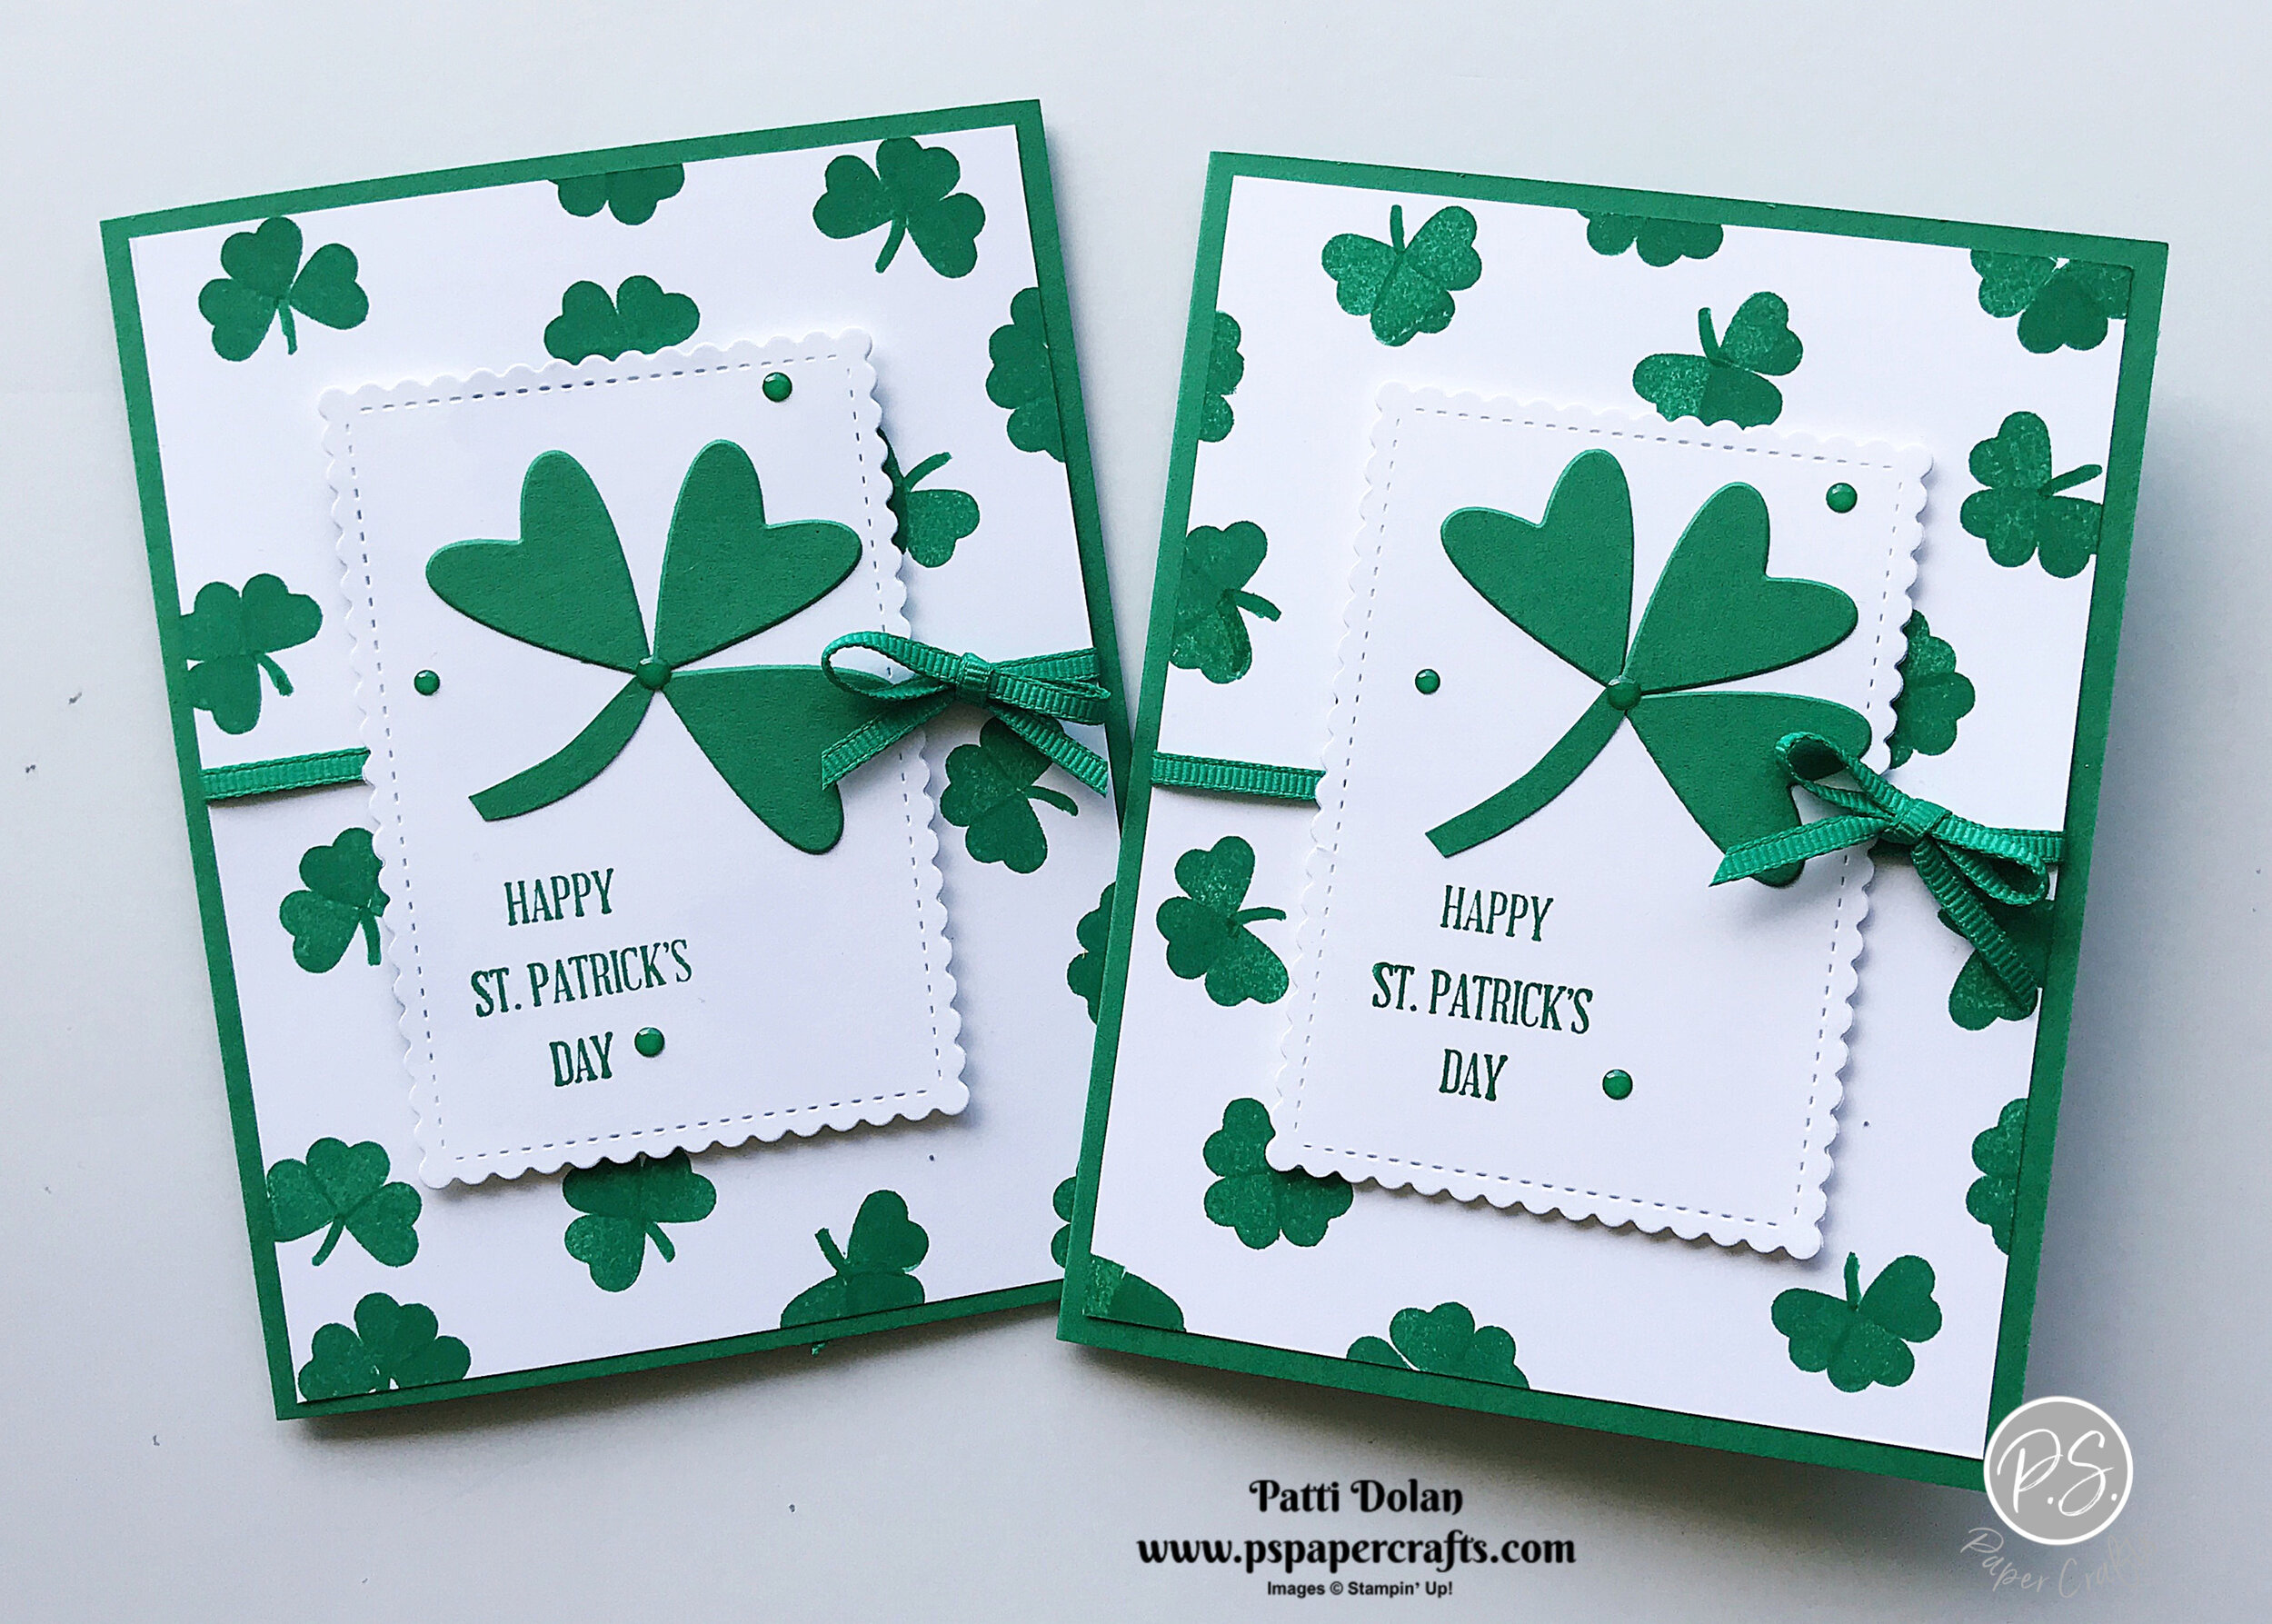
In the video I’ll show you how to make the shamrock background paper and the large shamrock using hearts.
Call Me Clover was the perfect green for this card.

Tips & Instructions
Call Me Clover Card Base - 5 1/2 x 8 1/2, score at 4 1/4
Whisper White Layer - 5 1/4 x 4
Stamp clusters of 3 hearts with Call Me Clover Ink randomly on Whisper White Layer, then draw in a stem using a Call Me Clover Stampin’ Write Marker.
Cut 2nd largest scalloped circle from Stitched So Sweetly Dies from Whisper White Cardstock
Cut 3 hearts from Stitched Be Mine Dies and hand cut stem from Call Me Clover Cardstock
Assemble shamrock and adhere to layer
Stamp sentiment with Call Me Clover Ink
Add Enamel Dot to center of shamrock and randomly around card
Wrap ribbon around white layer and adhere to back, make bow and adhere with Mini Glue Dot

Stamp sentiment and shamrock with Call Me Clover Ink.

Supply List

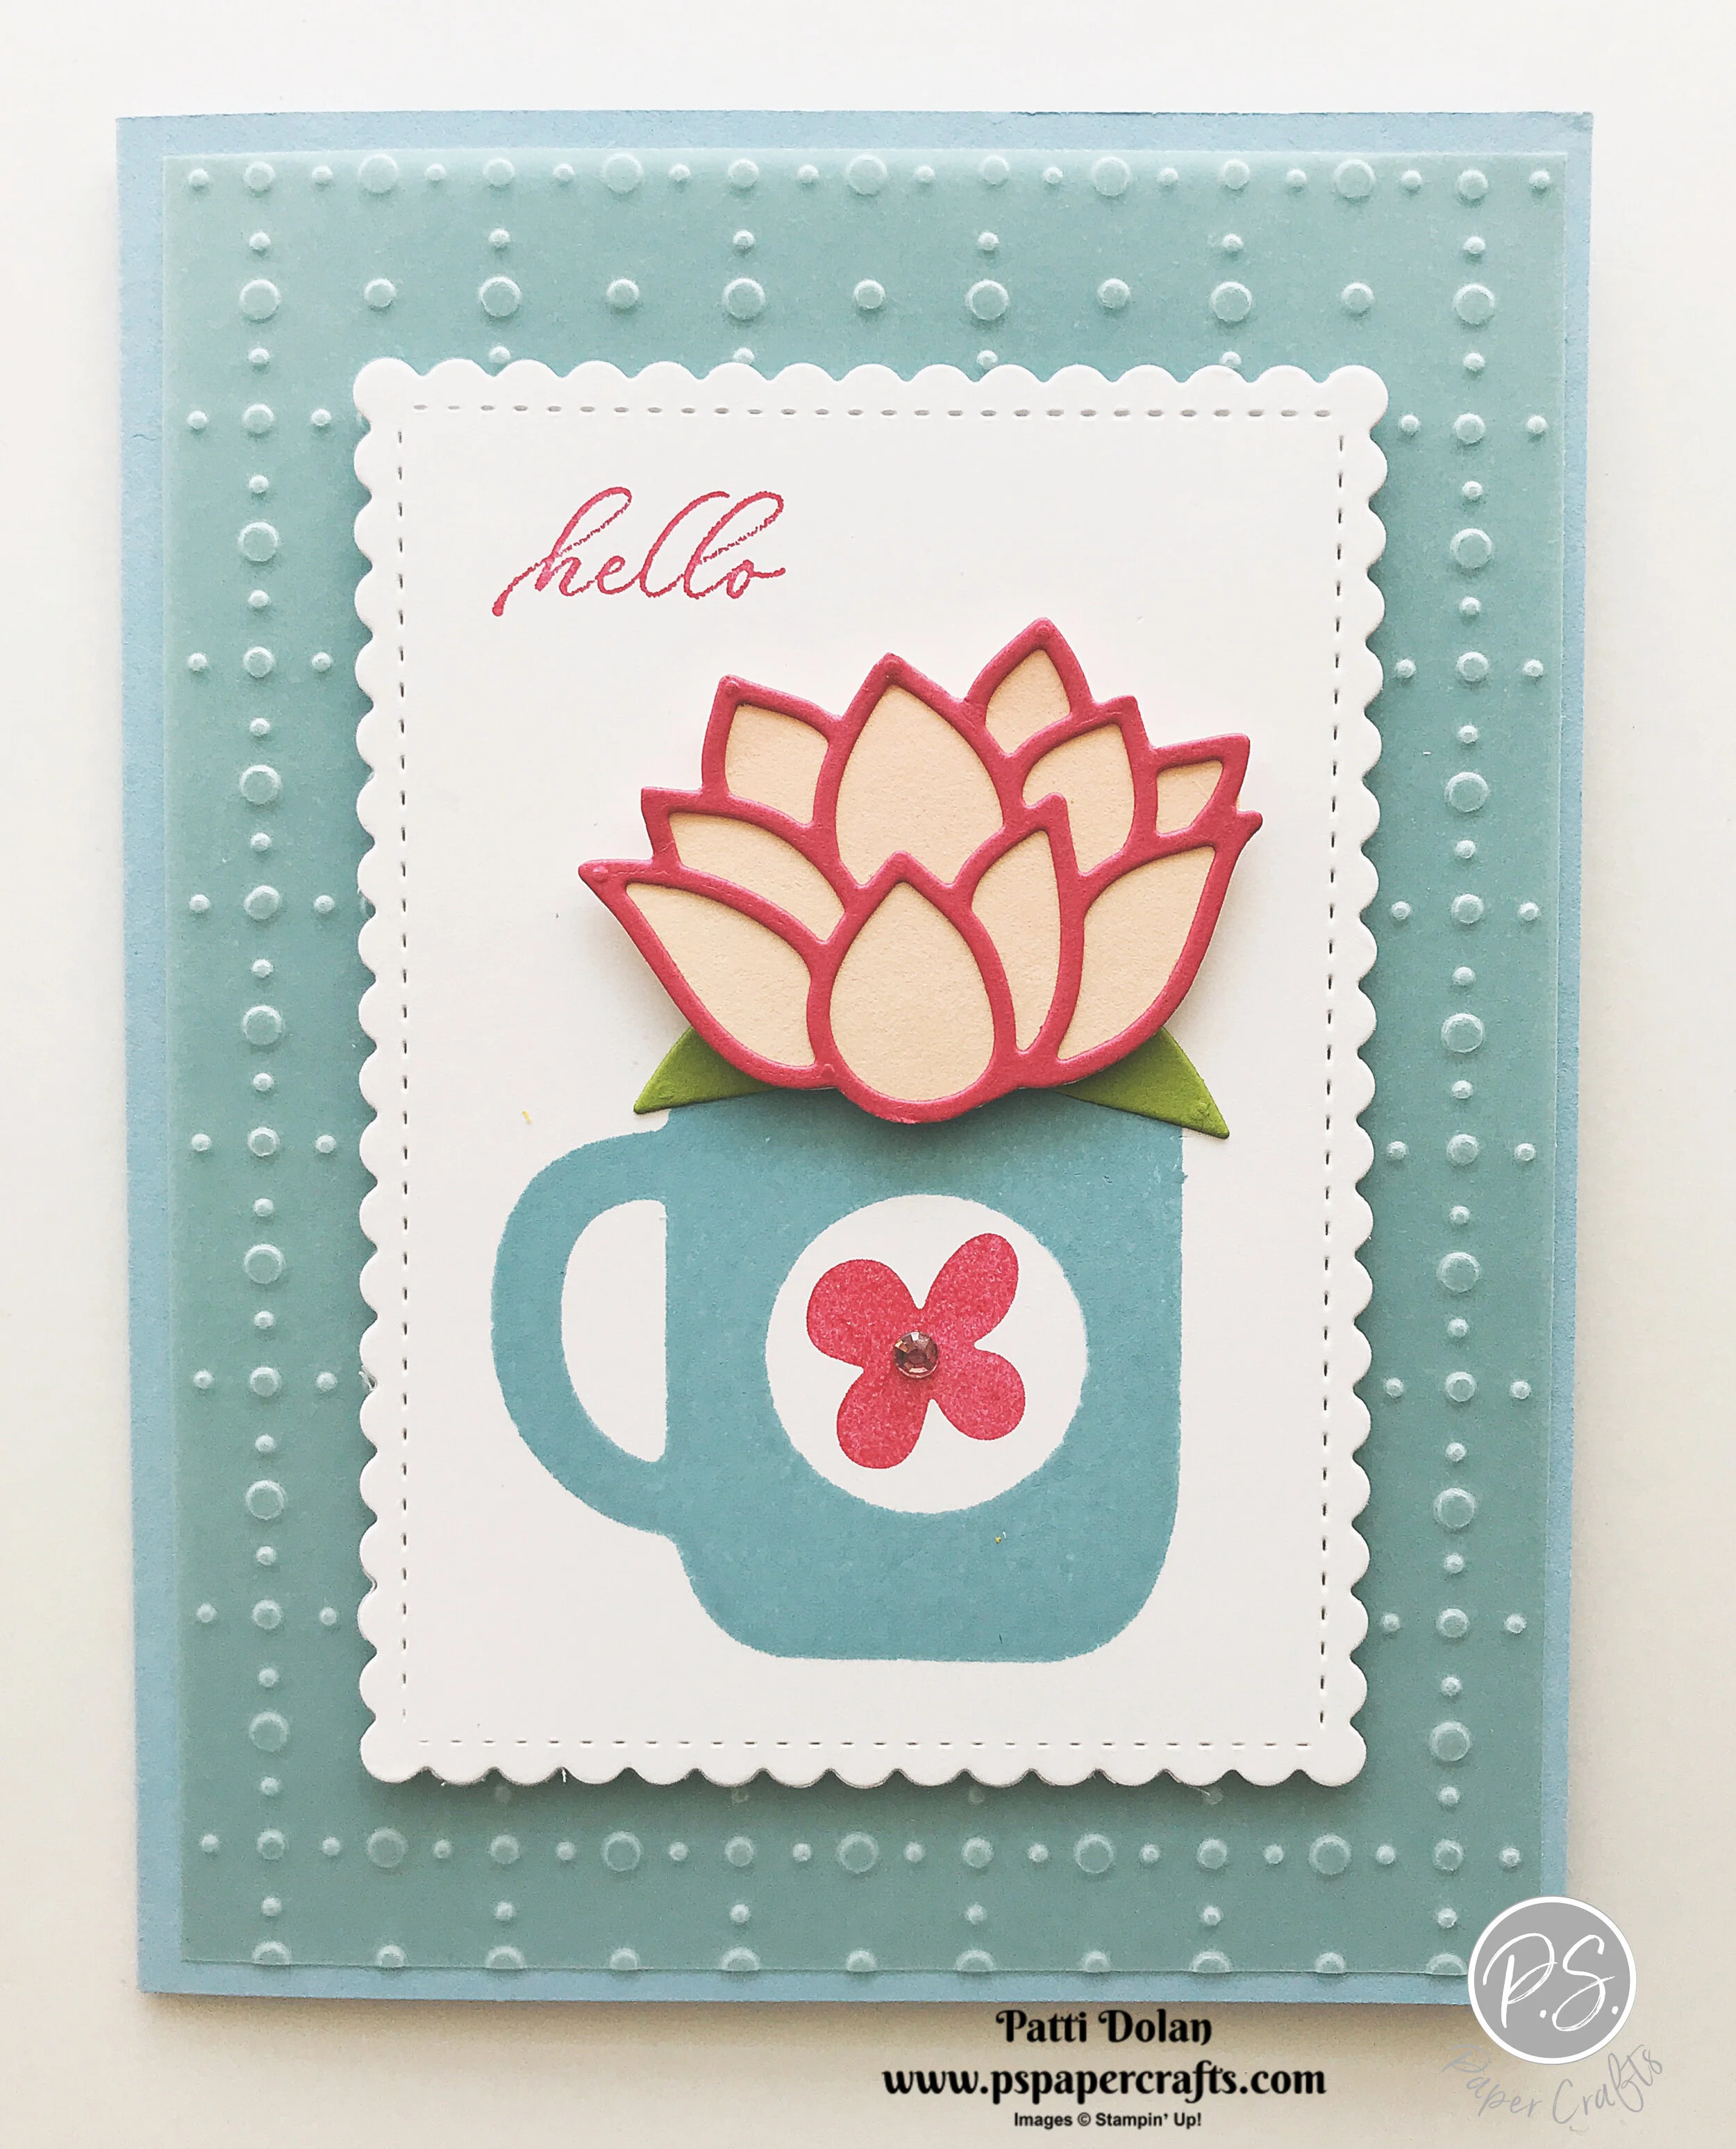
Lily In A Cup!!!
I’ve been seeing lots of small succulents in teacups and coffee mugs lately so I thought I would make a card with one!

I used mostly Sale-A-Bration products on this card. These are FREE with a qualifying purchase through the end of March 2020.

Tips & Instructions
Balmy Blue Card Base - 5 1/2 x 8 1/2, score at 4 1/4
So Very Vellum Specialty Designer Series Layer - 5 1/4 x 4
Whisper White - cut with largest scalloped rectangle from the Stitched So Sweetly Dies
Stamp cup with Balmy Blue Ink
Stamp flower in circle with Melon Mambo Ink
Cut lily outline from Melon Mambo Cardstock using the Lily Pad Dies
Adhere to Petal Pink Cardstock scrap and fussy cut the flower
Cut leaves from Granny Apple Green Cardstock and snip off stem, adhere to top of cup
Adhere flower over the leaves using Dimensionals
Stamp sentiment (from Timeless Tropical) with Melon Mambo Ink
Adhere layer to vellum layer using Dimensionals
Adhere layers to card base, putting adhesive behind white layer and just a dot at each corner where an embossed dot is
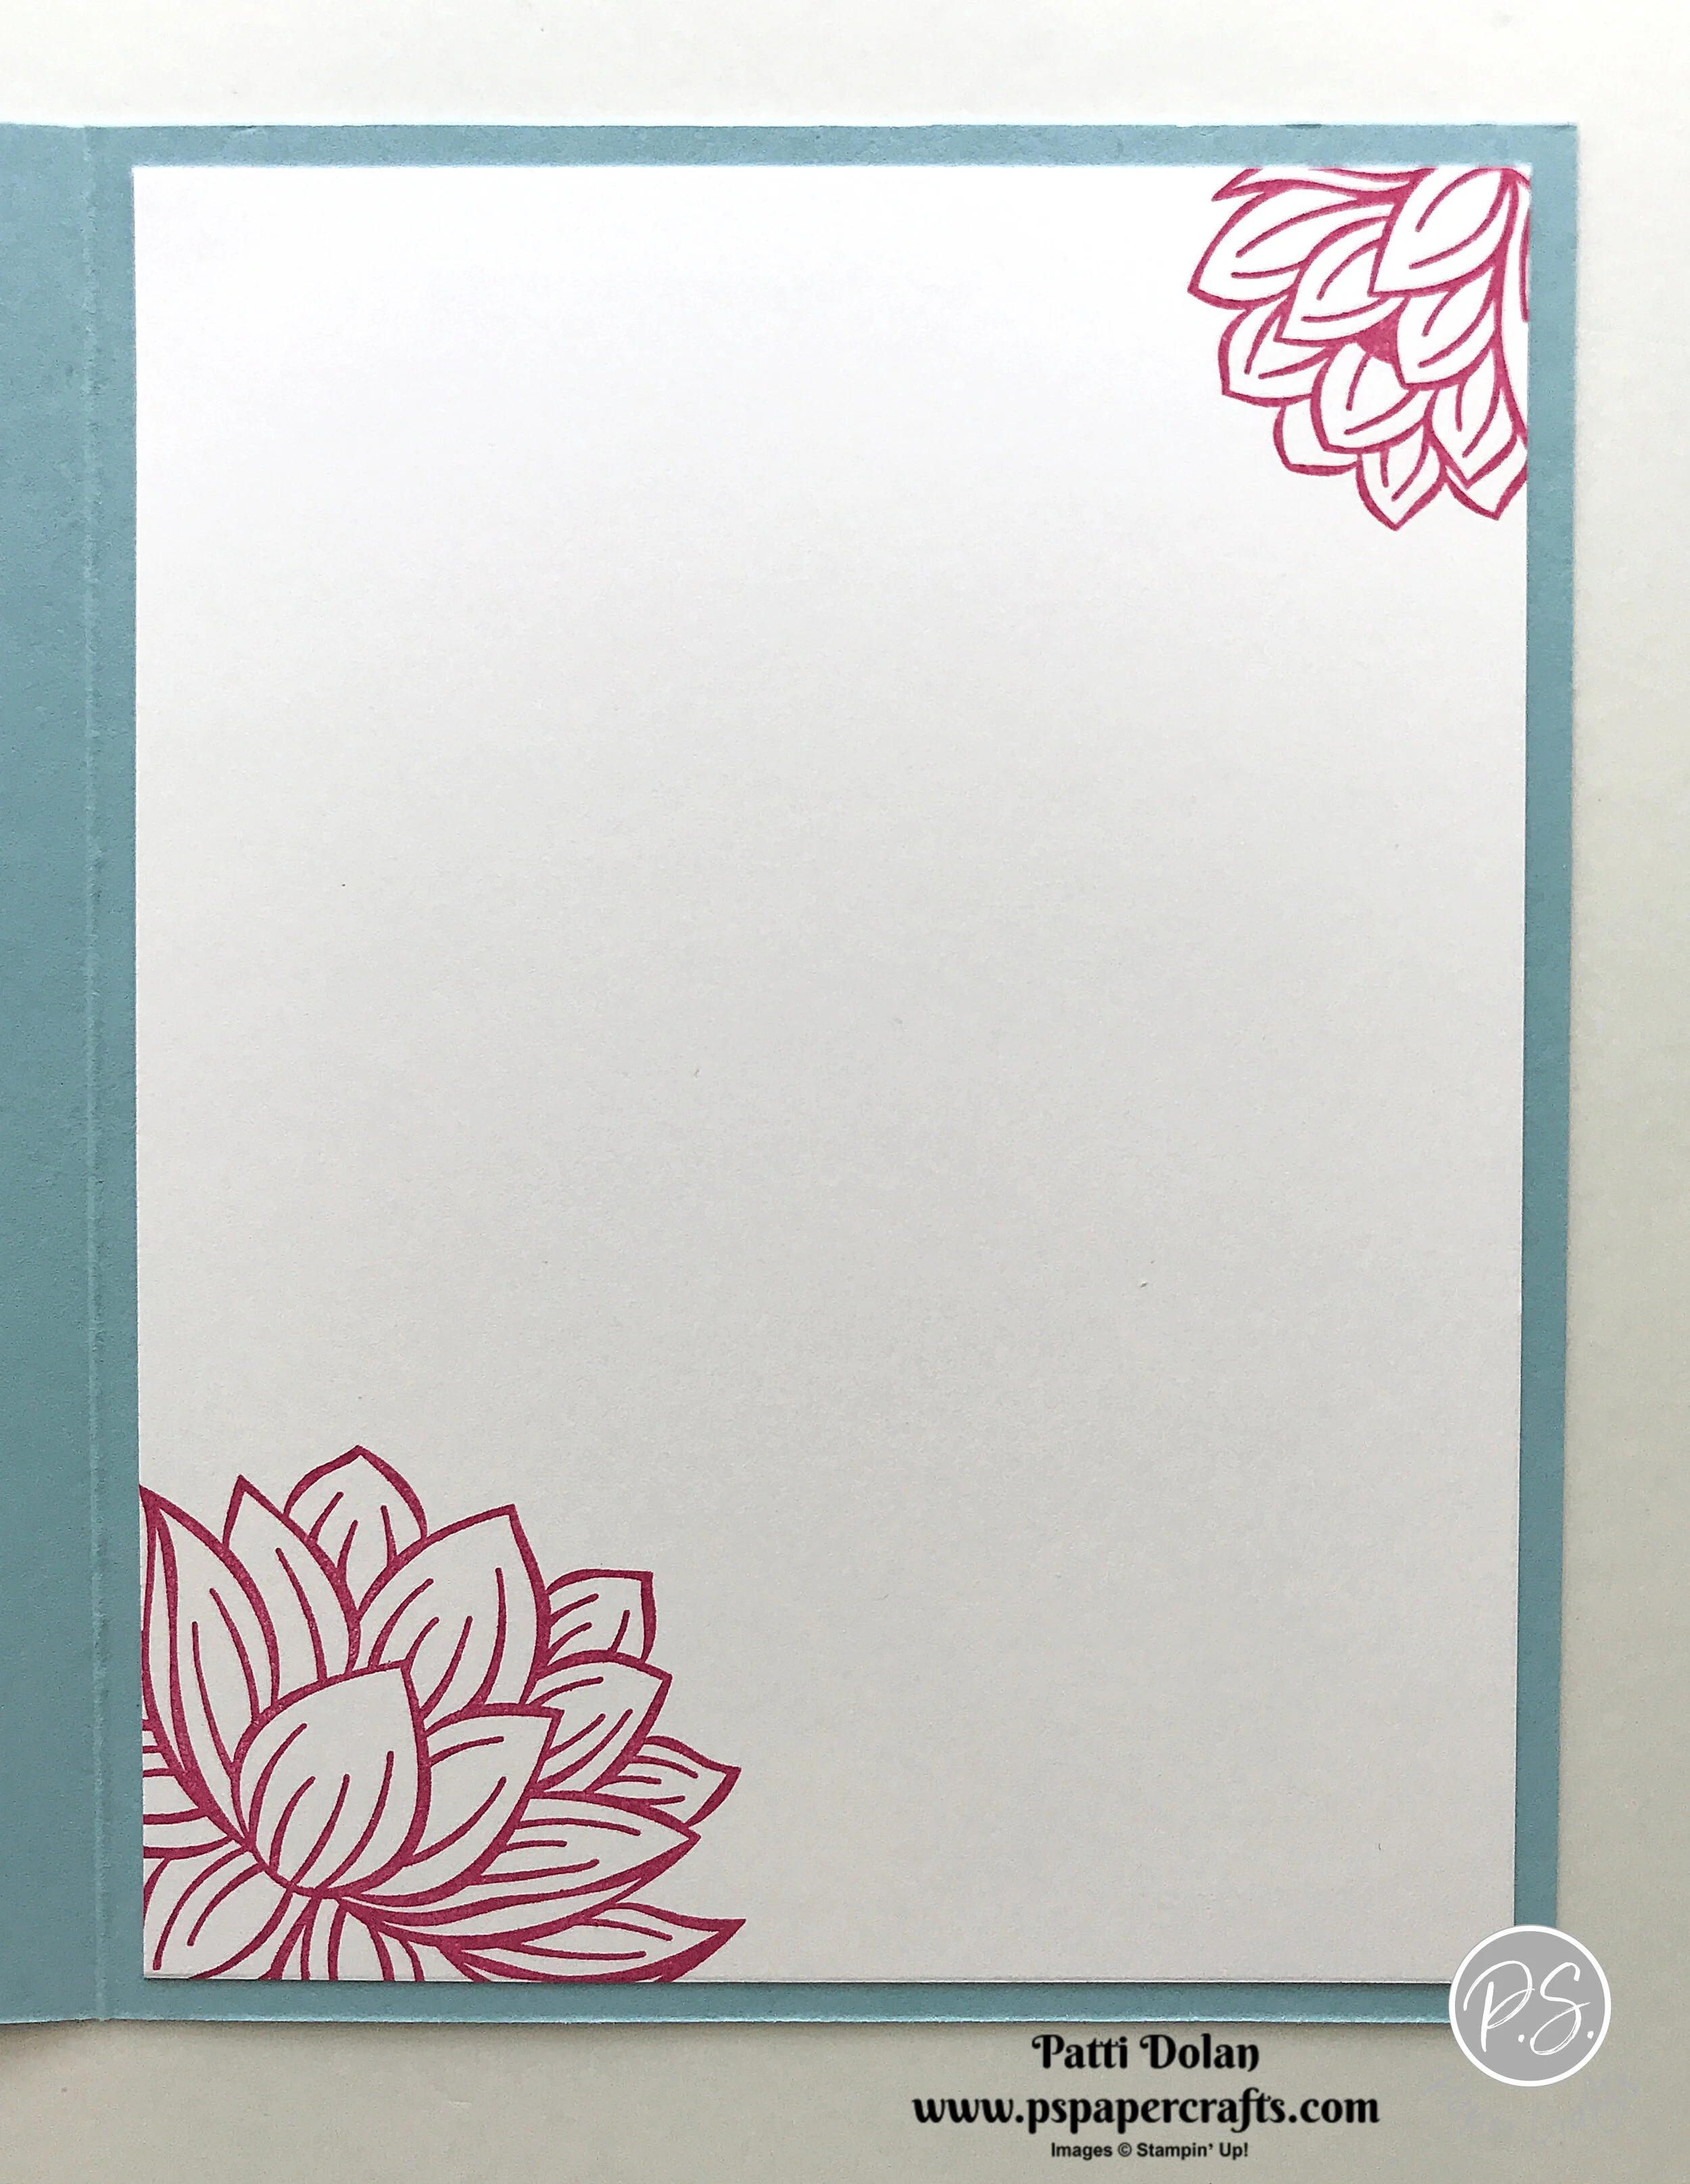
On the inside, stamp flowers with Melon Mambo Ink.
Supply List

Sketch Saturday - Timeless Tropical
I made this card for this week’s sketch using the Timeless Tropical Bundle and High Tides Stamp Set.

The sketch is from the CAS(E) This Sketch Challenge from Splitcoaststampers.

Tips & Instructions
Night Of Navy Card Base - 5 1/2 x 8 1/2, score at 4 1/4
Seaside Spray Layer - 5 1/4 x 4
Sahara Sand Strip - 4 x about 1 3/8 after torn (just gently tear the top)
Stamp sand image from High Tide using Sahara Sand Ink on the Sahara Sand strip, stamping multiple times without re-inking, then ink again, stamp multiple times, until you get complete coverage
Color trunk of the palm tree stamp with an Early Espresso Stampin’ Write Marker and the tree-top with a Garden Green Stampin’ Write Marker, then breathe on the stamp to moisten and stamp on scrap of Whisper White Cardstock (NOTE: Do Not use Stampin’ Blends to color stamps.)
Cut Trees with coordinating Die
Adhere trees to layer, then cover just bottom of trees with sand piece
Stamp birds from High Tide using Pacific Point Ink
Stamp sentiment with Pacific Point Ink on 4 x 5/8 strip of Whisper White and punch banner ends using Triple Banner Punch and adhere to card using Dimensionals

On the inside color palm tree stamp and stamp in bottom corner.

Supply List

Pretty Flowering Foils Birthday Card
I love coloring the Flowering Foil Specialty Designer Series Paper. For these cards I used Stampin’ Blends. Aren’t they pretty?

Watch the video to see how to make these cards; one in Granny Apple Green and one in Rich Razzleberry.

Tips & Instructions
Rich Razzleberry or Granny Apple Green Card Base - 5 1/2 x 8 1/2, score at 4 1/4
Flowering Foil Specialty Designer Series Paper - 5 1/4 x 4
Color flowers with Purple Posy Stampin’ Blends, leaves with Granny Apple Green Stampin’ Blends, and berries with Rich Razzleberry Stampin’ Blends.
Color a piece of Petal Pink Metallic Edged Ribbon with either Dark Granny Apple or Dark Rich Razzleberry Stampin Blend and wrap around the layer, then adhere to card base
Stamp sentiment from Layered With Kindness with Rich Razzleberry Ink and punch with Label Me Lovely Punch
Adhere label to card using Dimensionals
Add Champagne Rhinestones

