


Sketch Saturday - Merry Moose
The Merry Moose Stamp Set has some fun images and sentiments and has a coordinating punch for the moose. I used it for the CAS(E) This Sketch Challenge from Splitcoaststampers.

Here’s the sketch and if you click on the link you can see other cards made from this sketch. CAS(E) this Sketch #339

Isn’t this a great bundle? If you buy as a bundle, you save 10%

Tips & Instructions
Night Of Navy Card Base - 5 1/2 x 8 1/2, score at 4 1/4
Wrapped In Plaid Designer Series Paper Layer - 5 1/4 x 4 and adhere to card base
Night Of Navy - cut with largest scalloped Layering Squares Die
Whisper White - cut with 2nd largest scalloped Layering Squares Die and adhere to navy square
Scrap of Whisper White - stamp moose outline with Early Espresso Ink and inside with Crumb Cake Ink and punch with Moose Punch
Using moose as a guide, determine placement for sentiment and stamp with Real Red Ink
Adhere square to card using Dimensionals
Adhere moose to card using Dimensionals

On the inside stamp sentiment with Night Of Navy (or Real Red) Ink and stamp cute little raccoon with Early Espresso Ink.

If you want any of the products I used on this project, just click on the item below or the Shop Now button and it will bring you to my Online Store. Please use the current Host Code when you go to checkout your order. You can also click directly on an item to order.
Merry Christmas Tree Card
What a great color combination for Christmas cards - Coastal Cabana and Real Red!

The Let It Snow Specialty Designer Series Paper is so fun for this type of card. Take a look at the video and I’ll show you all the papers as well as the steps to make this card.

Tips & Instructions
Coastal Cabana Card Base - 5 1/2 x 8 1/2, score at 4 1/4
Real Red Layer - 5 3/8 x 4 1/8
Let It Snow Specialty Designer Series Paper - 5 1/4 x 4
Whisper White - cut 4th from smallest Rectangle Stitched Die
Whisper White - cut smallest Rectangle Stitched Die
Stamp trees on larger rectangle by stamping off (stamp on scrap before rectangle) across layer with Coastal Cabana Ink
Stamp sentiment on smaller rectangle with Real Red Ink
Scrap of Costal Cabana - wipe with embossing buddy, stamp tree with Versamark, pour embossing powder and then heat with heat tool
Punch tree with coordinating Tree Punch
Adhere layers to card base and adhere tree and sentiment layer with Dimensionals
Add Toile Tidings Glimmer Dots

If you want any of the products I used on this project, just click on the item below or the Shop Now button and it will bring you to my Online Store. Please use the current Host Code when you go to checkout your order. You can also click directly on an item to order.
Painted Harvest - Thankful For You
The Painted Harvest Stamp Set is one of my favorites and I’m so glad that it was carried over in the Annual Catalog!

The Designer Series Paper is from the Come To Gather pack and it coordinates so well with the Pretty Peacock Ribbon.

Tips & Instructions
Crumb Cake Card Base - 5 1/2 x 8 1/2, score at 4 1/4
Whisper White Layer - 5 1/4 x 4, stamp sentiment with Pretty Peacock Ink
Come Gather Together Layer - 2 x 4, adhere to Whisper White Layer
Wrap ribbon around at the seam and adhere to back. Adhere layer to card base
Stamp large flower image with Crushed Curry - Stamp off first to get a lighter color and then rotate a little and stamp again without re-inking
Stamp smaller flower image with Crushed Curry (direct) using the center as a guide
Fussy cut flower
Stamp leaf images on Pretty Peacock and on Whisper White and punch with coordinating Leaf Punch
Adhere leaves behind flower and adhere flower over ribbon using Dimensionals
Adhere Pretty Peacock Faceted Gems and Pearls

On the inside stamp sentiment and leaf images with Pretty Peacock.

If you want any of the products I used on this project, just click on the item below or the Shop Now button and it will bring you to my Online Store. Please use the current Host Code when you go to checkout your order. You can also click directly on an item to order.
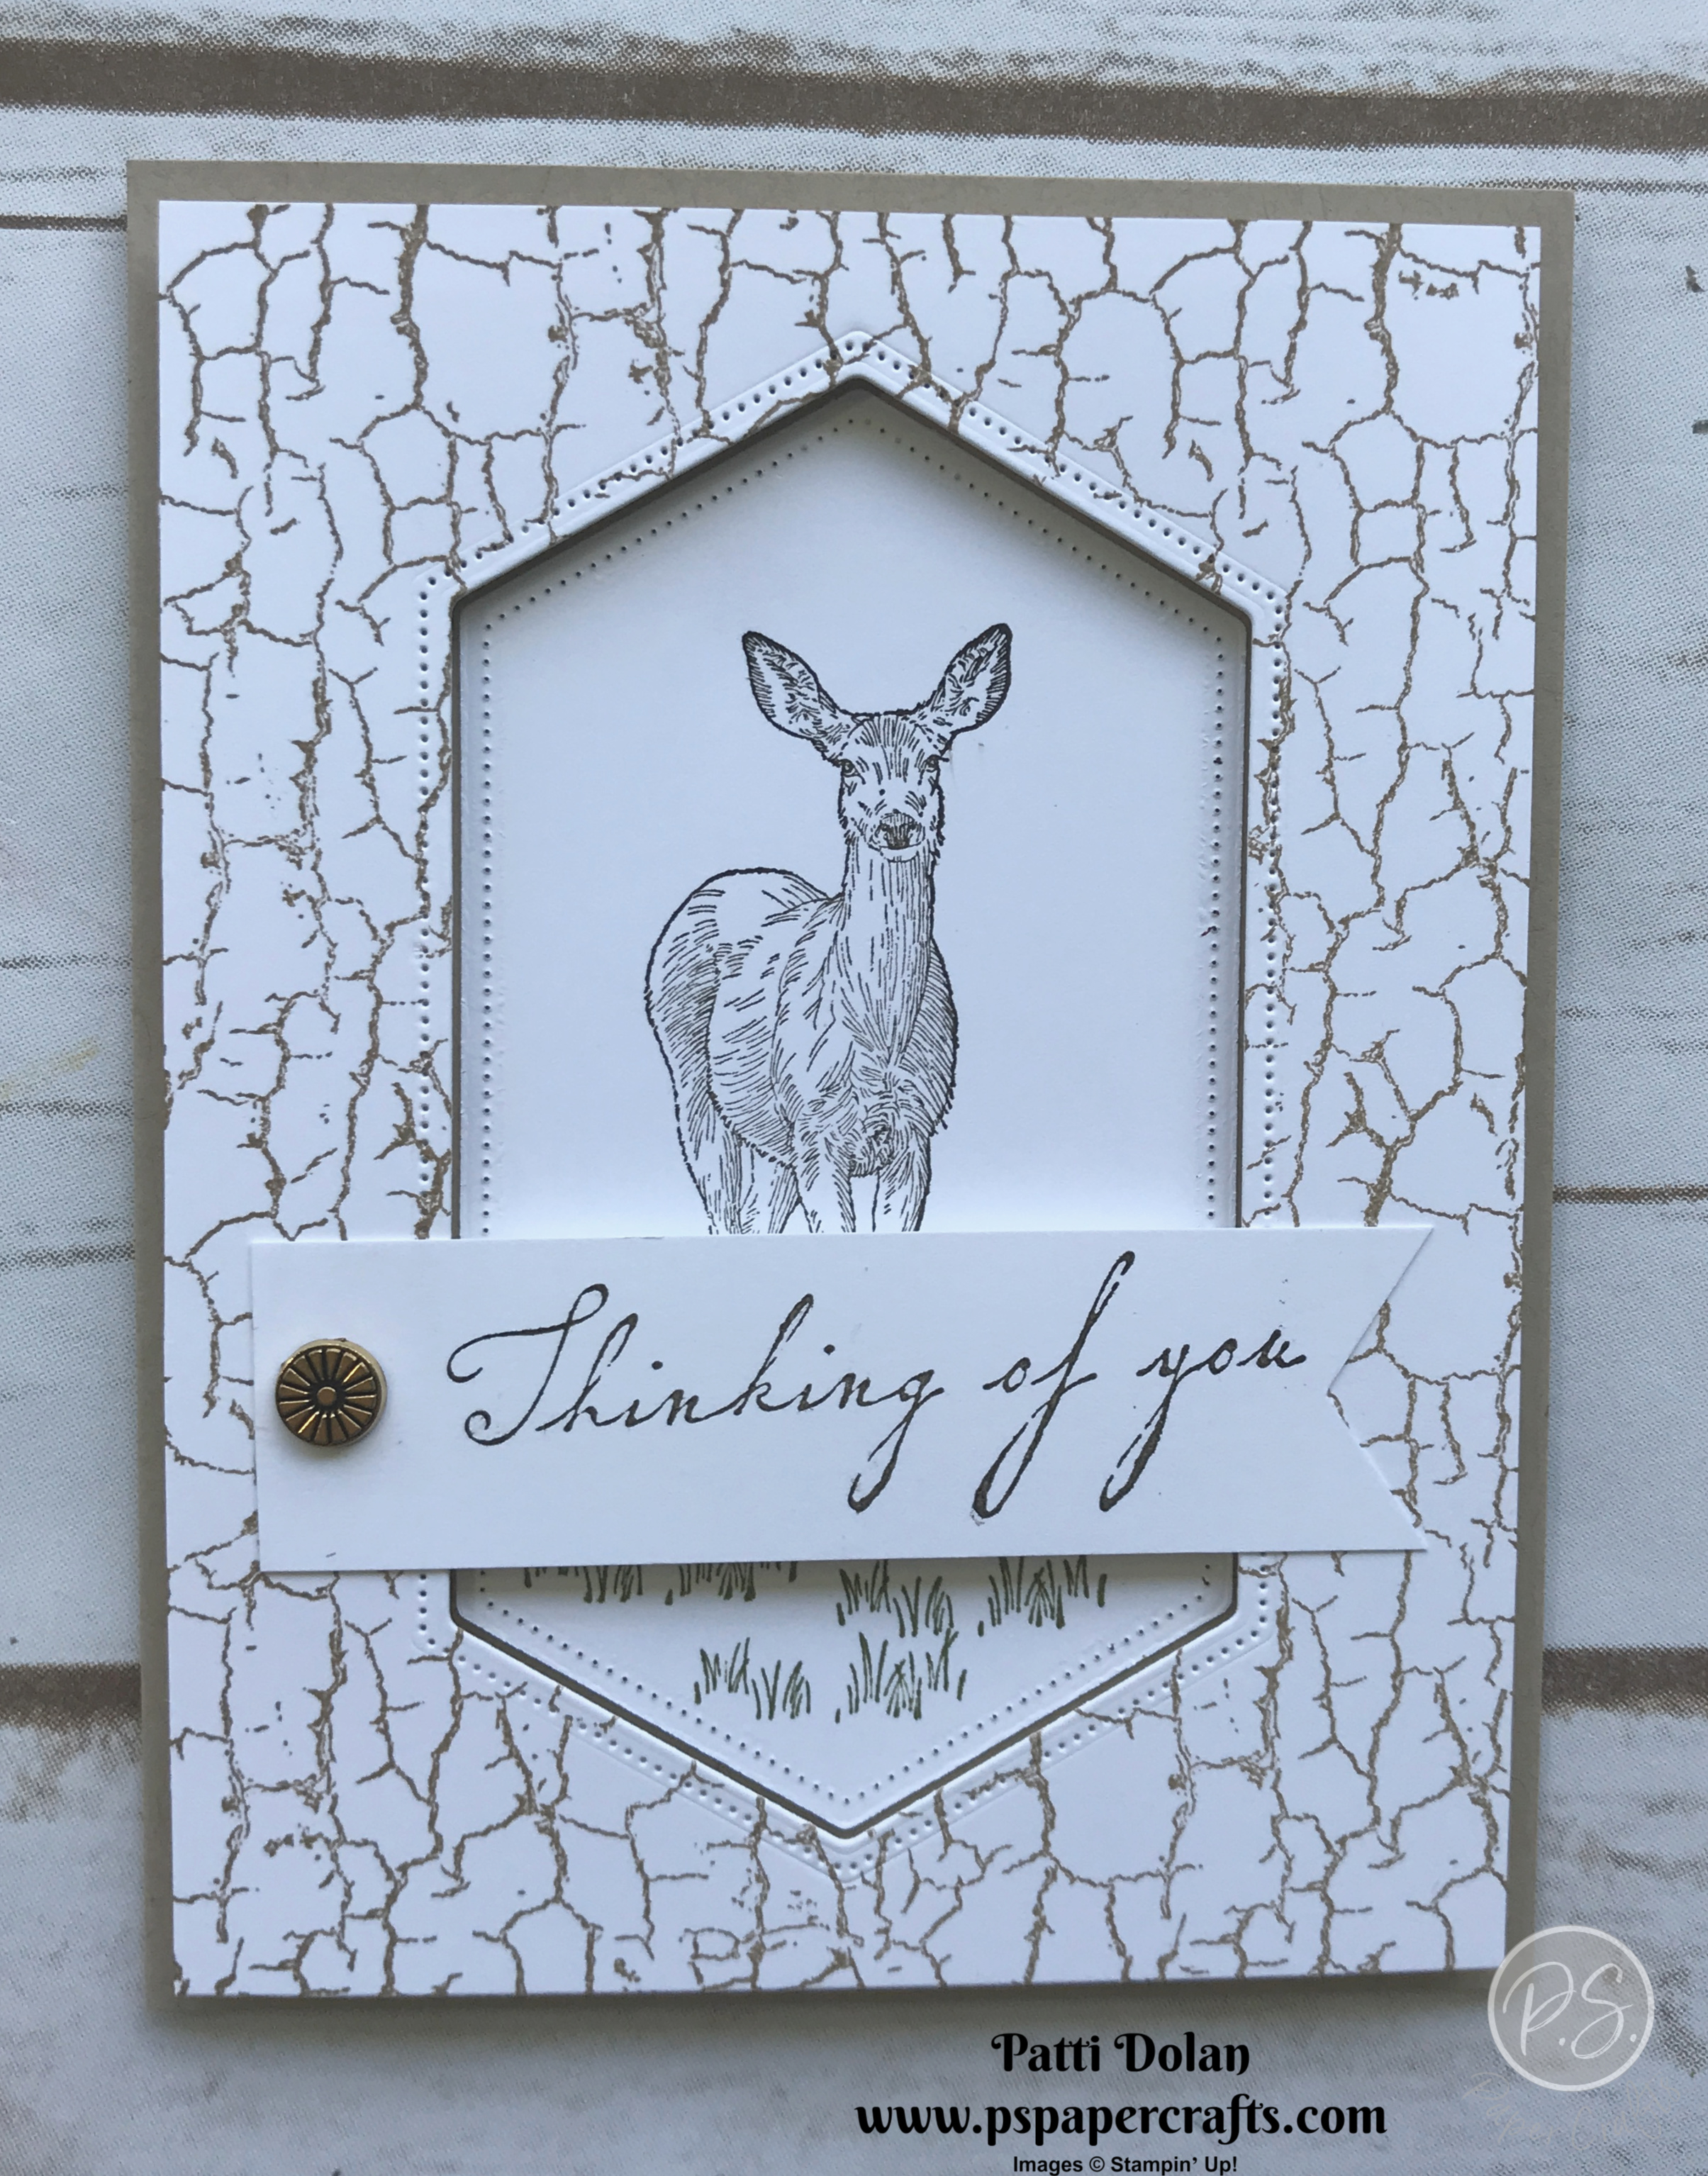
Nature's Beauty - Framed Deer
Isn’t this a great masculine card? I copied the idea from my friend Vicki Parsons from The Paper Connection. I changed it up a little.

Watch the video to see how I create this beautiful Crackle Frame for the deer. It’s easy to do!
This is a great masculine birthday card using the sentiment from Itty Bitty Birthdays.

Tips & Instructions
Crumb Cake Card Cake - 5 1/2 x 8 1/2, score at 4 1/4
Whisper White Layer - 5 1/4 x 4, using Stamparatus stamp the Crackle Background using Crumb Cake Ink
Cut center using the second largest Stitched Nested Labels Die
Flip the center piece that was cut out and stamp the deer using Early Espresso Ink and grass using Mossy Meadow Ink
Attach crackle layer to card base using Foam Strips
Adhere inside stamped layer, fitting it inside the crackle layer
Stamp sentiment on Whisper White strip (size according to size of sentiment)
Create a banner end using the Banner Triple Punch
Adhere sentiment as shown using a small piece of Foam Strip in the middle and a little bit of adhesive on both ends
Add Designer Element on sentiment strip
The Thinking of You sentiment is from the Woven Heirlooms Stamp Set.
If you want any of the products I used on this project, just click on the item below or the Shop Now button and it will bring you to my Online Store. Please use the current Host Code when you go to checkout your order. You can also click directly on an item to order.
Cute Little Piggy Card
I just love the This Little Piggy Stamp Set. I think spending time on my sister’s farm last week prompted me to make a card with this set.

This is a fun card to send to just about anyone to brighten their day. I used the Brick & Mortar 3D Embossing Folder for the background and some Granny Apple Green Ribbon. This card just makes me happy!
These are my sister’s piggies….they were my inspiration!


Tips & Instructions
Granny Apple Green Card Base - 5 1/2 x 8 1/2, score at 4 1/4
Whisper White Layer - 5 1/4 x 4, emboss with Brick & Mortar 3D Embossing Folder (Use 3D Embossing Folder Plate)
Wrap piece of Granny Apple Green Textured Weave Ribbon around embossed layer and adhere to card base
Whisper White - cut with Largest Layering Rectangle - stamp pig image and color with Stampin’ Blends (Petal Pink Light & Dark, Light Granny Apple Green, Dark Lovely Lipstick, Dark Pineapple Punch, Light Smoky Slate)
Granny Apple Green - cut with largest scalloped Layering Rectangle Die and adhere to white square.
Adhere squares layer over ribbon using Dimensionals

On the inside stamp some flowers with Lovely Lipstick Ink. I used the flower from the Perennial Birthday Stamp Set.

If you want any of the products I used on this project, just click on the item below or the Shop Now button and it will bring you to my Online Store. Please use the current Host Code when you go to checkout your order. You can also click directly on an item to order.
Sketch Saturday - Perfectly Plaid
Today’s sketch is another from a CAS(E) this Sketch Challenge from Splitcoaststampers. I love playing along with their challenges. You can click on this link to get see other cards using this sketch. CAS(E) this Sketch #338

I used the Perfectly Plaid Bundle and made it a horizontal card. That’s what’s fun about it; you get the idea from the sketch and then you make it your own.

Tips & Instructions
Cherry Cobbler Card Base - 5 1/2 x 8 1/2, scored at 4 1/4
Gold Foil Layer - 4 5/8 x 3 5/8
Whisper White Layer - 4 1/2 x 3 1/2
Cut Tree from Wrapped In Plaid Scrap
Stamp sentiment using Cherry Cobbler Ink on bottom right corner of Whisper White Layer
Adhere Tree using Dimensionals
Adhere Whisper White Layer to Gold Foil Layer and then adhere to card base with Dimensionals

On the inside stamp sentiment with Cherry Cobbler Ink and tree image with Shaded Spruce Ink.

If you want any of the products I used on this project, just click on the item below or the Shop Now button and it will bring you to my Online Store. Please use the current Host Code when you go to checkout your order. You can also click directly on an item to order.
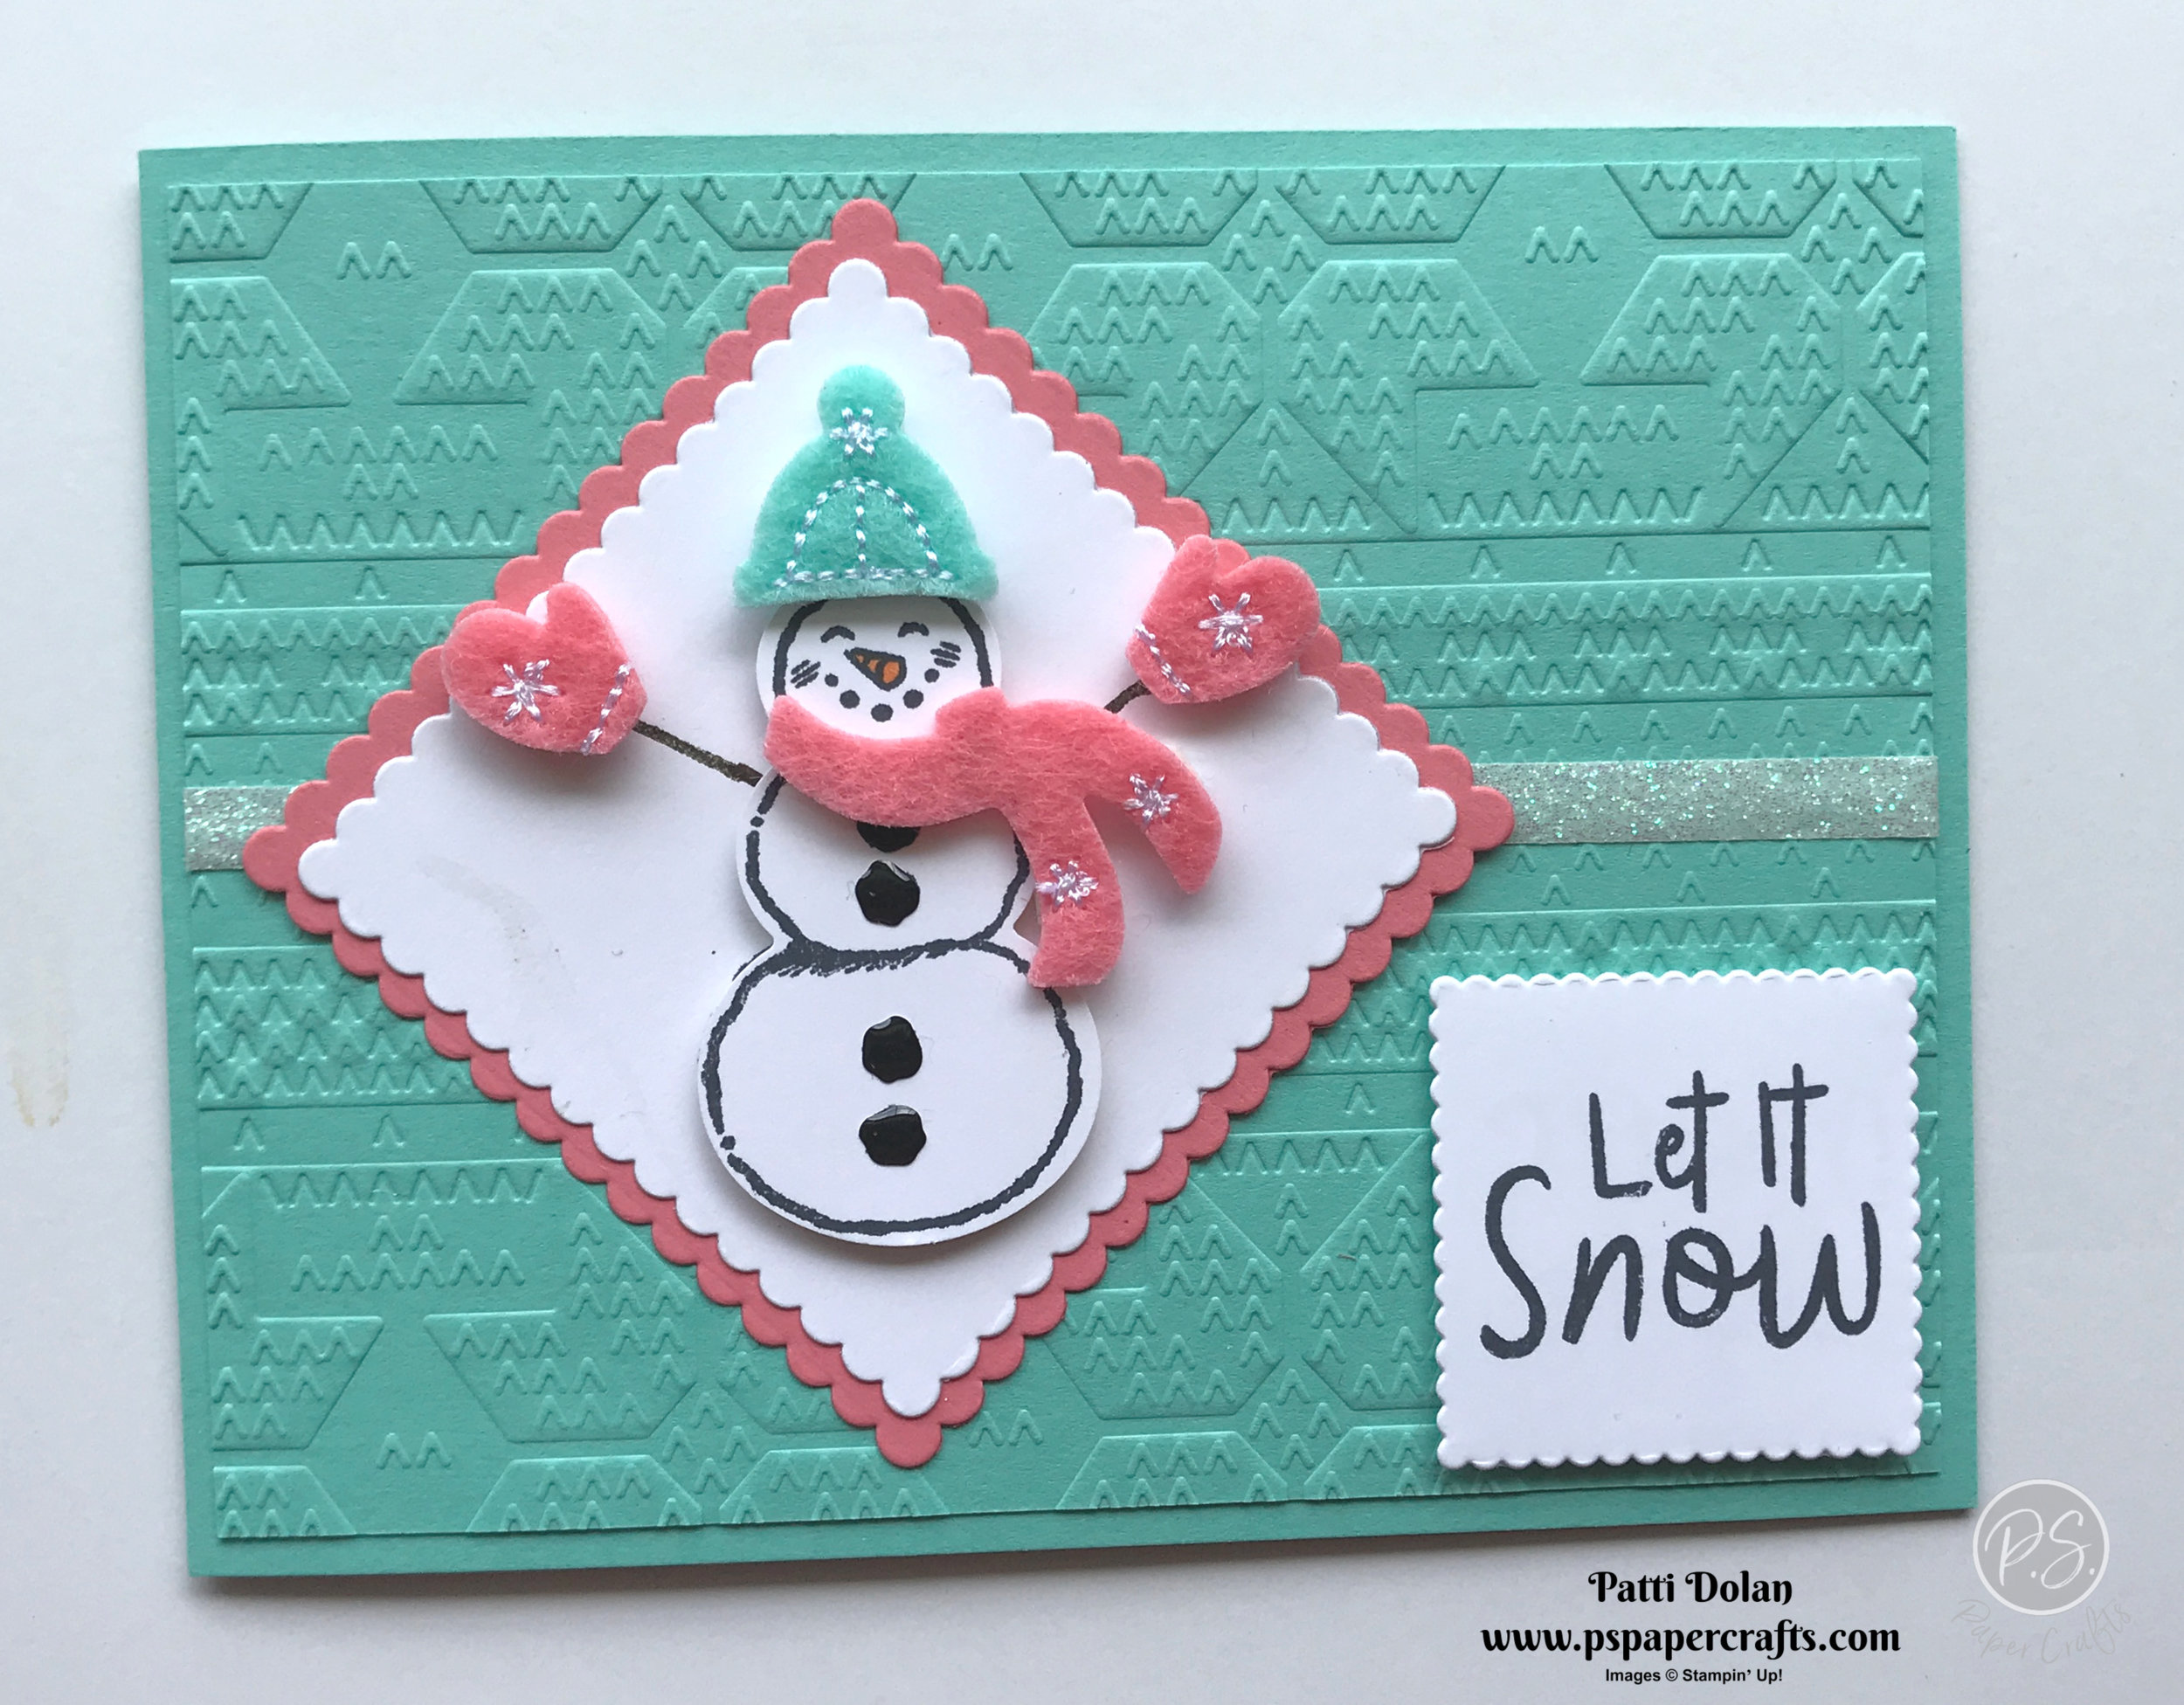
Fun Snowman Card
Isn’t this the cutest snowman? The felt hat, mittens and scarf along with the coal buttons from the Let It Snow Embellishment Kit are just adorable.

Watch the video below to see all the products that I used from the Let It Snow Suite.
Tips & Instructions
Coastal Cabana Card Base - 4 1/4 x 11 1/2, score at 5 1/2
Coastal Cabana Card Base - 5 1/2 x 4, emboss with Winter Knit 3D Embossing Folder (use 3D Embossing Folder Plate)
Flirty Flamingo Layer - cut with 2nd largest scalloped Layering Squares Dies
Whisper White Layers - cut one with 3rd largest and one with 4th smallest scalloped Layering Squares Dies
Whisper White Scrap - stamp and punch out snowman
Stamp snowman with black ink on large scalloped square as shown
Stamp arms with Early Espresso Ink
Adhere punched snowman over snowman on layer using Dimensionals
Color carrot nose with Dark Pumpkin Pie Blends Marker, adhere coal buttons and adhere hat, mittens and scarf using Dimensionals
Add Washi Tape around center of embossed layer
Adhere squares to card base
Stamp sentiment with black ink on smaller scalloped square and adhere using Dimensionals

If you want any of the products I used on this project, just click on the item below or the Shop Now button and it will bring you to my Online Store. Please use the current Host Code when you go to checkout your order. You can also click directly on an item to order.
Tiny Keepsakes - Cute Curvy Boxes
These fun little curvy boxes would be great for favors at a Halloween or Thanksgiving dinner.
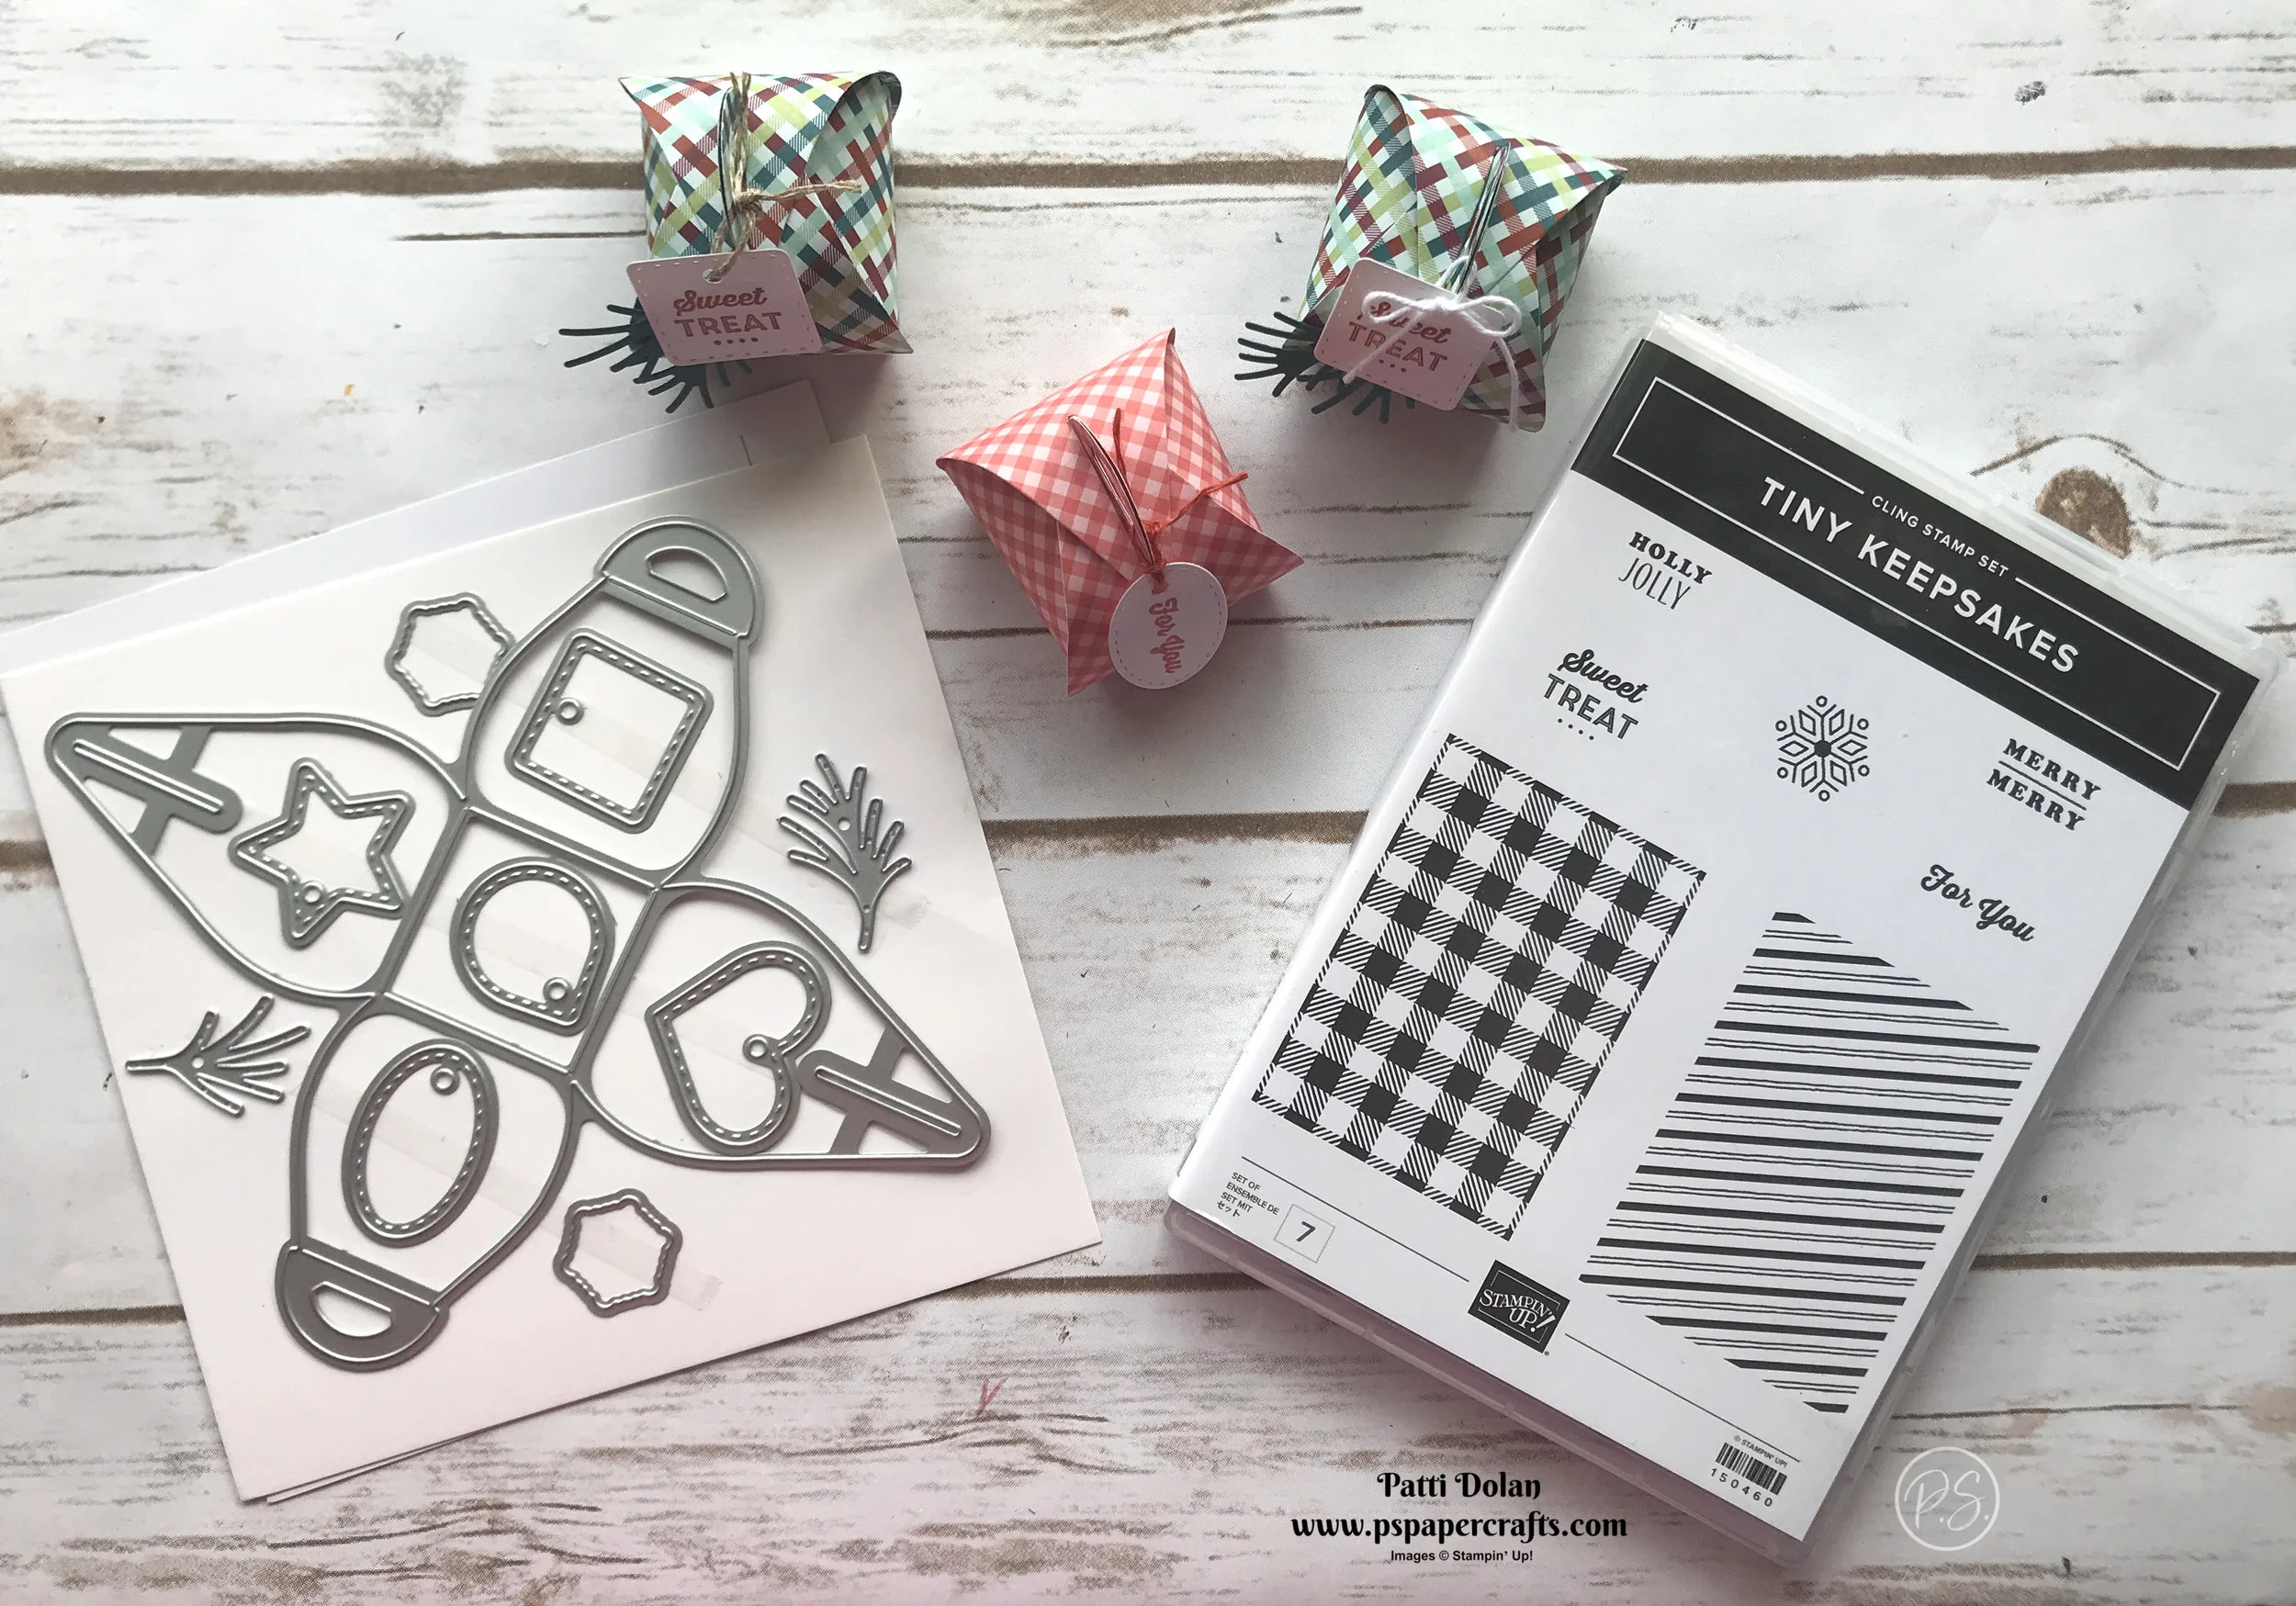
The Die does all the work; you just have to fold at the score lines and fit the handle through the slots. Watch the video below to see how to make them.
You can use whatever Designer Series Paper or Cardstock you want. It works with 6x6 sheets of paper if you lay it on a diagonal. I chose some fall colors for these.

I used the 2019-2021 In Color Designer Series Paper for this one, choosing the Terracotta Tile gingham paper. The sentiment was stamped with Terracotta Tile Ink on the stitched oval that comes in the Mini Curvy Keepsakes Box Dies. Tie it on with a piece of Terracotta Tile Bakers Twine and you’re all set.

For this one, I used the Come To Gather Designer Series Paper, cutting a 6x6 sheet. The sentiment was stamped also with Terracotta Tile Ink on the stitched square. Cut 2 sprigs with Die using Pretty Peacock Cardstock and adhere to back of label. Attach with Linen Thread or White Bakers Twine.

If you want any of the products I used on this project, just click on the item below or the Shop Now button and it will bring you to my Online Store. Please use the current Host Code when you go to checkout your order. You can also click directly on an item to order.
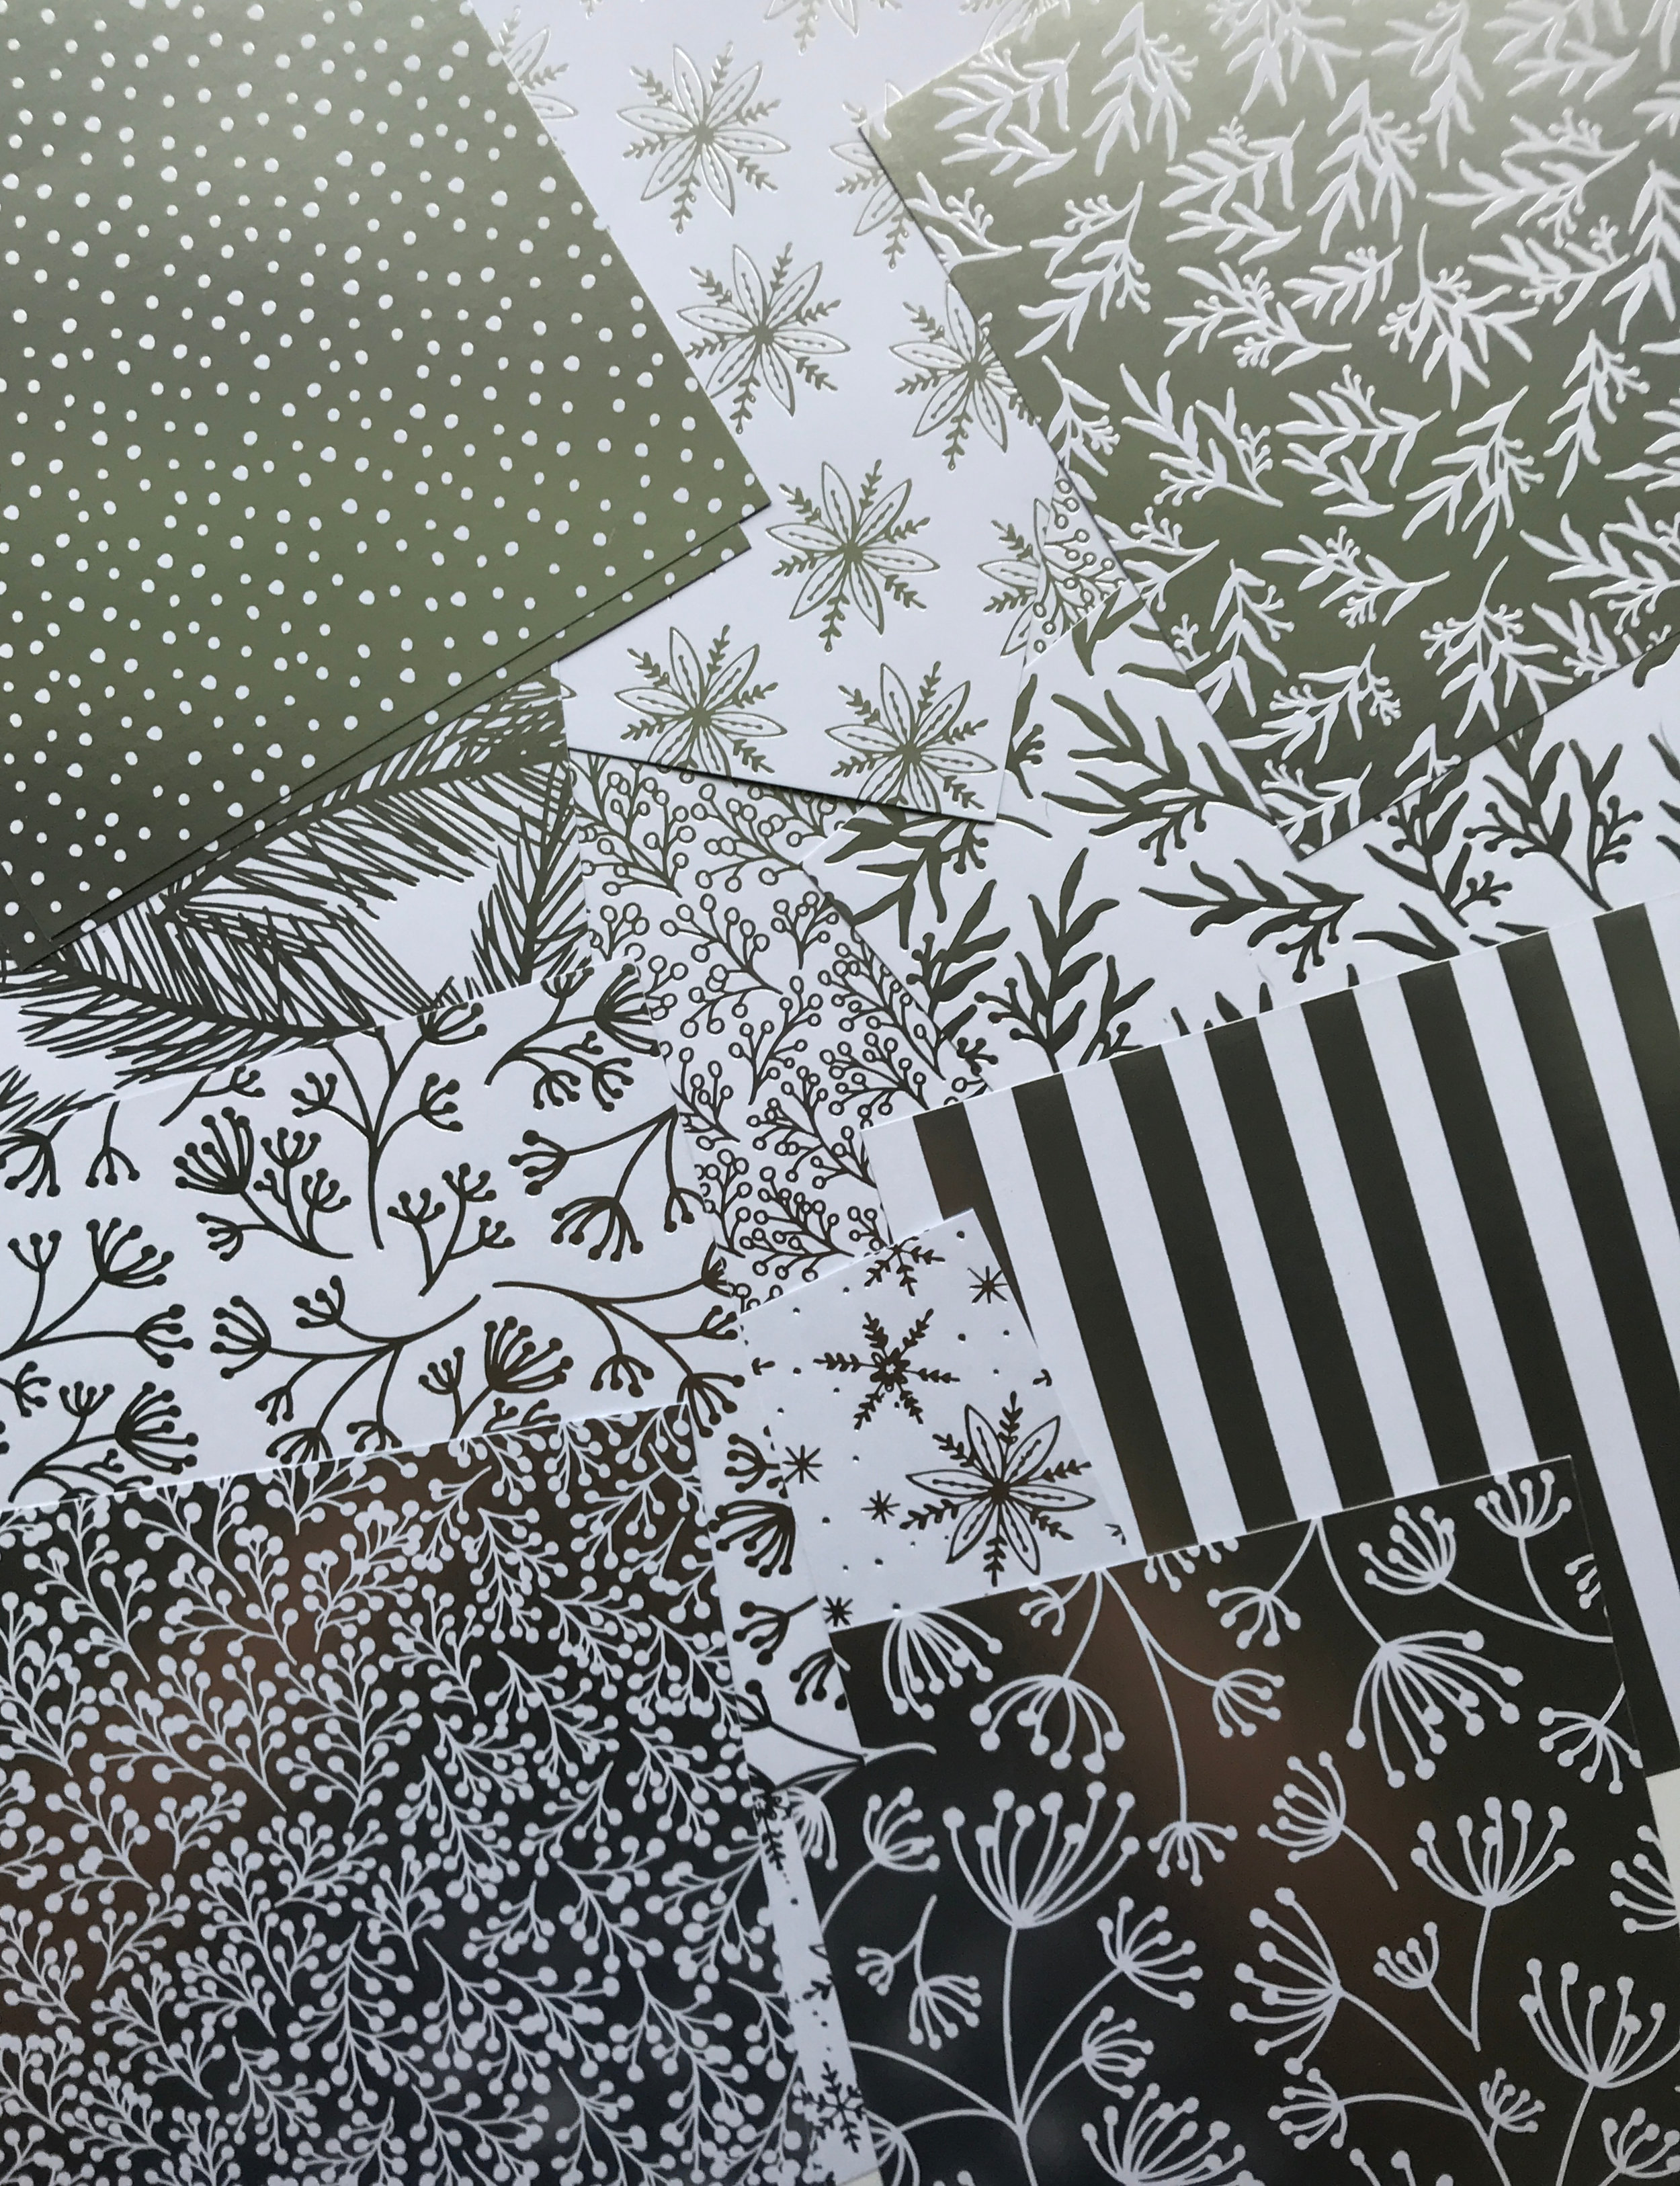
2019 Holiday Catalog & Designer Series Paper Sale

The 2019 Holiday Catalog is now available to order from. Just click on the picture of the catalog over on the right to see an online version. Below are a few videos to show off some of the new products.
Stampin’ Up! is doing their Designer Series Paper Sale once again. If you buy 3 of Select Designer Series Paper, you get 1 FREE through September 30.

These are the papers that are included.

Click the SHOP NOW button on the right to start shopping!
Daisy Lane Fall Card
Sometimes you don’t need a sentiment! I thought this card was just a perfect card for the Fall and didn’t need a sentiment.

The Daisy Lane Stamp Set has great images and has a coordinating punch so you can quickly stamp a couple of daisies and punch them out. The colors for this card a Terracotta Tile and Old Olive.

Tips & Instructions
Terracotta Tile Card Base - 5 1/2 x 8 1/2, score at 4 1/4
Very Vanilla Layer - 5 1/4 x 4
Pressed Petal Specialty Designer Series Paper Layer - 1 1/2 x 4
Lay the Designer Series Paper (DSP) across middle of Very Vanilla Layer and lightly place a mark at the top and bottom to help with placement of the ferns. Remove the DSP layer and stamp the ferns with Old Olive Ink over the top and bottom pencil mark. Stamp multiple times without re-inking to get variations on the shading.
Adhere DSP layer to Very Vanilla layer
Wrap piece of Scalloped Linen Ribbon around center and adhere to back. (I used Tear and Tape as my adhesive for this to keep the ribbon secure and straight.) Adhere layer to card base.
Stamp 2 daisy images on Very Vanilla scrap with Terracotta Tile Ink and punch with Medium Daisy Punch
Adhere daises together by putting adhesive in the center of the bottom daisy and offsetting the petals.
Color center of daisy with Daffodil Delight and paint with Wink of Stella
Adhere Daisy to card over ribbon
Using 2 strands of Linen Thread make bow and adhere with Mini Glue Dot

On the inside layer, stamp fern with Old Olive Ink multiple times without re-inking.

If you want any of the products I used on this project, just click on the item below or the Shop Now button and it will bring you to my Online Store. Please use the current Host Code when you go to checkout your order. You can also click directly on an item to order.
Sketch Saturday - Gather Together
Today’s sketch is a challenge from the team I’m on. We do sketch and color challenges to win Prize Patrol. I won the last one…Yay!
I’m really happy with how this came out. The embossed layer and the beautiful Designer Series Paper with a pop of Copper Foil create a beautiful fall card.

Here’s the sketch from the challenge.

Tips & Instructions
Cajun Craze Card Base - 5 1/2 x 8 1/2, score at 4 1/4
Very Vanilla Layer - 5 1/4 x 4 - Emboss with Scripty 3D Embossing Folder (be sure you use the new Embossing Plate with 3D Embossing Folders)
Come To Gather Designer Series Paper Layer - 1 3/4 x 4
Copper Foil Strip - 3/8 x 4
Copper Foil scrap - cut large leaf using Gathered Leaves Dies
Very Vanilla scrap - stamp large leaf from the Gather Together Stamp Set with Merry Merlot Ink and adhere to copper leaf, offsetting a little bit
Very Vanilla Strip - 3/4 x 3, stamp sentiment with Merry Merlot Ink and punch banner at each end with the Banner Triple Punch
Adhere embossed layer to card base and the Designer Series paper and copper strip as shown in picture
Adhere leaves and sentiment using Dimensionals

On the inside, stamp the wheat image with Cajun Craze Ink and stamp again without re-inking to get lighter shades.

If you want any of the products I used on this project, just click on the item below or the Shop Now button and it will bring you to my Online Store. Please use the current Host Code when you go to checkout your order. You can also click directly on an item to order.
Nature's Beauty - Stamp on your Embossing Folder!!!
This was a fun card to make using the Nature’s Beauty Stamp Set. Stampin’ Up! will donate $3.00 to Mental Health Organizations for ever set they sell. Isn’t that wonderful?

There were a few techniques involved in creating these cards; dry embossing, heat embossing, sponging and stamping on the embossing folder. Follow along to see how to do these techniques.
Tips & Instructions
Early Espresso Card Base - 5 1/2 x 8 1/2, score at 4 1/4
Sahara Sand Layer - 5 1/4 x 4
Whisper White snowy hill 4 x 2 (at the highest part) cut hill with die from In The Woods
Early Espresso Scalloped Oval - cut with 2nd from smallest Layering Oval
Whisper White Oval - cut with 2nd from smallest Layering Oval and stamp sentiment (from Gather Together) using Early Espresso Ink. Adhere Ovals together.
Stamp deer and wolf images on Woodland Textured Embossing Folder as shown in video. Be sure to stamp on the side that has the word Sizzix and also make sure the trees are not upside down. Carefully place Sahara Sand layer in folder and run through embossing machine.
Lightly wipe VersaMark on trees, pour White Embossing Powder and heat to melt powder. Be sure to use your Embossing Buddy, especially between the trees and use a paintbrush to remove embossing powder you don’t want.
Stamp Bunny on snowy hill
Attach layers to card base and attach sentiment using Dimensionals
For the sun/moon, sponge Calypso Coral over small piece of Daffodil Delight Cardstock and then punch with 1” punch. Adhere to card using Dimensionals

If you want any of the products I used on this project, just click on the item below or the Shop Now button and it will bring you to my Online Store. Note, the Nature’s Beauty Stamp Set is available for purchase starting September 4, 2019. Please use the current Host Code when you go to checkout your order. You can also click directly on an item to order.
Beautiful Frosted Foliage
You’re going to love this Feels Like Frost Specialty Designer Series Paper. It is absolutely gorgeous!

The beautiful foliage frame was cut from Highland Heather Cardstock with the Frosted Frames Dies and then a few sprigs were added in Night Of Navy. These colors coordinate so well with the Designer Series Paper.

Tips & Instructions
Night Of Navy Card Base - 5 1/2 x 8 1/2, score at 4 1/4
Feels Like Frost Specialty Designer Series Paper - 5 1/4 x 4 (make sure you cut so the design is horizontal) and adhere to card base
Highland Heather Frame - cut with the Frosted Frames Dies
Whisper White sentiment layer - cut with Frosted Frames Dies, stamp sentiment (from Forever Lovely) with Night Of Navy Ink
Night Of Navy - cut sprigs with Frosted Frames Dies
Adhere sentiment layer to frame layer and lay over card front to determine placement for the sprigs. Adhere sprigs.
Adhere Frame using Dimensionals
Add Noble Peacock Rhinestones and Clear Rhinestones

Stamp floral image with Highland Heather on the inside and stamp sentiment if wanted. I left mine without so I can write what I want when I decide who I will send the card to.

If you want any of the products I used on this project, just click on the item below or the Shop Now button and it will bring you to my Online Store. (Note, some of these products will be available beginning Sept. 4, 2019 when the 2019 Holiday Catalog launches.) Please use the current Host Code when you go to checkout your order. You can also click directly on an item to order.
Tidings All Around - Blessed and Grateful Card
Autumn is right around the corner and it’s time to start making cards with the beautiful fall colors.

I used the Stamparatus to make this wreath and it was so easy to do once I had the template. Watch the video to see how I made it.
Tips & Instructions
Old Olive Card Base - 5 1/2 x 8 1/2, score at 4 1/4
Crushed Curry Layer - 4 1/8 x 4 1/8
Whisper White Layer - 4 x 4
Using Stamparatus, stamp the leave images around to create the wreath with Old Olive Ink
Stamp berries at the end of each branch with Crushed Curry Ink
Stamp the Blessed sentiment in the center of the wreath with Crushed Curry Ink
Whisper White Strip 3/4 x 3 3/4 - stamp sentiment and cut banner on each end with Banner Triple Bunch
Adhere layers and adhere sentiment strip using Dimensionals
Tie bow with ribbon and adhere with Mini Glue Dot

If you want any of the products I used on this project, just click on the item below or the Shop Now button and it will bring you to my Online Store. (Note the Tidings All Around Stamp Set is available beginning Sept. 4.) Please use the current Host Code when you go to checkout your order. You can also click directly on an item to order.
Beautiful Cardinal Card
I love seeing cardinals in a snowy scene. The pop of red is just beautiful!

This cardinal is from the Toile Christmas Stamp Set and I cut it out using the coordinating dies. The paper is from the Feels Like Frost Designer Series Papers.

Tips & Instructions
Night Of Navy Card Base - 5 1/2 x 8 1/2, score at 4 1/4
Feels Like Frost Designer Series Paper - 5 1/4 x 4 (try to get the best part of the image when cutting). Adhere to Card Base
Stamp sentiment on Designer Series Paper using Tuxedo Black Memento Ink
Stamp cardinal on Whisper White Cardstock with Tuxedo Black Memento Ink and cut with coordinating die
Color cardinal with Poppy Parade Stampin’ Blends and darken the head with Black Stampin’ Write Marker. Add Wink of Stella if desired
Color beak with a Dark Pumpkin Pie Stampin’ Blends Marker
Adhere Cardinal using Dimensionals
Add Rhinestones

On the inside stamp the leaf image using Old Olive Ink.

The Feels Like Frost Designer Series Papers are gorgeous. One side has photographic imagery and the other side has hand-drawn images with silver foil. I’m not sure the pictures below really do it justice. Join my Paper Share and you will get a sample of these as well as all the other Designer Series Papers in the 2019 Holiday Catalog. Leave me a comment or email me - patti@pspapercrafts.com

You can start shopping for these products on September 4, 2019. Just click on the item below or the Shop Now button and it will bring you to my Online Store. Please use the current Host Code when you go to checkout your order. You can also click directly on an item to order.
Sketch Saturday - Colorful Seasons
I pulled out one of my old favorites for this card. It’s the Colorful Seasons Stamp Set and the coordinating Seasonal Layers Dies. I just love the Adirondack Chair.

The Sketch is another one from the CAS(E) this Sketch Challenge from Splitcoaststampers. You can check out their link and see what others have made. CAS(E) this Sketch #336

Here’s the card I made. The colors are Terracotta Tile, Seaside Spray and Crumb Cake. The ribbon below the sentiment is the Terracotta Tile Scalloped Linen Ribbon; so pretty!

Tips & Instructions
Terracotta Tile Card Base - 5 1/2 x 8 1/2, score at 4 1/4
Crumb Cake Layer - 5 1/4 x 4
Seaside Spray Layer - 5 1/8 x 3 7/8, emboss with Subtle 3D Embossing Folder
Scrap of Terracotta Tile - cut Adirondack chair with Seasonal Layers Dies
Crumb Cake Strip - 4 x 3/4
Adhere Layers
Stamp sentiment with black ink and adhere ribbon behind strip (I used Tear & Tape to adhere it)
Adhere sentiment to card and adhere Adirondack Chair over sentiment strip
Adhere 3 Seaside Spray Faceted Dots to top corner

I used a Crumb Cake layer on the inside and stamped some leaves with Terracotta Tile Ink.

If you want any of the products I used on this project, just click on the item below or the Shop Now button and it will bring you to my Online Store. Please use the current Host Code when you go to checkout your order. You can also click directly on an item to order.
Gather Together Autumn Leaves
I love Autumn colors and the Come To Gather Designer Series Paper really delivers with beautiful patterns and rich colors.

Watch my video below to see how I made these cards. The leaf dies cut and emboss in one pass, so pretty!
Tips & Instructions
Crumb Cake Card Base - 5 1/2 x 8 1/2, score at 4 1/4
Come To Gather Designer Series Paper - 5 1/4 x 4
Scraps of Cajun Craze and Crumb Cake - cut out leaves with coordinating dies
Scrap of Whisper White - stamp sentiment with Cajun Craze Ink and punch with Pretty Label Punch
Wrap piece of Crumb Cake Ribbon around the Designer Series Paper Layer and adhere to back and adhere to card base
Using label as guide, place leaves where you want them and adhere them to layer
Adhere label using Dimensionals
Tie two strands of Cajun Craze Linen Thread into a bow and adhere with Mini Glue Dot

Both sentiments work well with the Pretty Label Punch

On the inside, stamp sentiment with Merry Merlot and then stamp leaf image (stamping off first to get lighter color)

If you want any of the products I used on this project, just click on the item below or the Shop Now button and it will bring you to my Online Store. Please use the current Host Code when you go to checkout your order. You can also click directly on an item to order.
Season of Thanks
The Gather Together Stamp Set is just perfect for heading into Autumn.

The card base was embossed with the 3D Mosaic Embossing Folder which gives the card great texture.
Tips & Instructions
Pumpkin Pie Card Base - 5 1/2 x 8 1/2, score at 4 1/4 and emboss front with Mosaic 3D Embossing Folder (Be sure to use the new Embossing Plate with 3D folders)
Crumb Cake Layer - 4 1/8 x 3 1/8
Whisper White Layer 4 x 3
Whisper White scrap - stamp pumpkins with pumpkin Pie Ink and cut out with the Gathered Leaves Dies
Stamp Wheat and dots with Crumb Cake Ink and sentiment with Pumpkin Pie Ink Ink (I stamped one bunch of wheat a second time without re-inking to get a lighter look)
Adhere layers to card and adhere pumpkins using Dimensionals

On the inside stamp sentiment with Pumpkin Pie Ink and the wheat bunches with Crumb Cake Ink. Adhere pumpkins over the wheat.

If you want any of the products I used on this project, just click on the item below or the Shop Now button and it will bring you to my Online Store. Please use the current Host Code when you go to checkout your order. You can also click directly on an item to order.
Floral Essence Birthday Wishes
These flowers from the Floral Essence Stamp Set are so beautiful. I stamped them with Rich Razzleberry Ink and adding the centers with Crushed Curry, really makes them pop.

The floral oval cut out is from the Petal Labels Dies and its so pretty. The colors are Rich Razzleberry and Soft Sea Foam.
Tips & Instructions
Rich Razzleberry Card Base - 5 1/2 x 8 1/2, score 4 1/4
Soft Seafoam Layer - 5 1/4 x 4, cut floral oval in center using Petal Labels Die
Whisper White Layer 5 1/4 x 4 (cut it slightly smaller), stamp flowers across bottom half with Rich Razzleberry Ink, centers with Crushed Curry and add leaves with Garden Green. Lay oval over to help with placement as you go
Stamp sentiment where it fits with Black Memento Ink (I used the sentiment from Varied Vases as it fit nicely)
Adhere Soft Foam Layer over Whisper White Layer with Dimensionals. Cut any white that shows from behind.
Adhere layer to card base

