Sketch Saturday - Path Of Petals

Today’s sketch is from a challenge from the Splitcoaststamps CAS(E) this Sketch #330 Challenge

 
Sketch Saturday - Path Of Petals Card.jpg
 

This is the sketch from the challenge.

 
Screen Shot 2019-07-12 at 10.30.10 PM.png
 

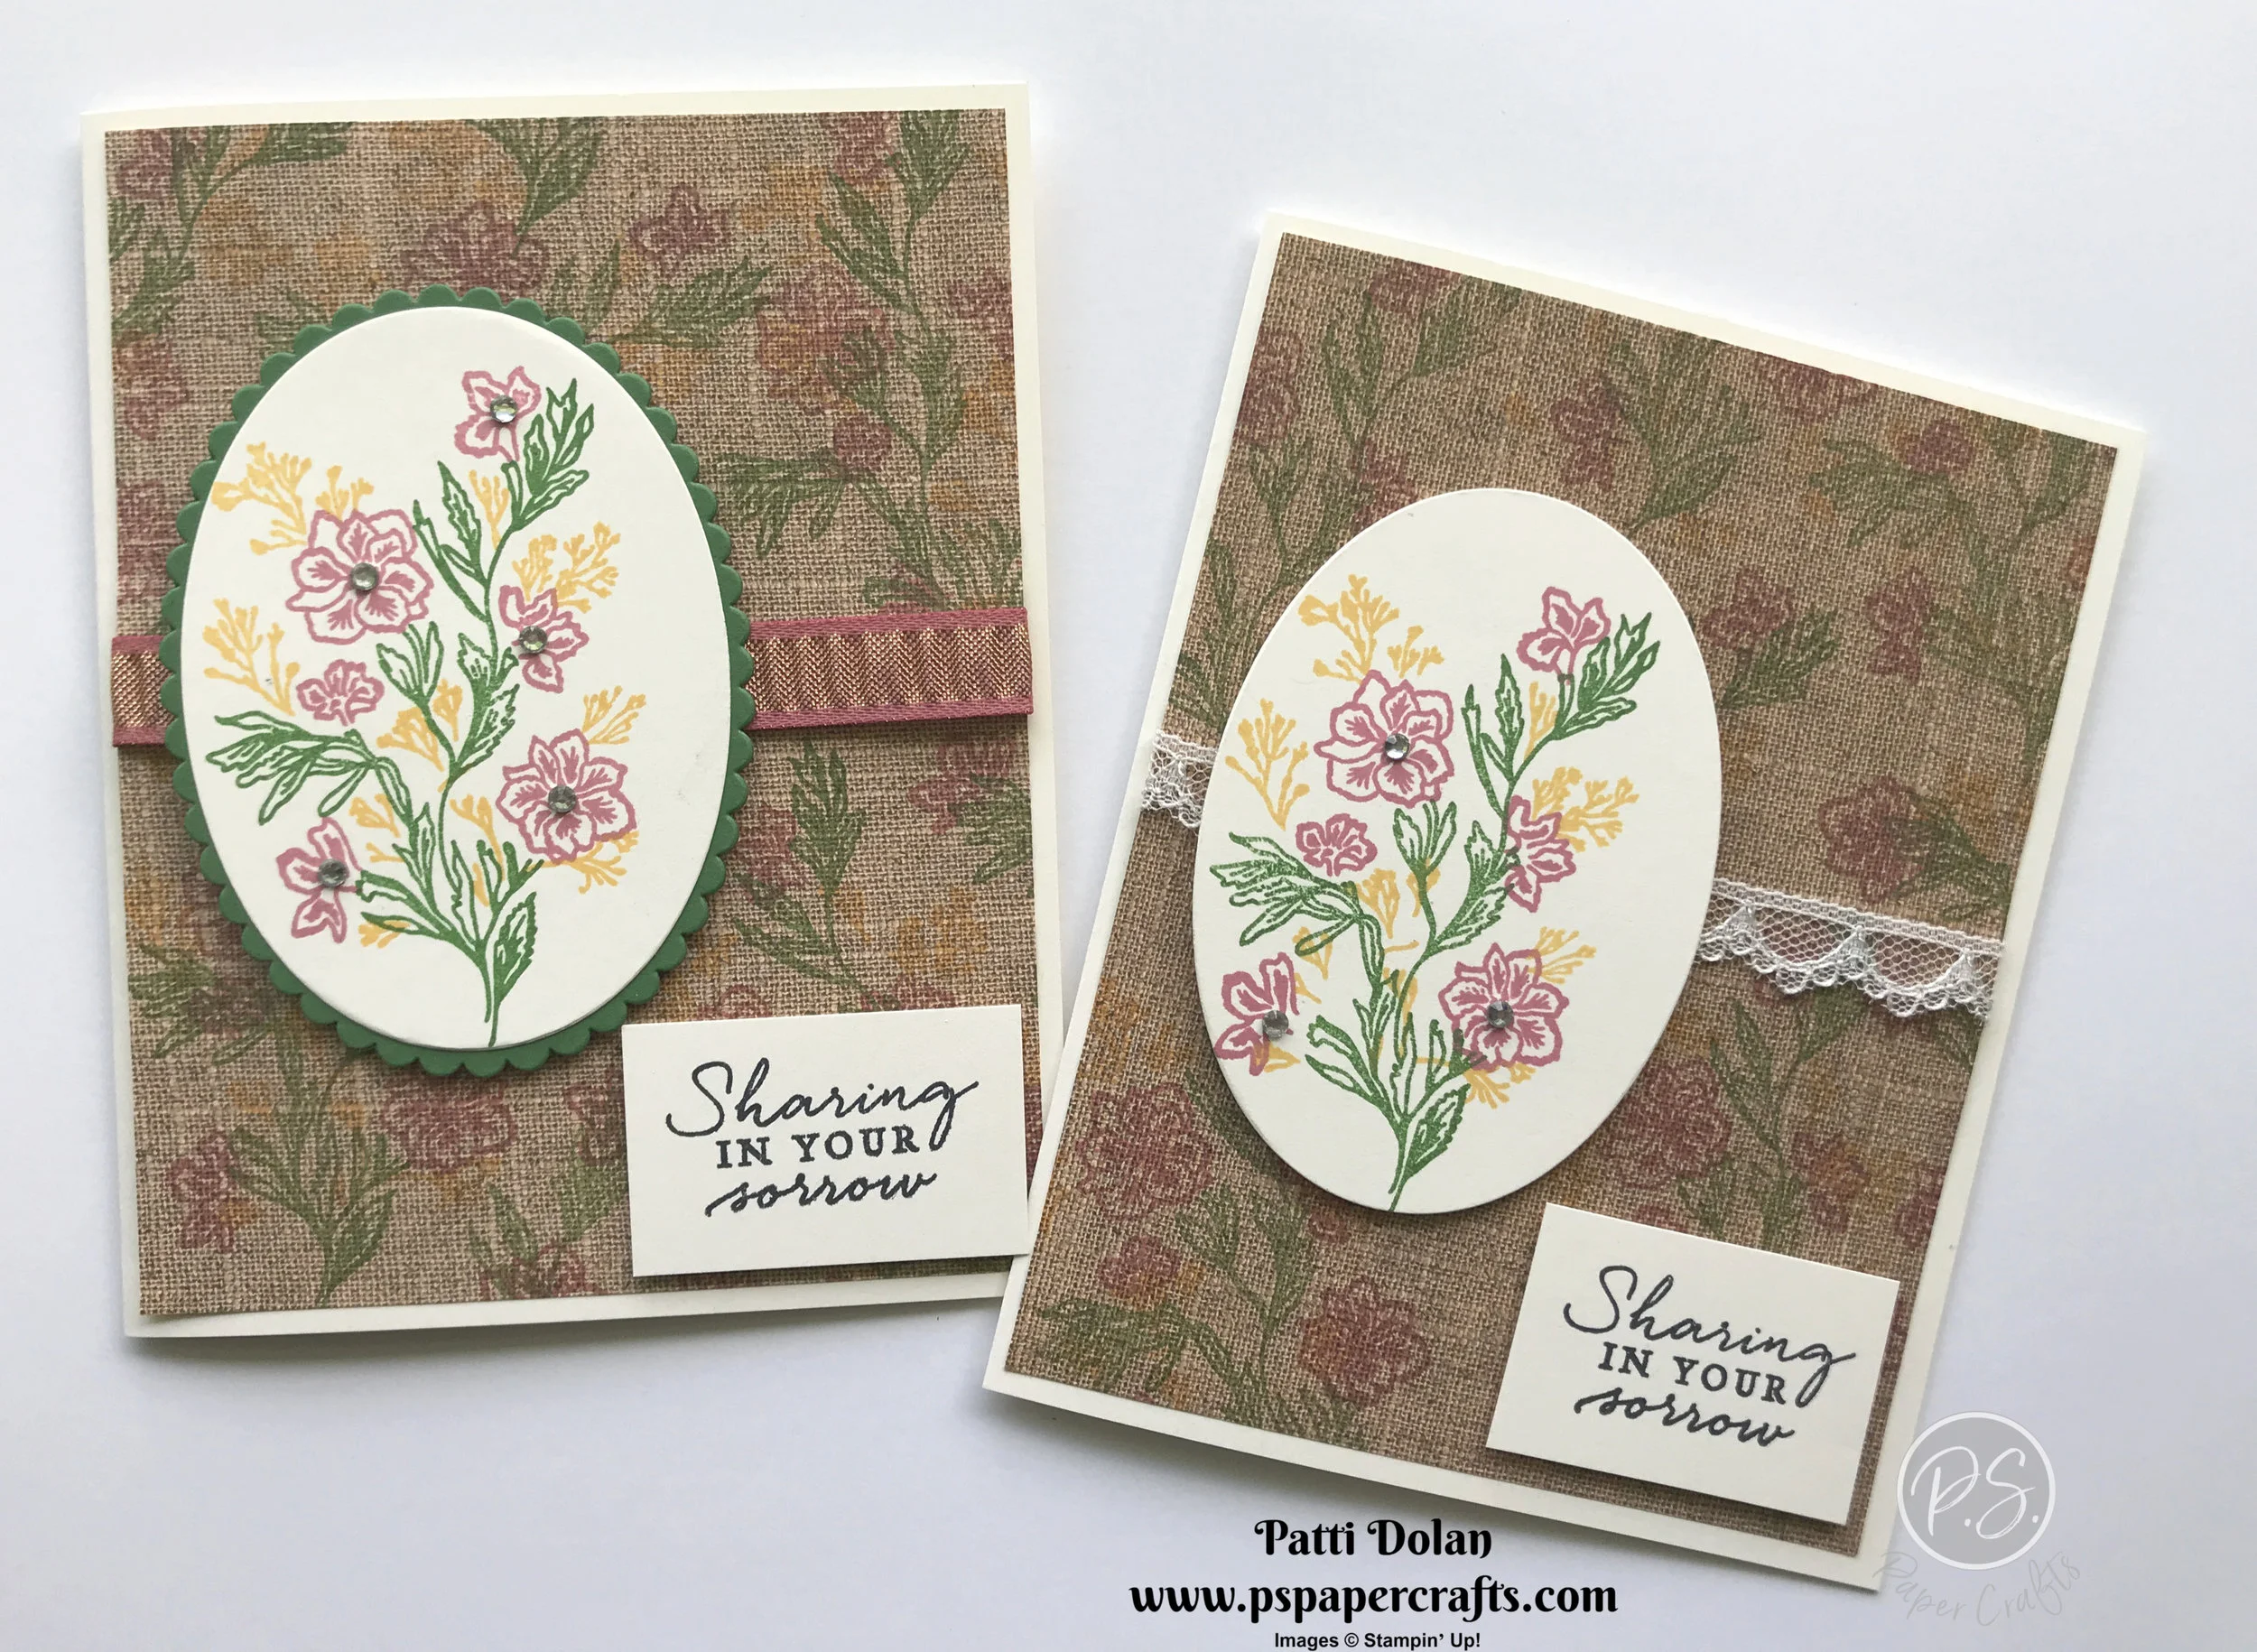
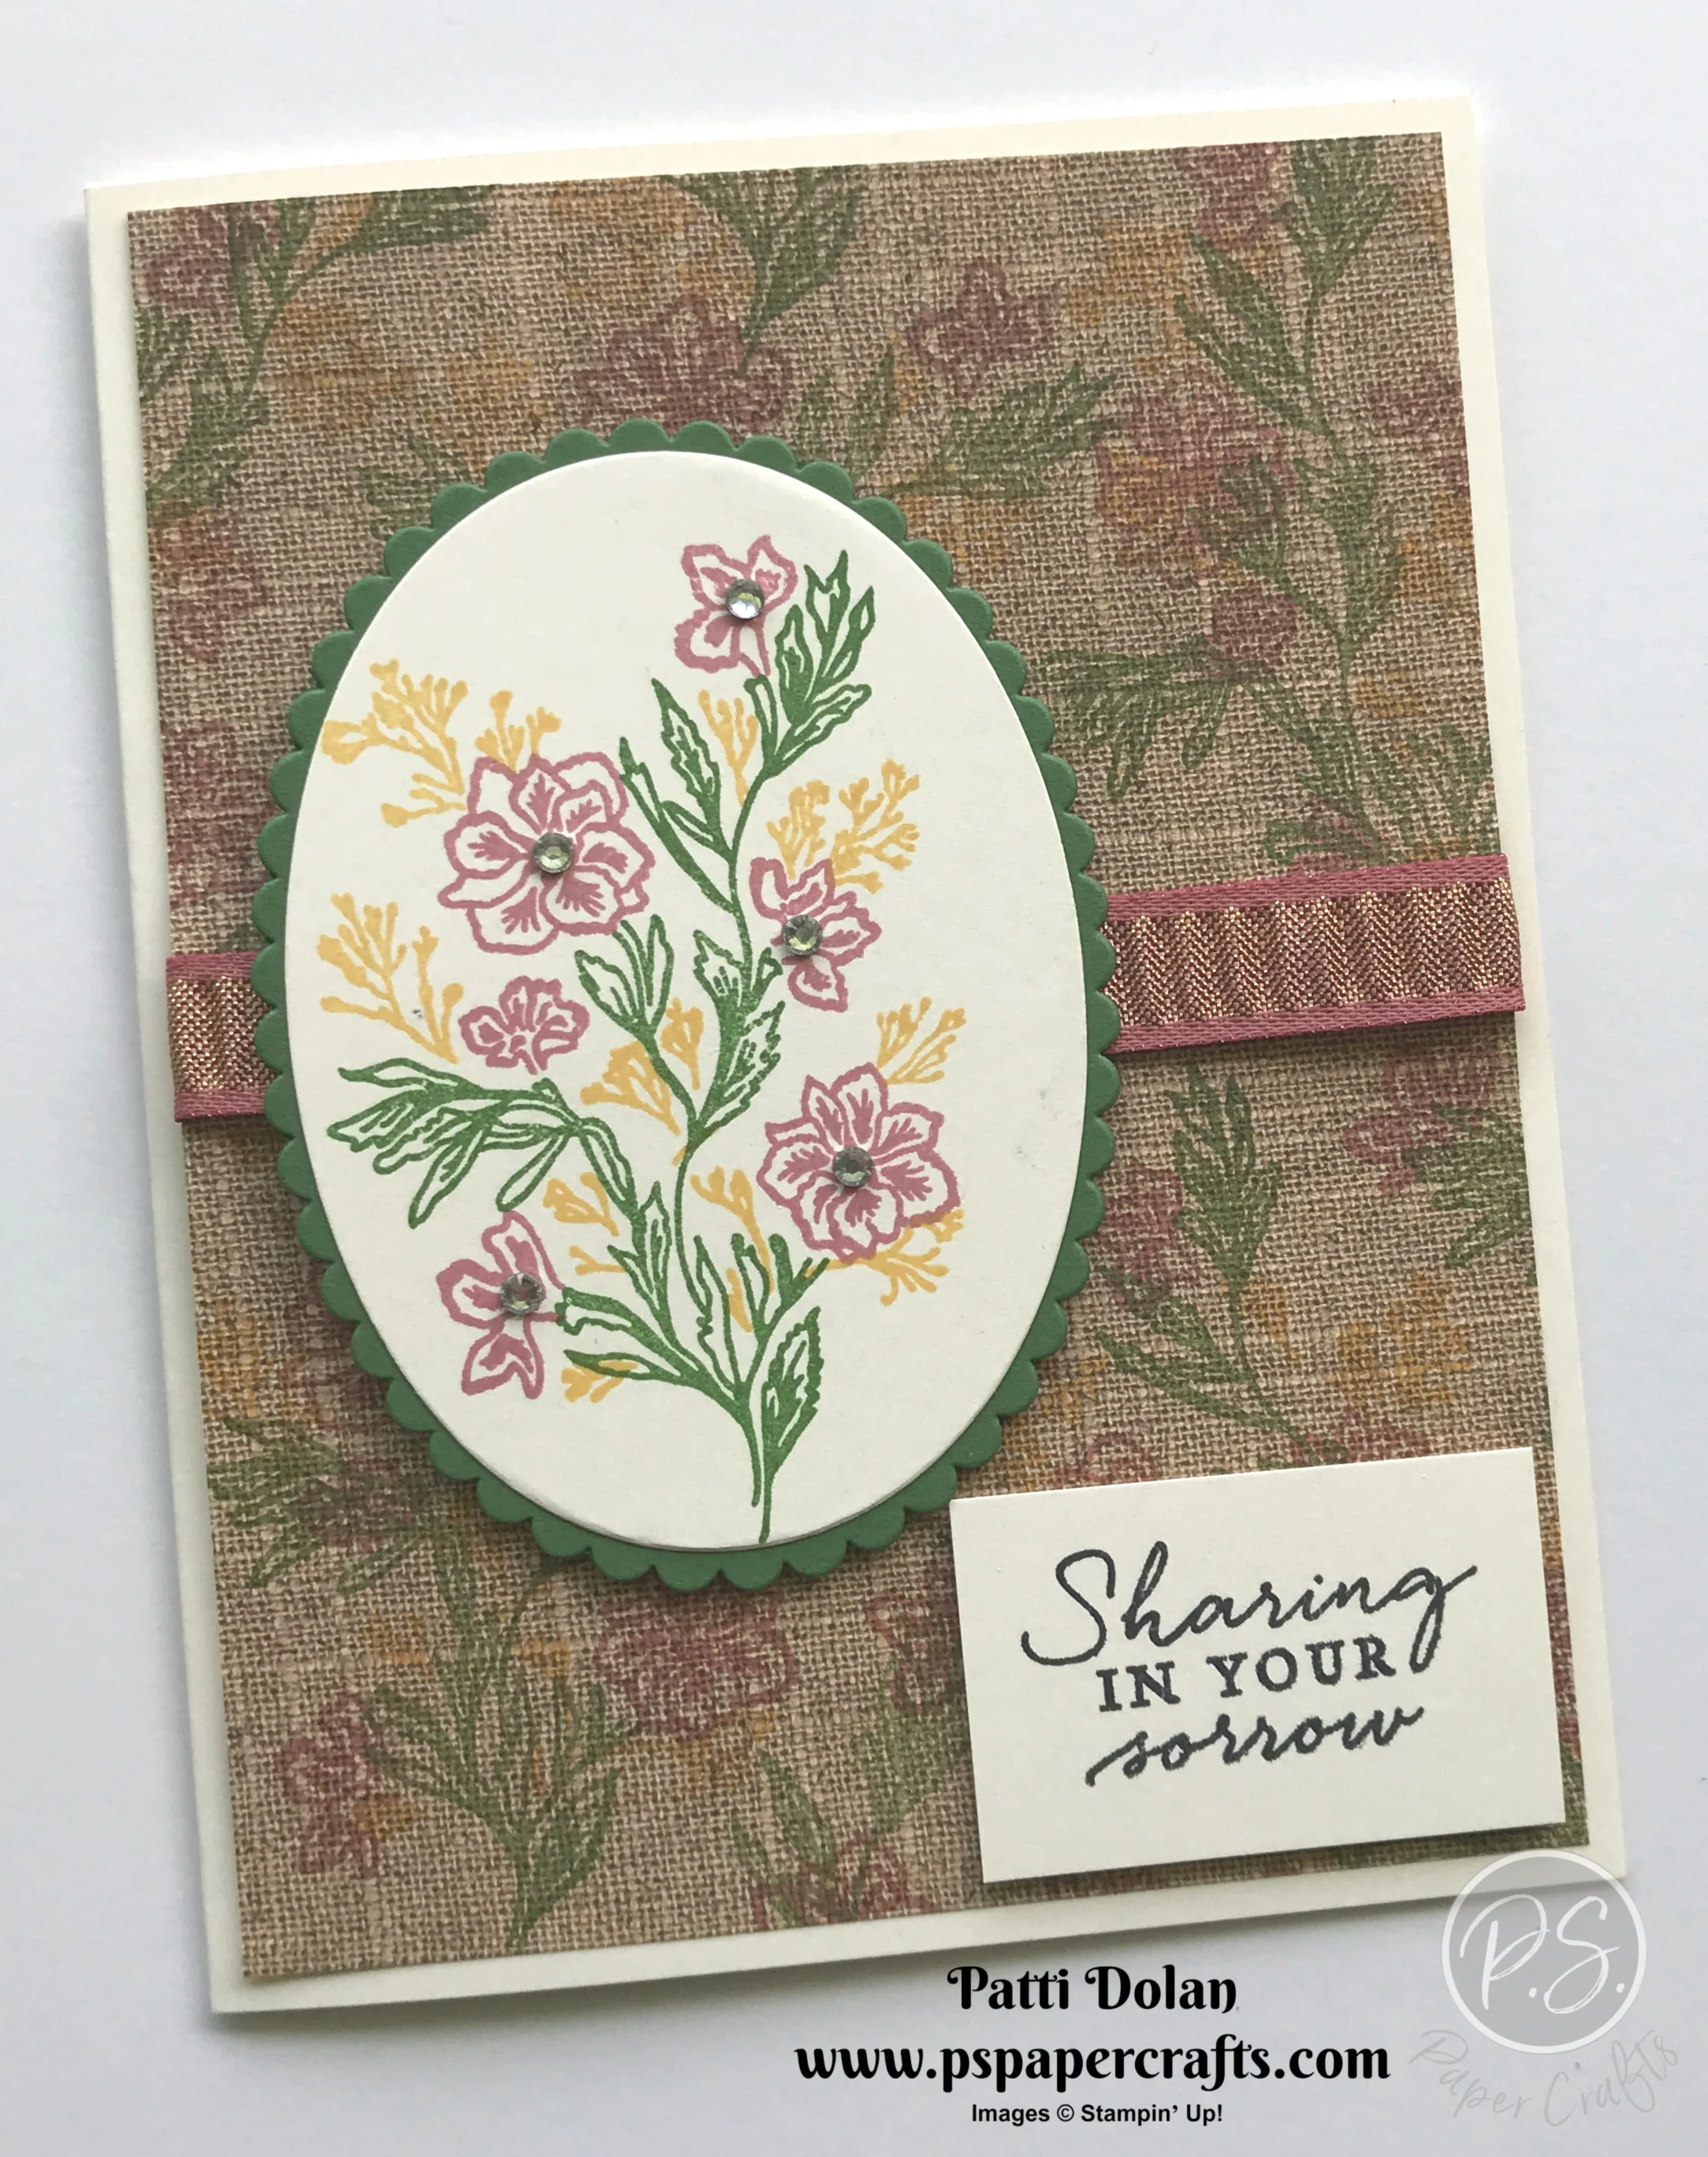
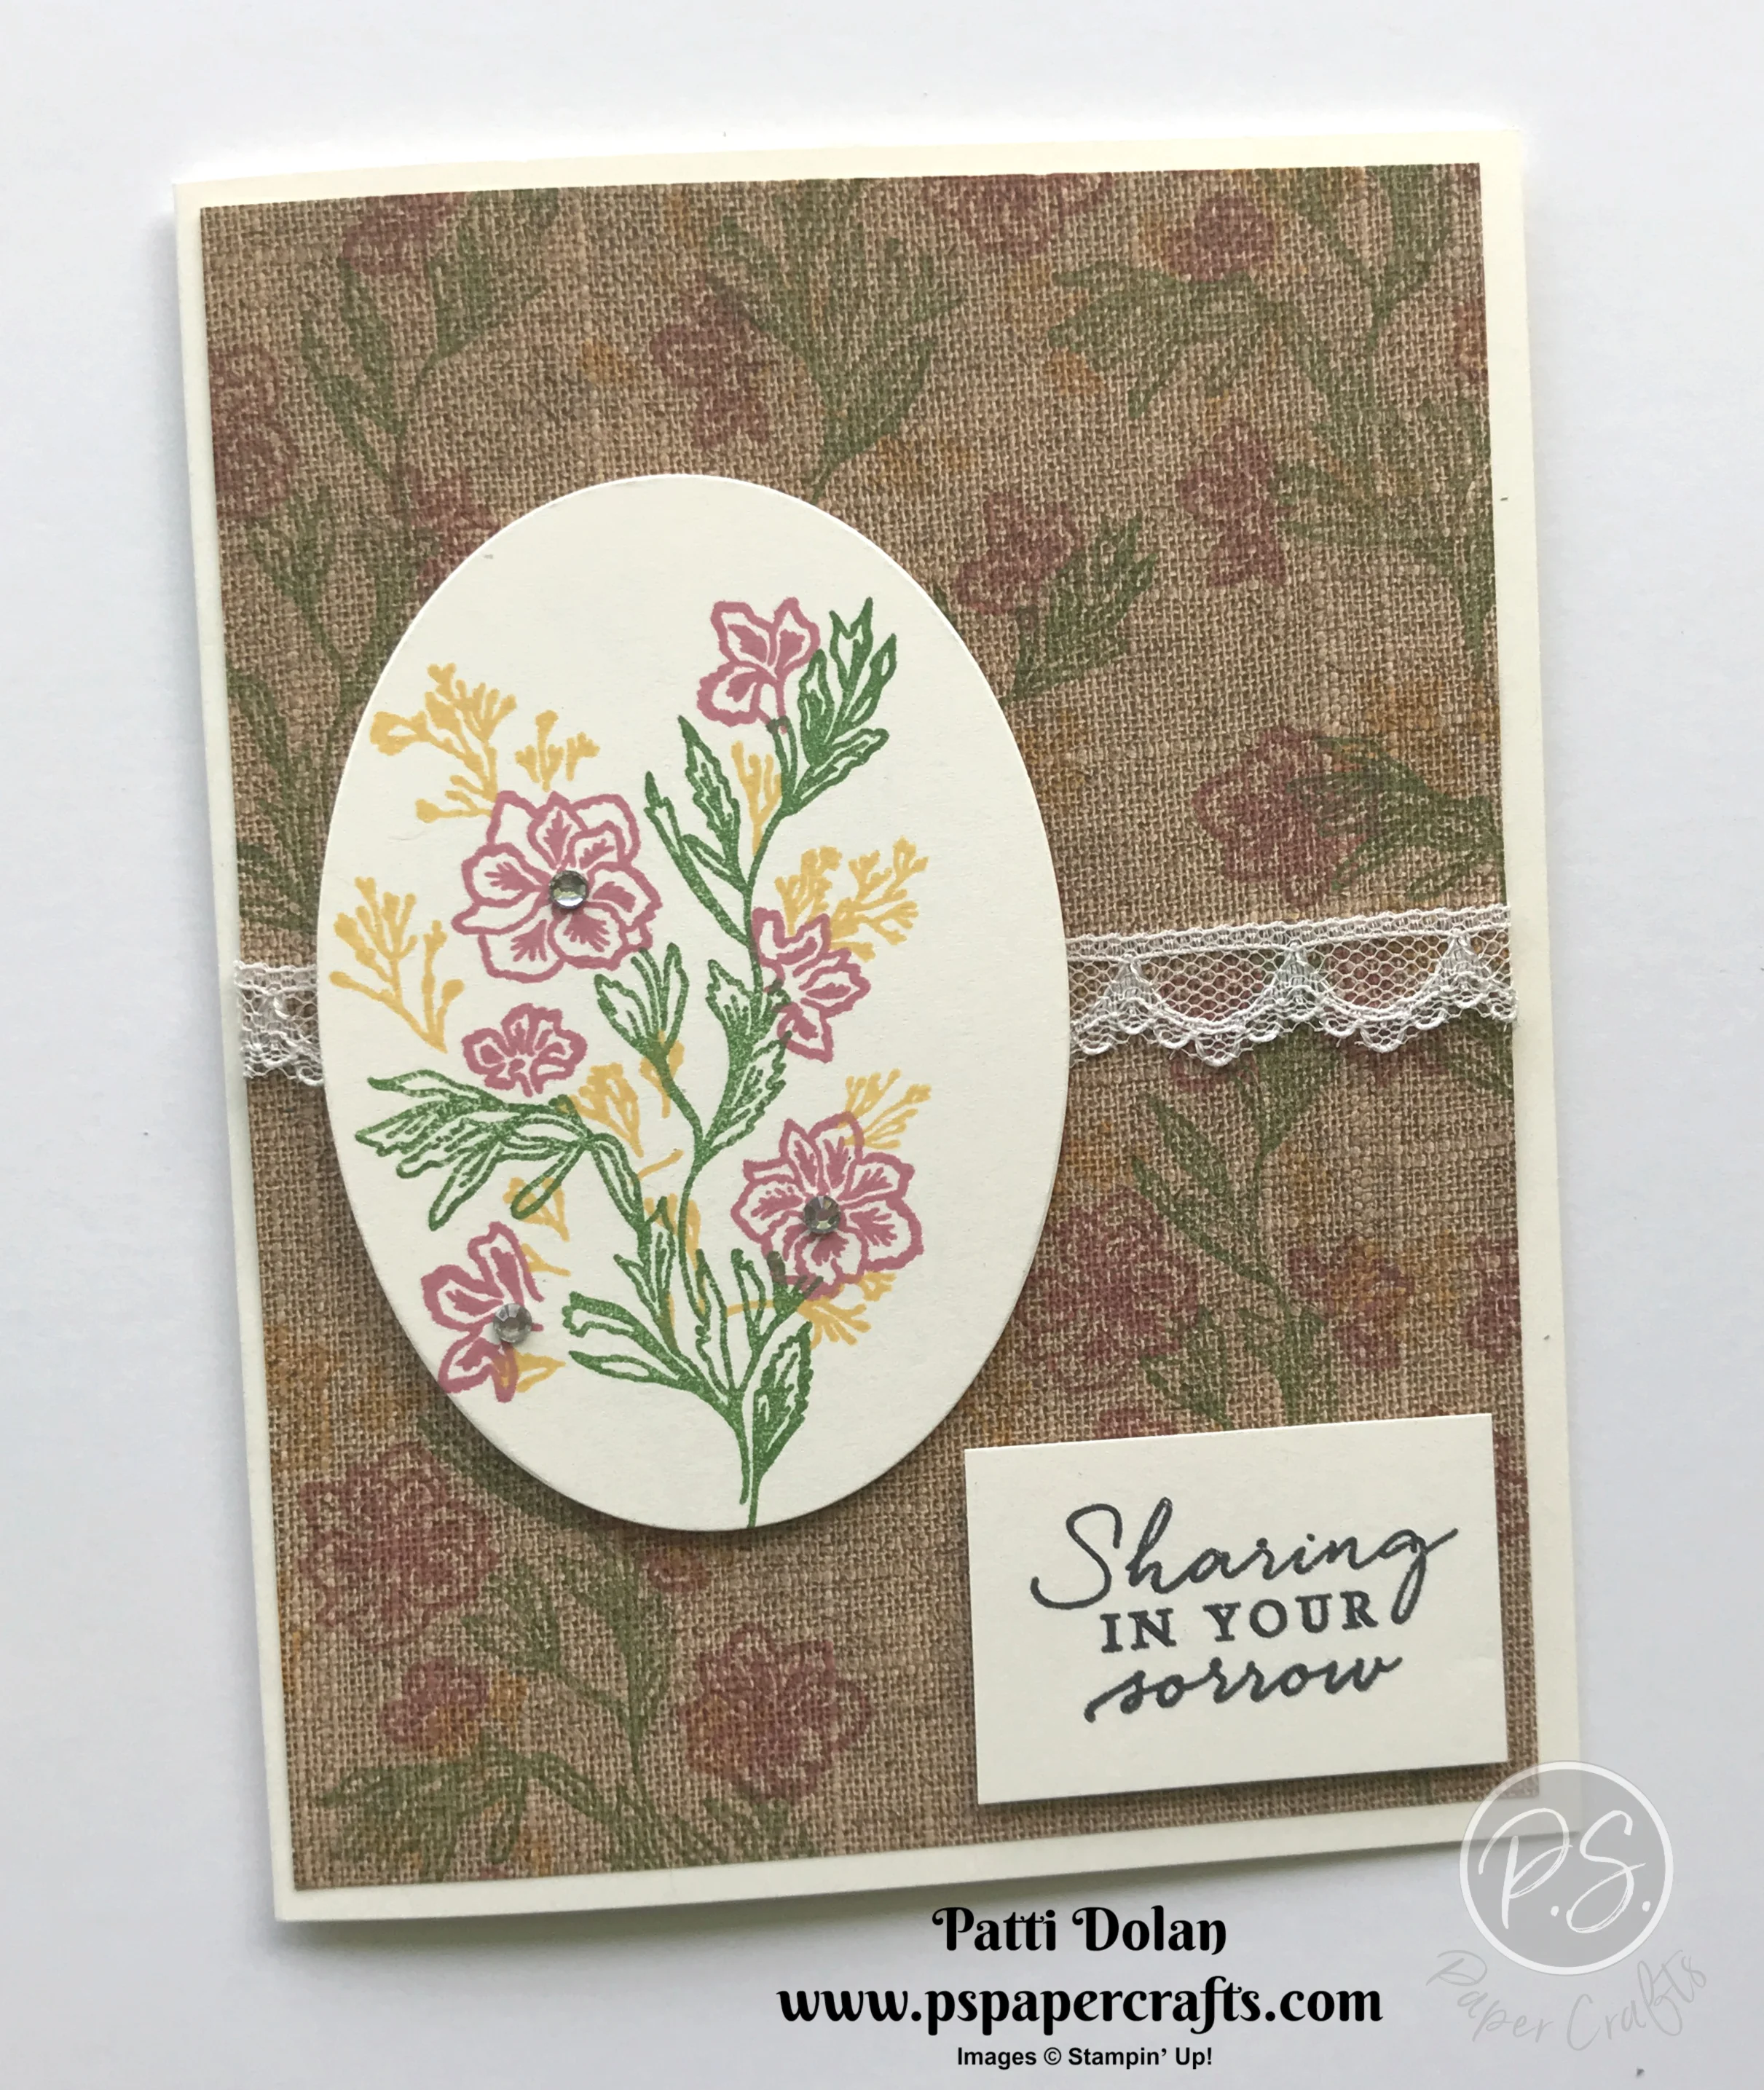
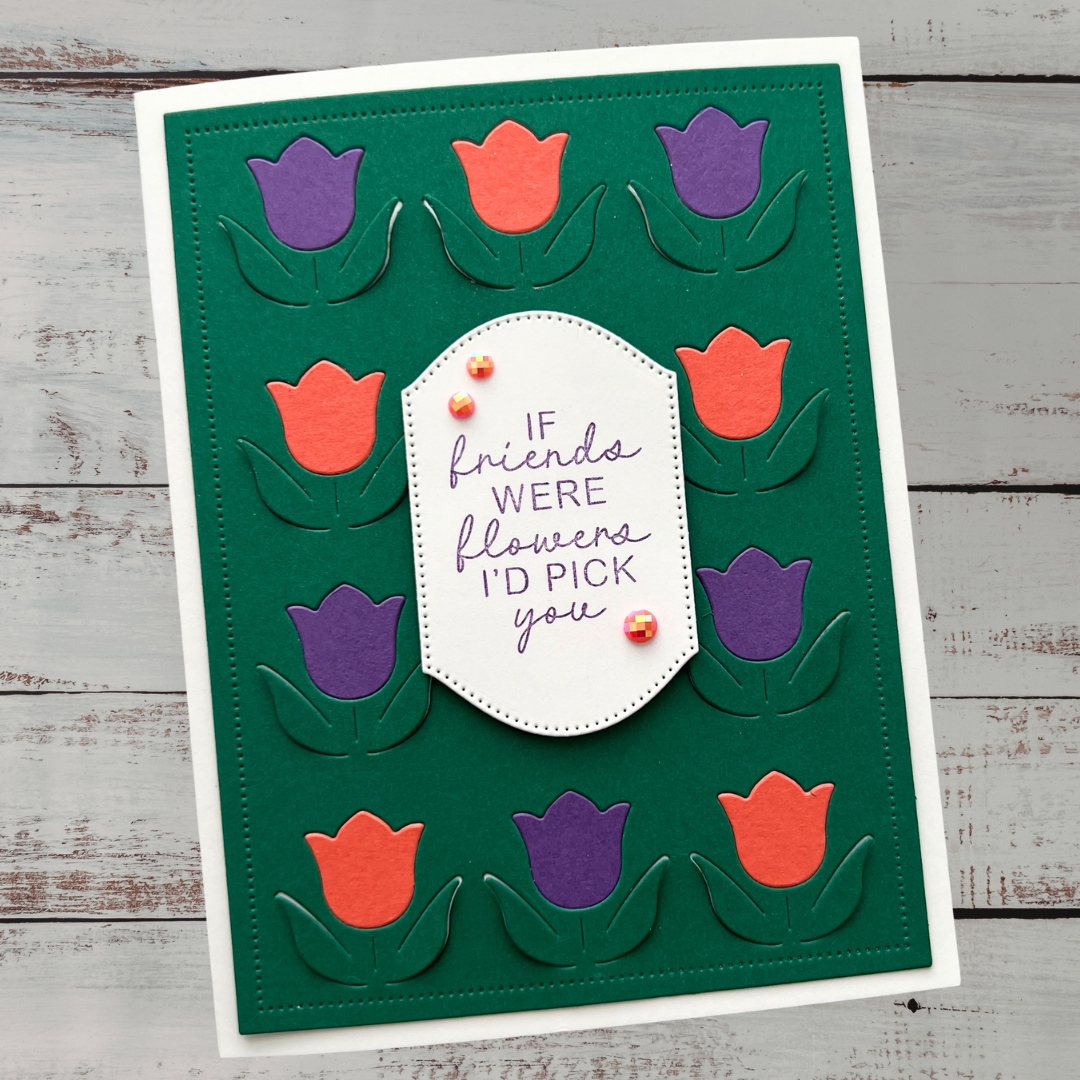
I used the Path Of Petals Bundle to create this beautiful card. The floral piece was cut with Pretty Peacock Cardstock using the smaller floral die and the sentiment was cut with the oval which fits perfectly inside of it.

 
Sketch Saturday - Path Of Petals Bundle.jpg
 

Tips & Instructions

  • Pretty Peacock Card Base - 5 1/2 x 8 1/2, scored at 4 1/4

  • Whisper White Layer - 5 1/4 x 4, emboss with Scripty 3D Embossing Folder

  • Cut Pretty Peacock Cardstock using smaller floral die

  • Stamp sentiment on Whisper White Cardstock with Pretty Peacock Ink and cut with oval die

  • Adhere sentiment to floral piece

  • Wrap White Bakers Twine around embossed layer twice and adhere in back.

  • Adhere floral piece to card with Dimensionals over twine - Using two strands, tie bow and adhere with Mini Glue Dot

  • Adhere Layer to card base

 
Sketch Saturday - Path Of Petals Card3.jpg
 

Stamp sentiment on inside layer with Pretty Peacock Ink. Stamp floral image on scrap paper first and then on bottom corner inside the card. Stampin on scrap paper gives you a lighter color.

 
Sketch Saturday - Path Of Petals inside.jpg
 

If you want any of the products I used on this project, just click on the item below or the Shop Now button and it will bring you to my Online Store. Please use the current Host Code when you go to checkout your order. You can also click directly on an item to order.

Back On Your Feet - Get Well

This is such a fun Stamp Set to make Get Well Cards with.

 
Back On Your Feet Turtle Both.jpg
 

I made the background by stamping the turtle with Versamark randomly on the Granny Apple Green layer of cardstock. Watch the video to follow along with me.

Tips & Instructions

  • Crumb Cake Card Base - 5 1/2 x 8 1/2, scored at 4 1/4

  • Granny Apple Green Layer - 5 1/4 x 4 - stamp turtle image randomly with Versamark

  • Stamp turtle image on Whisper White Stitched Circle (2nd largest) with Tuxedo Black Memento Ink and color with Stampin’ Blends

  • Cut Crumb Cake with Scalloped Circle (3rd largest) and adhere to Stitched Circle

  • Cut Whisper White Stitched Rectangle and stamp sentiment with Tuxedo Black Memento Ink

  • Wrap ribbon around Granny Apple Green layer and adhere to back. Adhere circles over ribbon with Dimensionals and adhere sentiment with Dimensionals

  • Add 3 Glitter Enamel Dots

 
Back On Your Feet Turtle3.jpg
 

Stamp the sentiment (from Healing Hugs) with Tuxedo Black Memento Ink and leave image twice with Granny Apple Green Ink.

 
Back On Your Feet Turtle Inside.jpg
 

If you want any of the products I used on this project, just click on the item below or the Shop Now button and it will bring you to my Online Store. Please use the current Host Code when you go to checkout your order. You can also click directly on an item to order. 

Pressed Petals - Thinking Of You

I love the rustic look of the Pressed Petals Designer Series Paper. The ribbon I used coordinates perfectly with it!

 
Pressed Petals Thinking of You.jpg
 

Tips & Instructions

  • Rococo Rose Card Base - 5 1/2 x 8 1/2, scored at 4 1/4

  • Pressed Petals Designer Series Paper Layer - 5 1/4 x 4

  • Very Vanilla Label - stamp sentiment and punch with Story Label Punch

  • Adhere Rococo Rose Scalloped Linen Ribbon around Designer Series Paper Layer

  • Adhere label with Dimensionals

 
Pressed Petals Thinking of You2.jpg
 
 
Pressed Petals Thinking of You4.jpg
 

On the inside I stamped the leaf image (from the Daisy Lane Stamp Set) with Pear Pizzazz Ink, lifting and stamping again without re-inking.

 
Pressed Petals Thinking of You inside.jpg
 

If you want any of the products I used on this project, just click on the item below or the Shop Now button and it will bring you to my Online Store. Please use the current Host Code when you go to checkout your order. You can also click directly on an item to order. 

Beautiful Pressed Petals Cards

The Pressed Petals Designer Series Paper is gorgeous. I made 7 cards using this one sheet and I love them all!!!

 
Pressed Petals 7 Cards.jpg
 

The cards are very simple but the Designer Series Paper is so pretty you don’t need to add much to make a beautiful card. Watch the video to see how I made all 7 cards.


Below I’ll tell you all the measurements and products I used for each card.

Card 1 - Pear Pizzazz Card Base 5 1/2 x 8 1/2, scored at 4 1/4, Very Vanilla Layer 4 1/2 x 3 1/2, DSP layer 4 1/4 x 3 1/4. Stamp sentiment (from A Little Lace) with Mossy Meadow on a 4 1/4 x 1/2 strip of Very Vanilla. Add Rococo Rose Faceted Dots.

 
Pressed Petals card1 small.jpg
 

Card 2 - Rococo Rose Card Base - 5 1/2 x 8 1/2, scored at 4 1/4. Cut DSP to 5 1/4 x 4. Stamp sentiment (from Verdant Garden) with Mossy Meadow Ink. Add pearls.

 
Pressed Petals card2.jpg
 

Card 3 (4 x 4 card) - Mossy Meadow Card Base 8 x 4, scored at 4. Very Vanilla Layer 3 1/2 x 3 1/2, DSP layer 3 1/4 x 3 1/4. Stamp sentiment (from Good Morning Magnolia) with Mossy Meadow Ink on Stitched Oval. Tie 3 strands of Mossy Meadow Linen Thread into a bow and adhere with Mini Glue Dot.

 
Pressed Petals card3.jpg
 

Card 4 - Merry Merlot Card Base - 5 1/2 x 8 1/2, scored at 4 1/4. Layer of DSP 5 1/4 x 4. Add Lace Ribbon to side. Stamp sentiment on Very Vanilla with Merry Merlot Ink on label cut from Parcels & Petals Bundle.

 
Pressed Petals card4.jpg
 

Card 5 (4 x 4 card) - Merry Merlot Card Base - 8 x 4, scored at 4. Very Vanilla Layer 3 1/2 x 3 1/2, DSP layer 3 1/4 x 3 1/4. Stamp sentiment (from Good Morning Magnolia) with Merry Merlot Ink on Very Vanilla Stitched Oval. Add Nobel Peacock Rhinestones.

 
Pressed Petals card5.jpg
 

Card 6 - Night Of Navy Card Base - 5 1/2 x 8 1/2, scored at 4 1/4. Daffodil Delight Layer 5 1/4 x 4 and DSP layer 5 x 3 3/4. Stamp sentiment (from Parcels & Petals) with Night Of Navy Ink on Whisper White Label cut with Story Label Punch. Cut left side of label off. Adhere Polka Dot Ribbon to DSP & Daffodil Delight layers prior to adhering to card base. Tie additional piece of ribbon around ribbon you adhered to look like a bow.

 
Pressed Petals card6.jpg
 

Card 7 - Mossy Meadow Card Base 5 1/2 x 8 1/2, scored at 4 1/4. Daffodil Delight Layer 5 1/4 x 4 1/8 and DSP Layer 5 1/8 x 4. Stamp sentiment (from Good Morning Magnolia) with Mossy Meadow Ink on Whisper White label cut from the Smooth Sailing Die. Add Nobel Peacock Rhinestones.

 
Pressed Petals card7.jpg
 

If you want any of the products I used on this project, just click on the item below or the Shop Now button and it will bring you to my Online Store. Please use the current Host Code when you go to checkout your order. You can also click directly on an item to order.

Quick & Easy Masculine Birthday Card

Create a simple birthday card for a guy using the Come Sail Away Designer Series Paper.

 
Come Sail Away Birthday2.jpg
 

I used the Designer Series Paper for the background and also for the strip with the knots behind the sentiment label.

 
Screen Shot 2019-07-08 at 10.58.03 PM.png
 

Tips & Instructions

  • Night Of Navy Card Base - 5 1/2 x 8 1/2, scored at 4 1/4

  • Come Sail Away Designer Series Paper Layer 5 1/4 x 4

  • Come Sail Away Designer Series Paper Strip - cut the width of the knots x 4 1/4

  • Stamp sentiment on Whisper White scrap with Night Of Navy Ink and punch with Story Label Punch

  • Adhere Layer to Card Base and Strip over layer. Adhere Label using Dimensionals

  • Color 2 Pearls with Dark Night Of Navy Stampin’ Blends Marker and adhere to Label

  • Adhere Come Sail Away Trinket to Label with Mini Glue Dot

 
Come Sail Away Birthday.jpg
 

Stamp sentiment, birds and sailboat on the inside using Night Of Navy Ink.

 
Come Sail Away Birthday Inside.jpg
 

If you want any of the products I used on this project, just click on the item below or the Shop Now button and it will bring you to my Online Store. Please use the current Host Code when you go to checkout your order. You can also click directly on an item to order. 

Sketch Saturday - Mosaic Mood

Today’s sketch is a challenge from the Stampin’ Up! team that I’m on. We have sketch or color challenges in our Facebook Group all the time. It’s so much fun to see what everyone creates.

Here’s the card I made from the sketch. I used the Mosaic 3D Embossing Folder on the card front and cut a piece of the Mosaic Mood Specialty Designer Series Paper for the focal piece.

 
Saturday Sketch - Mosaic Mood.jpg
 

Here’s the sketch I followed.

 
Screen Shot 2019-07-04 at 11.35.13 AM.png
 

Tips & Instructions

  • Garden Green Card Base - 5 1/2 x 8 1/2, scored at 4 1/4 - emboss card front with the Mosaic 3D Embossing Folder

  • Crushed Curry Layer - 4 1/8 x 3 3/8

  • Mosaic Mood Specialty Designer Series Paper - 4 x 3 1/4

  • Very Vanilla Strip - 1/2 x 3 3/4 - Stamp sentiment (A Little Lace Stamp Set) with Garden Green Ink

  • Adhere Layers and adhere to card base

  • Adhere sentiment strip using Dimensionals

  • Add Rhinestones to sentiment strip

 
Saturday Sketch - Mosaic Mood2.jpg
 

I cut 2 strips 4 x 1/2 from the Designer Series Paper and attached to the top and bottom of the inside layer.

 
Saturday Sketch - Mosaic Mood inside.jpg
 

If you ever thought about joining Stampin’ Up! now is the perfect time. They have a special going on. Between July 1 to August 31, 2019 you can get $155 worth of products (you choose) and pay only $99. Then you get a $10 coupon code to spend the following month. Once you join, you get 20% off your purchase and you can be part of this group as well; it’s really a wonderful group of people. Just let me know if you want more info. about it.

If you want any of the products I used on this project, just click on the item below or the Shop Now button and it will bring you to my Online Store. Please use the current Host Code when you go to checkout your order. You can also click directly on an item to order. 

Set Sail in the Direction of your DREAMS!

I love how the waves came out on these cards using the High Seas 3D Embossing Folder. The sailboats are sitting right in the water.

 
Sailing Home Sailboats both.jpg
 

I embossed a piece of Pacific Point Cardstock with the High Seas folder and then cut along the waves to get it to the right size for this card. You can see how I did it on the video below.

Tips & Instructions

  • Balmy Blue Card Base - 5 1/2 x 8 1/2, score at 4 1/4

  • Pacific Point Layer - 5 1/2 by approx 3 - emboss with High Seas 3D Embossing folder and then cut down to size along the waves

  • Stamp sentiment, 1 large sailboat and 2 small sailboats with Tuxedo Black Memento Ink and cut out with coordinating dies

  • Color sailboats with Stampin’ Blends Markers

  • Stamp birds at top of card base with Pacific Point Ink

  • Adhere waves to card base with Liquid Glue

  • Adhere sentiment and sailboats to card with Dimensionals

  • Adhere trinket at bottom of sentiment with Mini Glue Dots

 
Sailing Home Sailboats Card.jpg
 
 
Sailing Home Sailboats Card2.jpg
 

If you want any of the products I used on this project, just click on the item below or the Shop Now button and it will bring you to my Online Store. Please use the current Host Code when you go to checkout your order. You can also click directly on an item to order. 

Sigh....Such a Sad Sloth

Here’s another card made with the Back On You Feet Stamp Set. He’s so sad; he reminds me of Eeyore from Winnie the Pooh…sigh!

 
Back On Your Feet Sloth Stamp.jpg
 

This would be a great card to brighten up someone’s day who’s going through a rough time. Doesn’t he just make you smile….he’s so cute!

 
Back On Your Feet Sloth Card2.jpg
 

Tips & Instructions

  • Granny Apple Green Card Base - 5 1/2 x 8 1/2, scored at 4 1/4

  • Whisper White Layer - 5 1/4 x 4 - stamp leaf image from the Daisy Lane Stamp Set randomly to create background

  • Stamp Sloth Image and Sentiment with Tuxedo Black Memento Ink and cut with Stitched Nested Labels

  • Color Sloth with Stampin’ Blends Markers

  • Cut off edges to line up to Whisper White Layer and ddhere to layer

  • Adhere layer to card base with Dimensionals

 
Back On Your Feet Sloth Card.jpg
 

Isn’t this a great sentiment? I stamped it with black ink and then stamped the leaf image with Granny Apple Green lifting after the first stamp and stamping a second and third time without re-inking.

 
Back On Your Feet Sloth inside.jpg
 

If you want any of the products I used on this project, just click on the item below or the Shop Now button and it will bring you to my Online Store. Please use the current Host Code when you go to checkout your order. You can also click directly on an item to order.

This Is Knot Good!!!

What a fun stamp set this Back On Your Feet again is!

 
Back On Your Feet Giraffe Stamp.jpg
 

I’m sure that anyone receiving a card made with these images will put a smile on their face, even if they are going through a rough time.

 
Back On Your Feet Giraffe both.jpg
 

Watch the video and leave a comment with which color combo you like better.

Tips & Instructions

  • Card Base - 5 1/2 x 8 1/2, scored at 4 1/4 - Lovely Lipstick or Pretty Peacock

  • Layer - 5 1/4 x 4 - Flirty Flamingo or Pool Party

  • 4th largest Stitched Rectangle - Flirty Flamingo or Pool Party

  • 5th largest Stitched Rectangle - Whisper White

  • Border Strip - 5 1/4 x about 1 1/8 - Dinoroar Designer Series Paper (cut width to fit the stripe you want)

  • Stamp Giraffe and sentiment on white rectangle with Tuxedo Black Memento Ink and color with Stampin’ Blends Markers

  • Adhere Layers and striped boarder, use Dimensionals to attach the stitched rectangles

  • Adhere Dinoroar Enamel Shapes

Lovely Lipstick and Flirty Flamingo

 
Back On Your Feet Giraffe Red2.jpg
 

Pretty Peacock and Pool Party

 
Back On Your Feet Giraffe peacock2.jpg
 

If you want any of the products I used on this project, just click on the item below or the Shop Now button and it will bring you to my Online Store. Please use the current Host Code when you go to checkout your order. You can also click directly on an item to order. 

Foil Magnolia - Thinking of You Card

The magnolia on this card was embossed with the Magnolia 3D Embossing Folder with Noble Peacock Foil Paper and I think it is so pretty!

 
Magnolia embossed Thinking Of You.jpg
 

This Embossing fold is so big and gives you a beautiful impression. I embossed on the foil sheet and then cut out the smaller magnolia.

 
Magnolia embossed Thinking Of You folder2.jpg
 

Tips & Instructions

  • Old Olive Card Base - 5 1/2 x 8 1/2, scored at 4 1/4

  • Magnolia Lane Designer Series Paper - 5 1/4 x 4

  • Vellum Cardstock - 5 1/4 x 4

  • Noble Peacock Foil Sheet - emboss Old Olive sheet and cut out smaller magnolia

  • Whisper White scrap - cut label using Wild Rose Dies

  • Stamp sentiment on label with Old Olive Ink toward the right side

  • Layer Vellum on Designer Series Paper, putting adhesive where magnolia and label will cover it

  • Wrap piece of linen ribbon and 3 strands of Mossy Meadow Linen Thread around Vellum layer and adhere to card base

  • Adhere label and magnolia to card with Dimensionals

  • Tie bow with 3 strands of Mossy Meadow Linen Thread and attach with Mini Glue Dot

  • Color Rhinestones with Dark Mossy Meadow Blends Marker and adhere randomly on card

  • Add small dot of liquid glue behind rhinestones if needed to help keep vellum in place

 
Magnolia embossed Thinking Of You2.jpg
 

On the inside, stamp small magnolia image on top and bottom corner with Old Olive Ink.

 
Magnolia embossed Thinking Of You inside.jpg
 

If you want any of the products I used on this project, just click on the item below or the Shop Now button and it will bring you to my Online Store. Please use the current Host Code when you go to checkout your order. You can also click directly on an item to order. 

BONUS DAYS / NEW DEMONSTRATOR PROMOTION

Stampin’ Up! has some great promotions going on now!

 
Screen Shot 2019-07-01 at 10.17.08 AM.png
 

Easy as 1, 2, 3….

  1. Spend $50 (before shipping & tax) in July

  2. Receive $5 coupon(s)

  3. Redeem 5$ coupon(s) in August

 
Screen Shot 2019-07-01 at 10.17.27 AM.png
 

The best deal at Stampin’ Up! is always getting the Starter Kit, but it’s even better now because you get $30 additional free stuff. Here’s how it works:

  • Purchase $155 worth of products that you choose for $99 (free shipping) in July

  • Receive a $10 coupon in August

  • Receive a 20% discount on all future orders as a Demonstrator

  • Join a fun Facebook group with other Demonstrators

Don’t worry that you have pressure of running a business. Most Demonstrators join just for the discount. But….if you want to take it to the next level, there’s lots of training and support to help you along the way.

Interested? Just click the Join My Team at the top or email me patti@pspapercrafts.com

Sketch Saturday - Daisy Card

The new Daisy Lane Bundle coordinates to the older Daisy Delight Stamp Set and Punch!

This is the card I made based on another sketch challenge from Splitcoaststampers. CAS(E) this Sketch #328

I punched 2 of the large and medium daisies and layered them, offsetting them with each layer to make a full flower.

 
Sketch Saturday - Daisy Card2.jpg
 

Here’s the sketch. It’s pretty simple but I like it.

 
Screen Shot 2019-06-28 at 5.37.45 PM.png
 

Tips & Instructions

  • Granny Apple Green Card Base 4 1/4 x 11, scored at 5 1/2 (Top Folding)

  • Daffodil Delight Layer - 5 1/8 x 3 7/8

  • Whisper White Layer - 5 x 3 3/4

  • Daffodil Delight Border Layer - 1/2 x 5

  • Granny Apple Green Border Layer - 1/4 x 5

  • Whisper White Banner - 1 x 3, after banner punched with Banner Triple Punch

  • Scrap of Whisper White - stamp 2 large daisies and 2 small daisies with Daffodil Delight Ink. Punch with coordinating Daisy Punches. Layer both sets of daisies offsetting and adhering on top of each other with liquid glue in the center. Add Perennial Essence Floral Center.

  • Stamp stem with leaves on Whisper White Layer and adhere daisy

  • Adhere border layers as shown in picture and adhere all layers to the card base

  • Stamp sentiment on banner layer and adhere to card with Dimensionals

 
Sketch Saturday - Daisy Card.jpg
 

On the inside stamp the stem and the smaller daisy twice. The sentiments for this card are from the Daisy Delight Stamp Set.

 
Sketch Saturday - Daisy Inside.jpg
 

If you want any of the products I used on this project, just click on the item below or the Shop Now button and it will bring you to my Online Store. Please use the current Host Code when you go to checkout your order. You can also click directly on an item to order. 

A Little Lace - So Happy For You!

Wait until you see how pretty this Noble Peacock Foil Sheets are! I cut them with the Stitched Lace Dies to make these beautiful cards.

 
A Little Lace Foil Card both.jpg
 

The die is large and you can cut it down to the size you want. The coordinating edge piece cuts a delicate edge. Watch the video below to see what I mean.

Tips & Instructions

  • Granny Apple Green or Blueberry Bushel Card Base - 4 1/4 x 11, scored at 5 1/2 (top folding)

  • Noble Peacock Layer - 4 1/4 x 5 1/2 - cut with lace die and edge die

  • Adhere Foil Lace Layer to Card Base

  • Stamp sentiment on card or 1/2 strip of Whisper White (adhere with Dimensionals)

  • Adhere Rhinestones to card front

I think I like this one the best. The Pretty Peacock Foil Sheet and the Granny Apple Green combination is so pretty.

 
A Little Lace Foil Card3.jpg
 

I used the Old Olive Foil Sheet for this card with Blueberry Bushel.

 
A Little Lace Foil Card5.jpg
 

If you want any of the products I used on this project, just click on the item below or the Shop Now button and it will bring you to my Online Store. Please use the current Host Code when you go to checkout your order. You can also click directly on an item to order.

A Little Lace - Hello Card

I love the look of a Clean & Simple Card and when I saw this stamp set, I thought it would be perfect for this type of card.

 
A Little Lace - Stamp Set.jpg
 

The floral images look like someone doodled and I think its so pretty. The card is very basic, just black ink and some cardstock, oh and of course the A Little Lace Stamp Set.

Tips & Instructions

  • Basic Black Card Base - 5 1/2 x 8 1/2, score at 4 1/4

  • Pineapple Punch Layer - 5 1/8 x 3 7/8

  • Whisper White Layer - 5 x 3 3/4

  • Stamp large floral image on bottom and top corners using Tuxedo Black Memento Ink

  • Whisper White Strip - 1/2 x 3 3/4 - stamp sentiment in center

  • Pineapple Punch Strip - 5/8 x 3 3/4 - adhere white strip to it

  • Adhere layers to card base

 
A Little Lace - Hello2.jpg
 

Stamp the floral image at the bottom corner for the inside.

 
A Little Lace - Hello Inside.jpg
 

If you want any of the products I used on this project, just click on the item below or the Shop Now button and it will bring you to my Online Store. Please use the current Host Code when you go to checkout your order. You can also click directly on an item to order. 

Path Of Petals - Sympathy Card

These Sympathy Cards are beautiful with the subtle stamped background and pretty trim.

 
Path of Petals Sympathy Both.jpg
 

The background paper is from the Pressed Petals Designer Series Pack and I stamped the floral images on it. Watch the video below to see all the steps and products to make these cards.

Tips & Instructions

  • Very Vanilla Card Base - 5 1/2 x 8 1/2, scored at 4 1/4

  • Pressed Petals Designer Series Paper - 5 1/4 x 4 - Stamp floral image randomly with Garden Green, Rococo Rose and So Saffron Ink

  • Garden Green - Cut with largest Scalloped Layering Oval

  • Very Vanilla - Cut with 2nd largest Layering Oval

  • Stamp floral image on Very Vanilla Oval with Garden Green, Rococo Rose and So Saffron Ink

  • Very Vanilla - 1 3/4 x 1 1/8 - stamp sentiment with Tuxedo Black Memento Ink

  • Wrap ribbon around Designer Series Paper Layer and adhere to back. Adhere layer to Card Base

  • Adhere oval layers together and then adhere to card using Dimensionals

  • Adhere sentiment to card using Dimensionals

  • Add Rhinestones to flower centers

The card below has a Garden Green Scalloped Oval layered behind the stamped oval the the ribbon is the Rococo Rose Gathered Ribbon which is just gorgeous.

 
Path of Petals Sympathy2.jpg
 

This card just has the single oval with the stamped image and uses the Very Vanilla Scalloped Lace Trim.

 
Path of Petals Sympathy4.jpg
 

If you want any of the products I used on this project, just click on the item below or the Shop Now button and it will bring you to my Online Store. Please use the current Host Code when you go to checkout your order. You can also click directly on an item to order. 

Path Of Petals - Wedding Card

The Dies from the Path Of Petals Bundle are so cool! You can cut out your card front and center to make a pretty, flowery card.

 
Paths of Petals - Bundle.jpg
 

Isn’t the card beautiful? I made it for a wedding I’m going to in July. I love how delicate it is.

 
Paths of Petals - Wedding2.jpg
 

Tips & Instructions

  • Seaside Spray Card Base - 5 1/2 x 8 1/2, scored at 4 1/4

  • Whisper White - 5 1/4 x 4, use die to cut card front and center oval

  • Color flowers and leaves with Stampin’ Blends

 
Paths of Petals - Wedding Blends.jpg
 
  • Stamp sentiment on center oval with Tuxedo Black Memento Ink

  • Adhere front pieces using Dimensionals around the edges, leaving the flowers free

Paths of Petals - Wedding4.jpg

I stamped the inside sentiment with Black ink and the flower images with Soft Sea Foam Ink.

 
Paths of Petals - Wedding Inside.jpg
 

If you want any of the products I used on this project, just click on the item below or the Shop Now button and it will bring you to my Online Store. Please use the current Host Code when you go to checkout your order. You can also click directly on an item to order. 

Sketch Saturday - Over The Moon

Here’s another Cutie Patootie Cow Card using the Over The Moon Stamp Set.

 
Sketch Saturday - Over The Moon2.jpg
 

I love this set and thought it would be perfect for the Sketch Challenge from Splitcoaststampers - CAS(E) this Sketch #327

Here’s the sketch I followed:

 
Screen Shot 2019-06-22 at 1.21.12 PM.png
 

Cute, right….

 
Sketch Saturday - Over The Moon3.jpg
 

Tips & Instructions

  • Granny Apple Green Card Base - 5 1/2 x 8 1/2, scored at 4 1/4

  • Whisper White Layer - 5 1/4 x 4, embossed with Subtle Embossing Folder

  • Granny Apple Green Stitched Layer - Cut with 3rd largest Rectangle Stitched Die

  • Whisper White Stitched Layer - Cut with 4th largest Rectangle Stitched Die

  • Flirty Flamingo Heart - Cut with Stitched Labels Die

  • Stamp cow image and grass images with Tuxedo Black Memento Ink. Color cow, grass images and bottom part of the card with Stampin’ Blends.

  • Adhere embossed layer to card base and stamped layer to green stitched layer. Stamp sentiment on strip of Whisper White and adhere to back of green stitched layer. Adhere to card using Dimensionals.

  • Adhere heart with Mini Dimensional

 
Sketch Saturday - Over The Moon5.jpg
 

If you want any of the products I used on this project, just click on the item below or the Shop Now button and it will bring you to my Online Store. Please use the current Host Code when you go to checkout your order. You can also click directly on an item to order. 

Gorgeous Woven Heirloom Cards

Today I CASEd (Copy And Share Everything) a card from the 2019-2020 Annual Catalog and I love how it turned out.

 
Woven Heirlooms Catalog CASE Both.jpg
 

Aren’t they beautiful! There are quite a few techniques here: dry embossing, heat embossing, emboss resist and aqua painting. So follow along with me in the video below.

 
Woven Heirlooms Catalog CASE Card2.jpg
 

Tips & Techniques

  • Very Vanilla Card Base - 5 1/2 x 8 1/2, scored at 4 1/4

  • Watercolor Paper Layer - 5 3/8 x 4 1/8

  • Sahara Sand Strip 2 x 5 1/8 after banner is cut using Banner Triple Punch

  • Seaside Spray - Cut Oval Frame and Emboss

  • Very Vanilla - Cut center piece of Oval Frame

  • Press Versamark Pad on Watercolor Paper and add White Embossing Powder. Heat emboss.

  • Press clear block on Seaside Spray Ink Pad and then using Aqua Painter add color to embossed paper. Press with paper towel to dry and adhere banner strip.

  • Adhere embossed oval frame over banner using Dimensionals

  • Wrap Braided Linen Trim around twice and tie with bow

  • Stamp sentiment and flourish image on Very Vanilla Oval and adhere using two dimensionals on top of each other to pop it up higher.

  • Add Faceted Dots, Sequins and Rhinestones

 
Woven Heirlooms Catalog CASE Card4.jpg
 

If you want any of the products I used on this project, just click on the item below or the Shop Now button and it will bring you to my Online Store. Please use the current Host Code when you go to checkout your order. You can also click directly on an item to order.

Dream Big --- Over The Moon

I’m Over The Moon for this Stamp Set. It’s so cute and I love the sentiments…so fun!!!

 
Over The Moon Stamp Set.jpg
 

I CASEd (Copy And Share Everything) this card from page 32 of the Annual Catalog. I think they used Ink Pads and Blender Pens but I used the Stampin’ Blends Markers instead. I love how it turned out…it’s udderly cute.

 
Over The Moon Card2.jpg
 

Tips & Instructions

  • Pear Pizzazz Card Base - 5 1/2 x 8 1/2, scored at 4 1/4

  • Blushing Bride Layer - 4 x 2 1/2, cut banner at bottom and stamp heart in cloud image randomly with Flirty Flamingo Ink

  • Whisper White Layer - 3 x 3, use Stitched Labels Dies to get stitching at top

    Tip - Use a piece of Post-It Note to hold die in place when running it through your die cutting machine

 
Over The Moon - Stitched Label Die.jpg
 
  • Stamp Cow, Grass and heart images with Tuxedo Black Memento Ink. Color with Stampin’ Blends

 
Over The Moon Blends.jpg
 
  • Stamp sentiment on small piece of Pool Party Carstock with Coastal Cabana Ink. I cut it after stamping to get the size I wanted (1 1/4 x 1/2)

  • Adhere layers to base using Dimensionals on the Whisper White Layer

  • Adhere largest Epoxy Heart over the stamped heart

 
Over The Moon Card.jpg
 

If you want any of the products I used on this project, just click on the item below or the Shop Now button and it will bring you to my Online Store. Please use the current Host Code when you go to checkout your order. You can also click directly on an item to order. 

Parcels & Petals

What a great little box you can make with the Parcels & Petals Bundle!

 
Parcels & Petals boxes.jpg
 

They are so sweet and measure 3 1/2 length x 2 1/4 width x 1 1/2 depth and you can fit a gift card, some chocolates or jewelry in them. Watch the video below to see how to make them. There are some good tips for making these that I got from my friend Wendy Cranford.

The measurements for the belly band are: 3 1/4 x 8, scored at 1 1/4, 2 5/8, 4 7/8 and 6 2/8.

The box for this one is Mossy Meadow and I used the Magnolia Lane Designer Series Paper for the belly band. The topper is made with Mossy Meadow and Petal Pink Cardstock.

 
Parcels & Petals Magnolia Lane Box.jpg
 

The box for this is Garden Green and the belly band is the Garden Lane Designer Series Paper. The topper is made with Garden Green and Soft Sea Foam Cardstock.

 
Parcels & Petals Garden Lane Box.jpg
 

I love this sentiment. It’s from the Parcels & Petals Stamp Set, stamped with Black Ink and cut with the label from this Bundle.

If you want any of the products I used on this project, just click on the item below or the Shop Now button and it will bring you to my Online Store. Please use the current Host Code when you go to checkout your order. You can also click directly on an item to order.