Bird Ballad Thank You Card

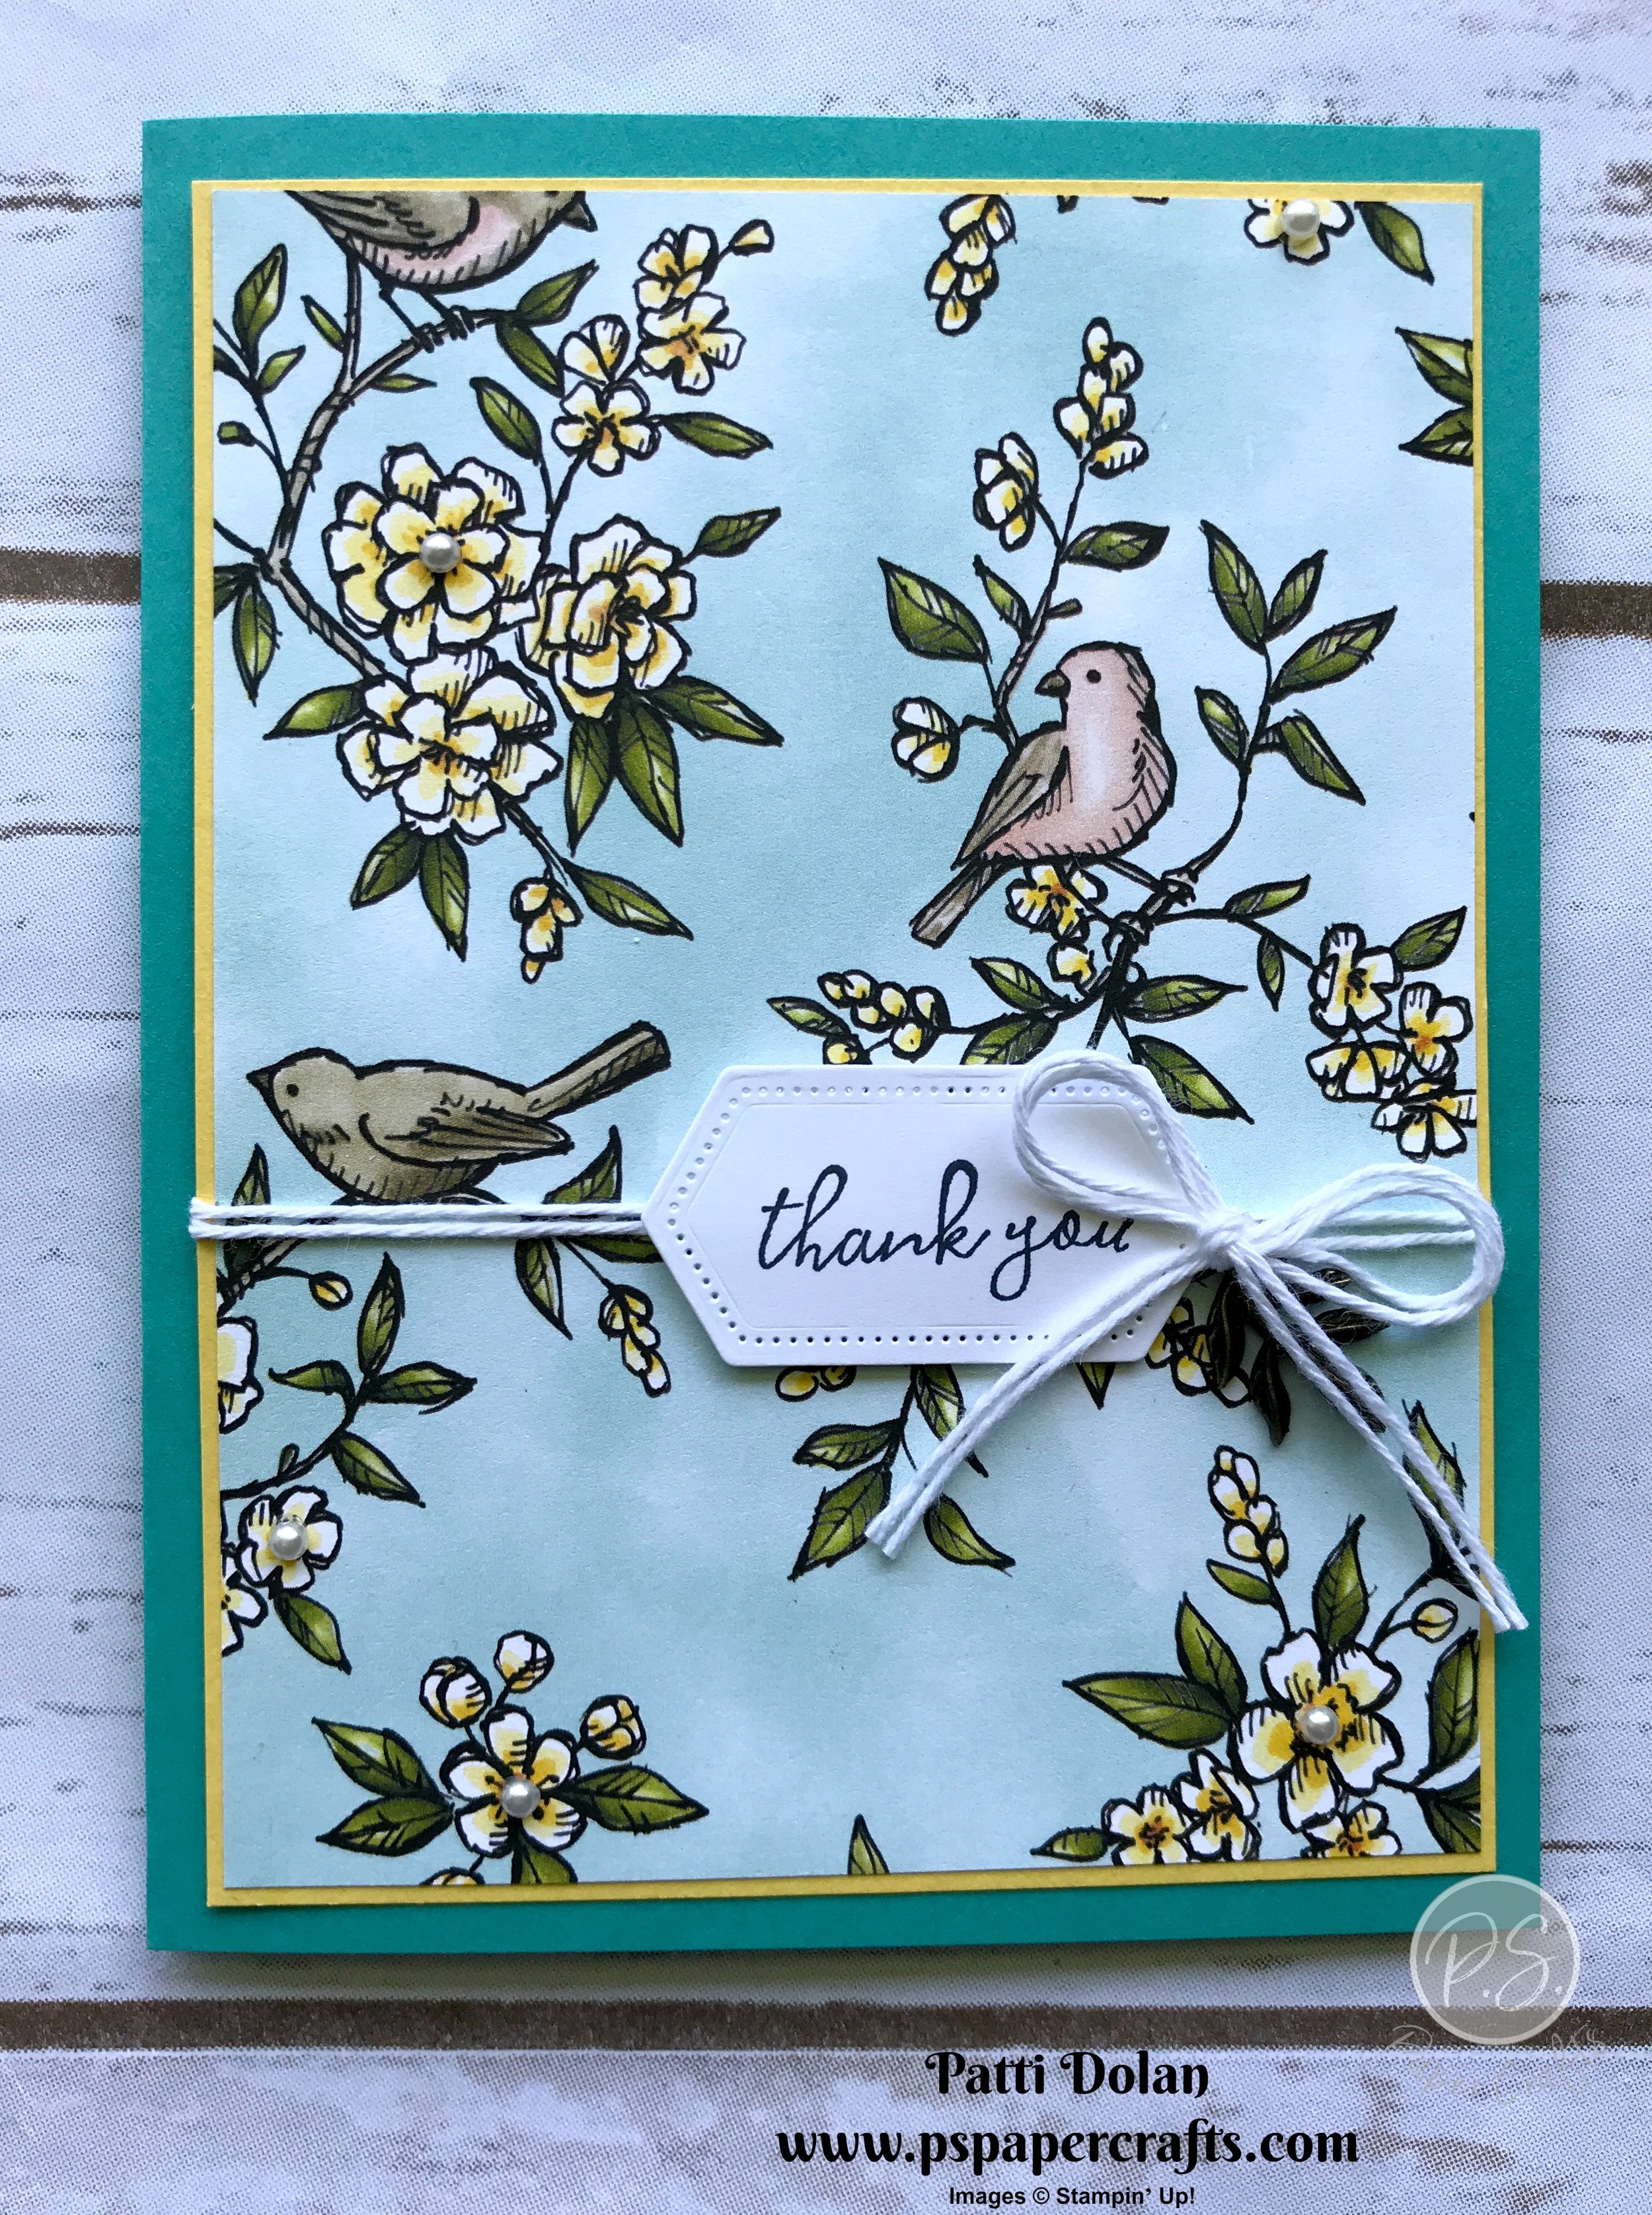
Let the Designer Series Paper do the work! The Bird Ballad DSP is just beautiful and pretty much makes the card.

 
Bird Ballad Thank You2.jpg
 

Isn’t this card pretty? I love the colors Bermuda Bay and Daffodil delight which coordinate with Designer Series Paper (DSP). The package shows you all the colors that coordinate with each set of DSP. Check out my video from yesterday’s post to see all the papers that are included with the Ballad Bird DSP.

I used the Free As A Bird and Stitched Nested Labels to make this card.

 
Bird Ballad Thank You bundle.jpg
 

TIPS & TECHNIQUES

  • Bermuda Bay Card Base - 5 1/2 x 8 1/2, scored at 4 1/4

  • Daffodil Delight Layer - 5 1/8 x 3 7/8

  • Bird Ballad DSP Layer 5 x 3 3/4

  • Whisper White, second smallest Stitched Nested Label Die

  • Stamp sentiment on Label

  • Adhere DSP layer to Whisper White layer

  • Wrap Whisper White Baker’s Twine twice around the card and tie in Bird Ballad Trinket

  • Adhere label using Dimensionals

  • Tie bow with 2 pieces of bakers twine and adhere with Mini Glue Dot

  • Adhere to card base

 
Bird Ballad Thank You pieces.jpg
 

These are the trinkets that you can purchase with this suite.

 
Bird Ballad Thank You trinkets.jpg
 

I added pearls to some of the flowers.

 
Bird Ballad Thank You.jpg
 

This is a great sentiment for the inside. I stamped some leaves with Old Olive Ink and flowers with Daffodil Delight Ink.

 
Bird Ballad Thank You inside.jpg
 

If you want any of the products I used on this project, just click on the item below or the Shop Now button and it will bring you to my Online Store.  Bird Ballad Suite products will be available purchase starting June 4, 2019. Please use the current Host Code when you go to checkout your order. You can also click directly on an item to order. 

Pretty Bird Hello Card

I’m having so much fun with the Free As A Bird Stamp Set.

 
Bird Hello Card both.jpg
 

I made these cards with the Bird Ballad Designer Series Paper which is absolutely beautiful. I’ll show you each sheet of paper on my video.

Tips & Instructions

  • Calypso Coral Card Base - 5 1/2 x 8 1/2, scored at 4 1/4

  • Bird Ballad DSP Layers - 4 x 2 1/2 (two - one with flowers, one with dots)

  • Bird Ballad DSP Strip - 4 1/4 x about 1 (I cut the color strips I wanted)

  • Calypso Coral Circle - Layering Circle, second largest

  • Whisper White Circle - Layering Circle, third largest

  • Mossy Meadow - scrap to punch sprigs (I used Mossy Meadow but realized the green in the DSP is Old Olive; either works)

  • Layer DSP pieces to card base and adhere DSP strip over their seam

  • Stamp bird and sentiment on Whisper White circle with Tuxedo Black Memento Ink

  • Color bird with Light Pool Party, Light Granny Apple Green and Light Crumb Cake Stampin’ Blends

  • Punch 4 sprigs with Sprig Punch with Mossy Meadow or Old Olive Cardstock

  • Adhere Whisper White Circle to Calypso Coral Circle offsetting it

  • Lay sprigs and circles to figure out placement and then adhere the sprigs. Adhere circles over using Dimensionals

  • Color 3 pearls with Dark Pool Party Stampin’ Blends and adhere under sentiment

  • Add white pearls to center of some of the flowers

 
Bird Hello Card3.jpg
 

On the inside I stamped the bird and some of the flower images. The bird was colored the same as the other bird and the flowers were colored with Dark Calypso Coral and Dark Pool Party in the center and then the light colors for the rest of the flower.

 
Bird Hello Card inside.jpg
 

If you want any of the products I used on this project, just click on the item below or the Shop Now button and it will bring you to my Online Store. The Bird Ballad Suite products will be available starting June 4, 2019. Please use the current Host Code when you go to checkout your order. You can also click directly on an item to order. 

Best Friends Card

Free As A Bird Bundle - my new favorite!!!

I’m so excited to start sharing some of the new products that will be available when the new catalog launches on June 4, 2019. These birds are just so cute and the Stitched Nested Label Dies are going to be a go-to die for me.

 
_Bird Best Friends Card2.jpg
 

Here’s a closer look at the stamp set and dies. I love birds and flowers and there are so many to choose from in the new catalog!

 
Bird Best Friends Dies.jpg
 

Tips & Instructions

  • Granny Apple Green card base - 5 1/2 x 11 1/2, scored at 4 1/4

  • Whisper White Layer - 5 1/4 x 4, embossed with the Layered Leaves Embossing Folder

 
Bird Best Friends Emboss.jpg
 
  • Stamp the birds on the branch image using Tuxedo Black Memento Ink and color with Stampin’ Blends

 
Bird Best Friends Blends.jpg
 
  • Wrap a piece of Granny Apple Green Textured Weave Ribbon around the embossed layer and adhere to the back. Adhere layer to card base.

  • Using dimensionals, adhere stamped image over ribbon.

  • Stamp sentiment on 1/2 strip of Whisper White and cut length to fit. Adhere to card using dimentionals

 
Bird Best Friends Card.jpg
 
  • On the inside, stamp sentiment with Tuxedo Black Memento Ink and some of the leaves with Granny Apple Green Ink.

 
Bird Best Friends Inside.jpg
 

If you want any of the products I used on this project, just click on the item below or the Shop Now button and it will bring you to my Online Store. The Stamp Set and Dies are not available until June 4, 2019. Please use the current Host Code when you go to checkout your order. You can also click directly on an item to order. 

Sketch Saturday - Sponge Technique

Today’s Sketch is a challenge that my team was given. I wanted to do something a little different than using a piece of cardstock or Designer Series Paper so I sponged it.

 
Hello Sponge Card2.jpg
 

Here’s the sketch from the challenge.

 
Screen Shot 2019-05-10 at 10.36.24 PM.png
 

Tips & Instructions

  • Balmy Blue Card Base - 5 1/2 x 8 1/2, scored at 4 1/4

  • Whisper White Layer - 5 1/4 x 4

  • Strip of Balmy Blue - 1 x 2 1/4

  • Strip of Whisper White - 3/4 x 2 1/4

  • Sponge Strip with Granny Apple Green, Flirty Flamingo and Balmy Blue Inks

  • Stamp floral image and butterfly with Tuxedo Black Memento Ink

  • Stamp butterfly and sentiment on Whisper White Strip and adhere to Balmy Blue strip and add cut banner using Banner Triple Punch

  • Adhere Sentiment using Dimensionals

  • Add Rhinestone Basic Jewels to flowers

I used Post-It Note Tape to cover the areas I didn’t want to ink. Make sure you use grid paper to get the tape straight. Lightly sponge the exposed area. I used Granny Apple Green, Flirty Flamingo and Balmy Blue Ink. Press the sponge on the ink pad and using a circular motion, lightly rub ink on the exposed area. You can continue until you have the look you want.

Hello Sponge Collage.png

I’m very happy with how it turned out. It’s always amazing when I pull off the tape. The edges look so clean.

 
Hello Sponge Card.jpg
 

On the inside, I stamped the floral image and the butterfly.

 
Hello Sponge Card Inside.jpg
 

If you want any of the products I used on this project, just click on the item below or the Shop Now button and it will bring you to my Online Store. Please use the current Host Code when you go to checkout your order. You can also click directly on an item to order. 

DADDY Cards!!!

I made some cute DADDY Cards using the Large Letter Dies.

 
Daddy Cards Both.jpg
 

I’ll walk you through how to get this shadow look for the letters on the video. It’s easy to do and makes the letters pop!

First up is the Birthday Card.

Daddy Card Happy Birthday.jpg
  • Night Of Navy Card Base - 5 1/2 x 8 1/2, scored at 4 1/4

  • Twinkle Twinkle Designer Series Paper - 5 3/8 x 2 1/2

  • Twinkle Twinkle Designer Series Paper Strip - 5 3/8 (cut to get 3 strips, navy in the middle)

  • Cut two of each letter to spell DADDY, once using Night Of Navy and once using Soft Sea Foam

  • Adhere letters offsetting Navy behind Sea Foam.

  • Adhere Designer Series Paper to card base. Lay letter down to determine placement for strip and adhere strip

  • Adhere letters across bottom

  • Scrap of Whisper White - stamp sentiment using Night of Navy Ink and punch with Pretty Label Punch. Color 2 rhinestones using Night of Navy Dark Stampin’ Blends and ad to label. Adhere with Dimensionals

Next up is the Father’s Day Card

 
Daddy Card Father's Day.jpg
 
  • Gray Granite Card Base - 5 1/2 x 8 1/2, scored at 4 1/4

  • Twinkle Twinkle Designer Series Paper - 5 3/8 x 4 1/8

  • Cut two of each letter to spell DADDY, once using Gray Granite and once using Pool Party

  • Adhere letters offsetting Gray Granite behind Pool Party

  • Adhere Designer Series Paper to Card Base and adhere letters across the card

  • Stamp sentiment on scrap of Whisper White and cut out with coordinating die. Adhere to top corner with Dimensionals

  • Cut stitched heart from Petal Pink Cardstock and adhere to bottom corner with Dimensional

If you want any of the products I used on this project, just click on the item below or the Shop Now button and it will bring you to my Online Store. Please use the current Host Code when you go to checkout your order. You can also click directly on an item to order. 

Hurry, these products will retire on June 3, 2019.

Simple Graduation Card

It’s that time of year…time for Graduations!!!

 
Graduation Card.jpg
 

This was a very easy card to make using the Large Letters Dies. These are great to spell out any word but they will be retiring in June when the new catalog comes out.

 
Large Letters.jpg
 

Tips & Instructions

  • Blueberry Bushel Card Base - 5 1/2 x 8 1/2, scored at 4 1/4

  • Gold Foil Strip - 3 1/2 x 1 (cut banner on one end using Banner Triple Punch

  • Whisper White strip - 3 1/2 x 3/4 (cut banner on one end using Banner Triple Punch

  • Cut letters with the Large Letters Die using Gold Foil Paper

  • Prepare strip for embossing by wiping with Embossing Buddy. Stamp sentiment with Versamark and then cover with Gold Embossing Powder. Heat until powder is melted and you see a shine over all the letters.

  • Adhere Gold Letters to card base

  • Adhere white strip to gold strip and adhere to card with Dimensionals. Add Gold Faceted Gems

TIPS - When cutting out the letters from Gold Foil Paper, use a piece that’s cut down (5 1/2 x 2 1/2) so that you don’t run a large piece through your Big Shot. If you don’t do this, you may mark up your excess Foil Paper. To get the most out of my paper, I cut the letters for GRAD and then ran it through again with the “!” It fit in between the letters.

 
Grad Tip.jpg
 

You can change up the colors to match the school colors of your graduate.

 
Graduation Card2.jpg
 

The sentiment on the inside is from the Incredible Like You Stamp Set from the Occasions Catalog. It’s perfect for a graduation card. I heat embossed it in gold.

 
Grad Card Inside.jpg
 

If you want any of the products I used on this project, just click on the item below or the Shop Now button and it will bring you to my Online Store. Please use the current Host Code when you go to checkout your order. You can also click directly on an item to order. 

Sheltering Tree - Thinking of You Card

So Long Sheltering Tree….

 
Sheltering Tree Both.jpg
 

I’ve been featuring Stamp Sets that are retiring when the new catalog launches on June 4, 2019. This is one that is so versatile. You can use it for any season and add a swing, bicycle or rake.

Tips & Instructions

  • Early Espresso Card Base - 5 1/2 x 8 1/2, scored at 4 1/4

  • Calypso Coral Layer - 5 1/4 x 4

  • Whisper White Layer - 5 x 3 3/4

  • Early Espresso Square Layer - 2 1/8 x 2 1/8

  • Whisper White Square Layer 2 x 2

  • Lay Whisper White square on white layer and stamp tree trunk with Early Espresso Ink. Stamp leaf/floral image with Calypso Coral being sure the square stays in place.

  • Stamp hill with Pear Pizzazz Ink and bicycle with Early Espresso and Granny Apple Green Ink

  • Stamp sentiment with Early Espresso Ink

  • Adhere card layers to base. Adhere Whisper White square to Early Espresso square and adhere to card in place using Dimensionals

 
Sheltering Tree Card.jpg
 

Here’s a look at the inside. I stamped flowers across the bottom leaving plenty of room for a nice handwritten note.

 
Sheltering Tree Inside.jpg
 

If you want any of the products I used on this project, just click on the item below or the Shop Now button and it will bring you to my Online Store. Please use the current Host Code when you go to checkout your order. You can also click directly on an item to order. 

Touches of Texture - Thinking Of You Card

Too-da-loo Touches Of Texture!!!

 
Touches of Texture Card2.jpg
 

This stamp set will be retiring when the new catalog launches on June 4, 2019. It’s a great set; actually its two cases full of stamps. You can really get your creativity on with this set!

 
Touches of Texture Stamps.jpg
 

The card base is Smoky Slate and then I added a layer of Balmy Blue cut with the 2nd largest Rectangle Stitched Die. The Whisper White layer is the 3rd largest Rectangle Stitched Die.

I stamped the background of the card base and the Whisper White layer with Smoky Slate Ink. It looks a little messy but it gives a great texture to the card.

 
Touches of Texture background.jpg
 

The floral images were stamped with Tuxedo Black Memento Ink. I used Stampin’ Blends to color the images. The flowers were colored with Dark Balmy Blue with a touch of Dark Pineapple Punch in the center and the leaves with Dark Granny Apple Green. Add a little Wink Of Stella to the flowers to give them some shine.

The sentiment is from the Sheltering Tree Stamp Set and was stamped on the smallest Rectangle Stitched Die.

 
Touches of Texture Card.jpg
 

I just stamped another floral image on the inside and didn’t color it in. It gives it an elegant, clean look.

Touches of Textures Inside.jpg

If you want any of the products I used on this project, just click on the item below or the Shop Now button and it will bring you to my Online Store. Please use the current Host Code when you go to checkout your order. You can also click directly on an item to order. 

Sketch Saturday - Animal Outing

On Saturdays I make a card from a sketch. Today’s sketch is from a challenge from my 2nd level up-line. I used the Animal Outing Stamp Set and the Animal Expedition Designer Series Paper.

 
Animal Outing Welcome Little One1.jpg
 

This is such a cute stamp set and I love the Designer Series Paper. This is the sketch that I followed.

Sketch1.jpg

Tips & Techniques

  • Call Me Clover Card Base - 5 1/2 x 8 1/2, scored at 4 1/4

  • Animal Expedition Designer Series Paper - 5 3/8 x 4 1/8

  • Call Me Clover Strips - 3 @ 3 1/2 x 1/2

  • Call Me Clover Layer 3 5/8 x 2 5/8

  • Whisper White Layer - 3 1/2 x 2 1/2

  • Call Me Clover Sentiment Layer - 1 1/8 x 5/8

  • Whisper White Sentiment Layer - 1 x 1/2

  • Stamp image and sentiments with Black Tuxedo Memento Ink

  • Color Kangaroo with Light Crumb Cake Blends and on the belly use Color Lifter to lighten

  • Color Koala Bear with Dark Crumb Cake Blends

  • Use Dimensional to adhere image and sentiment layers

  • Adhere Clear Epoxy Droplet to each strip

 
Animal Outing Welcome Little One2.jpg
 

If you want any of the products I used on this project, just click on the item below or the Shop Now button and it will bring you to my Online Store. Please use the current Host Code when you go to checkout your order. You can also click directly on an item to order. 

One For All - Fun Cards

What a great stamp this is!!!

I made these two cards using the One For All Stamp Set. They are both made with Lemon Lime Twist and Berry Burst Inks and Papers. I am really going to miss these colors and this stamp set when they retire, June 3, 2019.

 
One For All cards.jpg
 

The images in this set are large which are great because they take up a lot of room on a card. You don’t need to add much more to it.

 
One For All Stamp Set.jpg
 

Tips & Instructions:

  • Card Base - Berry Burst or Lemon Lime Twist - 5 1/2 x 8 1/2, scored at 4 1/4

  • Animal Expedition Designer Series Paper Layer - 5 1/4 x 4

  • Berry Burst or Lemon Lime Twist Layer - 4 1/8 x 3 1/8

  • Whisper White Layer - 4 x 3

  • Stamp sentiment on Birthday Card with Berry Burst Ink and add 3 Granny Apple Green Enamel Dots

  • Stamp Image on Bicycle Card with Lemon Lime Twist Ink and tie ribbon around DSP layer before adhering. Punch corners of Whisper White with Detailed Trio Punch

  • Use Dimensionals on Whisper White Stamped layer when adhering to card

 
All For One Birthday.jpg
 
 
One For All Best Day Ever.jpg
 

If you want any of the products I used on this project, just click on the item below or the Shop Now button and it will bring you to my Online Store. Please use the current Host Code when you go to checkout your order. You can also click directly on an item to order. 

Retiring List - Catalog Walk-thru

Are you confused about what is actually retiring in the Stampin’ Up! Annual and Occasions Catalogs? I decided to do a walk-thru of the catalogs to help clarify things. I’ve highlighted the stamp sets that are affected and hope this is helpful to you. So get out your catalogs and 3 highlighters and follow along.

Below is my cheat sheet. (Note, I had it wrong in the video but caught myself right away.)

Screen Shot 2019-05-01 at 9.23.28 PM.png

Below is a video from Stampin’ Up! about Cling Stamps.

Bye Bye Bella - Birthday Card with Bella & Friends

The Bella & Friends Stamp Set is retiring! I love this cute little dog and bird.

 
Bye Bye Bella.png
 

The background paper is from the Gingham Gala Designer Series pack and will also be retiring when the new catalog is launched on June 4, 2019.

Tips & Instructions

  • Balmy Blue Card Base - 5 1/2 x 8 1/2, scored at 4 1/4

  • Gingham Gala Designer Series Paper - 5 3/8 x 4 1/8

  • Whisper White Layer - Cut from 2nd Largest Rectangle Stitched Die

  • Balmy Blue Strip - 3 7/16 x 1

  • Whisper White Strip - 3 7/16 x 3/4

  • Stamp images and sentiment with Tuxedo Black Memento Ink & color with Stampin’ Blends. Add Wink of Stella to candles, frosting and balloon.

  • Adhere layers using Dimensionals to adhere sentiment strip.

  • Adhere Candle Embellishment

 
Bye Bye Bella3.jpg
 

I stamped another Bella image on the inside and colored it with the Stampin’ Blends. The sentiment is from the Itty Bitty Birthdays Stamp Set.

 
Bye Bye Bella Inside.jpg
 

If you want any of the products I used on this project, just click on the item below or the Shop Now button and it will bring you to my Online Store. Please use the current Host Code when you go to checkout your order. You can also click directly on an item to order. 

Everything is Rosy

LET YOUR CREATIVITY BLOOM!!!

I hope you’re ready for a ray of sunshine in your life, because the Everything Is Rosy Product Medley is here! This exclusive, limited-time collection of coordinating, petal-packed products has everything you need to let your creativity bloom.

This is available ONLY May 1 - May 31, 2019.

WHAT IS A PRODUCT MEDLEY?

Product medleys are new to Stampin’ Up! In addition to being filled to the brim with cute, coordinating products, they’ve designed their product medleys to provide you with endless creative possibilities.

 
Screen Shot 2019-04-30 at 10.16.08 PM.png
 

The Everything Is Rosy Product Medley includes these exclusive products:

  • Everything Is Rosy Photopolymer Stamp Set—18 stamps; suggested blocks: a, b, c,

  • Everything Is Rosy Dies—10 dies; largest die 2-7/8" x 1" (7.3 x 2.5 cm)

  • 6" x 6" (15.2 x 15.2 CM) Designer Series Paper Stack—48 sheets; 8 each of 6 double-sided designs

  • 6" x 6" (15.2 x 15.2 CM) rose gold foil paper—8 sheets

  • Printed die cuts—2 sheets

  • Rose gold die cuts—4 sheets; 2 each of 2 designs

  • Rose gold adhesive backed mirror embellishments—60 embellishments; 1/4" (6.4 mm)

  • Melon Mambo 1/4" (6.4 mm) Ruched Ribbon—10 yards (9.1 m)

  • Night of Navy/Rose Gold 3/8" (1 cm) Metallic –Edge Ribbon—10 yards (9.1 m)

  • Rose Gold Shimmer Paint—1/2 oz. (15 ml)

Below is the Everything is Rosy stamp set included in the product medley!  There are coordinating dies that are included as well.

 
Screen Shot 2019-04-30 at 10.19.13 PM.png
 

The Everything Is Rosy Product Medley is $80.00 USD and the Item number is 150059

Check out these beautiful samples created by Stampin’ Up! featuring the Everything is Rosy Medley.

Everything is Rosy Collage1.png
Everything is Rosy Collage2.png
Everything is Rosy Collage3.png

Card Sketch Saturday - Petal Palette

Saturday is for card sketches!

Every Saturday I’ll be making a card based on a sketch. This week’s sketch is a challenge from Splitcoaststampers CAS(E) this Sketch #319.

 
Screen Shot 2019-04-26 at 11.41.44 PM.png
 

This is the card I made using the Petal Palette Stamp Set and coordinating Framelits. The Designer Series Paper is from the Floral Romance package. It makes a nice background and you can sneak a peak at the bottom corner.

 
_CAS #319 card.jpg
 

This Stamp Set is retiring when the new catalog comes out on June 4, 2019. I’ll really miss this one. It has beautiful images and great sentiments.

 
Petal Palette Stamp Set.jpg
 

Tips & Techniques

  • Pear Pizzazz card base - cut at 5 1/2 x 8 1/2, score at 4 1/4

  • Layer of Floral Romance Designer Series Paper - 5 1/4 x 4

  • Layer of Whisper White - 5 x 3 3/4, tear off corner

  • Stamp leaf image on bottom right area using Pear Pizzazz Ink

  • Stamp flower image on scrap of Whisper White and cut with coordinating Framelit

  • Color flower with Lovely Lipstick and leaves with Mossy Meadow Stampin’ Blends

  • Stamp Sentiment (I used Hello from Varied Vases) on 1/2 strip of Whisper White and cut banner

  • Adhere layers and using Dimensionals adhere floral image. Glue sentiment strip behind floral image

 
_CAS #319 Pieces.jpg
 
 
Petals & More Framelits.jpg
 

Here’s another look at the finished card. I love the different shades of green and the beautiful floral image.

 
CAS(E)#119.jpg
 

If you want any of the products I used on this project, just click on the item below or the Shop Now button and it will bring you to my Online Store. Please use the current Host Code when you go to checkout your order. You can also click directly on an item to order. 

The Stamps, Framelits and Designer Series Paper retire June 3, 2019.

Jar of Love - Say Goodbye

Jar of Love is on the Retiring List.

As we get ready to launch the new Annual Catalog, I'm feeling sad over some of the stamp sets that will be retiring and Jar of Love is one of them. It has such great images and coordinating Framelits.

 
Jar of Love Both.jpg
 

The mason jar was stamped on Vellum Cardstock using Memento Tuxedo Black Ink and the stamped and colored with Balmy Blue Ink/Marker. Make sure you dry it with your heat tool so it doesn’t smear.

 
Jar of Love Hello2.jpg
 

Tips & Instructions

  • Old Olive Card Base - 5 1/2 x 8 1/2, scored at 4 1/4

  • Whisper White Layer - 5 1/4 x 4

  • Piece of Vellum Paper - stamp mason jar image and cut with coordinating framelit

  • Lay Mason Jar on Whisper White layer for placement and stamp leafy branches using Old Olive, stamping direct and then lifting and stamping again to get color variations.

  • Wrap Linen Thread around top of mason jar (adhering to back). Adhere Mason Jar to card with a little adhesive around the edges.

  • Stamp and cut flowers using Lovely Lipstick, Daffodil Delight and Balmy Blue Ink. Watch video to see how to stamp off and then direct to get dark and light shades. Adhere flowers to card using Mini Glue Dots.

  • Stamp bees with Black Memento Ink and color with Balmy Blue and Daffodil Delight Stampin’ Write Markers OR Light Pool Party and Dark Daffodil Delight Stampin’ Blends

  • Stamp sentiment with Old Olive Ink

  • Adhere to card base

 
Jar of Love Thanks2.jpg
 

I stamped the bees again on the inside along with the leafy image.

 
Jar of Love Inside.jpg
 

If you want any of the products I used on this project, just click on the item below or the Shop Now button and it will bring you to my Online Store. Please use the current Host Code when you go to checkout your order. You can also click directly on an item to order. 

Vibrant Vases

Say goodbye to the 2017-2019 In Colors!

I’m so sad to see these colors retire. Fresh Fig and Tranquil Tide are two of my favorite colors. Stampin’ Up! has a challenge to make a simple card (stamps, ink, paper) using one or more of these colors. I decided to use them all.

 
Vibrant Vases2.jpg
 

These are all the colors that I used and they will no longer be available after June 3, 2019.

 
Screen Shot 2019-04-24 at 10.13.50 PM.png
 

Tips & Techniques

  • Fresh Fig card base - 5 1/2 x 8 1/2, scored at 4 1/4

  • Powder Pink Layer - 5 1/4 x 4

  • Whisper White Layer - 5 x 3 3/4

  • Stamp vases with detailed design with Fresh Fig and Tranquil Tide, then stamp the solid background in same colors but stamping on scrap first to get a lighter shade.

  • Stamp flower outlines with Lemon Lime Twist, Berry Burst and Powder Pink; then stamp the flower insides in same colors but stamping on scrap first to get a lighter shade.

  • Stamp sentiment with Tranquil Tide Ink

  • Adhere layers to card base

Sweet, simple but very elegant!!!

 
Vibrant Vases.jpg
 

On the inside I stamped the other style vase with Fresh Fig Ink and the flowers with Powder Pink Ink.

 
Vibrant Vases Inside.jpg
 

If you want any of the products I used on this project, just click on the item below or the Shop Now button and it will bring you to my Online Store. Please use the current Host Code when you go to checkout your order. You can also click directly on an item to order. 

Tea Together Mother's Day Card

The Tea Together Stamp Set is perfect for a Mother’s Day Card!

 
Tea Together Mother's Day both.jpg
 

I went through my Designer Series Paper (DSP) to find just the right piece for the teapot. It’s from the Petal Promenade DSP and I think it worked out great. I do this a lot; just look through it all and you’ll find the perfect design. Take a look at the video to see how I made these cards.

Tips & Instructions

  • Call Me Clover Card Base - 5 1/2 x 8 1/2, scored at 4 1/4

  • Whisper White Layer - 5 1/4 x 4

  • Grapefruit Grove Layer - 5 x 3 3/4, embossed with Tufted Embossing Folder

  • Piece of Petal Promenade DSP - stamp teapot image with Memento Black Ink and cut with coordinating framelits

  • Stamp small flower with Memento Black Ink and cut with coordinating framelit. Color with Grapefruit Grove and Call Me Clover Stampin’ Write Markers. Adhere to teapot

  • Stamp sentiment using Call Me Clover Ink and cut with smallest scalloped Layering Oval

  • Adhere 5 x 1/2 In Color Designer Series Paper (Grapefruit Grove) to 5 x 3/4 Whisper White Strip

  • Adhere Layers to card base. Adhere teapot and Sentiment using Dimensionals

  • Add Happiness Blooms Enamel Dots and a bow

This card has a bow made with a piece Call Me Clover ribbon and adhered with a Mini Glue Dot.

 
Tea Together Mother's Day green.jpg
 

This is the one we made in my card class with the Grapefruit Grove ribbon which was a Sale-A-Bration item and is no longer available.

 
Tea Together Mother's Day orange.jpg
 

Here’s a look at the inside. I stamped and colored two flowers and the sentiment is from the Golden Afternoon Stamp Set. It has some really nice sentiments.

 
Tea Together Mother's Day inside.jpg
 

If you want any of the products I used on this project, just click on the item below or the Shop Now button and it will bring you to my Online Store. Please use the current Host Code when you go to checkout your order. You can also click directly on an item to order. 

April Paper Pumpkin

The April Paper Pumpkin Kit is called Sentimental Rose and it’s gorgeous. The flower and leaf images are Distinktive Stamps which are photo-realistic, crisp, and clear. 

Paper Pumpkin7.jpg

Let’s start from the beginning. With a Paper Pumpkin subscription, you receive box full of goodness each month.

 
Paper Pumpking.jpg
 

Open it and you’ll see a stamp set, ink spot and a package with instructions and everything you need to make your projects.

 
Paper Pumpkin1.jpg
 

This month includes everything you need to make 9 cards (3 different designs), coordinating envelopes and an acetate box that you will decorate and then can put your cards in.

 
Paper Pumpkin3.jpg
 

Stamp your sentiments. You get more labels then needed which is good if you make a mistake.

 
Paper Pumpkin4.jpg
 

Stamp the flower and leaves on the layers using Gray Granite Ink.

 
Paper Pumpkin6.jpg
 

Here’s a look at each card along with the coordinating envelopes. You can change up the sentiments however you want. Aren’t they pretty?

 
Paper Pumpkin Single.jpg
 
 
Paper Pumpkin Single2.jpg
 
 
Paper Pumpkin Single3.jpg
 

The kit includes an acetate box that you can decorate with a corrugated belly band and some die-cuts. The cards fit in the box and would make a beautiful gift to give someone.

 
Paper Pumpkin8.jpg
 

It’s too late to order the April Paper Pumpkin Kit but you can get a special Shelli Kit designed by the Stampin’ Up! Founder, Shelli Gardner. Watch the video for a sneak peak. You have to subscribe by May 10, 2019 to get the May Kit.

Happiness Blooms

Happiness Blooms Suite meets CAS(E) this Sketch!

Today’s card was made using the Happiness Blooms Suite from the Stampin’ Up! Occasions Catalog. I love how having a suite makes it so easy to pull a card together. The card is based on a sketch from CAS(E) this Sketch which is a weekly challenge from Splitcoaststampers.

 
Happiness Blooms Happy Birthday.jpg


Screen Shot 2019-04-19 at 3.35.17 PM.png
 

These are the products I used from the Happiness Blooms Suite. The sentiments are from the Itty Bitty Birthdays Stamp Set.

 
Happiness Blooms Happy Birthday Supplies.jpg
 

Tips & Instructions

  • Night Of Navy Card Base - 5 1/2 x 8 1/2, scored at 4 1/4

  • Happiness Blooms Designer Series Paper Layer - 5 1/4 x 4

  • Whisper White Strip - 5 1/4 x 2, embossed with the Dot to Dot Embossing Folder

  • Scrap of Whisper White - Stamp Flower with Lovely Lipstick Ink and stem/leaves with Granny Apple Green Ink. Fussy Cut.

  • Adhere layers to card and flower.

  • Stamp sentiment with Night Of Navy Ink on 2 3/4 x 3/4 Whisper White Strip and using the Banner Triple Punch, punch right end. Adhere to card with Dimensionals and add 3 Happiness Blooms Enamel Dots.

 
Happiness Blooms Happy Birthday2.jpg
 

For the inside I stamped a smaller flower and the sentiment is also from the Itty Bitty Birthdays Stamp Set.

 
Happiness Blooms Happy Birthday Inside.jpg
 

If you want any of the products I used on this project, just click on the item below or the Shop Now button and it will bring you to my Online Store. Please use the current Host Code when you go to checkout your order. You can also click directly on an item to order.