


Sketch Saturday - Animal Outing
On Saturdays I make a card from a sketch. Today’s sketch is from a challenge from my 2nd level up-line. I used the Animal Outing Stamp Set and the Animal Expedition Designer Series Paper.

This is such a cute stamp set and I love the Designer Series Paper. This is the sketch that I followed.

Tips & Techniques
Call Me Clover Card Base - 5 1/2 x 8 1/2, scored at 4 1/4
Animal Expedition Designer Series Paper - 5 3/8 x 4 1/8
Call Me Clover Strips - 3 @ 3 1/2 x 1/2
Call Me Clover Layer 3 5/8 x 2 5/8
Whisper White Layer - 3 1/2 x 2 1/2
Call Me Clover Sentiment Layer - 1 1/8 x 5/8
Whisper White Sentiment Layer - 1 x 1/2
Stamp image and sentiments with Black Tuxedo Memento Ink
Color Kangaroo with Light Crumb Cake Blends and on the belly use Color Lifter to lighten
Color Koala Bear with Dark Crumb Cake Blends
Use Dimensional to adhere image and sentiment layers
Adhere Clear Epoxy Droplet to each strip

If you want any of the products I used on this project, just click on the item below or the Shop Now button and it will bring you to my Online Store. Please use the current Host Code when you go to checkout your order. You can also click directly on an item to order.
One For All - Fun Cards
What a great stamp this is!!!
I made these two cards using the One For All Stamp Set. They are both made with Lemon Lime Twist and Berry Burst Inks and Papers. I am really going to miss these colors and this stamp set when they retire, June 3, 2019.

The images in this set are large which are great because they take up a lot of room on a card. You don’t need to add much more to it.

Tips & Instructions:
Card Base - Berry Burst or Lemon Lime Twist - 5 1/2 x 8 1/2, scored at 4 1/4
Animal Expedition Designer Series Paper Layer - 5 1/4 x 4
Berry Burst or Lemon Lime Twist Layer - 4 1/8 x 3 1/8
Whisper White Layer - 4 x 3
Stamp sentiment on Birthday Card with Berry Burst Ink and add 3 Granny Apple Green Enamel Dots
Stamp Image on Bicycle Card with Lemon Lime Twist Ink and tie ribbon around DSP layer before adhering. Punch corners of Whisper White with Detailed Trio Punch
Use Dimensionals on Whisper White Stamped layer when adhering to card


If you want any of the products I used on this project, just click on the item below or the Shop Now button and it will bring you to my Online Store. Please use the current Host Code when you go to checkout your order. You can also click directly on an item to order.
Retiring List - Catalog Walk-thru
Are you confused about what is actually retiring in the Stampin’ Up! Annual and Occasions Catalogs? I decided to do a walk-thru of the catalogs to help clarify things. I’ve highlighted the stamp sets that are affected and hope this is helpful to you. So get out your catalogs and 3 highlighters and follow along.
Below is my cheat sheet. (Note, I had it wrong in the video but caught myself right away.)

Below is a video from Stampin’ Up! about Cling Stamps.
Bye Bye Bella - Birthday Card with Bella & Friends
The Bella & Friends Stamp Set is retiring! I love this cute little dog and bird.
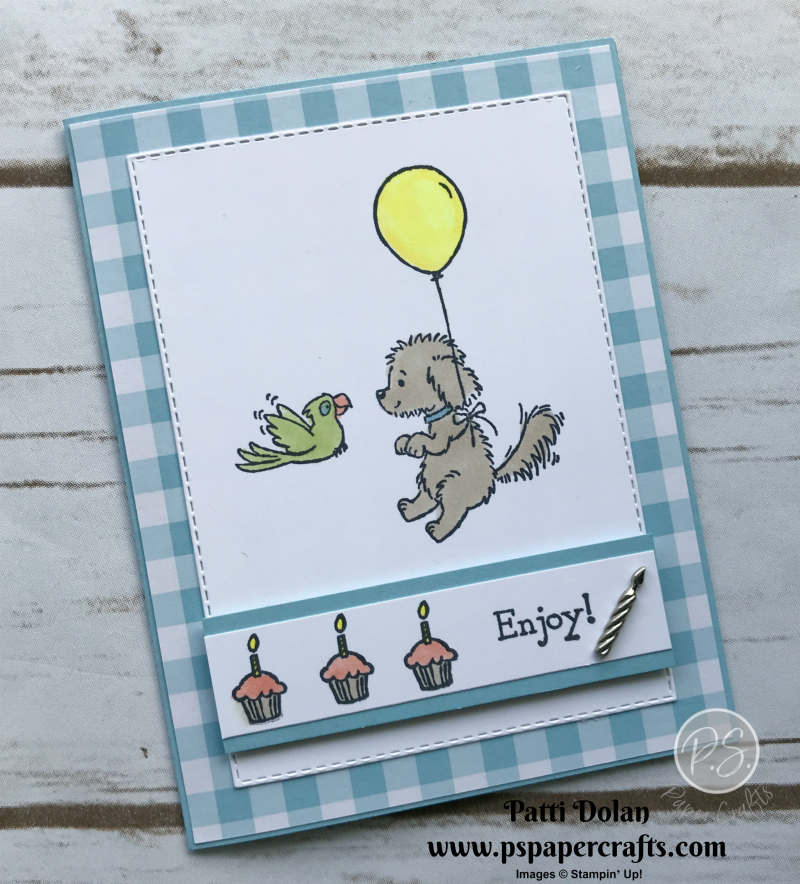
The background paper is from the Gingham Gala Designer Series pack and will also be retiring when the new catalog is launched on June 4, 2019.
Tips & Instructions
Balmy Blue Card Base - 5 1/2 x 8 1/2, scored at 4 1/4
Gingham Gala Designer Series Paper - 5 3/8 x 4 1/8
Whisper White Layer - Cut from 2nd Largest Rectangle Stitched Die
Balmy Blue Strip - 3 7/16 x 1
Whisper White Strip - 3 7/16 x 3/4
Stamp images and sentiment with Tuxedo Black Memento Ink & color with Stampin’ Blends. Add Wink of Stella to candles, frosting and balloon.
Adhere layers using Dimensionals to adhere sentiment strip.
Adhere Candle Embellishment

I stamped another Bella image on the inside and colored it with the Stampin’ Blends. The sentiment is from the Itty Bitty Birthdays Stamp Set.

If you want any of the products I used on this project, just click on the item below or the Shop Now button and it will bring you to my Online Store. Please use the current Host Code when you go to checkout your order. You can also click directly on an item to order.
Everything is Rosy
LET YOUR CREATIVITY BLOOM!!!
I hope you’re ready for a ray of sunshine in your life, because the Everything Is Rosy Product Medley is here! This exclusive, limited-time collection of coordinating, petal-packed products has everything you need to let your creativity bloom.
This is available ONLY May 1 - May 31, 2019.
WHAT IS A PRODUCT MEDLEY?
Product medleys are new to Stampin’ Up! In addition to being filled to the brim with cute, coordinating products, they’ve designed their product medleys to provide you with endless creative possibilities.

The Everything Is Rosy Product Medley includes these exclusive products:
Everything Is Rosy Photopolymer Stamp Set—18 stamps; suggested blocks: a, b, c,
Everything Is Rosy Dies—10 dies; largest die 2-7/8" x 1" (7.3 x 2.5 cm)
6" x 6" (15.2 x 15.2 CM) Designer Series Paper Stack—48 sheets; 8 each of 6 double-sided designs
6" x 6" (15.2 x 15.2 CM) rose gold foil paper—8 sheets
Printed die cuts—2 sheets
Rose gold die cuts—4 sheets; 2 each of 2 designs
Rose gold adhesive backed mirror embellishments—60 embellishments; 1/4" (6.4 mm)
Melon Mambo 1/4" (6.4 mm) Ruched Ribbon—10 yards (9.1 m)
Night of Navy/Rose Gold 3/8" (1 cm) Metallic –Edge Ribbon—10 yards (9.1 m)
Rose Gold Shimmer Paint—1/2 oz. (15 ml)
Below is the Everything is Rosy stamp set included in the product medley! There are coordinating dies that are included as well.

The Everything Is Rosy Product Medley is $80.00 USD and the Item number is 150059
Check out these beautiful samples created by Stampin’ Up! featuring the Everything is Rosy Medley.


Card Sketch Saturday - Petal Palette
Saturday is for card sketches!
Every Saturday I’ll be making a card based on a sketch. This week’s sketch is a challenge from Splitcoaststampers CAS(E) this Sketch #319.

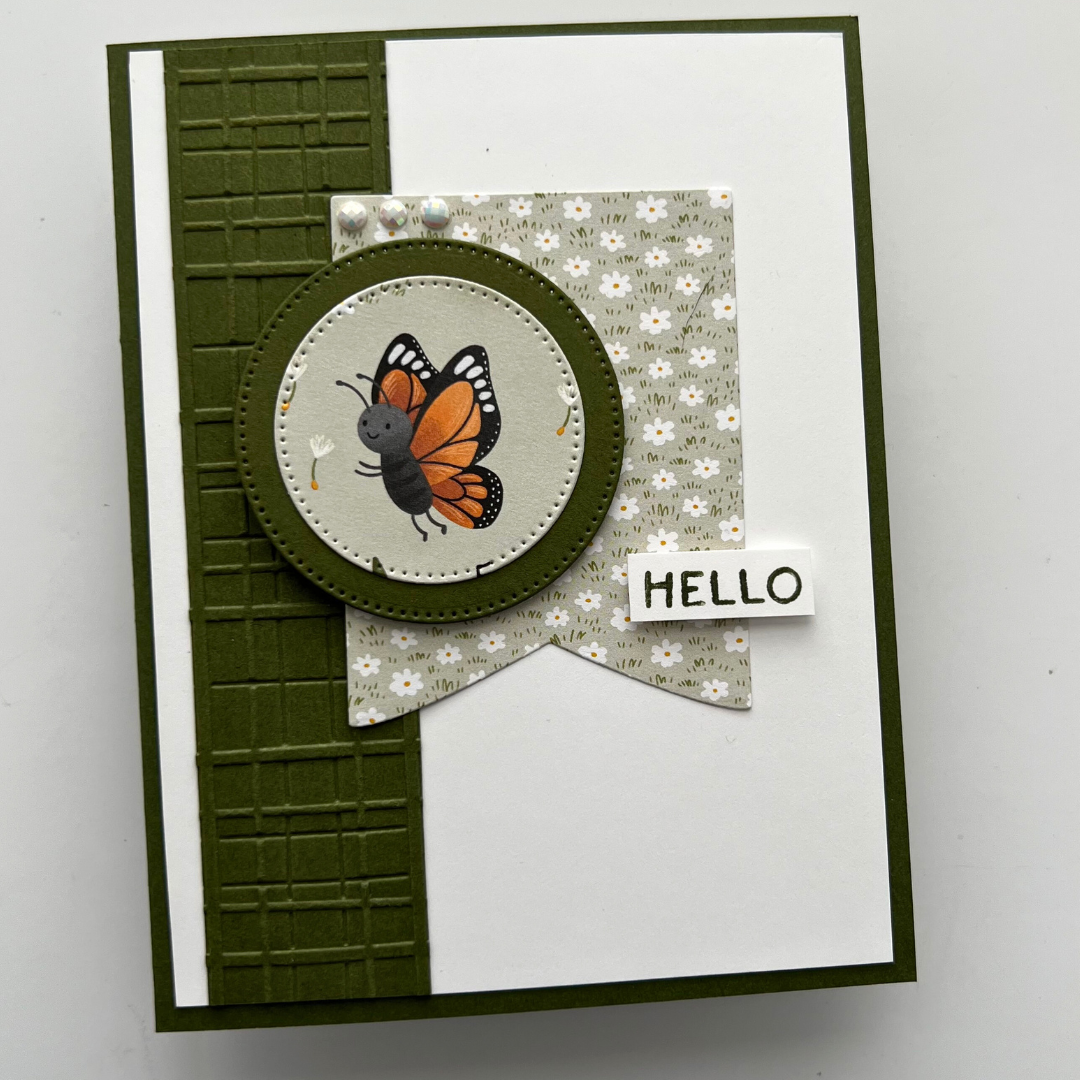
This is the card I made using the Petal Palette Stamp Set and coordinating Framelits. The Designer Series Paper is from the Floral Romance package. It makes a nice background and you can sneak a peak at the bottom corner.

This Stamp Set is retiring when the new catalog comes out on June 4, 2019. I’ll really miss this one. It has beautiful images and great sentiments.

Tips & Techniques
Pear Pizzazz card base - cut at 5 1/2 x 8 1/2, score at 4 1/4
Layer of Floral Romance Designer Series Paper - 5 1/4 x 4
Layer of Whisper White - 5 x 3 3/4, tear off corner
Stamp leaf image on bottom right area using Pear Pizzazz Ink
Stamp flower image on scrap of Whisper White and cut with coordinating Framelit
Color flower with Lovely Lipstick and leaves with Mossy Meadow Stampin’ Blends
Stamp Sentiment (I used Hello from Varied Vases) on 1/2 strip of Whisper White and cut banner
Adhere layers and using Dimensionals adhere floral image. Glue sentiment strip behind floral image


Here’s another look at the finished card. I love the different shades of green and the beautiful floral image.

If you want any of the products I used on this project, just click on the item below or the Shop Now button and it will bring you to my Online Store. Please use the current Host Code when you go to checkout your order. You can also click directly on an item to order.
The Stamps, Framelits and Designer Series Paper retire June 3, 2019.
Jar of Love - Say Goodbye
Jar of Love is on the Retiring List.
As we get ready to launch the new Annual Catalog, I'm feeling sad over some of the stamp sets that will be retiring and Jar of Love is one of them. It has such great images and coordinating Framelits.

The mason jar was stamped on Vellum Cardstock using Memento Tuxedo Black Ink and the stamped and colored with Balmy Blue Ink/Marker. Make sure you dry it with your heat tool so it doesn’t smear.

Tips & Instructions
Old Olive Card Base - 5 1/2 x 8 1/2, scored at 4 1/4
Whisper White Layer - 5 1/4 x 4
Piece of Vellum Paper - stamp mason jar image and cut with coordinating framelit
Lay Mason Jar on Whisper White layer for placement and stamp leafy branches using Old Olive, stamping direct and then lifting and stamping again to get color variations.
Wrap Linen Thread around top of mason jar (adhering to back). Adhere Mason Jar to card with a little adhesive around the edges.
Stamp and cut flowers using Lovely Lipstick, Daffodil Delight and Balmy Blue Ink. Watch video to see how to stamp off and then direct to get dark and light shades. Adhere flowers to card using Mini Glue Dots.
Stamp bees with Black Memento Ink and color with Balmy Blue and Daffodil Delight Stampin’ Write Markers OR Light Pool Party and Dark Daffodil Delight Stampin’ Blends
Stamp sentiment with Old Olive Ink
Adhere to card base

I stamped the bees again on the inside along with the leafy image.

If you want any of the products I used on this project, just click on the item below or the Shop Now button and it will bring you to my Online Store. Please use the current Host Code when you go to checkout your order. You can also click directly on an item to order.
Vibrant Vases
Say goodbye to the 2017-2019 In Colors!
I’m so sad to see these colors retire. Fresh Fig and Tranquil Tide are two of my favorite colors. Stampin’ Up! has a challenge to make a simple card (stamps, ink, paper) using one or more of these colors. I decided to use them all.

These are all the colors that I used and they will no longer be available after June 3, 2019.

Tips & Techniques
Fresh Fig card base - 5 1/2 x 8 1/2, scored at 4 1/4
Powder Pink Layer - 5 1/4 x 4
Whisper White Layer - 5 x 3 3/4
Stamp vases with detailed design with Fresh Fig and Tranquil Tide, then stamp the solid background in same colors but stamping on scrap first to get a lighter shade.
Stamp flower outlines with Lemon Lime Twist, Berry Burst and Powder Pink; then stamp the flower insides in same colors but stamping on scrap first to get a lighter shade.
Stamp sentiment with Tranquil Tide Ink
Adhere layers to card base
Sweet, simple but very elegant!!!

On the inside I stamped the other style vase with Fresh Fig Ink and the flowers with Powder Pink Ink.

If you want any of the products I used on this project, just click on the item below or the Shop Now button and it will bring you to my Online Store. Please use the current Host Code when you go to checkout your order. You can also click directly on an item to order.
Tea Together Mother's Day Card
The Tea Together Stamp Set is perfect for a Mother’s Day Card!

I went through my Designer Series Paper (DSP) to find just the right piece for the teapot. It’s from the Petal Promenade DSP and I think it worked out great. I do this a lot; just look through it all and you’ll find the perfect design. Take a look at the video to see how I made these cards.
Tips & Instructions
Call Me Clover Card Base - 5 1/2 x 8 1/2, scored at 4 1/4
Whisper White Layer - 5 1/4 x 4
Grapefruit Grove Layer - 5 x 3 3/4, embossed with Tufted Embossing Folder
Piece of Petal Promenade DSP - stamp teapot image with Memento Black Ink and cut with coordinating framelits
Stamp small flower with Memento Black Ink and cut with coordinating framelit. Color with Grapefruit Grove and Call Me Clover Stampin’ Write Markers. Adhere to teapot
Stamp sentiment using Call Me Clover Ink and cut with smallest scalloped Layering Oval
Adhere 5 x 1/2 In Color Designer Series Paper (Grapefruit Grove) to 5 x 3/4 Whisper White Strip
Adhere Layers to card base. Adhere teapot and Sentiment using Dimensionals
Add Happiness Blooms Enamel Dots and a bow
This card has a bow made with a piece Call Me Clover ribbon and adhered with a Mini Glue Dot.

This is the one we made in my card class with the Grapefruit Grove ribbon which was a Sale-A-Bration item and is no longer available.

Here’s a look at the inside. I stamped and colored two flowers and the sentiment is from the Golden Afternoon Stamp Set. It has some really nice sentiments.

If you want any of the products I used on this project, just click on the item below or the Shop Now button and it will bring you to my Online Store. Please use the current Host Code when you go to checkout your order. You can also click directly on an item to order.
Clearance Rack Refresh
New items have been added to the Clearance Rack in the online store! Supplies are limited, and with discounts up to 60%, products will go quickly. Shop now and stock up.
April Paper Pumpkin
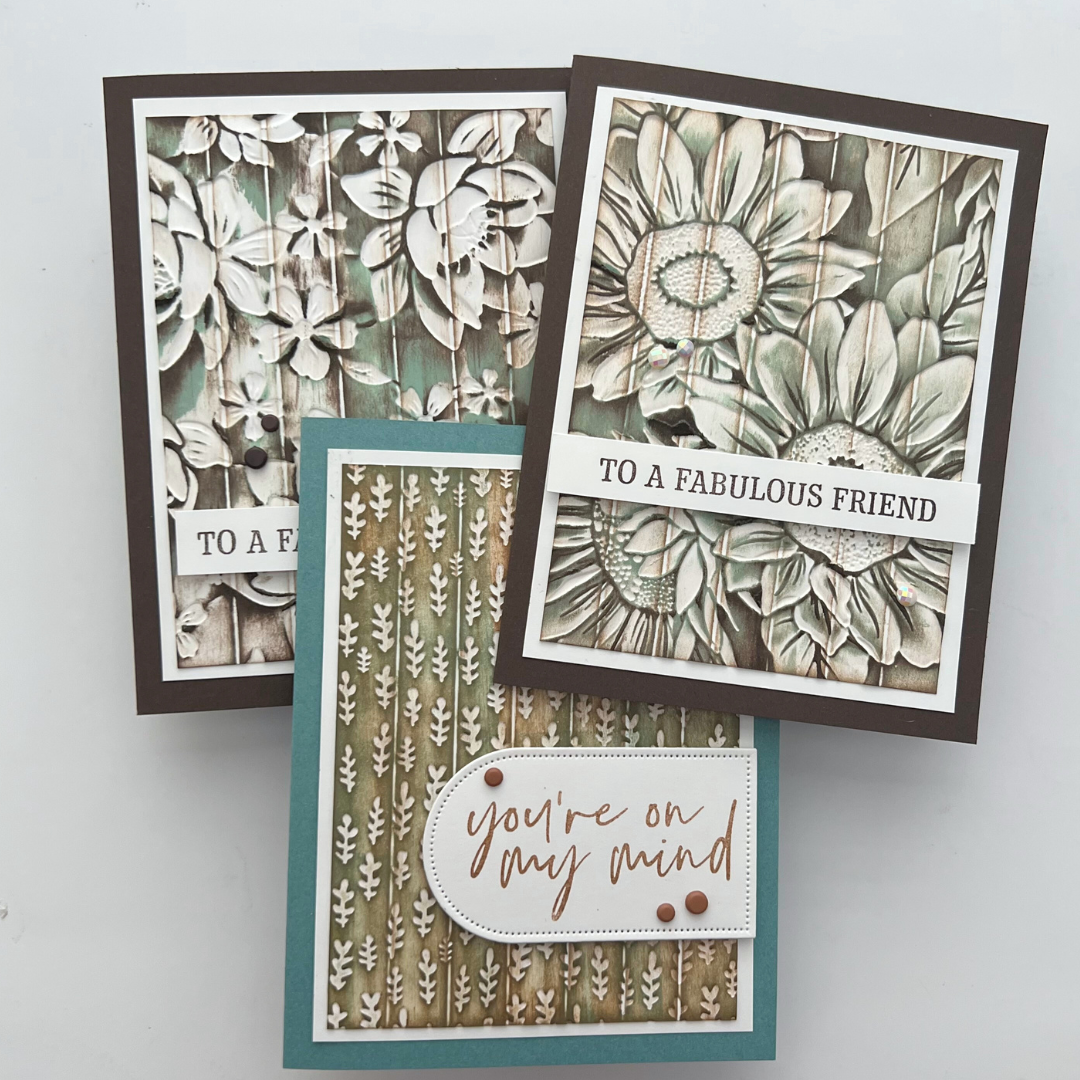
The April Paper Pumpkin Kit is called Sentimental Rose and it’s gorgeous. The flower and leaf images are Distinktive Stamps which are photo-realistic, crisp, and clear.

Let’s start from the beginning. With a Paper Pumpkin subscription, you receive box full of goodness each month.

Open it and you’ll see a stamp set, ink spot and a package with instructions and everything you need to make your projects.

This month includes everything you need to make 9 cards (3 different designs), coordinating envelopes and an acetate box that you will decorate and then can put your cards in.

Stamp your sentiments. You get more labels then needed which is good if you make a mistake.

Stamp the flower and leaves on the layers using Gray Granite Ink.

Here’s a look at each card along with the coordinating envelopes. You can change up the sentiments however you want. Aren’t they pretty?


The kit includes an acetate box that you can decorate with a corrugated belly band and some die-cuts. The cards fit in the box and would make a beautiful gift to give someone.

It’s too late to order the April Paper Pumpkin Kit but you can get a special Shelli Kit designed by the Stampin’ Up! Founder, Shelli Gardner. Watch the video for a sneak peak. You have to subscribe by May 10, 2019 to get the May Kit.
Happiness Blooms
Happiness Blooms Suite meets CAS(E) this Sketch!
Today’s card was made using the Happiness Blooms Suite from the Stampin’ Up! Occasions Catalog. I love how having a suite makes it so easy to pull a card together. The card is based on a sketch from CAS(E) this Sketch which is a weekly challenge from Splitcoaststampers.


These are the products I used from the Happiness Blooms Suite. The sentiments are from the Itty Bitty Birthdays Stamp Set.

Tips & Instructions
Night Of Navy Card Base - 5 1/2 x 8 1/2, scored at 4 1/4
Happiness Blooms Designer Series Paper Layer - 5 1/4 x 4
Whisper White Strip - 5 1/4 x 2, embossed with the Dot to Dot Embossing Folder
Scrap of Whisper White - Stamp Flower with Lovely Lipstick Ink and stem/leaves with Granny Apple Green Ink. Fussy Cut.
Adhere layers to card and flower.
Stamp sentiment with Night Of Navy Ink on 2 3/4 x 3/4 Whisper White Strip and using the Banner Triple Punch, punch right end. Adhere to card with Dimensionals and add 3 Happiness Blooms Enamel Dots.

For the inside I stamped a smaller flower and the sentiment is also from the Itty Bitty Birthdays Stamp Set.

If you want any of the products I used on this project, just click on the item below or the Shop Now button and it will bring you to my Online Store. Please use the current Host Code when you go to checkout your order. You can also click directly on an item to order.
Mama & Her Ducklings
The Fable Friends images are so darn cute! I love the Mother Duck and her sweet little ducklings.

I stamped the Ducks on a piece of the Floral Romance Designer Series Paper that had a wood grain design. They were colored with Stampin’ Blends Markers, my favorite coloring tool right now.

Tips & Instructions
Sahara Sand Card Base - 5 1/2 x 11, scored at 4 1/4
Bermuda Bay Layer - 5 1/4 x 4
Floral Romance Designer Series Paper 5 x 3 3/4
Stamp images and sentiment using Black Memento Ink
Color with Stampin’ Blends
Stamp the grass with Bermuda Bay Ink
Tie Bow with 3 strands of Linen Thread and adhere with Glue Dot
Add 3 Frosted Epoxy Droplets
Here’s another look. Isn’t this a cute card?

If you want any of the products I used on this project, just click on the item below or the Shop Now button and it will bring you to my Online Store. Please use the current Host Code when you go to checkout your order. You can also click directly on an item to order.
Flourishing Phrases Thank You Card
I’m calling this the Triple Layer Technique; not sure if that’s the technical name but I’m going with it.

It’s so easy to do and really turns out beautiful. Watch the video to see how I made this.
Tips & Instructions
Poppy Parade Card Base - 5 1/2 x 8 1/2, scored at 4 1/4
Whisper White Layers: 5 1/4 x 4, 4 1/2 x 3 1/4, 3 1/2 x 2 1/4
Poppy Parade Layers: 4 3/4 x 3 1/2, 3 3/4 x 2 1/2
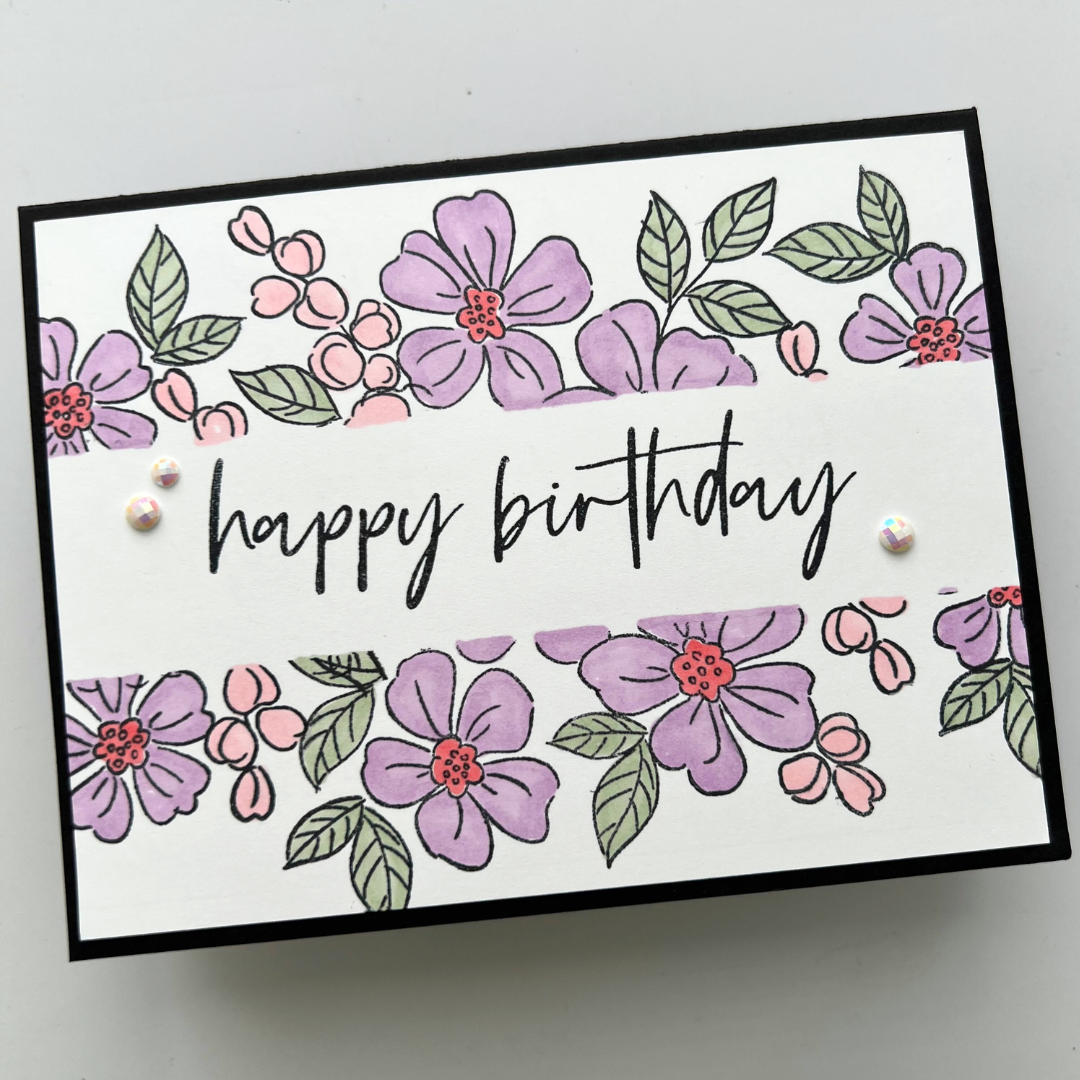
Lay Whisper White pieces on top of each other, centering and stamp Sentiment, Flowers and Leaves
Adhere layers alternating Whisper White with Poppy Parade to build card
Add Granny Apple Green Glitter Dots around sentiment

If you want any of the products I used on this project, just click on the item below or the Shop Now button and it will bring you to my Online Store. Please use the current Host Code when you go to checkout your order. You can also click directly on an item to order.
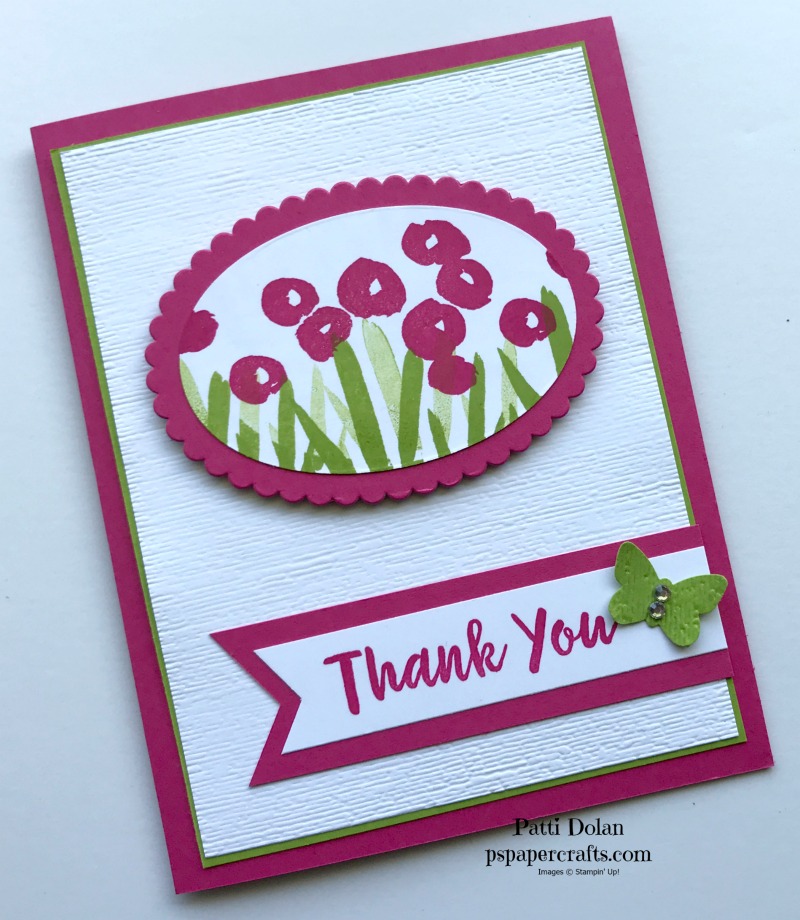
Abstract Impressions - Thank You
Thank You Card using the Abstract Impressions Set!
These were the swap cards I made for the Stampin’ Up! OnStage Convention. I made 25 of them and swapped with other demonstrators and came home with 25 beautiful cards that they made. Swaps are great.
Tips & Instructions
Melon Mambo Card Base - 5 1/2 x 8 1/2, scored at 4 1/4
Granny Apple Green Layer - 5 3/8 x 4 1/8
Whisper White Layer - 5 1/4 x 4, embossed with Subtle Embossing Folder. Adhere layers to card base.
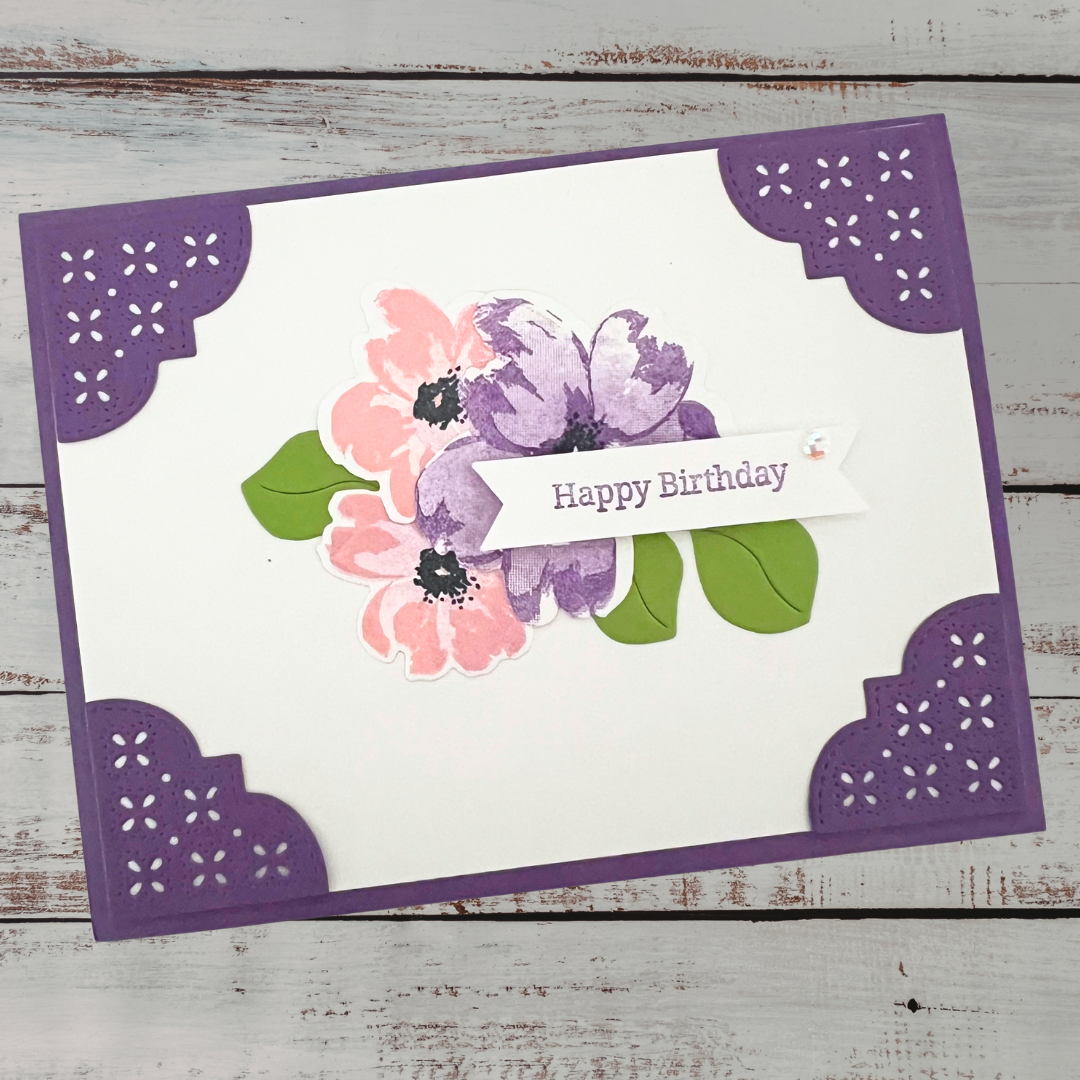
Stamp leaves using Granny Apple Green Ink on a Whisper White Oval (4th smallest). Stamp direct, then lift and stamp again to get lighter shade. Stamp flowers with Melon Mambo.
Cut Melon Mambo with 2nd largest scalloped oval and adhere adhere white oval. Using Dimensionals adhere Oval to Card.
Stamp sentiment on 3/4” strip of Whisper White. Punch one end of the Whisper White Strip and one and of a 1” Melon Mambo strip using Banner Triple Punch. Adhere strips to card.
Emboss strip of Granny Apple Green with Subtle Embossing Folder and punch with small end of Butterfly Duet Punch. Add Rhinestones to butterfly and adhere to sentiment strip.

Here’s another look at the card. I’m happy with how it came out and it was easy to make multiples of this card.

On the inside I just stamped some flowers and leaves. I didn’t want to put a sentiment so whoever receives the swap can use it how they want to.

If you want any of the products I used on this project, just click on the item below or the Shop Now button and it will bring you to my Online Store. Please use the current Host Code when you go to checkout your order. You can also click directly on an item to order.
Retiring Products
Stampin’ Up! just announced their Retiring List.
Stampin’ Up! will be coming out with their new Annual Catalog which means that some of their products will be retiring. All retiring items are only available while supplies last and will be discontinued after June 3.
New Catalog Coming June 3rd!

I was in Charlotte over the weekend at the Stampin’ Up! OnStage Convention and we received the new catalog. I had a wonderful time with teammates and meeting new people. We stamped, laughed, celebrated, ate and just enjoyed our time with people who share this love for papercrafting. I can only show you the cover of the catalog. It goes live in June, 2019. I’ll share projects when I get my pre-order delivered.
Cutest Squirrel Ever -- Happy Spring!
Isn’t this just the sweetest little squirrel? It’s from the Fable Friends Stamp Set.
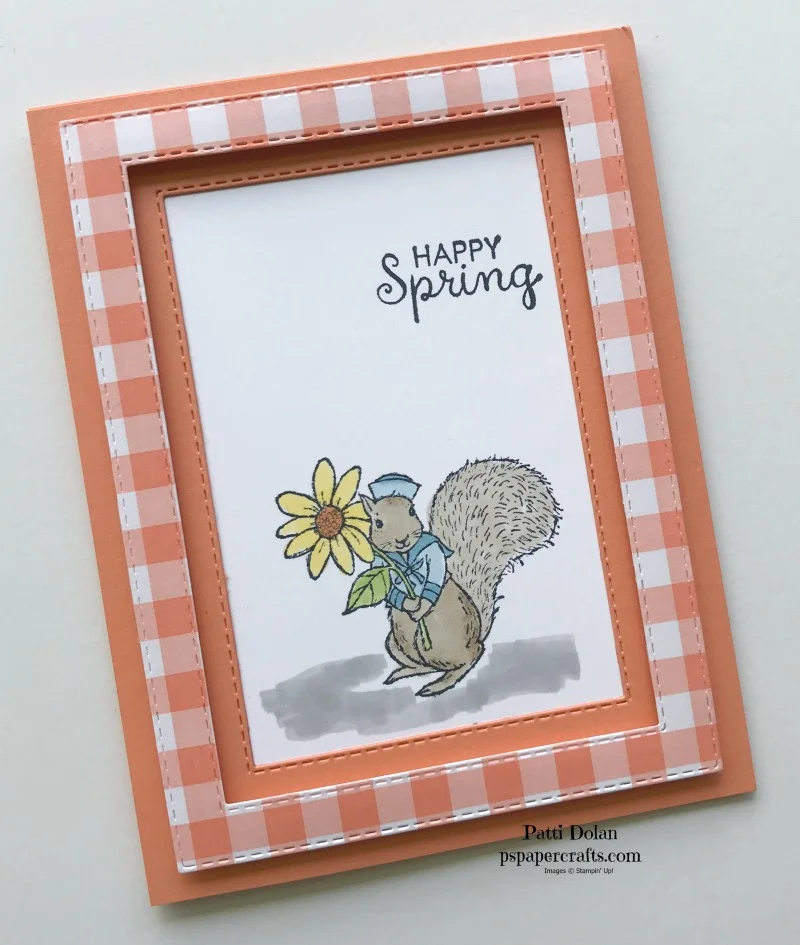
I’ll show you how I made this stitched frame and popped it up to give it a 3D look.
Tips and Instructions:
Cut Grapefruit Grove Card Base at 5 1/2 x 8 1/2 and score at 4 1/4
Using the largest and 3rd largest Rectangle Stitched Framelits cut Frame from Gingham Gala Designer Series Paper.
Using the 4th largest Rectangle Stitched Framelit cut a rectangle from a piece of 5 1/2 x 4 Grapefruit Grove Cardstock.
Stamp your images on 3 1/4 x 4 1/2 Whisper White Cardstock with Memento Black Ink and color with Stampin’ Blends Markers.
Adhere stamped layer behind Grapefruit Grove layer and then adhere to Card Base.
Using Foam Adhesive Strips adhere Gingham frame to card.
I think it’s adorable. Swap out the sentiment for Easter or Baby.

For any order you place this month, I will send you a Free pdf link to 8 beautiful projects featuring the Gingham Gala Suite.
If you want any of the products I used on this project, just click on the item below or the Shop Now button and it will bring you to my Online Store. Please use the current Host Code when you go to checkout your order. You can also click directly on an item to order.
Stampin' Trimmer Discontinuation
Stampin’ Trimmer Discontinuation
Stampin’ Up! has decided to retire the Stampin’ Trimmer as of June 3, 2019, including all accessories—replacement cutting blades, scoring blades, and cutting mats. They’ve experienced challenges with their supplier and are taking the opportunity to research and explore a replacement option for this product, which will not be the same as the current Stampin’ Trimmer.
If you own a Stampin’ Trimmer, I would suggest you order replacement and scoring blades. They are already on backorder but you can place your order and you’ll get them when they are replenished.
Retiring Product Lists Coming Soon
On April 15 at 1:00 PM (MT), Stampin’ Up! will post retiring product lists for the occasions and annual catalogs. These last-chance products will be available until June 3 or while supplies last only, so check my website on April 15 and get your favorite items before they’re gone!
Click any of the products below to purchase them at my online store.
Paper Pumpkin Gets Distinktive
Paper Pumpkin Gets Distinktive!!!

Here at Paper Pumpkin, we love providing easy, fast, and fun creative experiences for our subscribers. We do this in a cost-saving and time-efficient way: by delivering a cute package filled with fun papercrafting goodies . . . right to your door.
In addition to providing everything you need to make a pre-designed, all-inclusive project, we also have another goal in mind: to help you unlock and explore your creativity by introducing you to exciting and innovative products from Stampin’ Up!
In April’s Paper Pumpkin kit, we’re pleased to announce that we’ll be treating you to something extra-special: Stampin’ Up!’s brand new Distinktive® stamp images.
—————— ABOUT DISTINKTIVE STAMPS —————-
Distinktive stamps give you photo-realistic images with just one stamp. They have a special texture that gives added depth and dimension in a single step.
These stamps are available only from Stampin’ Up! and are made using a patent-pending process.
Distinktive stamps are available in red rubber and photopolymer; Paper Pumpkin’s April kit includes photopolymer stamps.
Shop Distinktive stamps in the online store by searching “Distinktive,” or look for the Distinktive icon in Stampin’ Up! catalogs.