


Home Decor Project Falling For Leaves Candle
Today’s project is a little bit different. The only paper I’m using is a piece of tissue paper. I’ll show you how you can stamp on the tissue paper and then melt it onto a plain candle.
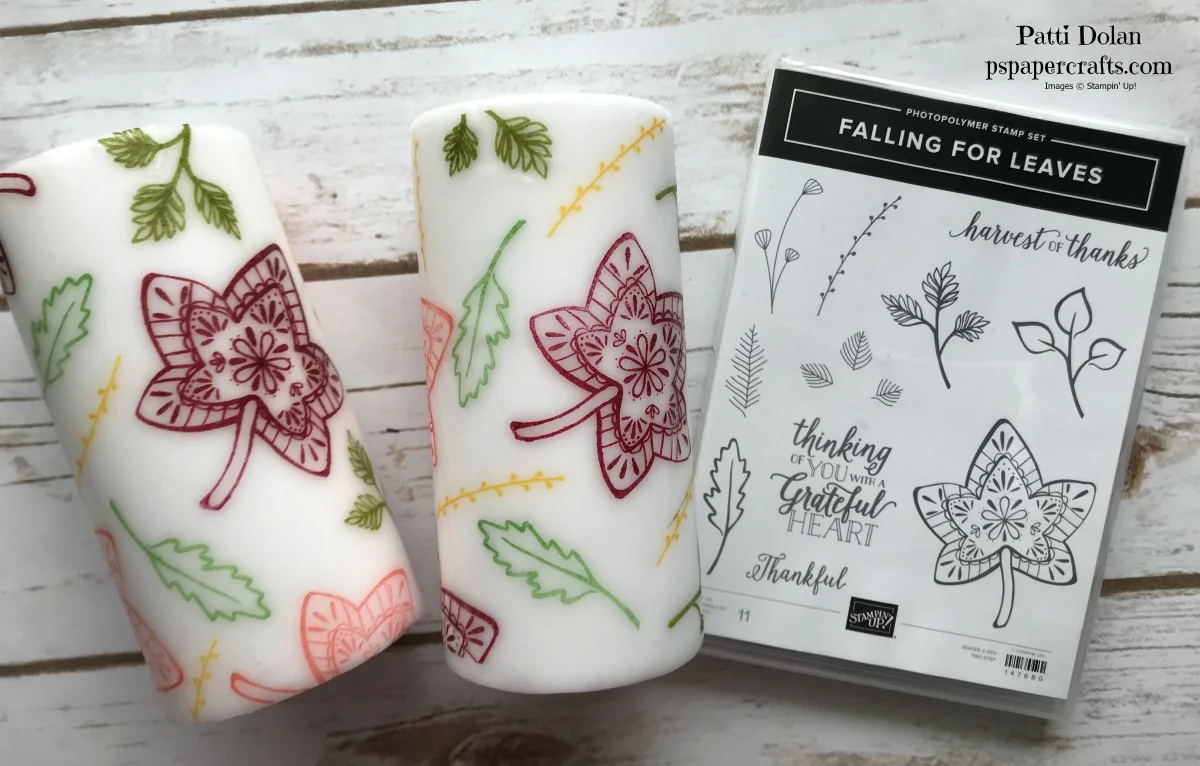
I used the Falling For Leaves Stamp set and the Ink Pads are Merry Merlot, Calypso Coral, Old Olive, Garden Green and Crushed Curry. Perfect for fall!
First cut a piece of white tissue paper just a little shorter than the height of the candle and wrap it around to just barely have the ends meet.
Then Stamp all over the tissue paper with a random pattern starting with your largest images first and filling in with your smaller images.
Next wrap the tissue paper around the candle and heat it on the LOW setting of your heat tool. You’ll see the wax start to melt and the tissue paper adhere to the candle.
Work your way around the candle and then go back and melt any air bubbles.
Easy right! Look how beautiful the candle is. I plan on making some smaller with Christmas stamps next month. Watch the video to see how I did it.
If you want any of the products I used on this project, just click on the item below or the Shop Now button and it will bring you to my Online Store. Please use the current Host Code when you go to checkout your order. You can also click directly on an item to order.
Tip of the Week - Extending a Die Cutout
Did you ever have a die that was too short for your card? I wanted to use the lacy piece on a card and it needed to be 5 1/2 inches but the die was too short. What to do, what to do??? I decided to cut 2 pieces and hide where they met behind an embellishment.
See how short it is?

Cut a second one and place them with the seam where you can place an embellishment over it. Cut the excess pieces off and save them for another project.

Adhere an embellishment over the seam and no one will ever know it’s not one long piece.

If you want any of the products I used on this project, just click on the item below or the Shop Now button and it will bring you to my Online Store. Please use the current Host Code when you go to checkout your order. You can also click directly on an item to order.
Product of the Week - Falling For Leaves Bundle
Autumn is in full swing but here in Florida, it still feels like summer. It seems to me that its been getting hotter as the days go on. I love all things Fall though, especially the colors of the leaves back in New York. This was my favorite time of year.
The Falling For Leaves Bundle has some great images and thinlits. If you bundle it, you can save 10%

Here are some samples from the Holiday Catalog on page 45. Aren’t they beautiful?

I’ll be featuring this set this week so stay tuned! You can click on the product below to purchase it from my Online Store.
To Thank You For All You Do
Here’s another card using the Corrugated Embossing Folder. Adding an embossed layer gives the card some texture. The stamp set is one of my favorites, Rooted In Nature.

Make sure you start with a piece of cardstock a little longer than needed. When you emboss it with this folder, you lose about a quarter inch.

For the tree image I colored the trunk with Early Espresso Stampin’ Write Marker and the leaves with Old Olive. You can use whatever brown and green water-based markers you have on hand. Breath on the stamp to moisten it and stamp on your cardstock.

I didn’t have any Cherry Cobbler pearls so I colored them with my Dark Cherry Cobbler Stampin’ Blends. These are alcohol markers which dry really fast.

I wrapped a piece of Striped Burlap Trim around the layers and then attached the banner with the sentiment to it.

Here’s a look at the inside.

The Dimensions for this card are:
Early Espresso Card Base - 5 1/2 x 8 1/2, scored at 4 1/4
Cherry Cobbler Layer - 5 1/8 x 3 7/8
Crumb Cake Layer (after embossed - 5 x 3 3/4
Banner Strip - 1/2 x 3 1/4
If you want any of the products I used on this project, just click on the item below or the Shop Now button and it will bring you to my Online Store. Please use the current Host Code when you go to checkout your order. You can also click directly on an item to order.
Corrugated Wreath Happiest Christmas Wishes
A fun way to use the Corrugated Embossing Folder is to emboss shapes. I made this wreath using the Scalloped Layering Circle Framelits and then ran it through my Big Shot with the Corrugated Embossing Folder. I love how it came out.

Once I had the wreath made, I decorated it with a bow made from a piece of Cherry Cobbler Cotton Twine. I wanted to add some berries to it but didn’t have anything in my stash to match so I decided to color some Pearl Basic Jewels with a Cherry Cobbler Stampin’ Blend and it came out great. I love that you can color the pearls with those alcohol markers and match your project perfectly.

The sentiments came from the Dashing Deer Stamp Set. I love “Happiest Christmas Wishes”….what a sweet sentiment.
If you want any of the products I used on this project, just click on the item below or the Shop Now button and it will bring you to my Online Store. Please use the current Host Code when you go to checkout your order. You can also click directly on an item to order.
WORLD CARD MAKING DAY

Stampin’ Up! is celebrating World Card Making Day by offering some great specials on some great products. Why not stock up on adhesives and envelopes and save some $$$?
Here’s the list of the products that are discounted by 10%.

Here’s the link to my online store to purchase any of these items.
Tip of the Week - Corrugated Card Protector
My customers have given me a great tip for protecting the embellishments on cards when mailing. They place a piece of corrugated cardstock over the card front before putting it in the envelope.
With the new Corrugated Dynamic Textured Impressions Embossing Folder, this will be very easy. Cut a piece of cardstock, something that’s old or you don’t use much at 5 1/4 x 4 and then use the Corrugated Embossing Folder to emboss it. Place it over your card and put it in an envelope.
It’s easy to do and protects all your hard work. You can make a bunch up ahead of time to have them on hand.


You can click on the product below to purchase it from my Online Store.
Product Of The Week - Corrugated Dynamic Textured Impressions Embossing Folder
This week I’ll be featuring the Corrugated Dynamic Textured Embossing Folder from the 2018 Holiday Catalog. I used to have one of those crimpers that you would put the cardstock through to get this look but this embossing folder is so much easier to use.

Here’s a sample from the catalog. Embossing folders add so much dimension to your project and they are so easy to use.

Check in tomorrow for a quick tip and the rest of the week to what I plan to make using this embossing folder.
You can click on the product below to purchase it from my Online Store.
Woodsy Christmas Card
Here’s a quick Christmas card I made for a challenge to use new embellishments. I love how you can add just a few embellishments to a card to pull it together. This was so easy to make.

I stamped the trees from the Winter Woods Stamp Set in Gray Granite on a piece of 5 x 3 3/4 Wood Textures DSP. I layered that on a 5 1/4 x 4 piece of Real Red Cardstock and then layered that on the Crumb Cake card base.
The sentiment was stamped in Real Red on a strip of Whisper White Cardstock and then I cut the end with the Banner Triple Punch. The Banner was clipped to the Wood Textures Layer using a Galvanized Clip and that layer was adhered to the Real Red layer and then to the card base. I tied a piece of Braided Linen Trim around the card and tied a bow. To finish it off, I added 3 Clear Epoxy Droplets.

If you want any of the products I used on this project, just click on the item below or the Shop Now button and it will bring you to my Online Store. Please use the current Host Code when you go to checkout your order. You can also click directly on an item to order.
Pretty Wishing You All The Best Card
I decided to make a similar card to yesterday’s, I just changed it up a bit. Instead of all the layers, I only have one 5 1/4 x 4 Frosted Floral DSP layer.
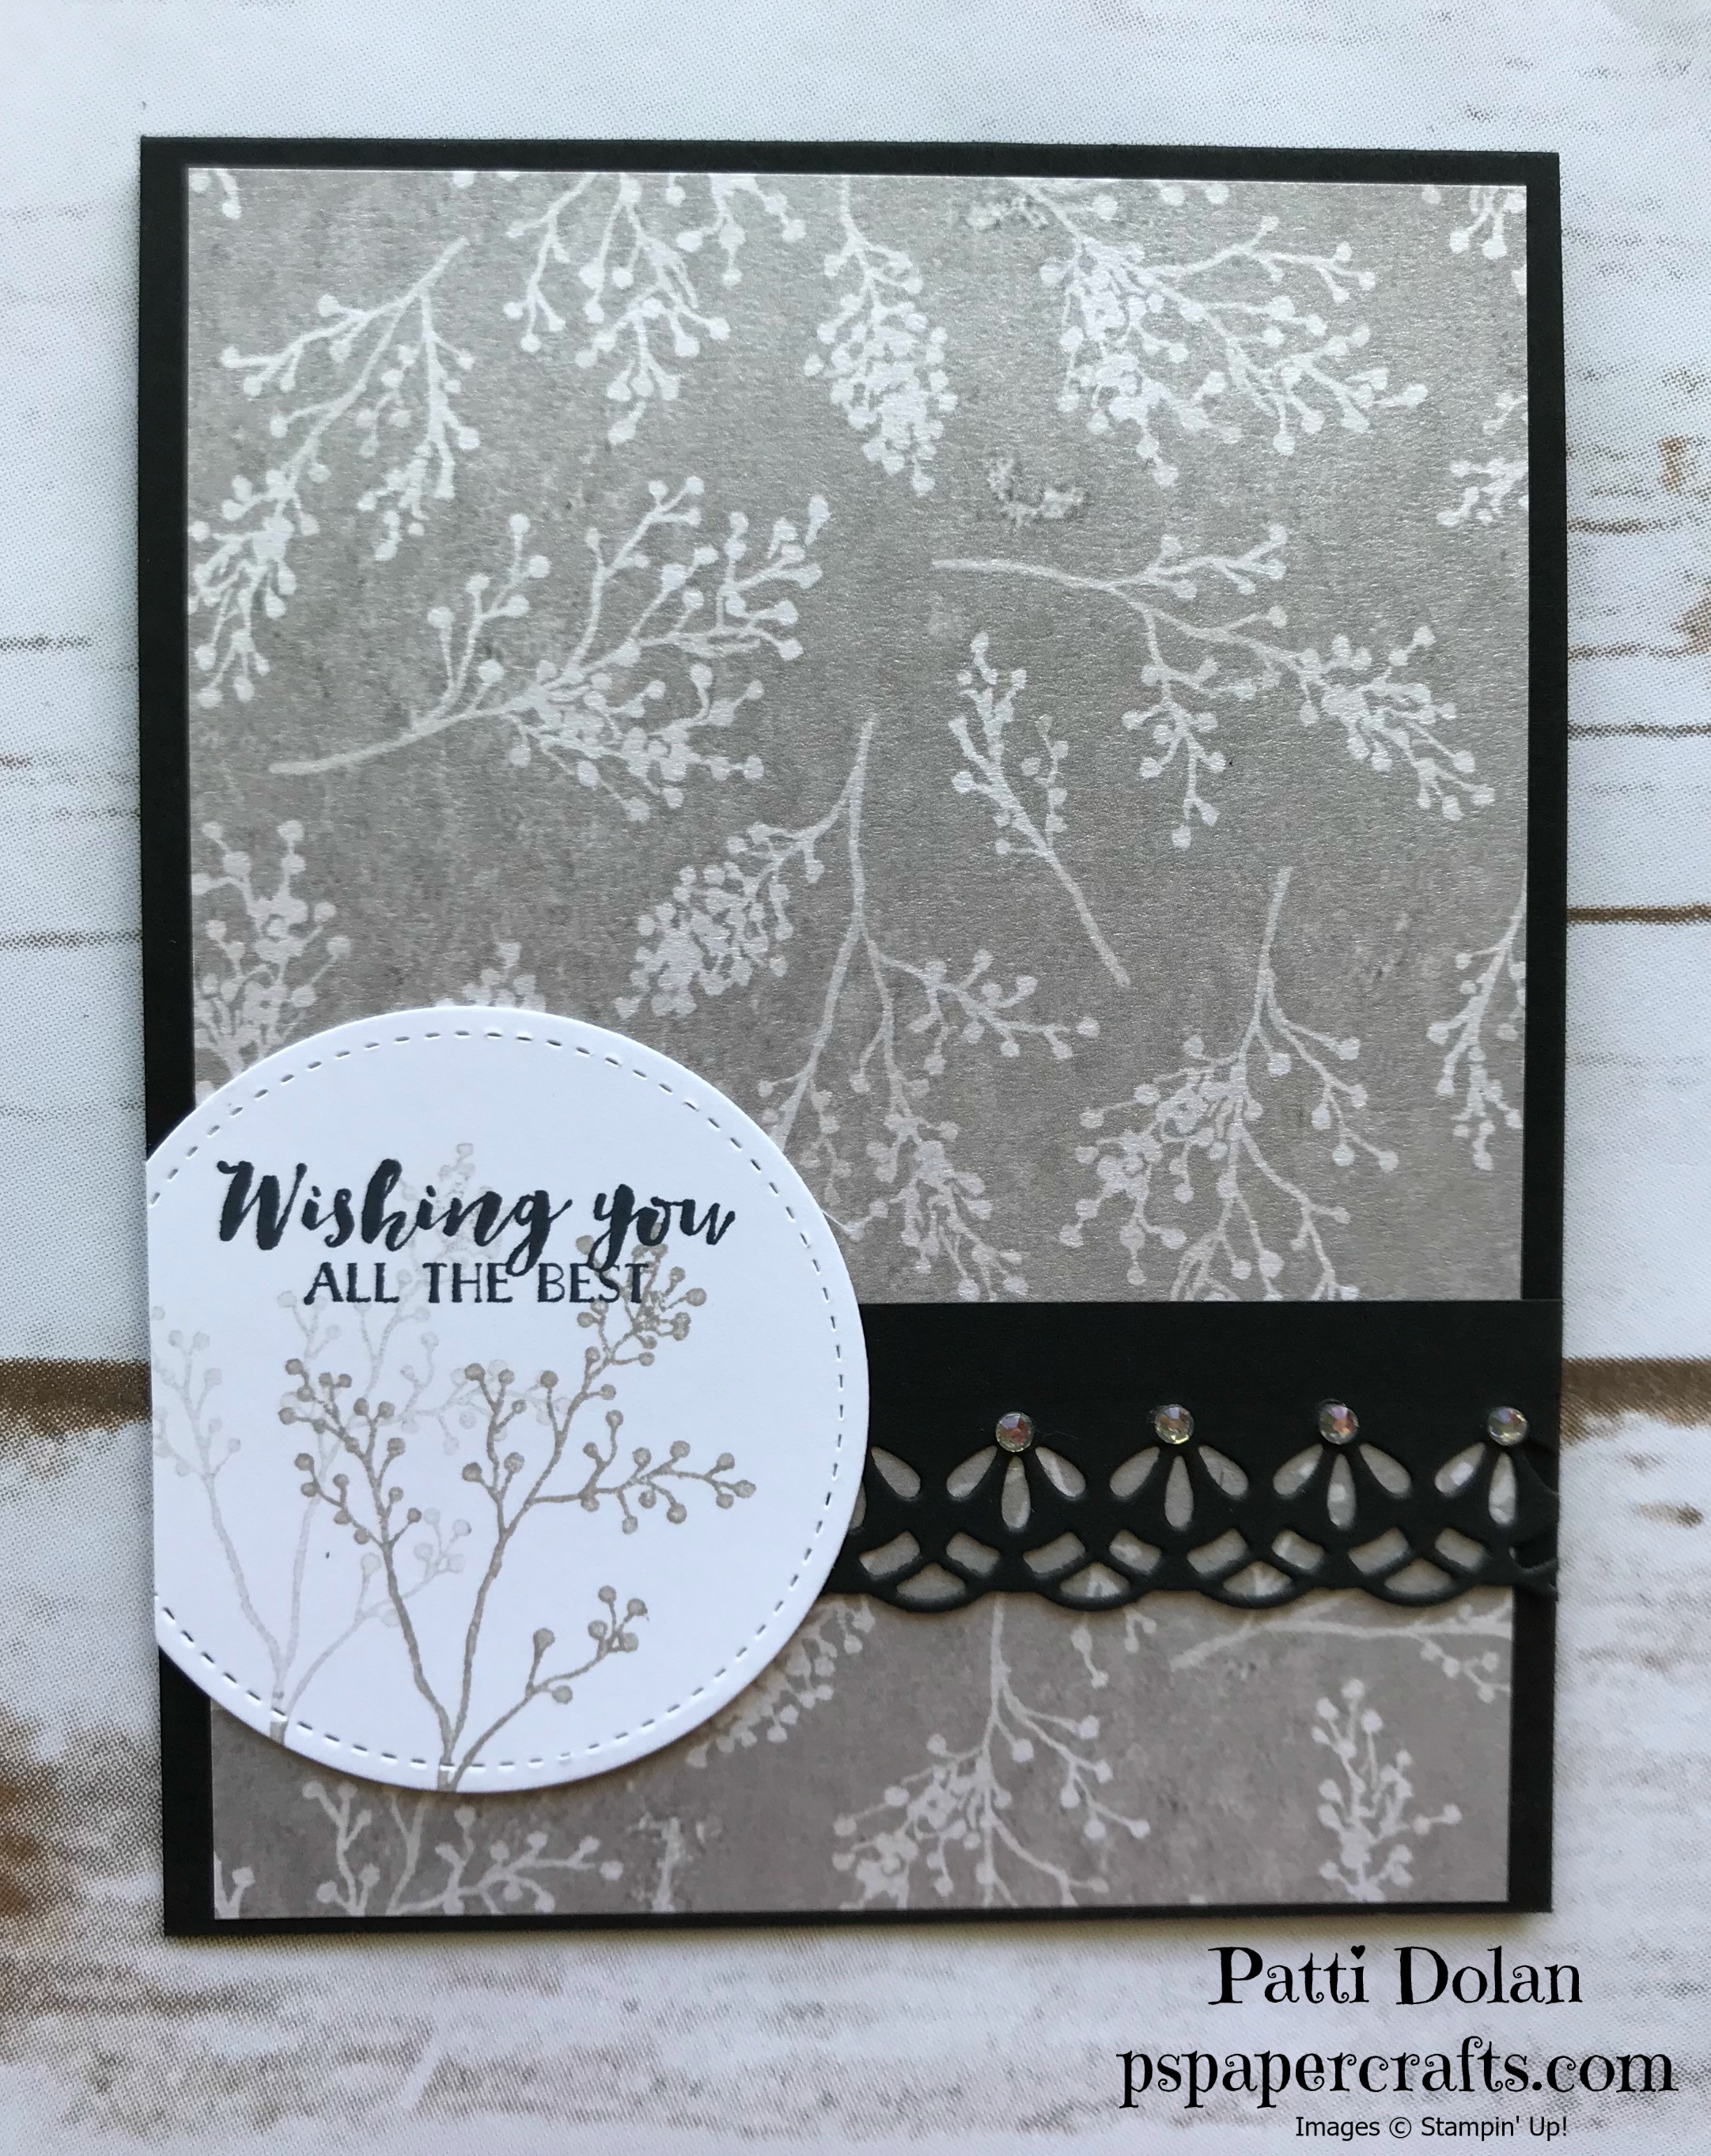
Next I cut a Basic Black border using the Detailed Leaves Framelits. It’s a very delicate border piece and I added some rhinestones to it to glam it up a bit. The sentiment is from the First Frost Stamp Set in Black Memento. The branch images were stamped in Gray Granite, directly and then a second time without re-inking.
If you want any of the products I used on this project, just click on the item below or the Shop Now button and it will bring you to my Online Store. Please use the current Host Code when you go to checkout your order. You can also click directly on an item to order.
First Frost
This week I’ve been featuring the Stampin’ Trimmer and sharing dimensions for card bases and layers. I thought I would put this into action with these cards.

The First Frost Stamp Set and the Frosted Floral DSP coordinate so well together. This DSP is just gorgeous; it has a pearlized glimmer to it. For the flower image, I used Stampin’ Write Markers in Pear Pizzaz and Powder Pink. I colored the stamp with the markers and then breathed on it to moisten before stamping. Three Frosted Epoxy Droplets were added just below the image.

Here are the dimensions:
Card Base - 5 1/2 x 8 1/2, scored at 4 1/4
OR
4 1/4 x 11, scored at 5 1/2 (top folding)
Basic Black Layer - 5 1/4 x 4
Basic Gray Layer - 5 x 3 3/4
Smaller Basic Black Layer - 3 5/8 x 2 5/8
Whisper White Layer - 3 1/2 x 2 1/2
On the inside, I have a 5 1/4 x 4 layer that was stamped with the sprigs in Pear Pizzaz and Gray Granite (I stamped off the Gray Granite first to make it a little lighter.

Follow along with the video below.
If you want any of the products I used on this project, just click on the item below or the Shop Now button and it will bring you to my Online Store. Please use the current Host Code when you go to checkout your order. You can also click directly on an item to order.
Tips of the Week - Stampin' Trimmer / Standard Layering Dimensions
I have a few things to share with you today that I hope are helpful when making cards.
First, a couple of tips to help you avoid cutting instead of scoring. Has that ever happened to you? With the Stampin’ Trimmer, there is a light gray scoring blade and a dark gray cutting blade and sometimes I’ve used the wrong one. This is ok if you accidentally score instead of cut, BUT if you cut instead of score, there’s no fixing it.
One tip is to mark the cutting blade with red nail polish or something similar. It will sort of jump out at you that its the cutting blade.

Another way to avoid this is to remove the scoring blade and use your Bone Folder instead. If you saw my post yesterday, there is a video that shows how to remove your blades. Once you remove the scoring blade, use your Bone Folder right in the groove where the blades sit.
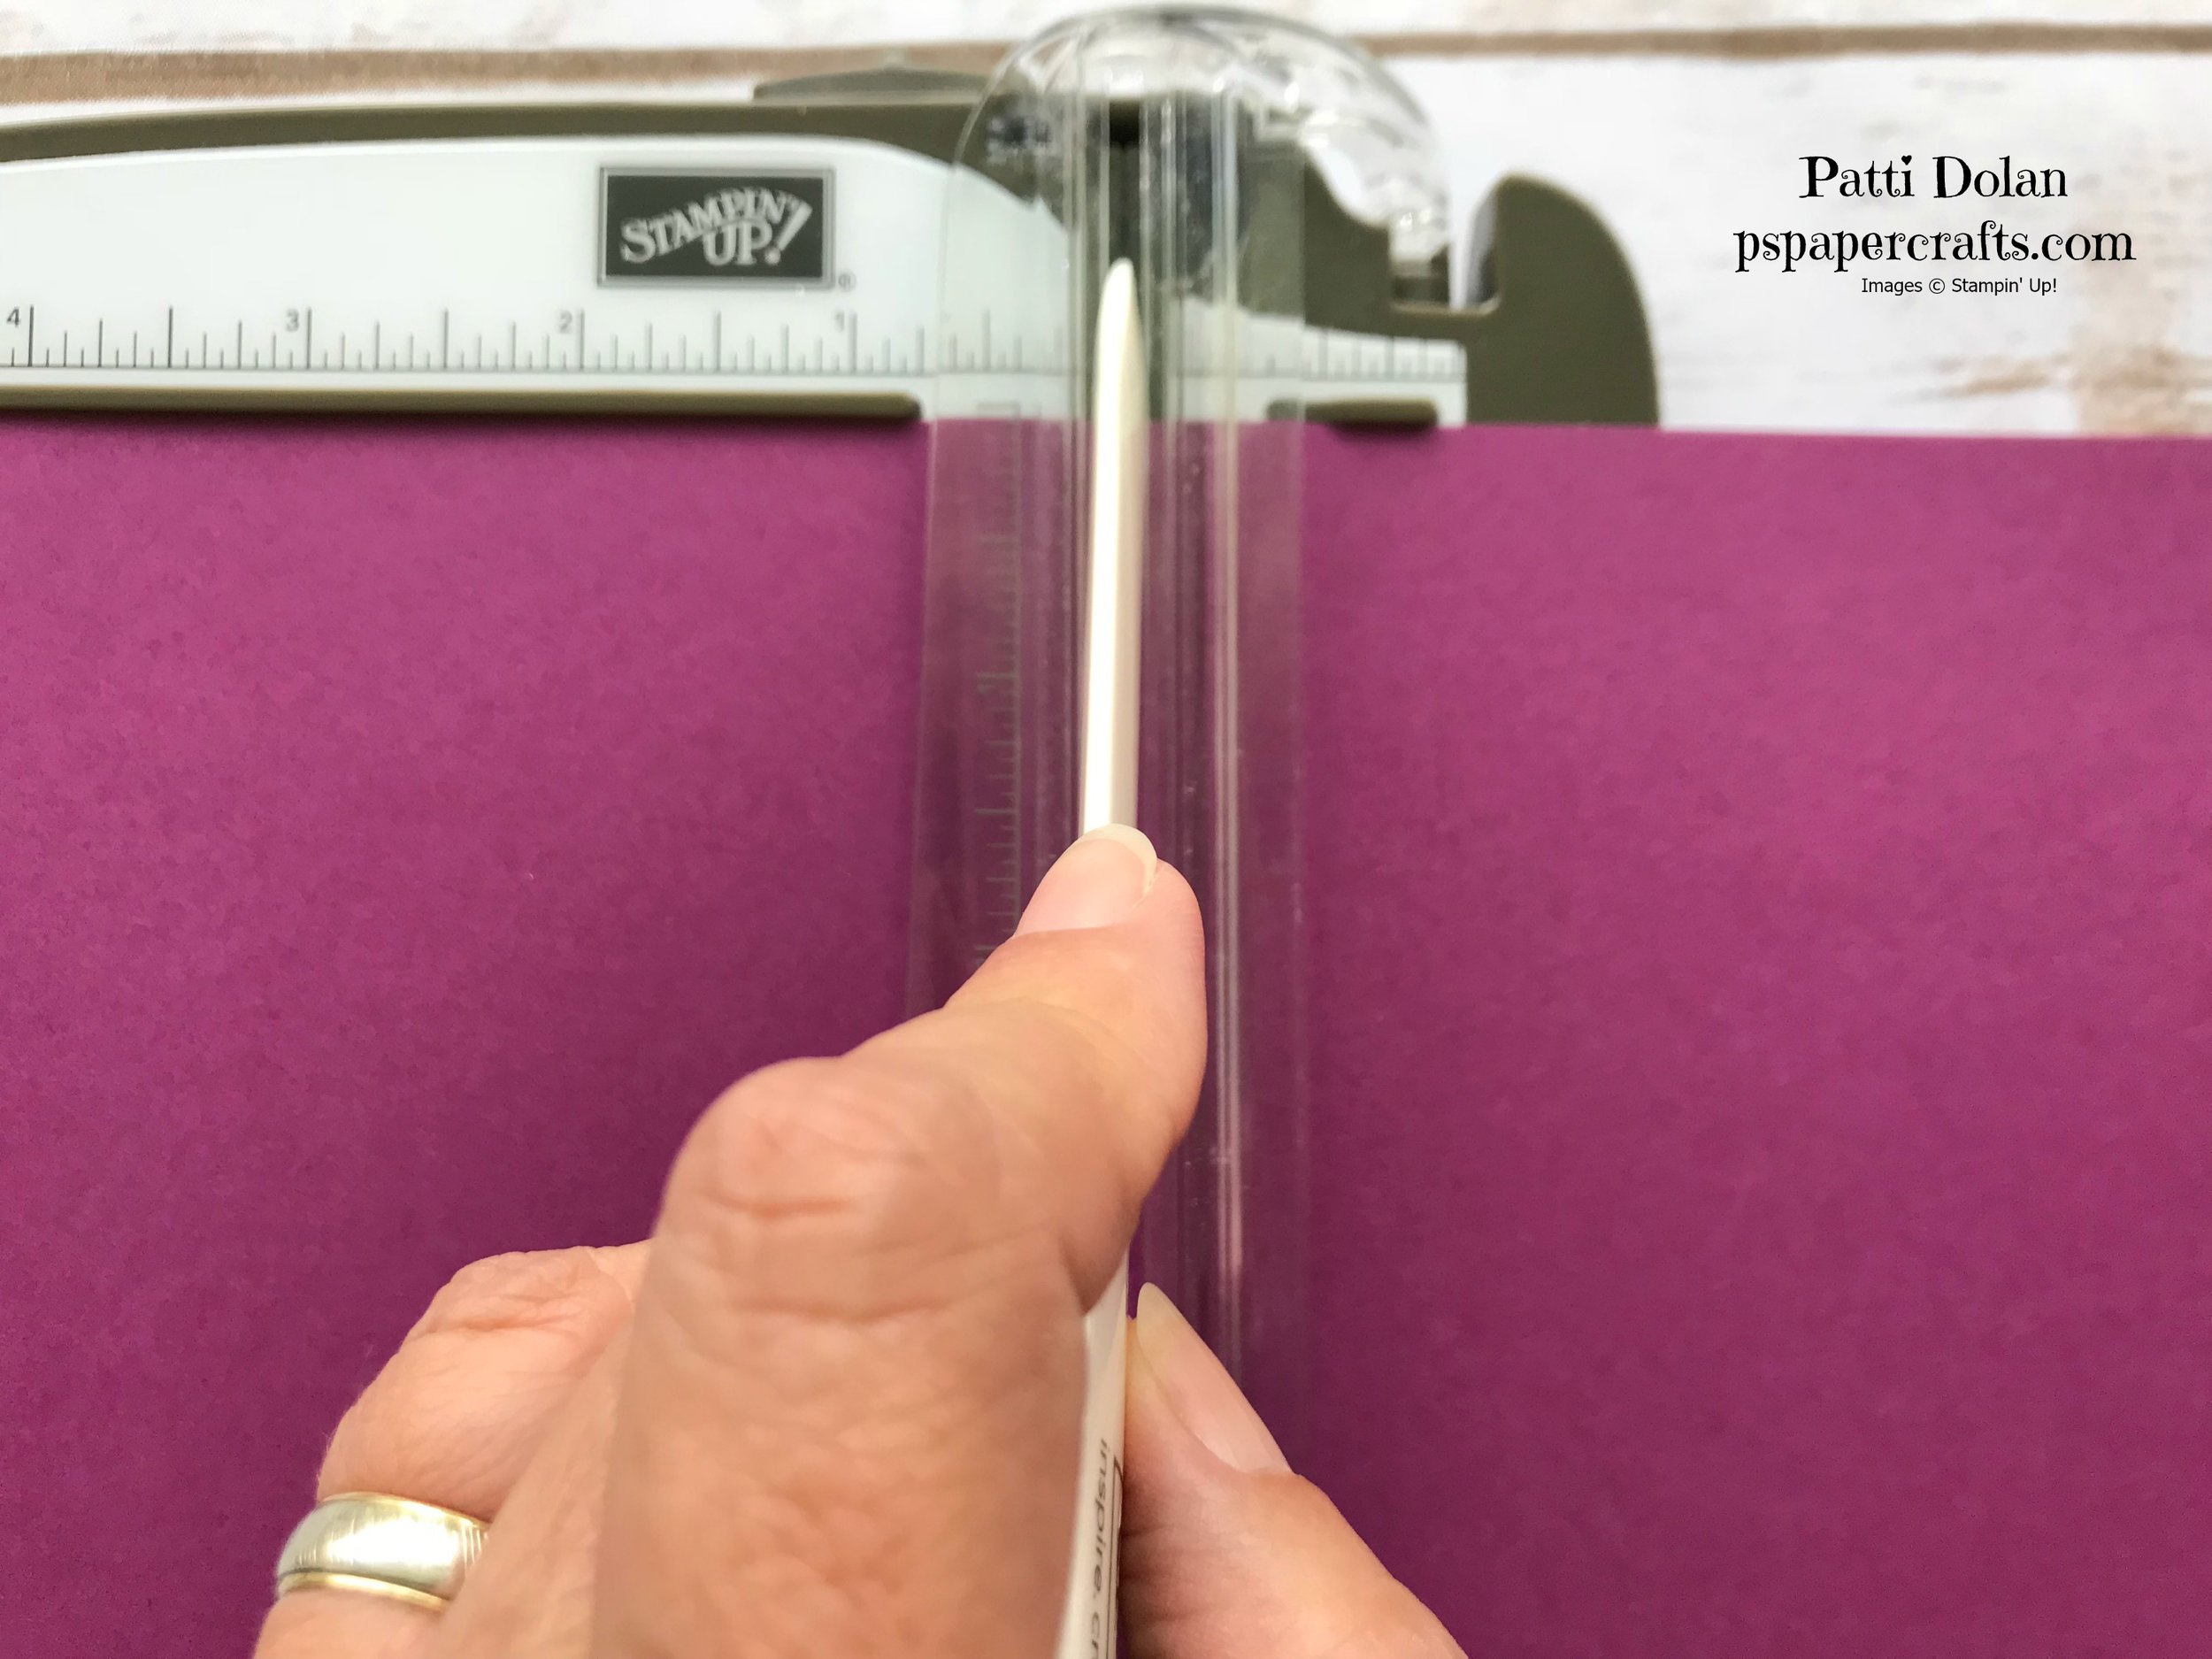
I also want to share some standard dimensions that I use for A2 size cards. Those are the cards that fit into our medium size envelopes or an invitation size envelope.
You can cut your 8 1/2 x 11 cardstock on the 11” side at 5 1/2 and score at 4 1/4.
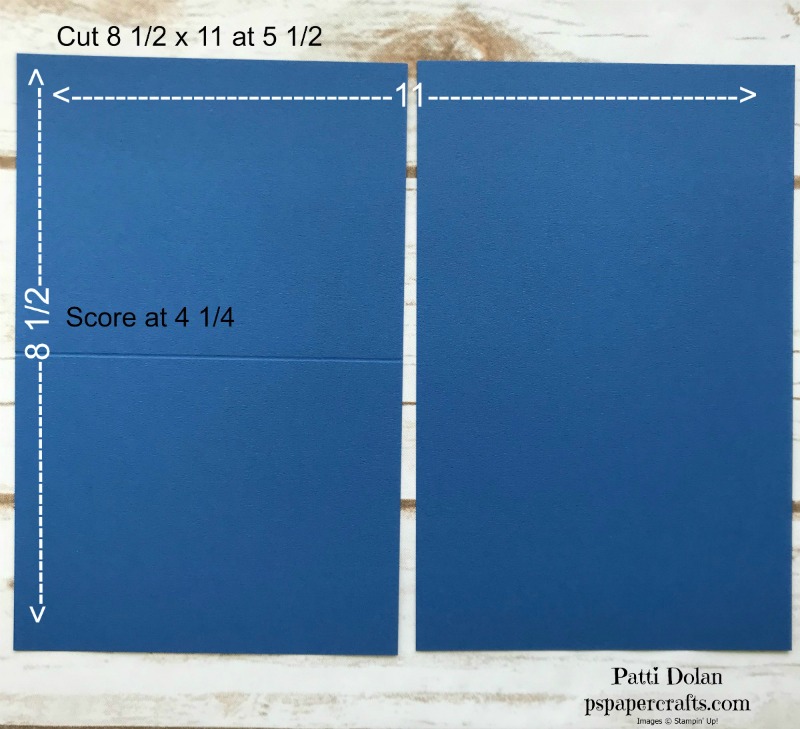
Or cut the 8 1/2” side at 4 1/4 and score at 5 1/2”.

Then I usually go down a 1/4” for each layer. If I want a tighter layer (smaller border), I go down an 1/8”.

Tools are so important in paper crafting and I wanted to share with you information about the Stampin’ Trimmer. It allows you to cut and score and fits 12x12 paper.

Here’s a quick video to show the highlights of this tool from Stampin’ Up!
Tomorrow I’ll give you some tips and share standard measurements for making cards with layers. You can click on the products below to purchase them on my online store.
Sweet Just A Note Card
Here’s another card using the Wishing You Well Stamp Set. I am really loving this set, its so sweet and simple.

Here’s the dimensions:
Night of Navy Card Base - 8 1/2 x 5, scored at 4 1/4
Soft Sea Foam Layer - 5 1/4 x 4
Fresh Fig Layer - 3 7/8 x 2 7/8
Whisper White Layer - 3 3/4 x 2 3/4

I used the Layered Leaves Dynamic Textured Impressions Embossing Folder to emboss the Soft Sea Foam Layer.

The floral bunch was stamped in Soft Sea Foam and the bow in Night of Navy. The flowers and sentiment are Fresh Fig.

I stamped the Floral Bunch in both Soft Sea Foam and Fresh Fig, offsetting it a little to give it some depth. I like how it came out.

If you want any of the products I used on this project, just click on the item below or the Shop Now button and it will bring you to my Online Store. Please use the current Host Code when you go to checkout your order. You can also click directly on an item to order.
Tip of the Week - Refilling Your Stampin' Write Markers
Today I have a quick video to show you how to refill your Stampin’ Write Markers. Take a look, its so easy to do.
Here’s the link to my Online Store where you an purchase the Ink Refills, Stampin’ Write Markers and any current Stampin’ Up Products.
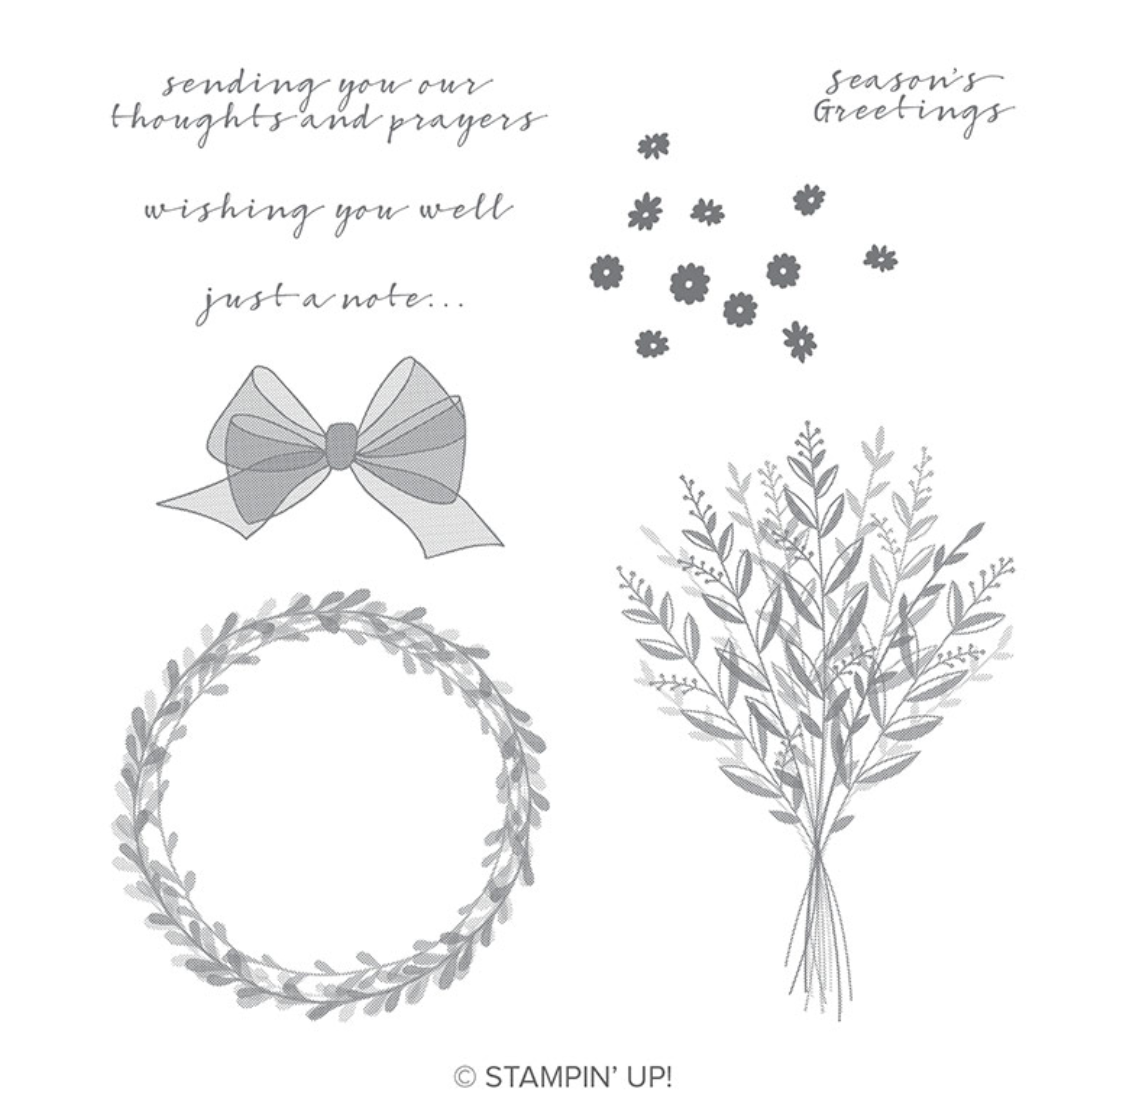
Wishing You Well Card Using the Thumping Technique
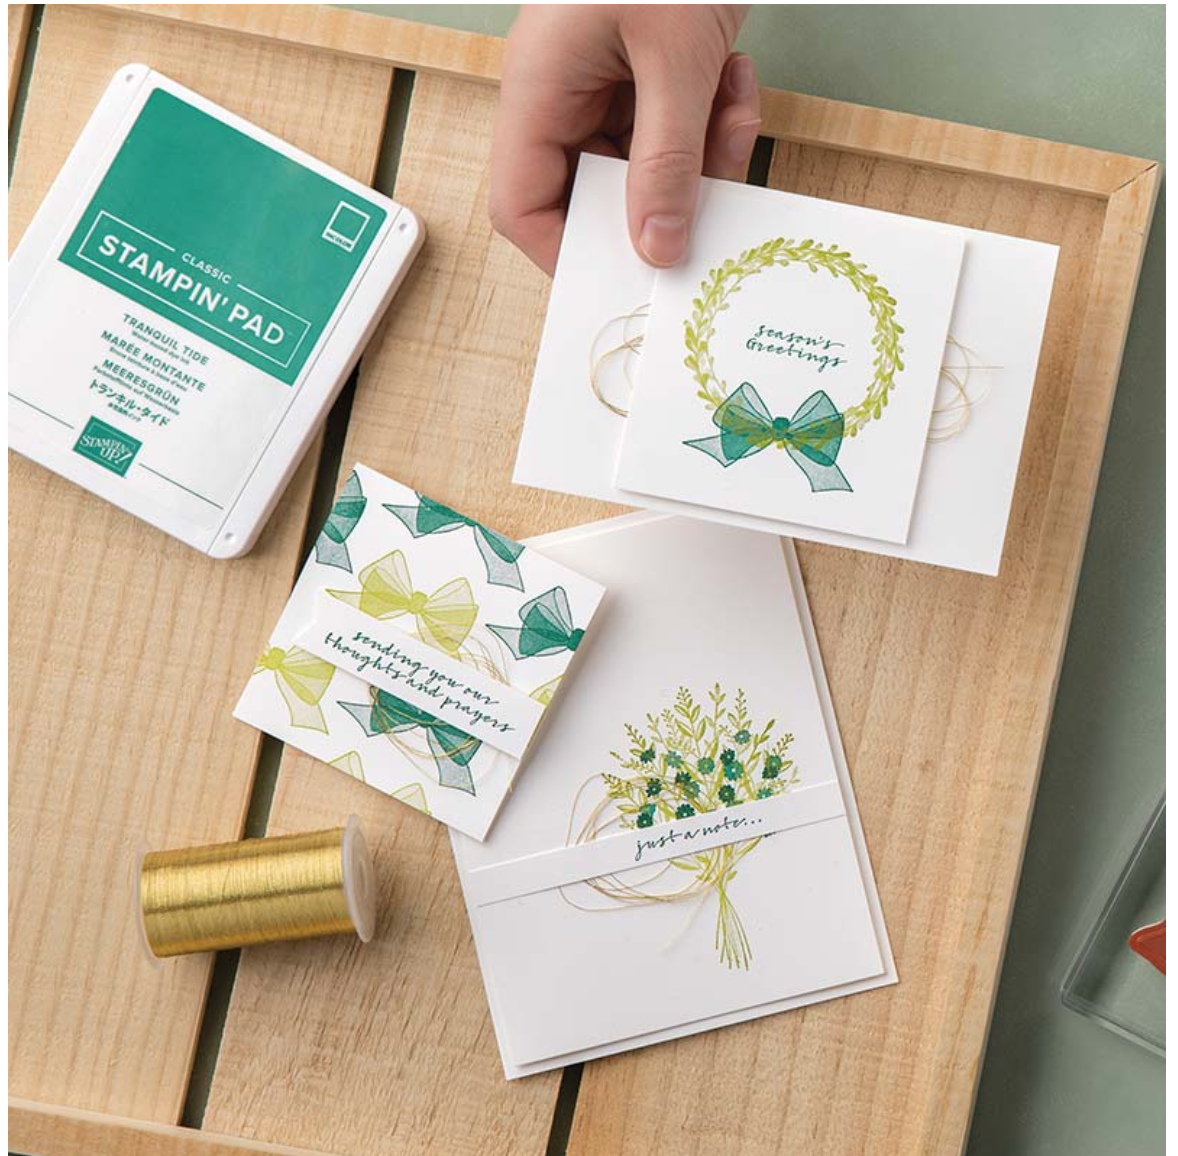
Today I have a really cool technique to show you. It’s called “thumping”. It gives you a multi-colored image. You get it by thumping or bouncing or tapping your Stampin’ Write Markers on your stamp. You’ll have to watch the video to see what I mean. I used this technique on the wreath image.

The card base is Merry Merlot and that’s the color I used for the bow and the sentiments as well. I just love this Wishing You Well stamp set. The images are so pretty and delicate.
I used Pear Pizzaz to first ink up the stamp to get good coverage. Then I used these markers: Pear Pizzaz, Grapefruit Grove, Old Olive, Call Me Clover, Tranquil Tide and Fresh Fig. You can try whatever colors you have handy that would work well with the image you’re using.

Once I thumped the markers on the stamp, I breathed on it to moisten the ink and then stamped it on a piece of 5 1/4 x 4 Very Vanilla. I stamped the bow in Merry Merlot over the bottom of the wreath. The strip of Very Vanilla for the sentiment is 1/2 x about 3 and then was cut using the Banner Triple Punch to give it a flag on both ends. I did the same with a 5/8 x 3 strip of Merry Merlot. The corners were punched with the Detailed Trio Punch.
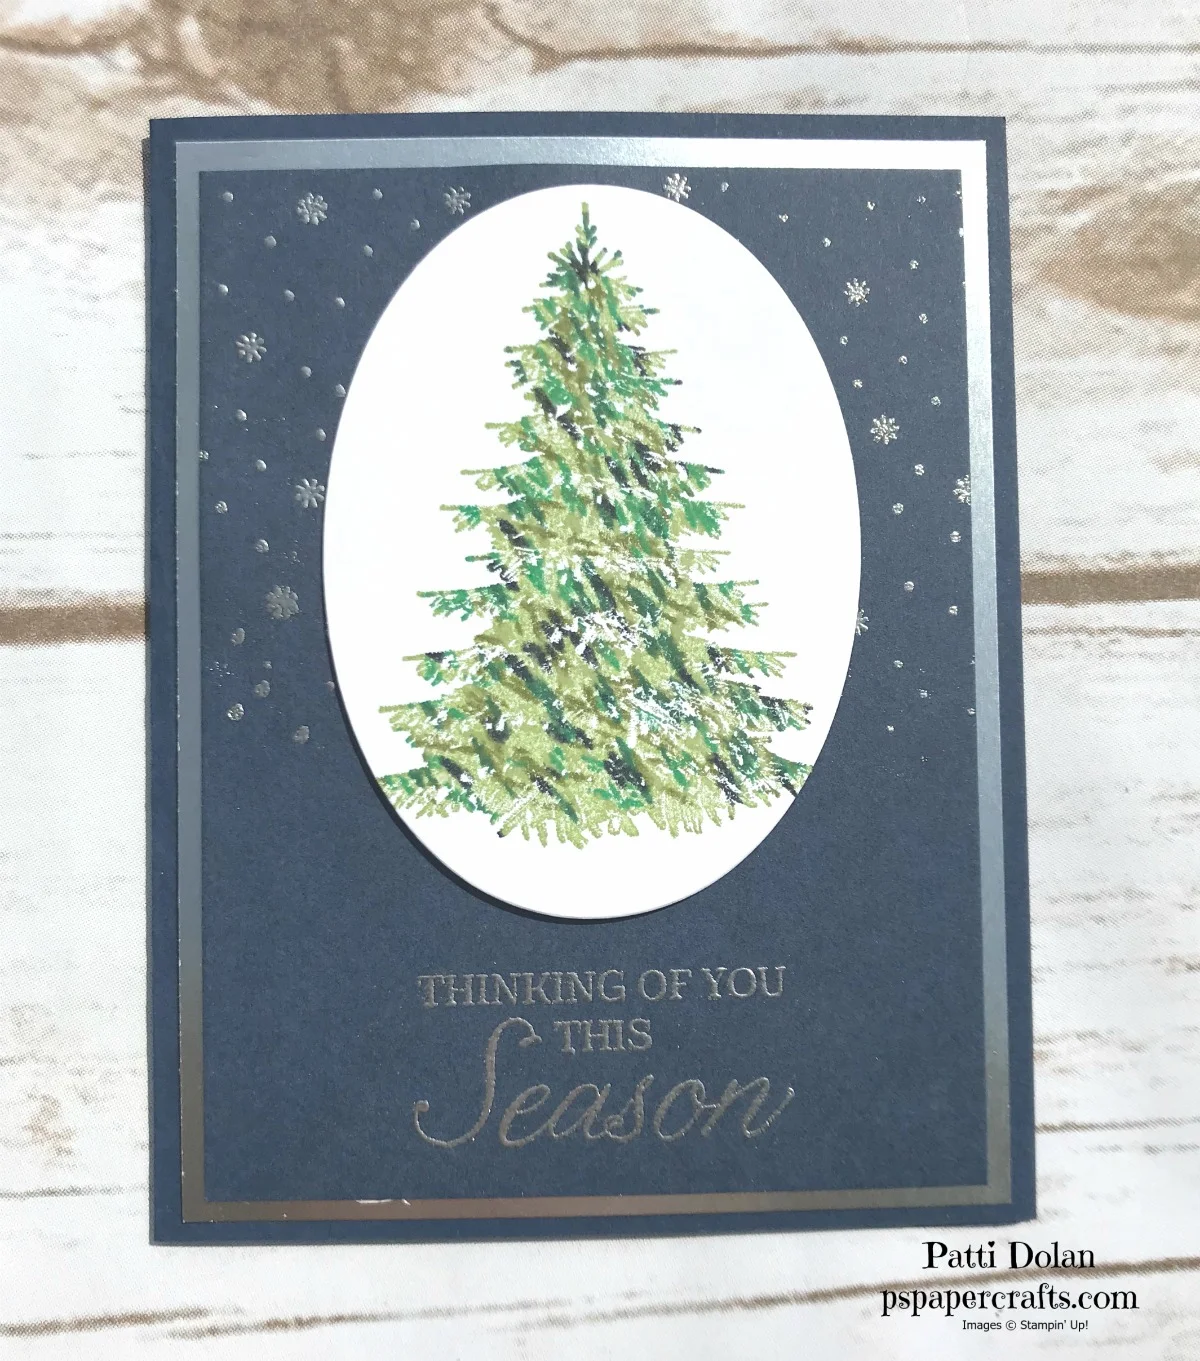
I used this technique on the tree on a Christmas Card. Isn’t it pretty? I used the same greens but left out the Grapefruit Grove and Tranquil Tide and added Night of Navy.
Watch the video to see how to do this technique, it’s really fun.
These are the products I used to make the Wishing You Well Card. You can click any of the products to purchase them on my Online Store.
The Christmas Card has a Night of Navy Card Base with a 5 1/4 x 4 layer of Silver Foil Paper and then a 5 x 3 3/4 layer of Night of Navy. I used the Thumping Technique for the tree from the Winter Woods Stamp Set and cut it out with the largest Layering Oval Die. I stamped the snowflakes from the Christmas Pines Stamp Set with Versamark and then added Silver Embossing Powder and heated with the Heat Tool. I also embossed the sentiment. Below is the list of products for this card.
Product of the Week - Wishing You Well Stamp Set
This week I’m featuring the Wishing You Well Stamp Set. It is so pretty and easy to use. The images are very delicate and the bow is so simple and sweet. These are the images that come in the set. They are red rubber and you can get Clear Mount or Wood Mount.
You can purchase this stamp set by itself or Stampin’ Up! put some products together that you can purchase in a set to make these cards below.
Stop back tomorrow when I’ll show you a neat tip/technique to add multiple colors to the image.
You can purchase the stamp set by clicking the product below in either Clear Mount or Wood Mount. You can also purchase the supplies together to make the samples that are in the catalog by clicking the card supplies set which include the stamp set.


