


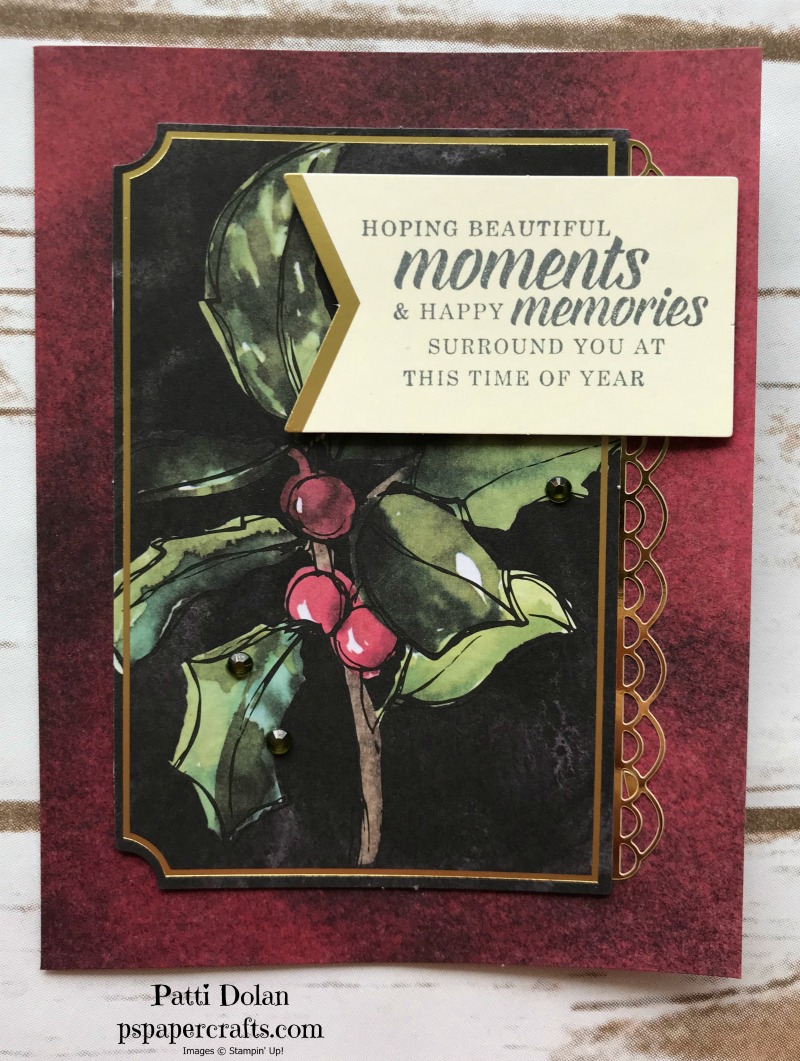


There are a few items you'll need to complete these cards. You need the Timeless Tidings Stamp Set, StazOn Ink, Dimensionals and Snail. You need clear blocks for the stamps or the Stamparatus. I have some tips on my blog post yesterday on getting your sentiments lined up perfectly using the Stamparatus.

It's Here, It's Here!!! The 2018 Holiday Catalog is now available for ordering.

I'm so excited to share this new catalog with you. It is chock full of fantastic products for the upcoming holidays. The samples in the catalog are so beautiful. Here are some quick videos highlighting some of the products in the catalog.

Now is the time to redeem your Bonus Coupons. You should have emails from Stampin' Up! with your coupon code.
Let me know if you need a catalog or if you have any questions. You can click on the catalog icon on the right to see a pdf file of the catalog or go to my online store to see products and order.
TIP of the Week - Using your Stamparatus with your Project Kit!
Did you ever stamp and the image wasn't dark enough or you didn't quite get all the the image inked. This happens to me and its ok if I can just cut another piece of cardstock but when I'm making a kit with prepared pieces, I don't want to waste any of them with a mistake.
Stamparatus to the rescue!!!!
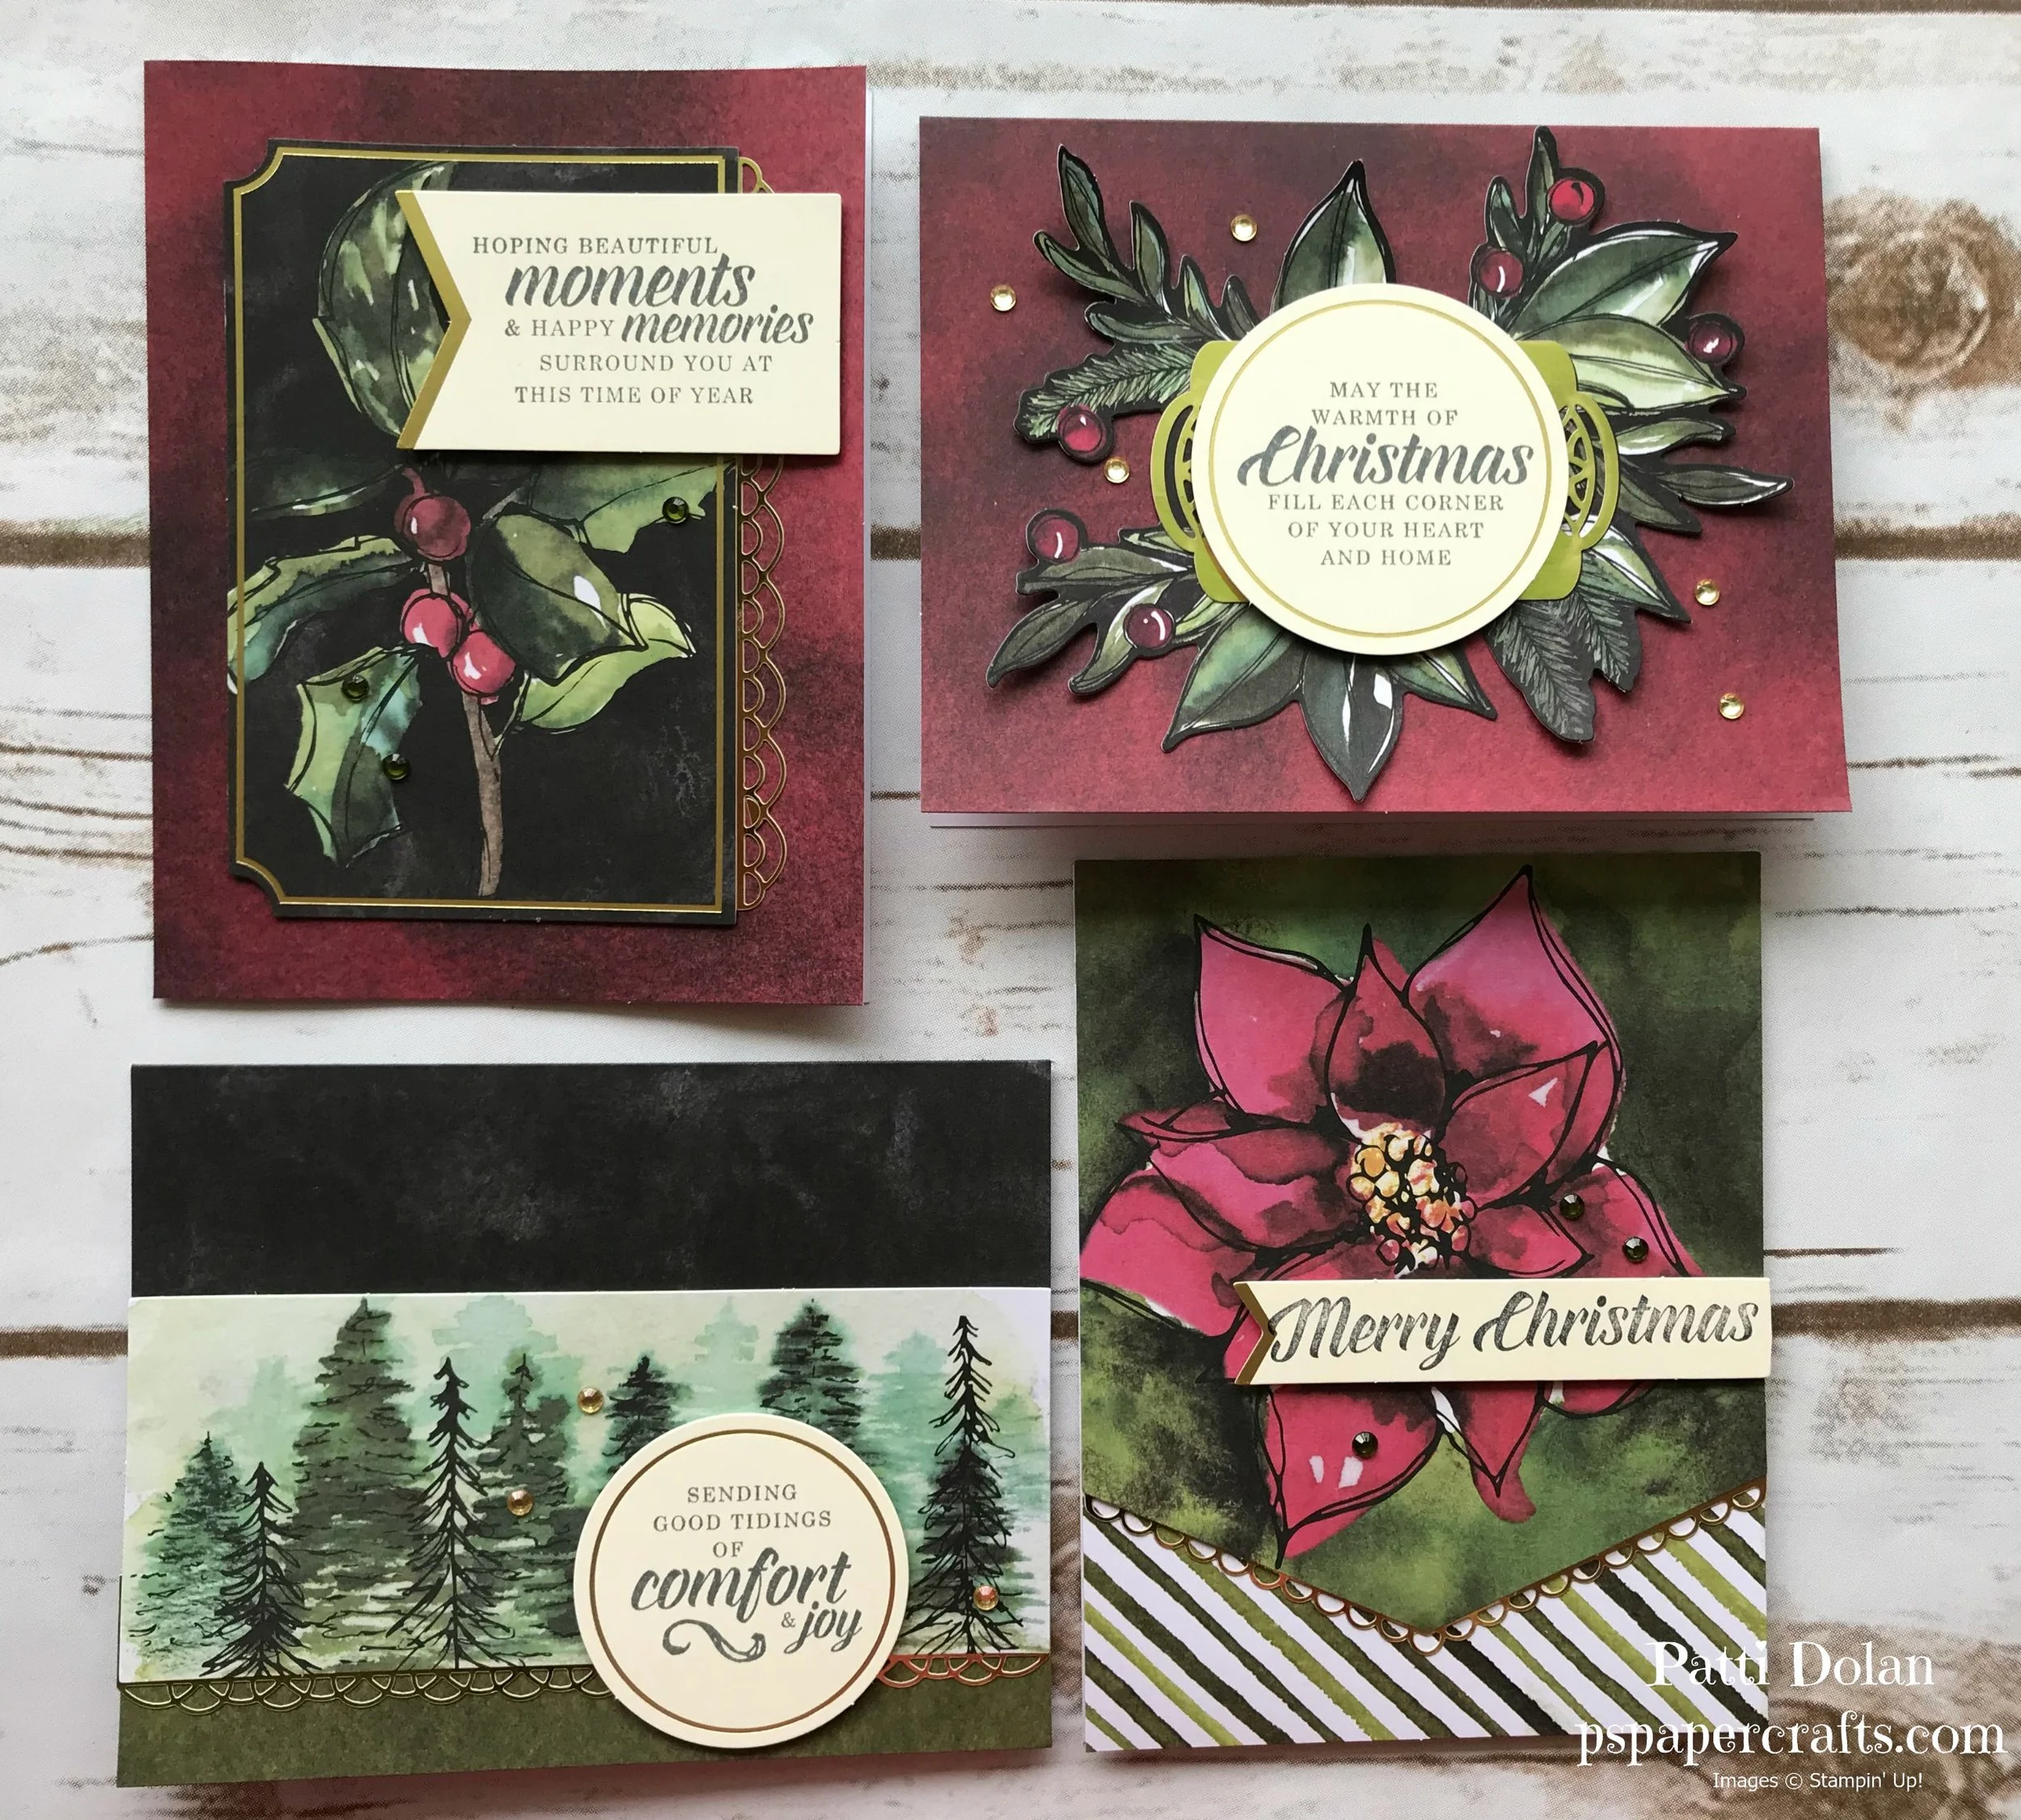
I made these cards from the Timeless Tidings Project Kit. I plan on using the Stamparatus to make the rest so I can be sure they are all stamped perfectly.
Here are some tips for the circles. Punch out all the circles keeping the small and large separate. Use the leftover sheet as a template, placing the circle in one of the punch-outs and lining up the stamp just where you want it. Make sure you use the magnet on the edge of the circle because you won't want it to move if you have to re-stamp. Just keep adding your circles until all are stamped.

For the banners, you can do the same; punch them all out and use the leftover piece as a template. The trick with this narrow banner is getting the Merry Christmas sentiment in just the right place. Using a piece of scrap paper, do some testing until you get it right and then remove the scrap, add the banner and stamp away.

Come back September 5 and you can see the video I made with the Timeless Tidings Project Kit. You can also start ordering from the catalog.
Let me know if you need a catalog!!!
Product of the Week - Timeless Tidings Project Kit!!!
This week I'm featuring the Timeless Tidings Project Kit. I have to tell you that the cards are so beautiful. They really knocked it out of the park with this kit. It's available starting September 5th in the new Holiday Catalog.

The kit includes almost everything you need to make 20 cards. There are 4 different designs and you make 5 of each. There is a gorgeous gold foil piece for each card. The envelopes have gold foil trim and a pretty striped liner.
You'll need to get the coordinating Timeless Tidings Stamp Set as well as StazOn Ink, Snail and Dimensionals.

Why not get some friends together and make your Christmas cards? You can chip in for the stamp set and supplies and then each buy a kit or two, depending on how many cards you want to send.
If you want any of the products I used on this project, just click on the item below or the Shop Now button and it will bring you to my Online Store. Please use the current Host Code when you go to checkout your order. You can also click directly on an item to order.
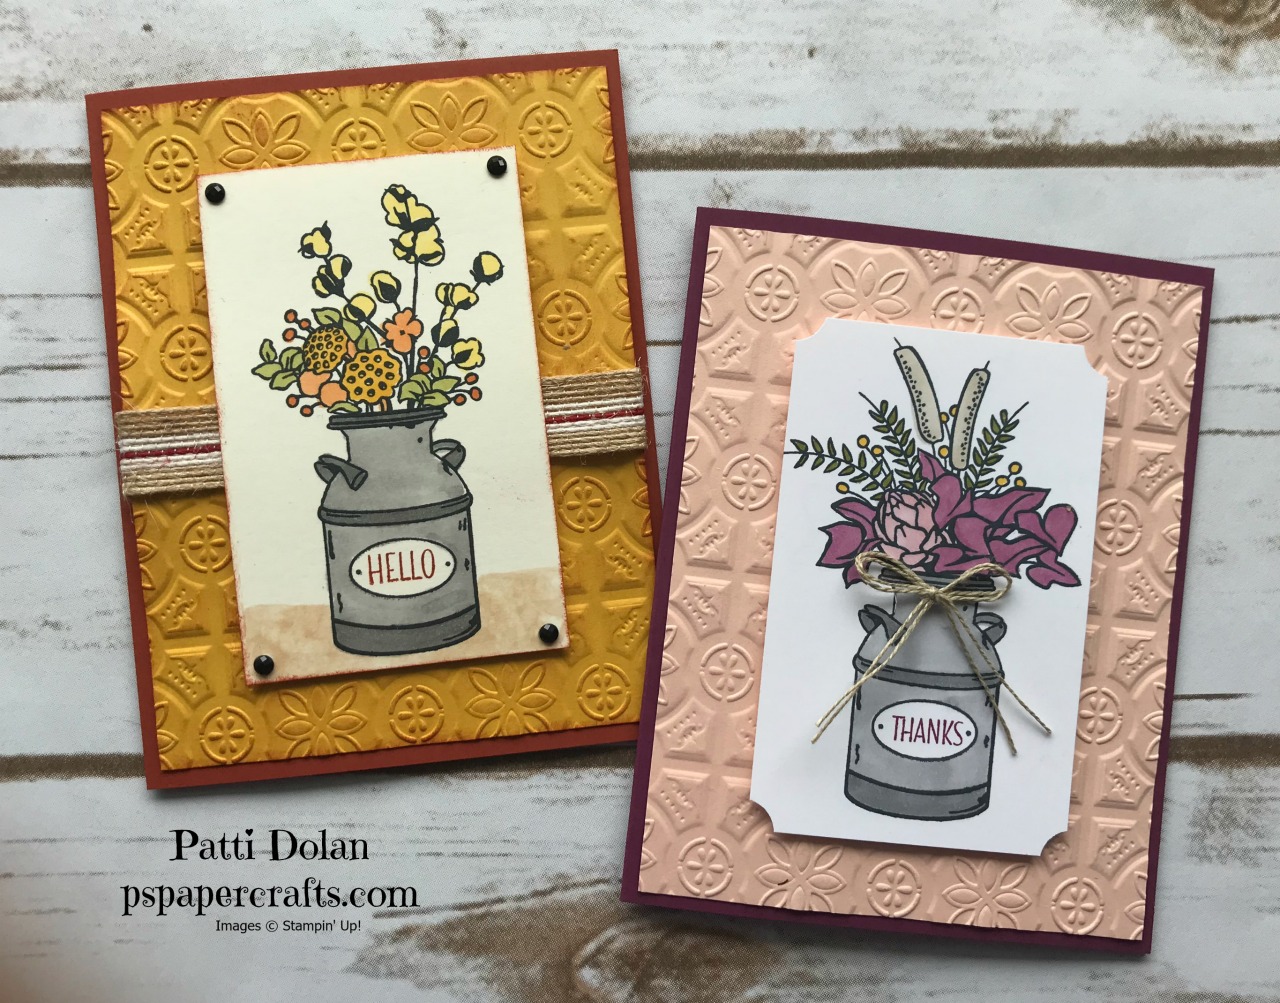
Country Christmas Card with Tin Tile Embossing Folder
This week I've been featuring the Tin Tile Dynamic Textured Embossing Folder. Today I have a Christmas card using a border layer that I embossed with this folder.

This was pretty easy to make and I love the colors, Cherry Cobbler and Mossy Meadow. It really has a country feel to it. The sentiment is from the Timeless Tidings Stamp Set.

Below are the pieces you need:
--Cherry Cobbler Card Base - 5 1/2 x 8 1/2, scored at 4 1/4
--Strip of Mossy Meadow - 1 1/2 x 5 1/4
--Very Vanilla Layer - 5 1/4 x 4
--Festive Farmhouse DSP Layer - 4 3/4 x 3
--Cherry Cobbler Scallop Circle
--Very Vanilla Circle

This Festive Farmhouse Designer Series Paper has so many nice country patterns. I just love plaid for the holidays.

Emboss the strip of Mossy Meadow and then trim as needed. I usually start with a piece a little longer than needed because it shrinks a little when you emboss it. Trim it after you emboss it.

I adhered the layers down with Liquid Multi-Purpose Glue and then the sentiment was popped up with Dimensionals. I cut 3 strands of Linen Thread and tied a small bow and then attached with a glue dot.
If you want any of the products I used on this project, just click on the item below or the Shop Now button and it will bring you to my Online Store. Please use the current Host Code when you go to checkout your order. You can also click directly on an item to order.
Getting Ready for Autumn!
I've been featuring the Tin Tile Dynamic Impressions Embossing Folder and today I have a video with some autumn cards and details on the tips I shared yesterday. The stamp set is called Country Home and has some really pretty images. Both are available starting September 5, 2018 in the new Holiday Catalog.
Aren't these cards just beautiful. I love this country style. The embossing folder just adds so much texture to the cards.
This first card was made with a Rich Razzleberry card base and the embossed layer is Petal Pink. The Whisper White layer is 2 1/2 x 4 and I stamped the images in Memento Ink. I used my smallest circle punch to punch the corners. The jug and flowers were colored with Stampin' Blends and tied two strands of Linen Thread into a bow and added it with a glue dot.

This card base is Cajun Craze and the layer is Crushed Curry that was embossed and then sponged with Crushed Curry. I love the look that sponging gives it. The 2 1/2 x 4 layer is Very Vanilla and then stamped with the other flower bunch from the Country Home set. I sponged the edges of both layers and wrapped a piece of Striped Burlap Trim to the embossed layer before adhering it. The Black Faceted Dots were adhered to each corner.

Which card do you like better? Take a look at my video for some tips on coloring the embossed layer.
If you want any of the products I used on this project, just click on the item below or the Shop Now button and it will bring you to my Online Store. Please use the current Host Code when you go to checkout your order. You can also click directly on an item to order.
TIP of the Week - Adding Color to Embossed Layers!!!
This week I have some tips on adding color to dry embossed layers. I'm featuring a fabulous embossing folder. It's called the Tin Tile Dynamic Textured Impressions Embossing Folder and its new in the Stampin' Up! 2018 Holiday Catalog.
Here are 3 tips:
1. Use sponge to dab color on embossed piece.

2. Use Sponge Brayer to lightly add ink to embossed piece.
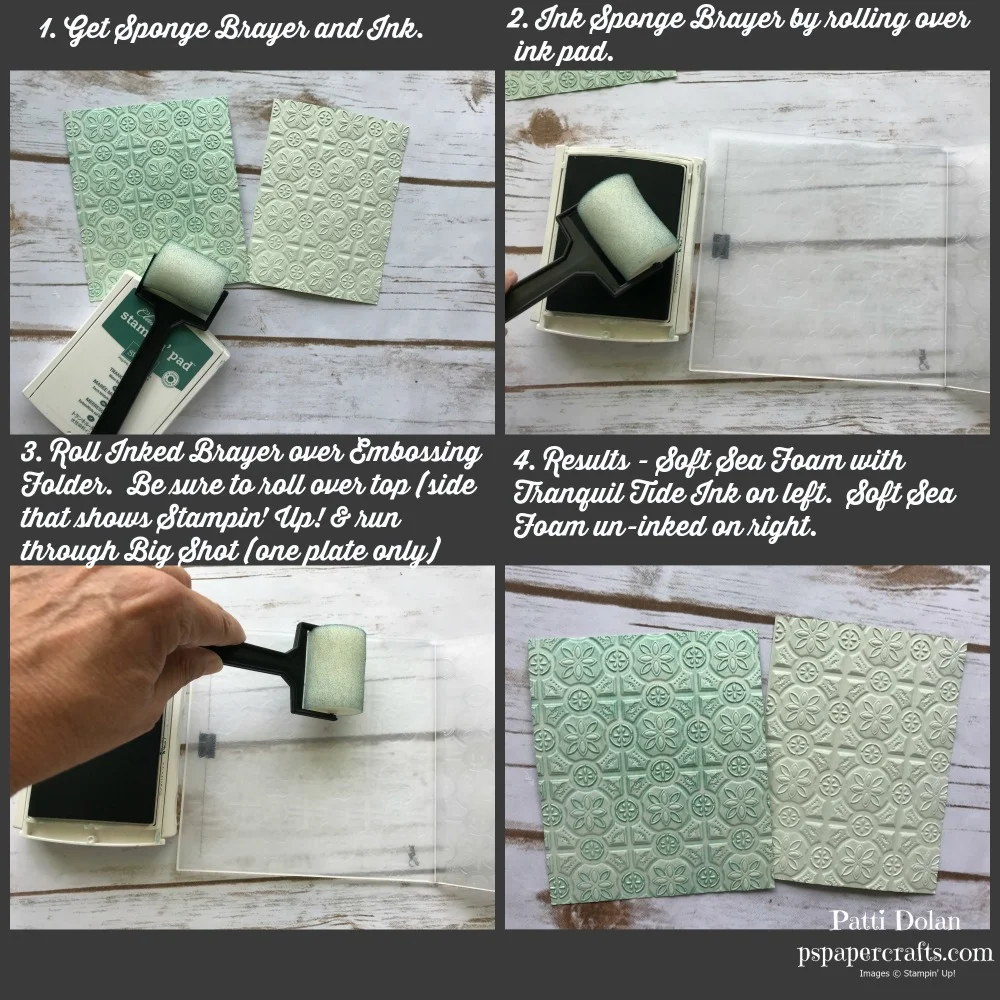
3. Use Sponge Dauber to add color to embossing folder and then emboss your cardstock.
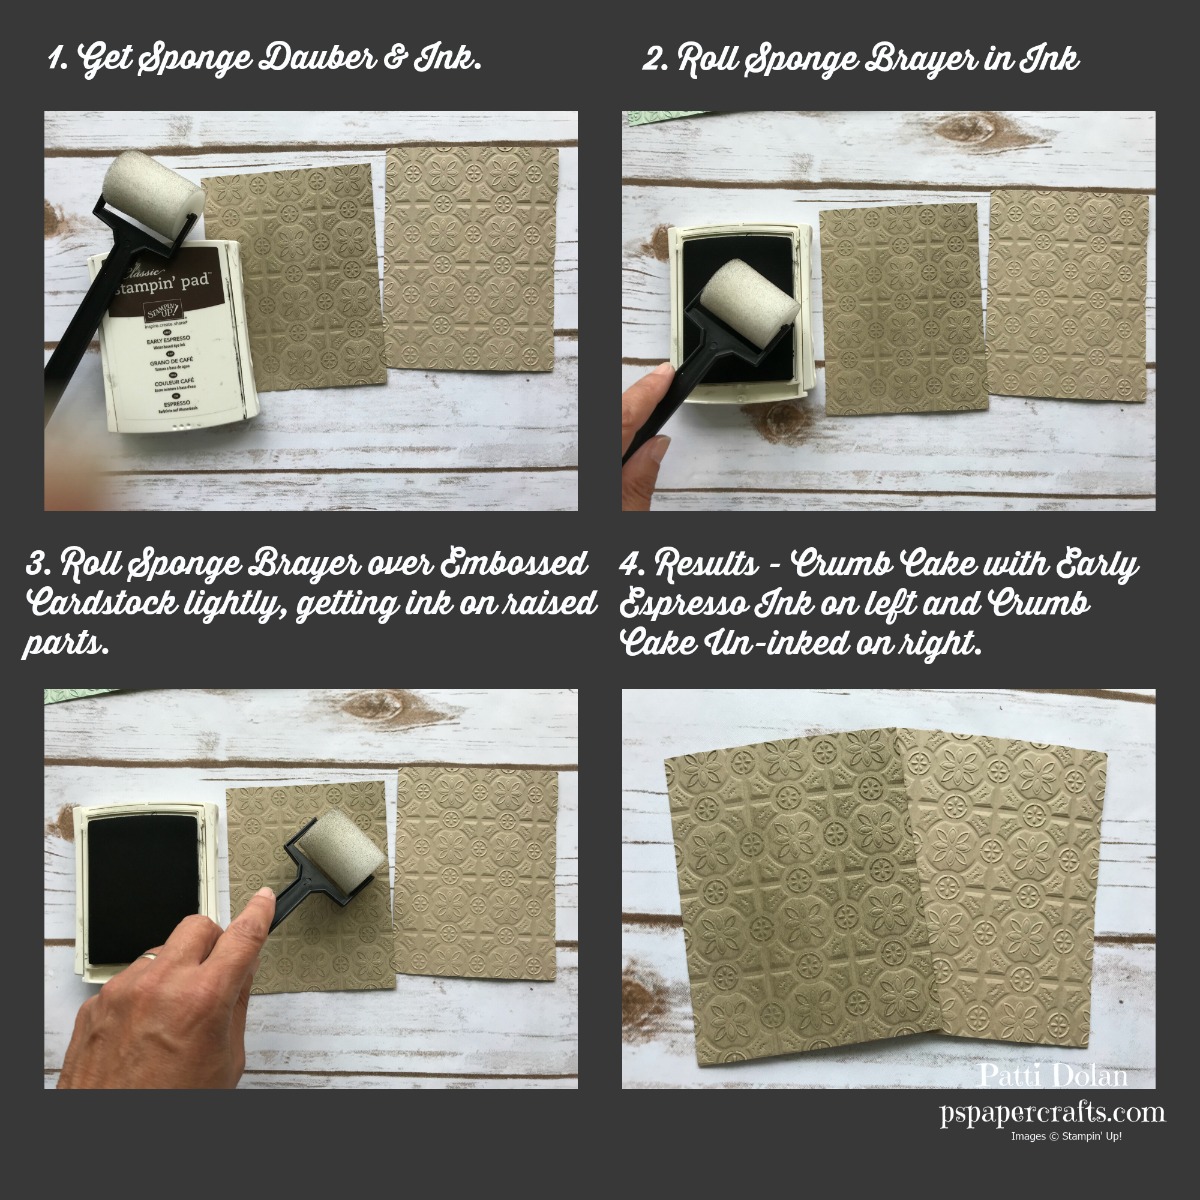
Watch my video tomorrow where I will describe these techniques in more detail.
Product of the Week!!!
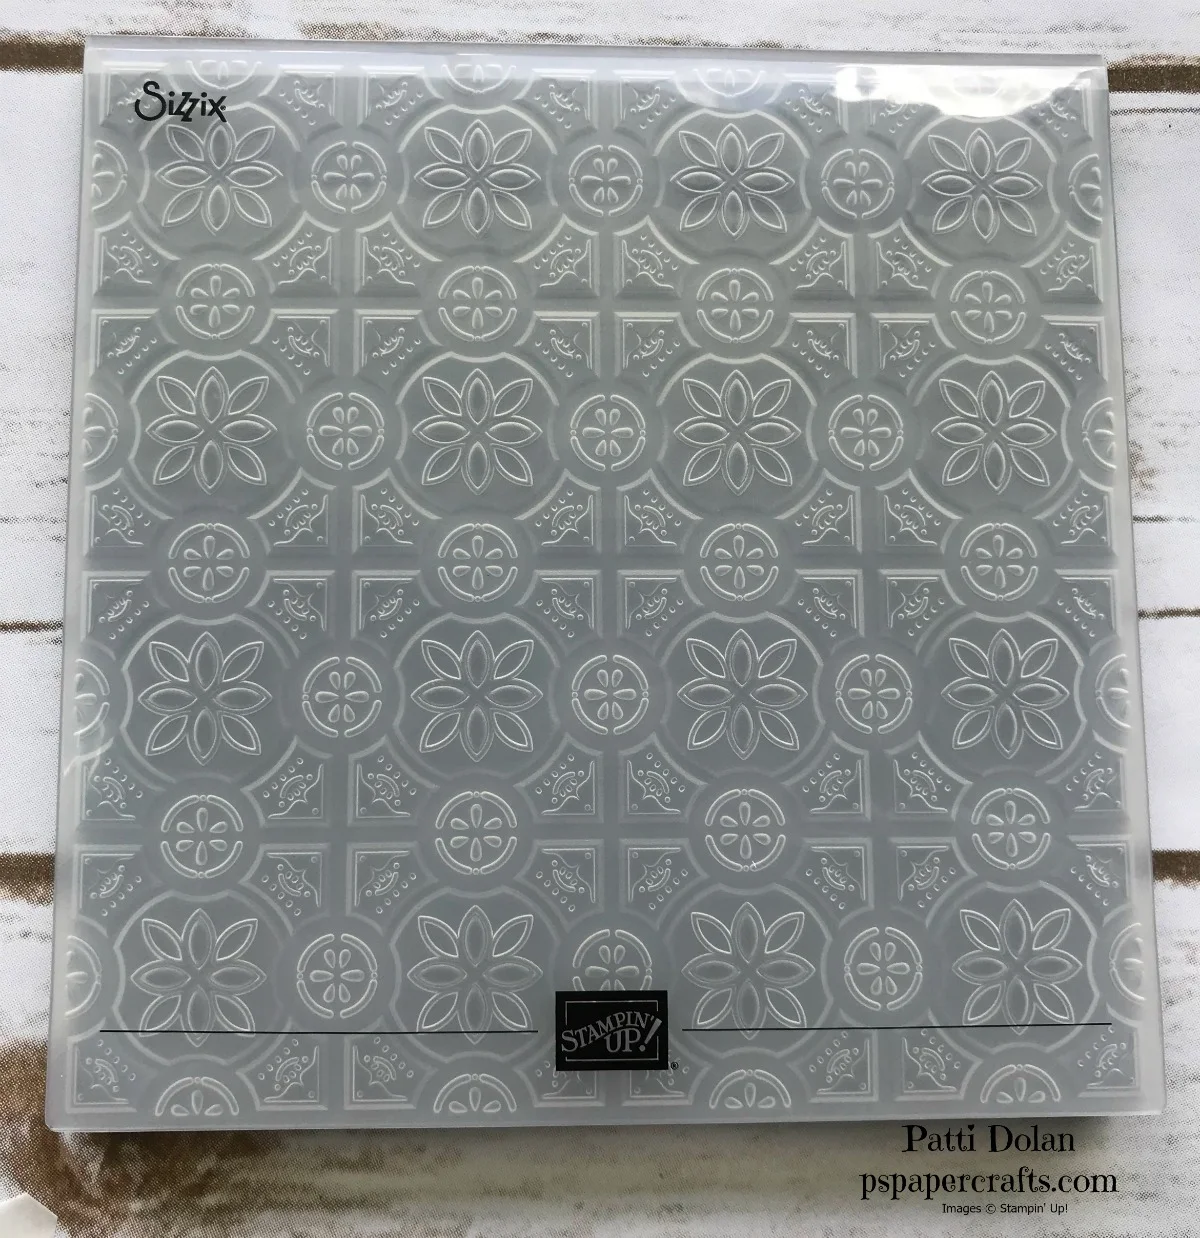
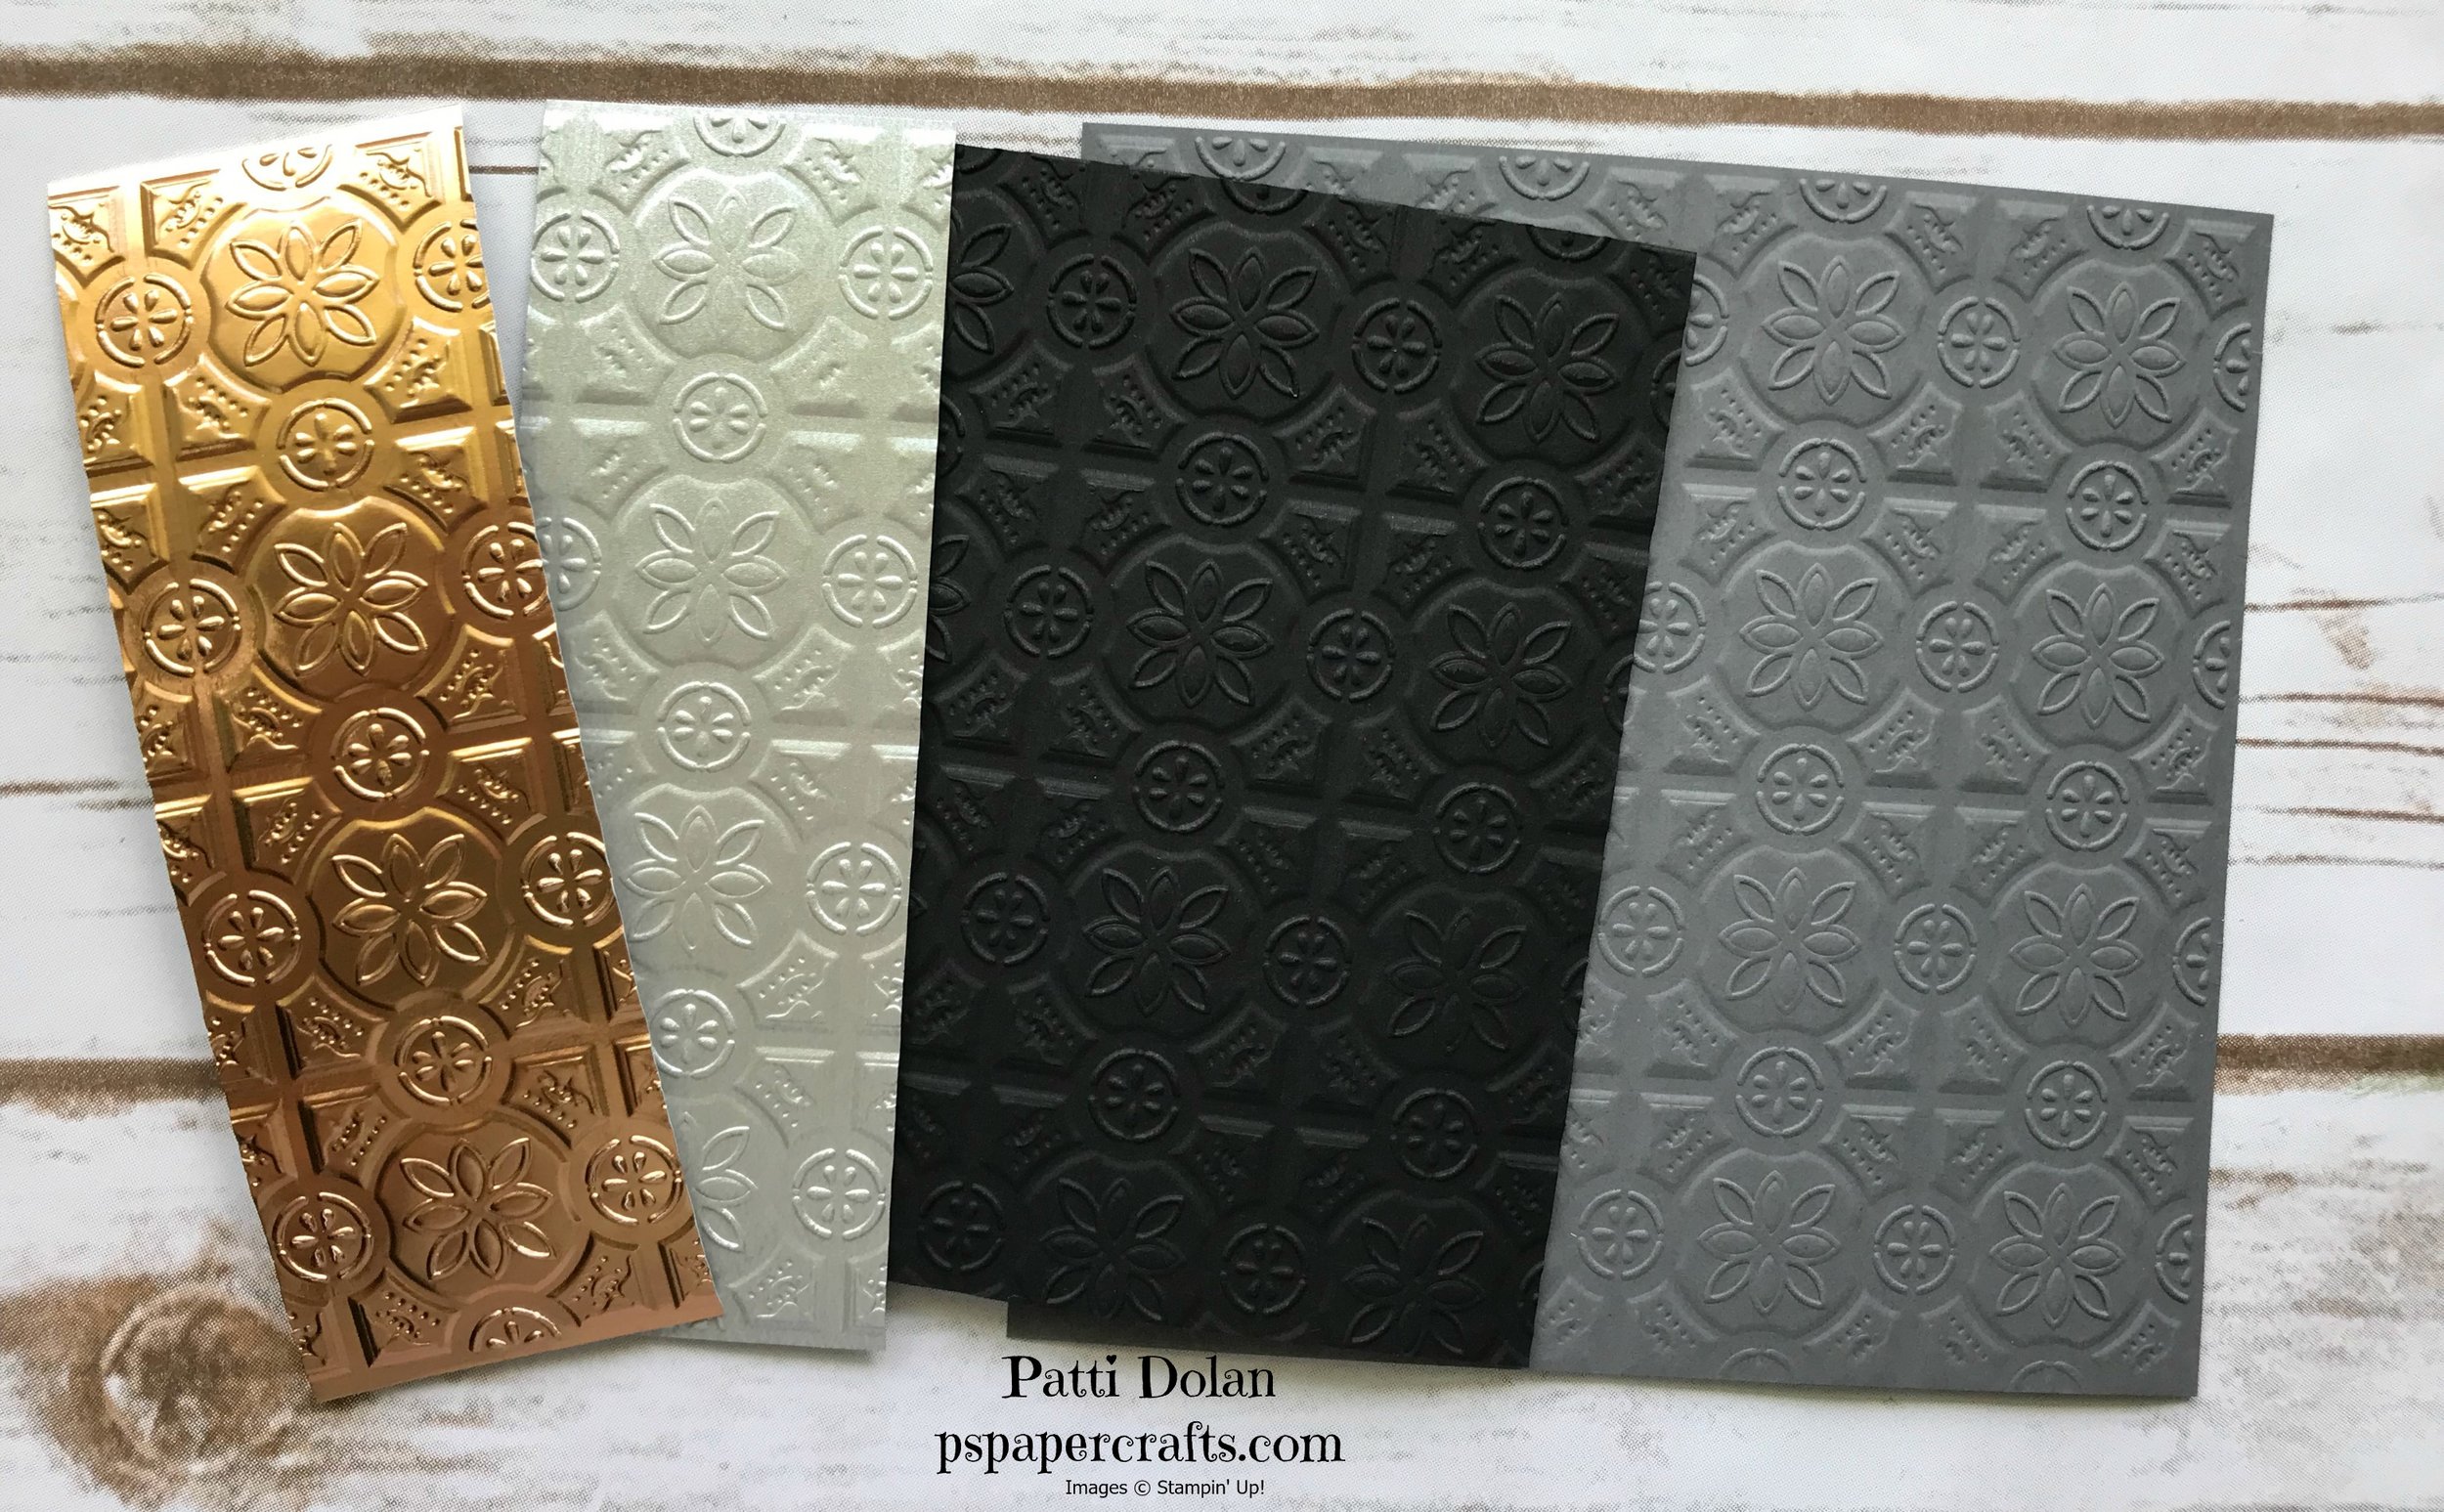
This week I'm featuring the new Tin Tile Dynamic Textured Impressions Embossing Folder! Boy, that's a mouthful! This is a product in the new Holiday Catalog that you can start ordering from on September 5th.
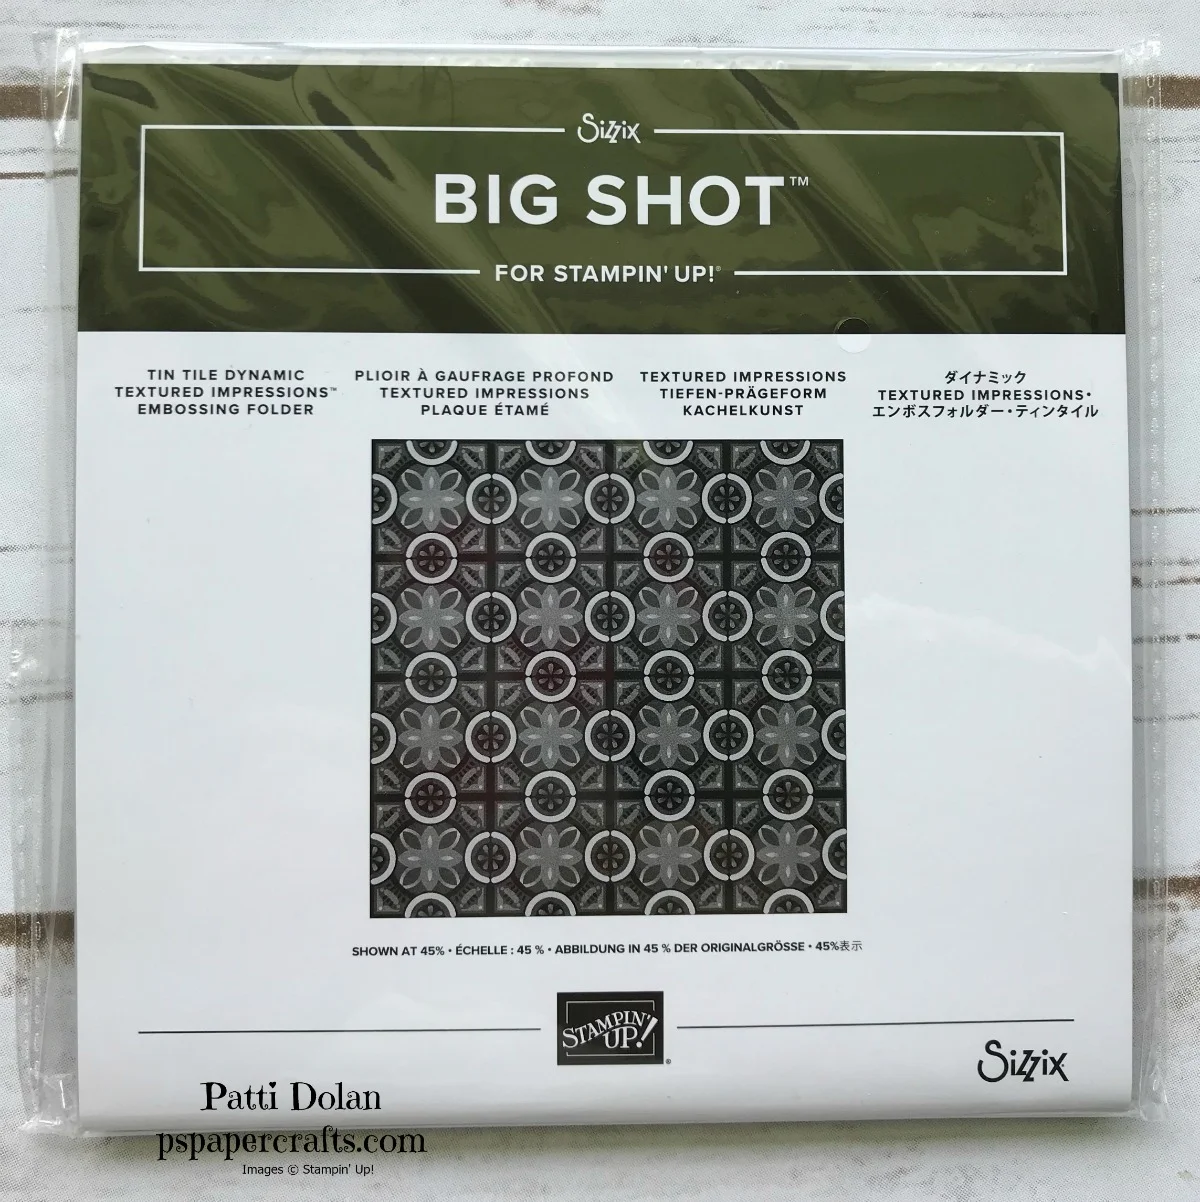
This embossing folder is so cool, it really looks like a tin tile! Its 6 x 6 and its one of those Dynamic Textured Impressions Folders that you only need one plate when running it through the Big Shot.
Here are some samples that I made while I was playing with it. The first is with a Copper Foil Sheet, then I used the new Galvanized Metallic Paper from the new Holiday Catalog. I also used Basic Black and Basic Gray Cardstock. If you spritz cardstock with a little water before you put it in the Big Shot, you get deeper embossing.
Let me know if you need a catalog. Check back later for some tips on adding color to these embossed pieces.
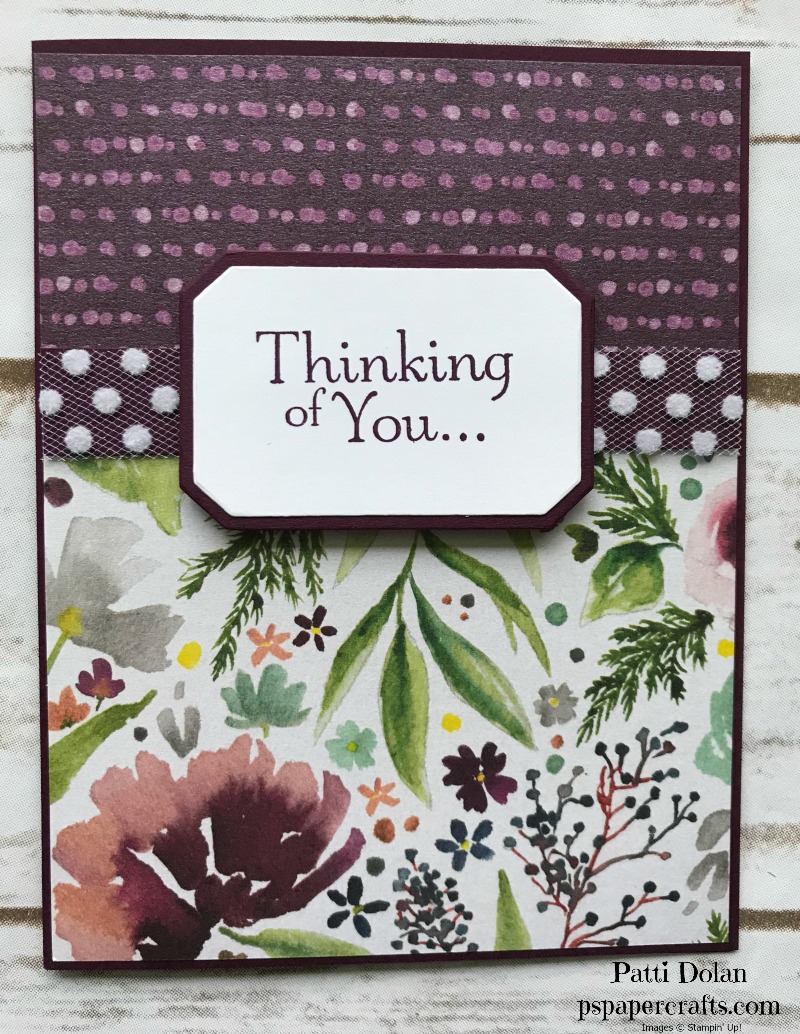
Thinking of You Card using the GORGEOUS Frosted Floral DSP!!!
I have to say that I am just crazy over this new Frosted Floral Specialty Designer Series Paper. It is absolutely gorgeous! It has a shimmer to it and feels so nice. I don't think you can tell from the picture but check out my last post to see it on the video.

The card base for this card is Blackberry Bliss which coordinates so well with the paper. I love that Stampin' Up! lists all the coordinating colors on the label of the DSP package.

I cut a strip of Blackberry Bliss cardstock 4 1/8 x 3/4 and covered it with a piece of Whisper White Polka Dot Tulle Ribbon, adhering it to the back of the strip.

The top piece of DSP is 4 1/8 x 1 3/4 and the bottom is 4 1/8 x 3 1/2. Just adhere them to the card base.

Layer the strip over the DSP layer.

I wanted a Thinking of You stamp and found one in the Thoughts & Prayers set but I didn't want to use the full sentiment. Post-It Note to the rescue. Cover the part you don't want with a Post-It Note and then ink it up. Be sure you remove the Post-It Note before stamping.

It's so great that the Frosted Bouquet has some framelits for your sentiment and a layer to put behind it.

Here's another look at the finished card.
If you want any of the products I used on this project, just click on the item below or the Shop Now button and it will bring you to my Online Store. Please use the current Host Code when you go to checkout your order. You can also click directly on an item to order.
Beautiful Floral Cards using the Frosted Floral Suite
I received my pre-order from the Holiday Catalog and I started playing with the Frosted Floral Suite. It is so beautiful. Look at these cards I made!
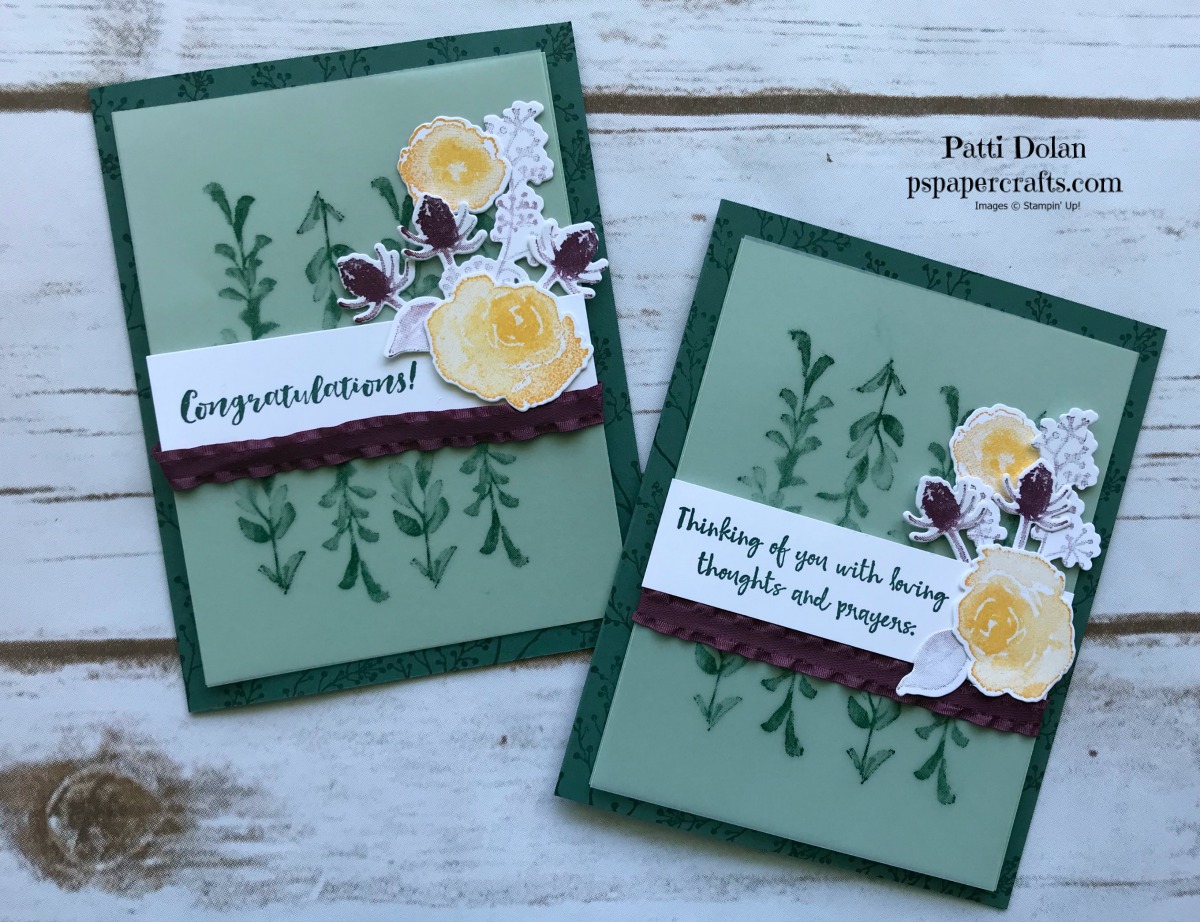
The green branches were stamped on Vellum Cardstock four times in Tranquil Tide. I backed the vellum with a piece of Mint Macaron Cardstock (both 5 x 3 3/4) and then adhered on the Tranquil Tide card base. Before I added the layer, I stamped some sprigs all around to give it a background.

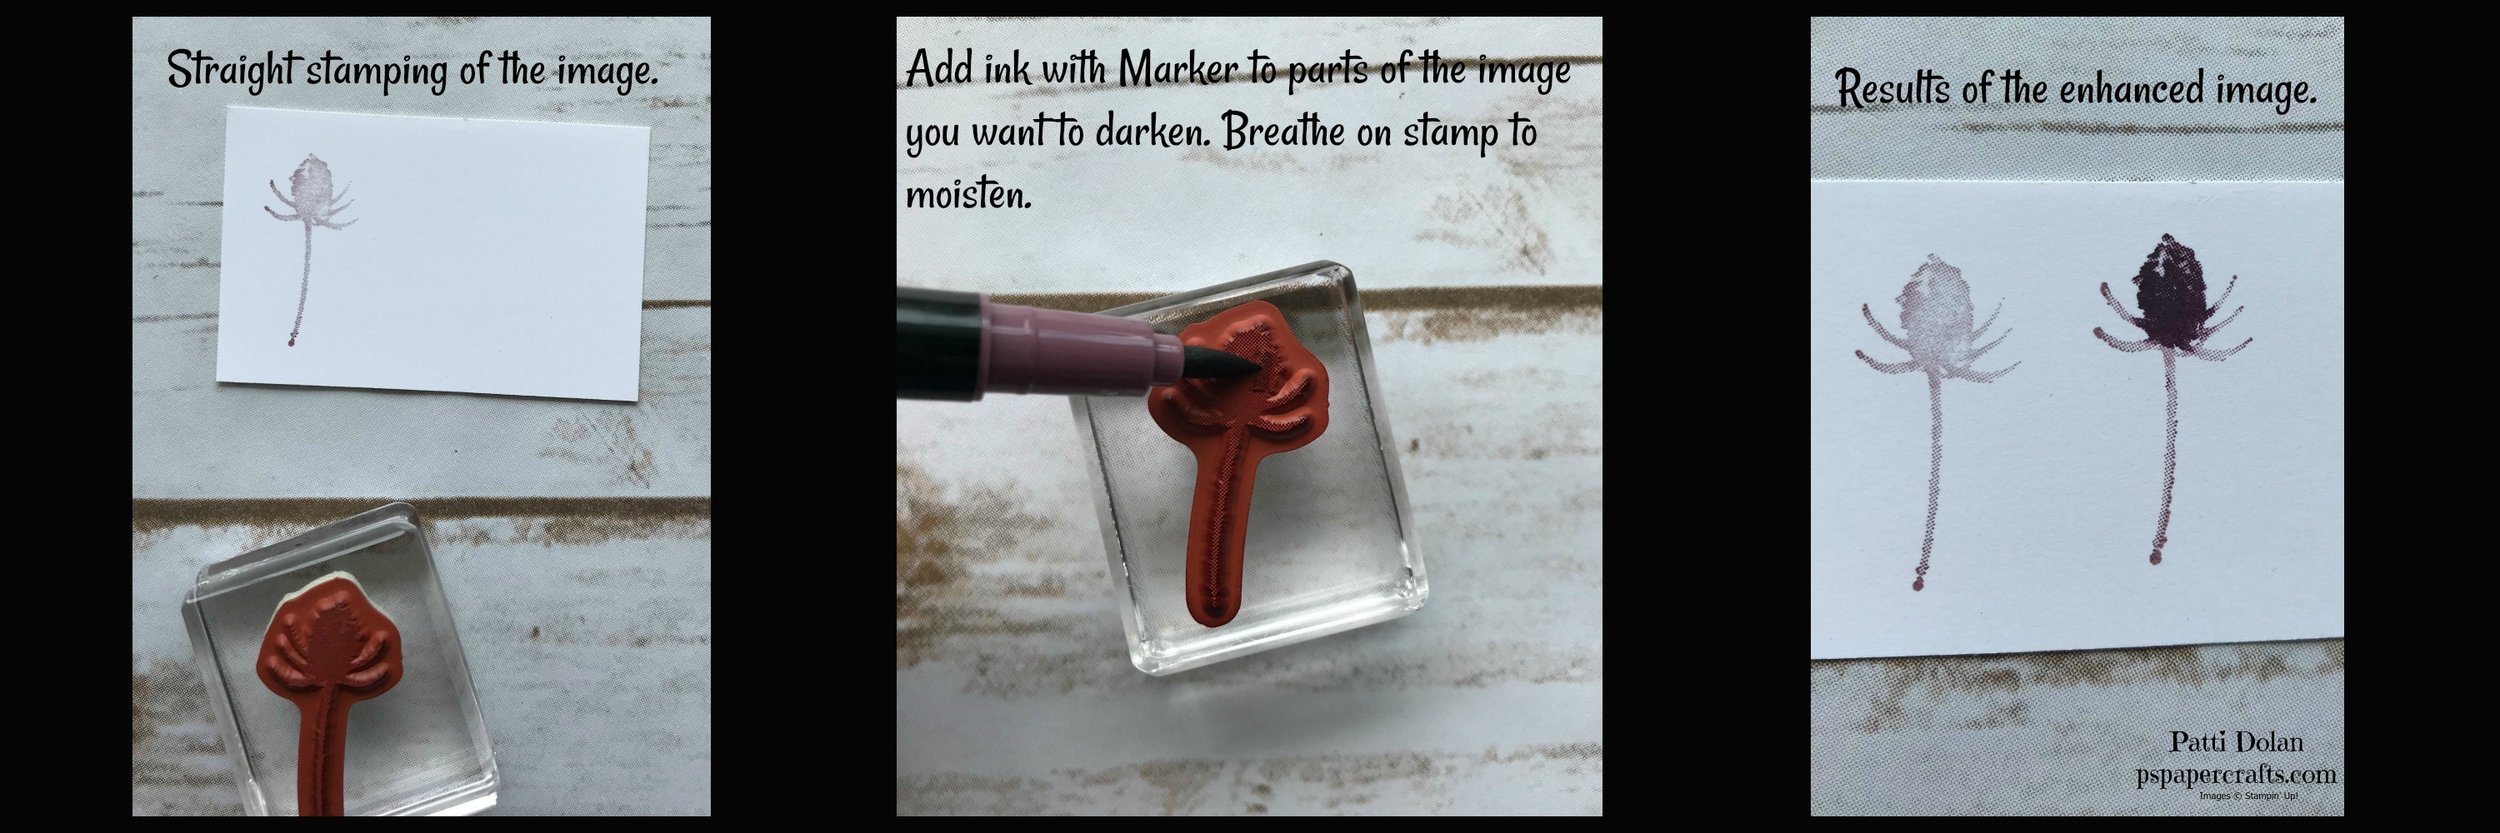
It was so easy to stamp and cut out the floral images with the Framelits that coordinate. If you buy the Stamp Set and Framelits as a bundle, you save 10%. One tip to get some darker shading on the image is to stamp it, then color with a mark and breathe on it. Then stamp on the cardstock. See the picture below to see the steps.
I needed a Thinking Of You card for a friend and found the perfect sentiment from the Lilypad Lake Stamp Set. The white strip for the sentiment is 5 x 1. I looked through my stamps to find the words I wanted that would fit that strip. I used a piece of Mini Ruffled Ribbon in Fresh Fig to finish of the card.

If you want any of the products I used on this project, just click on the item below or the Shop Now button and it will bring you to my Online Store. Please use the current Host Code when you go to checkout your order. You can also click directly on an item to order.
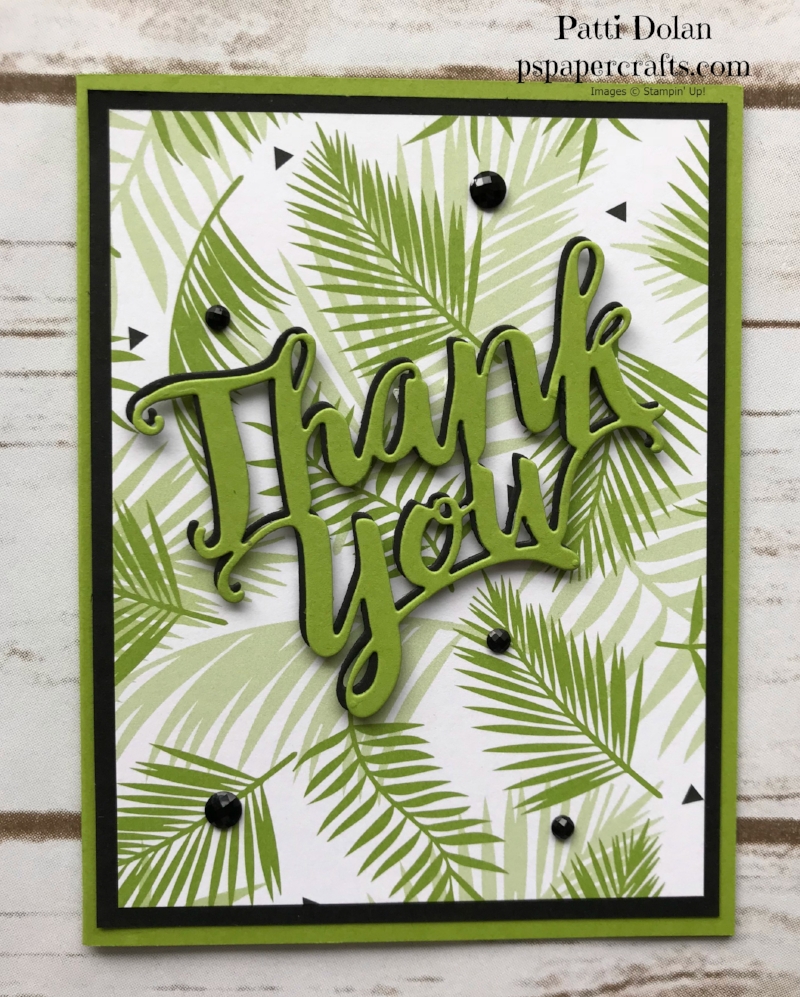
Easy Tropical Thank You Card!
This was such an easy card to make. Don't you love the background layer? Its just ink and stamps. I used the new Tropical Chic Stamp set. The color combo is my new favorite; Granny Apple Green and Gorgeous Grape.

The Granny Apple Green Textured Weave Ribbon is perfect to add the Oval Layers to. The card is so fun and vibrant. Just add the Glitter Enamel Dots and you've got a quick and beautiful card. Here's what I did on the inside.

Watch the video below to see how I made these cards.
If you want any of the products I used on this project, just click on the item below or the Shop Now button and it will bring you to my Online Store. Please use the current Host Code when you go to checkout your order. You can also click directly on an item to order.
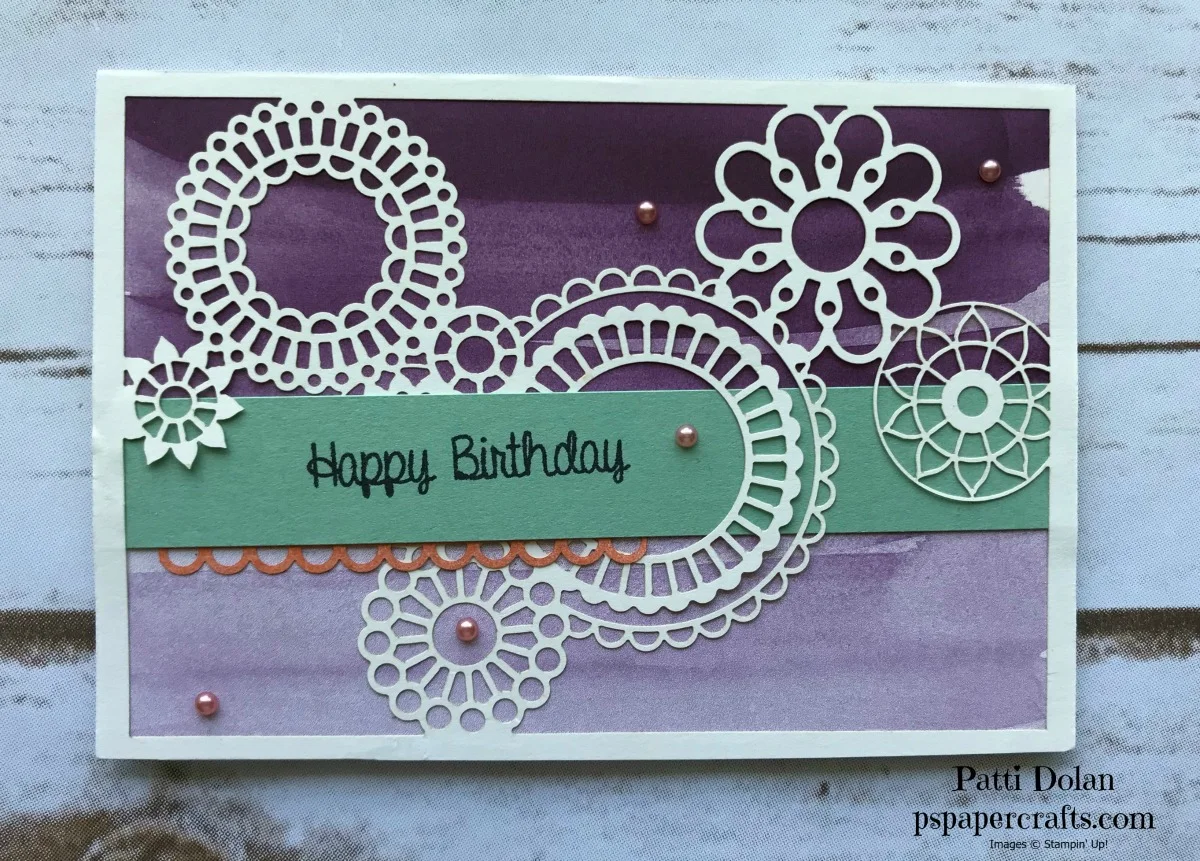
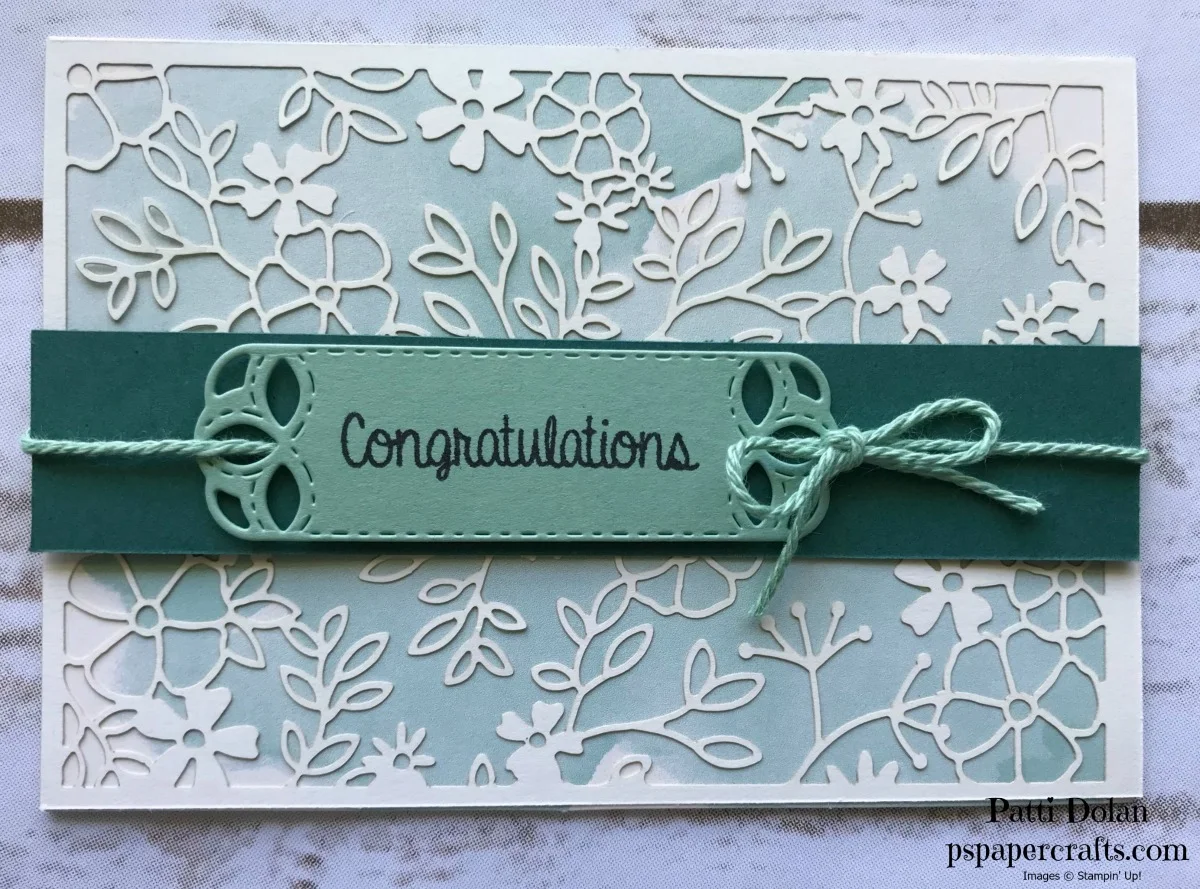
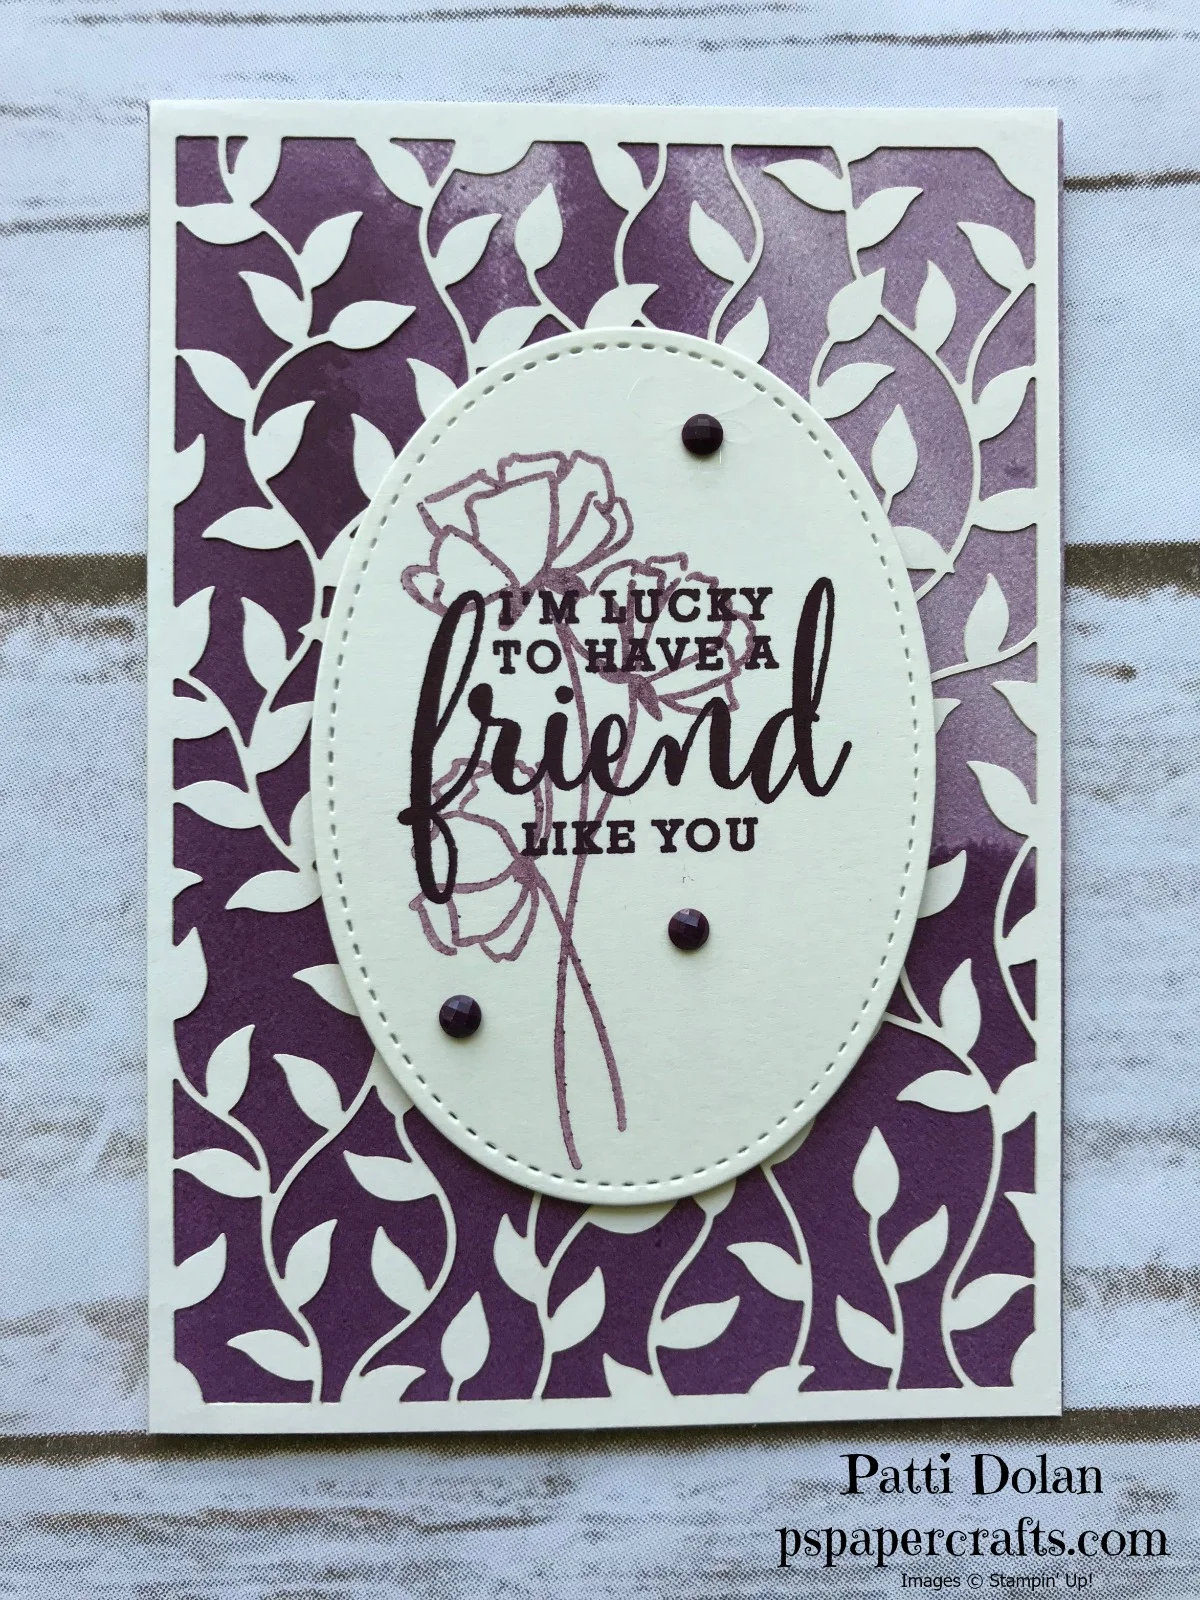
Pretty Delightfully Detailed Note Cards
Today I want to show you how you can make some quick and pretty notecards using the Delightfully Detailed Note Cards and the Delightfully Detailed Laser-Cut Specialty Paper. Boy, that's a mouthful!
Aren't these beautiful? The Note Cards have the watercolor wash already printed on them. You'll get 20
3 1/2 x 5 cards and envelopes. There are 4 different watercolor looks; 2 in Mint Macaron and 2 in Blackberry Bliss. How easy is that! I added a layer from the Laser-Cut Specialty Paper and the cards were almost done!

We made this one at the OnStage Convention where we were able to play with new products. That's one of the perks of being a demonstrator. The strip of Grapefruit Grove Cardstock was covered with the beautiful Polka Dot Tulle Ribbon. The small piece of Very Vanilla was stamped and then punched with the Detailed Trio Punch and then some Faceted Dots were added.
The Blackberry Bliss background on this card is so beautiful. I cut a strip of 3/4" x 5" of Mint Macaron and then stamped the Sentiment from the Hand Delivered Stamp Set. This is a free set with an order of $150 and I love the fonts on the sentiments. The small scalloped layer is one of the Laser-Cut borders and I sponged it with Grapefruit Grove. I added some Artisan Pearls to finish it off.
This is one of my favorite layers, its so delicate. All I did was add a 1" x 5" strip of Tranquil Tide and then cut a piece of Mint Macaron using the Stitched Label Framelits. I stamped the Sentiment using that same Hand Delivered set. A piece of Mint Macaron Nature's Twine was wrapped around the strip of Tranquil Tide and then a bow added with a glue dot.
This last card is what I made on the video. I cut the largest Stitched Oval and then stamped it with Blackberry Bliss Ink. The stamps are from the Love What you Do Stamp Set. I stamped the flower on scrap paper twice before stamping on the oval so it would be a lighter shade. A few Blackberry Bliss Faceted Dots were added to give it a little shine. Here's the video:
I've listed the products I used on all of the projects so check which ones you may want to purchase. Just click on the item below or the Shop Now button and it will bring you to my Online Store. Please use the current Host Code when you go to checkout your order. You can also click directly on an item to order.
Lovely Cards Featuring Accented Blooms!
Today I made some beautiful cards featuring the Accented Blooms Stamp Set. The Stamp Set coordinates with the Tailored Tag Punch so you can stamp the sentiment, punch it out and fit it into the space within the flowers.

I stamped the flowers using Black StazOn Ink and then colored with Watercolor Pencils and blended with Blender Pens. The purple flowers were colored by picking up some ink off the Highland Heather Ink Pad with my Blender Pen.

The Thank You and Hello Fonts are so pretty. I Stamped it on a piece of scrap cardstock, punched out with the Tailored Tag Punch and then adhered with Dimensionals.

If you want any of the products I used on this project, just click on the item below or the Shop Now button and it will bring you to my Online Store. Please use the current Host Code when you go to checkout your order. You can also click directly on an item to order.
Quick and Easy Thank You Card

Today I'll show you how to make a very simple Thank You card using the Thank You Thinlits and some Designer Series Paper (DSP).
The colors are Granny Apple Green and Basic Black. I'm loving this Tropical Escape Designer Series Paper. If you're watching this in July, 2018, don't forget that there's a special going on where if you purchase 3 packages of DSP, you get 1 free. You don't want to miss out on this!
Aren't those Faceted Dots so pretty? They just add a nice sparkle to the card. The Thank You was cut out twice; once in Granny Apple Green and once in Basic Black. I adhered the Green onto the Black, slightly offsetting it to get the shadow effect.
Here's a look at the inside of one of the cards. I used the sentiment from the A Big Thank You Stamp Set which comes in a bundle with the Thinlits. I also added a 1/2" strip of the DSP to the side of the inside layer.

I made the second card using a different sentiment from the same set but stamped it in Memento Black Ink.

You can watch the video to follow along with the steps to make this card.
Here's one more card using different colors and DSP. The base is Lovely Lipstick and the DSP layer is the In Color Designer Series Paper. I stamped some flowers with the Pop Of Petals Stamp Set and punch with the coordinating Punch. The colors are the In Colors and I really love how bright and cheerful this card is.

If you want any of the products I used on this project, just click on the item below or the Shop Now button and it will bring you to my Online Store. Please use the current Host Code when you go to checkout your order. You can also click directly on an item to order.
Sweet Friendship Card with Time for Tea!
Wouldn't you love to send this card to a special friend? I used the Time For Tea Bundle and it has some great sentiments and beautiful floral images along with a pretty teacup.

The cardstock and ink are a new color called Merry Merlot and it's really beautiful. I stamped the teacup on a piece of scrap and then onto the cardstock to get a lighter shade. The layers with the doily style edges were made with one of the framelits that comes in the bundle. A piece of the Polka Dot Tulle Ribbon adds such a nice finish to the card.
If you check out pages 14 & 15 in the catalog, you will see the other items in this Suite. There are Copper Tea Tins, Copper Vinyl Stickers, Ribbon and beautiful Designer Series Paper (DSP). I ordered the DSP with this great promotion for the month of July, 2018 where you purchase 3 DSPs and get one FREE!
Here are the Dimensions:
Merry Merlot Card Base - 5 1/2 x 8 1/2, scored at 4 1/4
Whisper White Layer - 4 3/4 x 3 1/2
Merry Merlot Layer 4 1/2 x 2 7/8 (run through Big Shot with Framelit)
Whisper White Layer 4 x 2 3/4 (run through Big Shot with Framelit)
You can watch how I made it in the video below.
If you want any of the products I used on this project, just click on the item below or the Shop Now button and it will bring you to my Online Store. Please use the current Host Code when you go to checkout your order. You can also click directly on an item to order.
Gorgeous Roses With Healing Hugs!
Today, I made some beautiful cards using the Healing Hugs Stamp Set. The flower and leaf images are photorealistic stamps.

The Gorgeous Grape and Lemon Lime Twist color combination is so pretty. I stamped the darker rose first and then without re-inking stamped the top one and then again without re-inking stamped the bottom one. Three different shades of the same color!
One is a get well card using the sentiment from the stamp set.

The second card is a birthday card. The sentiments are from the Varied Vases Stamp Set. I love the font on the sentiments. The ribbon is the Gorgeous Grape Mini Striped Ribbon and then there's a Gorgeous Grape Glitter Enamel Dot to finish it off.

Here's some additional cards using the Healing Hugs Stamp Set. They both have Pear Pizzaz card bases and one is stamped in Flirty Flamingo and the other in Highland Heather. I used the Detailed Trio Punch on the corners and then added a Pearl Basic Jewel to each. Which do you like better?

If you want any of the products I used on this project, just click on the item below or the Shop Now button and it will bring you to my Online Store. Please use the current Host Code when you go to checkout your order. You can also click directly on an item to order.
Stampin' Up! - JULY Specials!!!!
Stampin' Up! has some spectacular specials during the month of July! I told you about the Free Stamp Pad Special in my last post. There's also a Designer Series Sale.
From July 1 through July 31, 2018, there is an incredible offer of Buy 3 get 1 Free of the following Designer Series Papers.


If you missed my blog post on the FREE Ink Pads, scroll down to yesterday's post. It's really a fantastic offer with NO STRINGS ATTACHED!
FREE assortment of Classic Stampin' Pads
July 1 - 31, 2018
I'm so excited to share this new promotion from Stampin' Up! If you ever thought about joining Stampin' Up! this is the best time to do it. Please read on before you make a decision. There are NO STRINGS ATTACHED!!!
Usually, you get a great deal to join, you get a $125 starter kit (products of your choice) plus free shipping and then a 20% discount on your orders after you join.
Stampin' Up! just sweetened the deal by adding a choice of a FREE assortment of Classic Stampin' Pads. These are the new pads that just came out with the new catalog.
So here's the deal in a nutshell. For $99 you get:
$125 worth of product
Free Shipping
Free assortment of new Classic Stampin' Pads
Enjoy a 20% discount on orders after you join.
Be part of a fantastic team and fun FaceBook Group
You Pick one of the bundles below - a $67.50 value!

You don't have to run a business to be a Stampin' Up! Demonstrator. The majority are Hobby Demonstrators that just want the discount and want to be part of a group that shares their love for paper crafting. Again, no strings attached!
Oh, and stay tuned for another July special that I'll be communicating in the next day or two. It's a DSP (Designer Series Paper) special. Buy 3, get 1 free!!!
Sweet Dandelion Wishes Card!
Today's card was made with the Dandelion Wishes Stamp Set. It's really so simple but so pretty. It reminds me of being a child and blowing on a dandelion and making a wish.
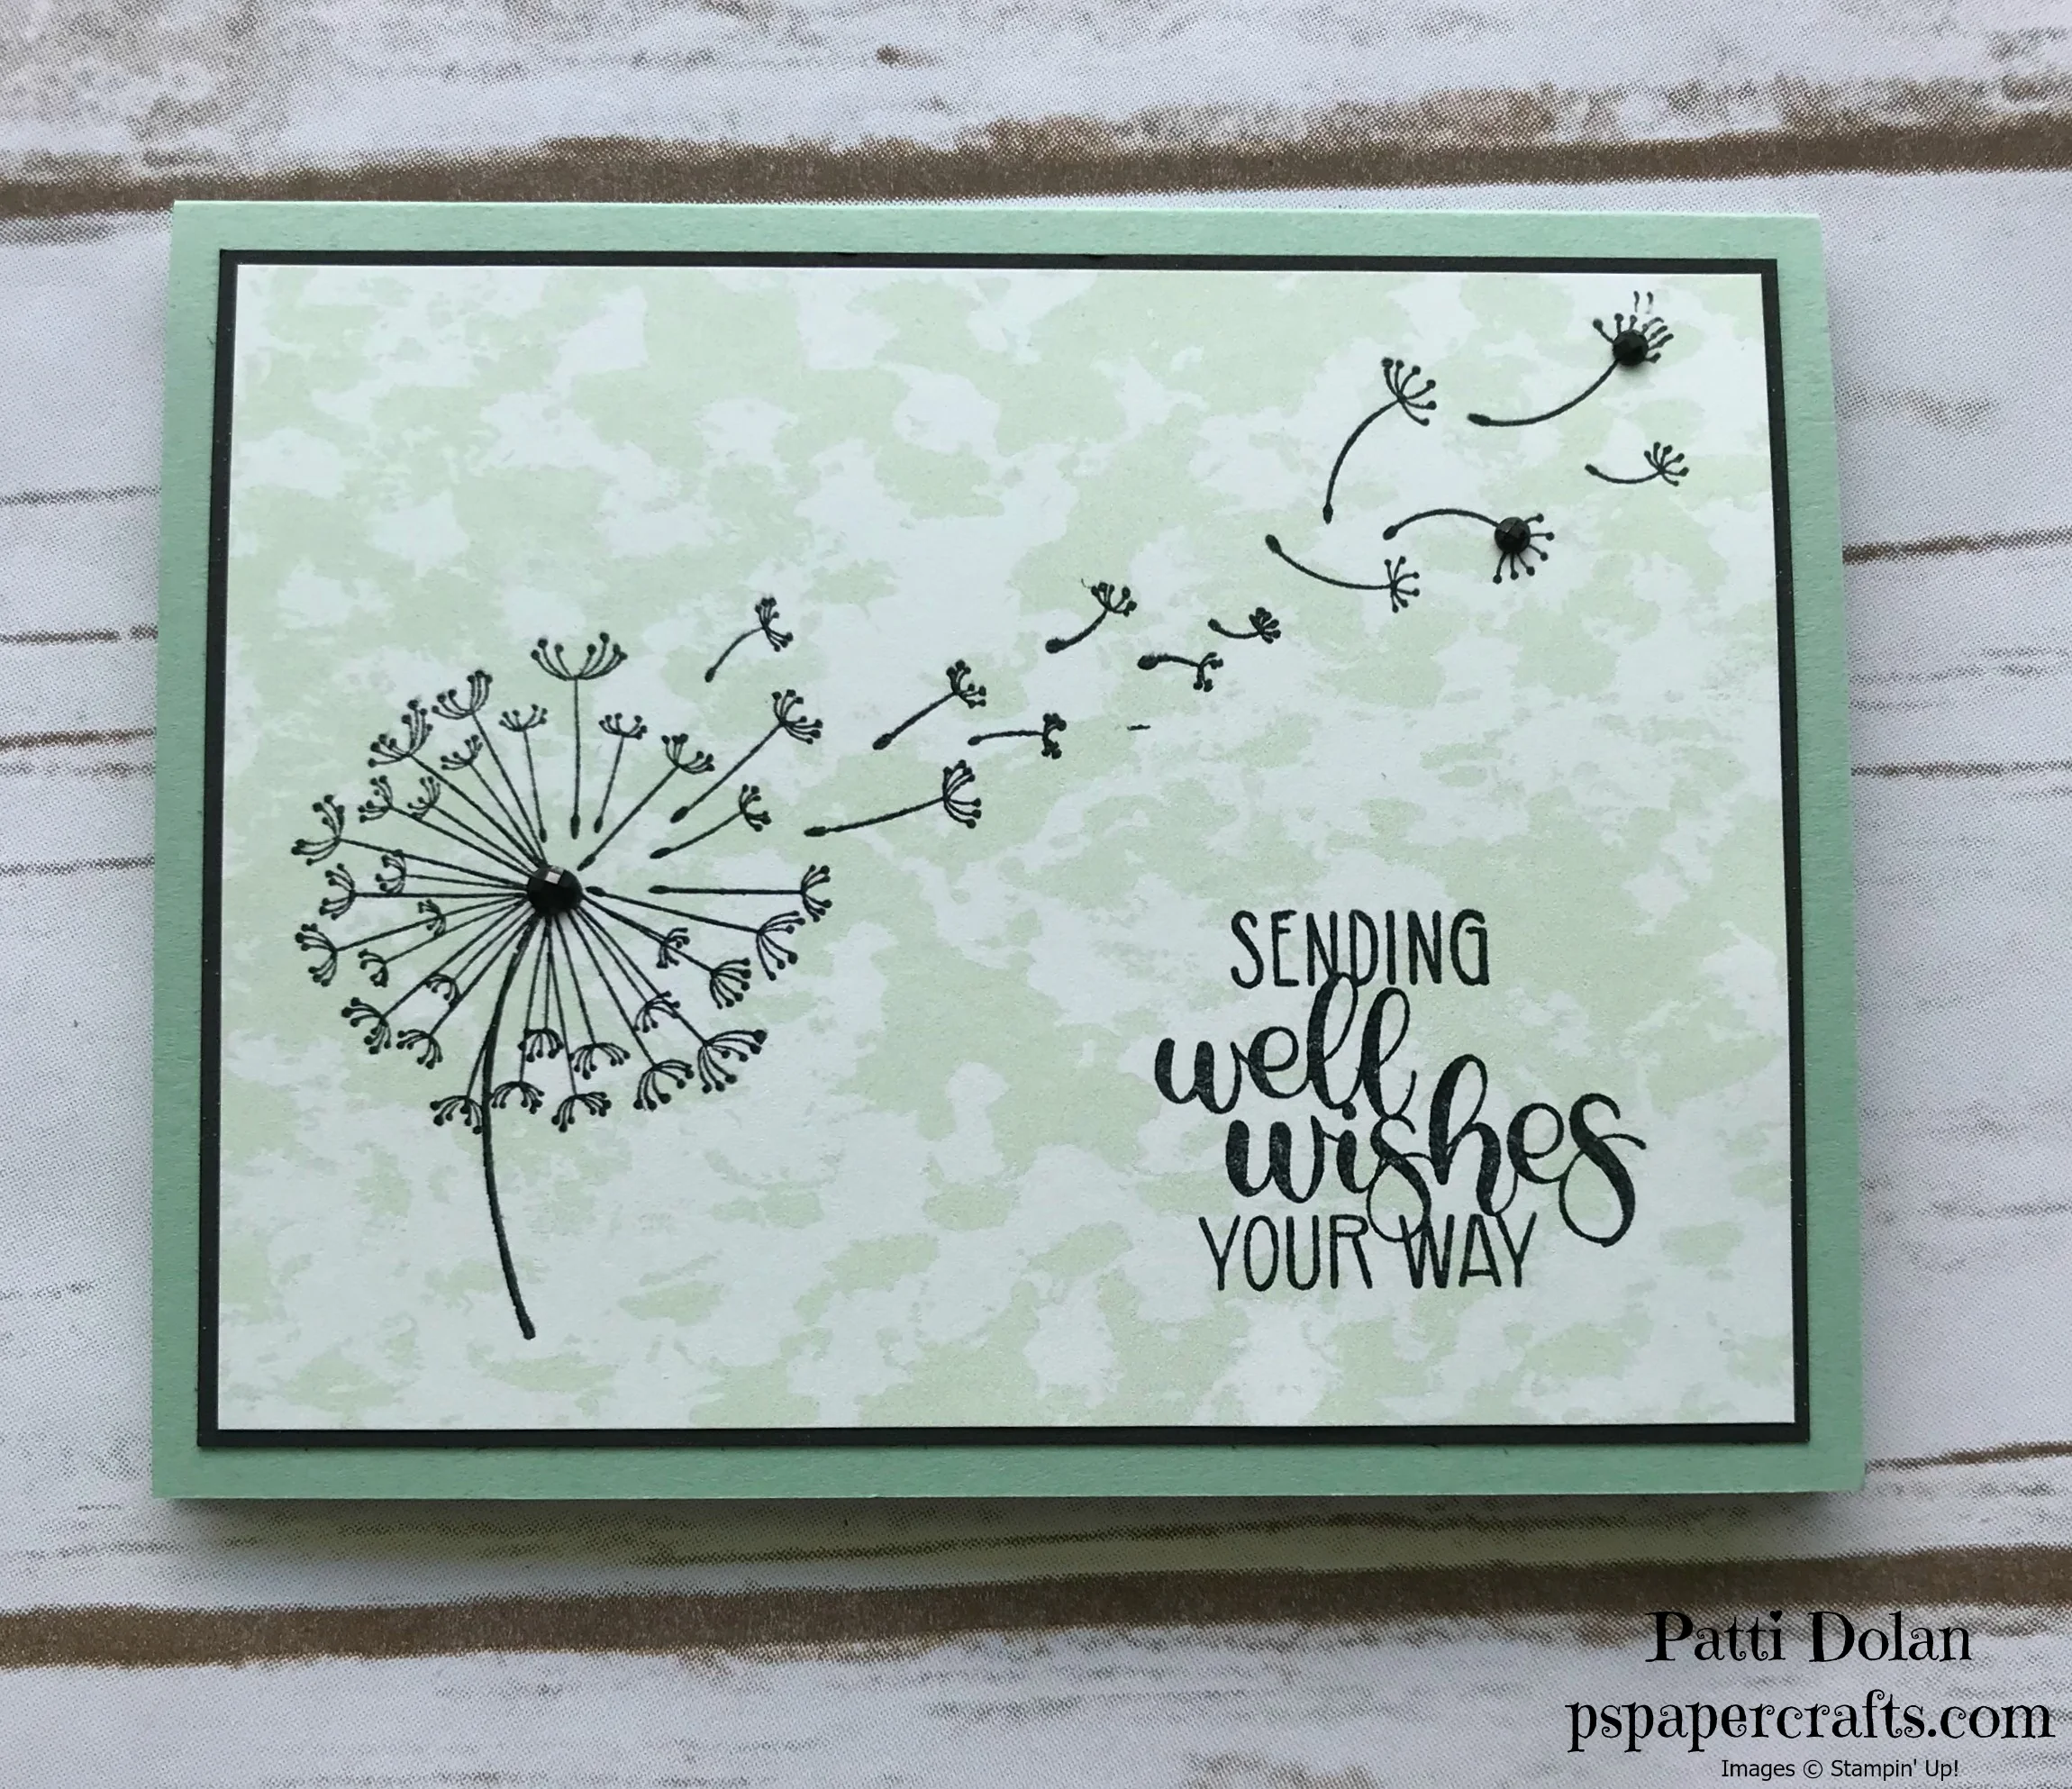
The card base is in Mint Macaron and a layer of Tranquil Textures Designer Series Paper (DSP) was stamped on and then backed with a piece of Basic Black.
I stamped the images and sentiment in Memento Ink and then embossed it with Clear Emboss Powder. This gives it a little shine. The final touch was to add a few Black Faceted Dots.

The Dimensions are:
Mint Macaron Card Base - 5 1/2 x 8 1/2, scored at 4 1/4
Basic Black Layer - 5 1/8 x 3 7/8
DSP Layer - 5 x 3 3/4


